Jeetman
-
Posts
902 -
Joined
-
Last visited
Content Type
Profiles
Forums
Events
Everything posted by Jeetman
-
Stian, Your modeling skills are amazing! You should seriously think about making a DVD on how to create models is A:M. I'd buy that in a second!! George
-
Are you trying to constrain a model to 2 paths? If you are, I never got that to work. A better way would be to copy the same model and constrain the second model to the second path and just turn off the first one. Example: Shorcut to model is constrained to path_1 (this copy of the model plays out all the actions for the first path). Shortcut to model(2) is constrained to path_2 (this copy of model plays out all the actions for the second path). Actually, it works with a single path object of 2 separate splines too (as in my sample prj file). Set the "active" option to off for the second model that's constrained to the second path. Set your ease to where you want the action(s) for each copy of the model to play out on the paths Then you just set active to on on the second model that is playing out the actions on the second path and set active off for the first model. Here's a project example 2_paths_set_up.prj Hope this helps, George
-
I've had this happen to me too. I found that if you overlap the bar a little (in your case slide the bar to the left) it should appear. George
-
Hi Bighop, The glide is happening because the timeline is longer than the walkcycle animation. If you look at the keys you'll see a red bar on the dopesheet (the dopesheet is where all your keys are shown). You need to extend the red bar by dragging it out to match the timeline. Example: If your timeline is at say 02:00 and your walkcycle animation "red bar" is under that by 4 frames at 01:20, then the model will appear to slide with arms out from 01:20 to 02:00. I hope this helps, George Edit: I just reread your post. Check the timeline bar. It's the blue bar at the top. Make sure it extends to the length of your timeline too.
-
is the Alpha buffer on? Turn it off. Yep. That was it. Thank you very much
-
I'm trying to render a camera view with a solid white background and for some reason it's not working. All I can render is a black background no matter what I set the camera background to. I've also changed the codec to none to check if the problem is compression. It still renders black. I'm thinking there's another setting that I need to set. Can anyone tell me how to make this work? Thanks, George
-
Hello, I have an idea that would be cool if the people who run the forum could do it. It came to me because I had a newbie question about modeling and being so use to working inthe TWO section of the forum, I'm use to going directly to the subject matter I need help with (I.E TWO Animating if I need animation help, TWO Rigging if I have rigging questions, TWO Modeling, etc) and I noticed there are no sub-topics in the newbie area. My idea is to set up the newbie topic with the same format as in the TWO movie topics. You'd create sub-topics in the Newbie forum for Modeling, Animating, rigging, etc that way you have an organized location that is not exclusively to TWO. The sub-topics would be the same as in the TWO area only pertaining to all A:M user questions (basically as it is now but having it organized in a specific location The sub-topics would be: A:M Modeling A:M Rigging A:M Animating A:M Texuring A:M Lighting A:M Effects A:M sound This would help to organize info and when a non-TWO question is asked, there's a specific location for the info. I hope this is doable. It would be a great way to organize the Newbie threads. George
-
Hi all, Purpledingo recently contacted me asking if I could provide the X-Wing model I used in my CGI video because he couldn't find it in the free models location. Knowing that this is an excellent rendition model of an X-Wing I thought it would be a shame not to have it. I don't know how it could have been lost but according to Purpledingo, it's not on the free models CD so here's the zip from my original download. Please re-add this to the free models collection. It's a bummer that the modeler didn't leave their name. thanks, George Xwing.zip
-
T-Dogg, I'm glad that you have not abandoned this WIP. It is coming out really cool!!! To just let it go would be such a shame. All A:M users who have thought of and worked on challenging projects can relate to the huge commitments involved. I hope you stay inspired and can someday finish this. George
-
It's pretty good. As Mark mentioned, your ball motion needs work. The motion looks more like a yo-yo because of how it accelerates then decelerates and accelerate as the ball is being thrown to the ground. It needs to have a constant increase in speed as it is thrown down. If you look at your animation, you'll see that this is not what is happening. You have a point that just after he throws the ball down and lets go of the ball where it slows down. This is impossible to do unless it's controlled. Building on what Robert suggested: You need more overlapping motion to give more realism to the throw. Again look at the wind up and the release. It's too stiff. Even the anticipation of the throw could use a little offsetting. If you do this the movement will look more fluid. In the throw, look at the lean back to falling forward. Notice there is no (or very little) hip snap. watch a clip of a real pitcher. You'll notice that there's actually a chain reaction of movements. Each body part lags a little behind the actual throw. The reason for this is because for a pitcher to get maximum acceleration from a throw, he build the speed through the body by overlapping each movement. I'll try to give a visual.... The order of movement in a pitch is pretty much like this: legs hips torso shoulders arm wrist Each movement builds the speed. The leg initiate the movement. The hips lag slightly but come into play as the legs are still moving into position. The torso does the same thing. The torso lags slightly but comes into play with the hips and the legs. Shoulder lags but then is moving with the torso, hips legs and so on. This happens right up until the release of the ball. What's actually happening is a whipping effect. Each part moves to increase the speed of the throw. Once the ball is released, the speed is the result of the accumulation of the speeds of the body parts. Right now you may be thinking,"ummm..I just wanted to know if my animation looked good LOL." If you add the over lapping motion based on this, and can get the right timing (we are talking all this happening in about 1 second), then it will look really good and if this is for a demo reel, you need to go all out and be very conscious that your motions are arcing motions. Oh and this would also apply in the follow through motion at the end. Just remember that you don't want your animation to look stiff and the way to loosen it up is to offset your body part motions a little. When I heard that a 10 second clip of animation could take a week or more, I thought that was ridiculous. I mean common, it's ONLY 10 seconds right? Well, that was until I actually DID work on a couple of 10 second animations LOL. I hope this helps, George
-
Stian, First time I've seen this post and I read mostly all the threads and one thing I really like about checking out a WIP late is watching the progress unfold in the following threads. All I can say Stian is I've seen your work and you are the epitome of what I aspire to when it comes to mechanical modeling. Your modeling skills are amazing and Martin must have counted his blessings the day you agreed to work on TWO! George
-
Are you making this for a project to use or just for practice? The reason I ask is because there's an excellent X-Wing model in the donated models section on the hash site. I used it for the project I worked on for my brother-in-law and his friend. Check it out. http://www.hash.com/forums/index.php?act=a...st&id=21470 If you are just doing it as practice, then you're doing a great job so far!!! George Jeetman, Would you be so kind as to enlighten me where the donated models section is? I would really like to get my hands on that X-Wing. Nicely done video, btw I got it a while ago on the original site. The set up was different then in that you could download from different model catagories but this all in one should have the X-Wing model on it. I couldn't find the name of the person who made it unfortunately otherwise I WOULD have given credit where credit was due. Here's the link to the extra's CD. You can download a zip here http://www.hash.com/freemodels/
-
Here's the way I did the fly through. On frame 0, I constrained the camera to the path. Then constrained a null on the same path and set the ease to 4. This puts the null a little bit in front of the camera. I then set the ease of the "null" (not the camera) on the last frame to 100. I went back to frame 0 and created an "aim at" constraint for the camera to the null. This forces the camera to aim at the null that's a little ahead. I set the path so it travels very close to the objects in the scene. There's a lot you could do that I didn't experiment with. You could add "aim at constraints for the objects and transfer the enforcements as needed. That way you should get a smooth transition to aim at the objects and back to the path. It's really fun to tweek. I hope this help you, George Here's the project. school2.prj
-
Looking good Al
-
Hi Holmes, under the "Rigging & Relationships thread there's a sub-topic called Squetch Rig. Here's where you'll find the rigging thread and Mark takes you step by step in how to setup the poseable squetch rig. Just make sure you have all the latest files for it. George
-
Are you making this for a project to use or just for practice? The reason I ask is because there's an excellent X-Wing model in the donated models section on the hash site. I used it for the project I worked on for my brother-in-law and his friend. Check it out. http://www.hash.com/forums/index.php?act=a...st&id=21470 If you are just doing it as practice, then you're doing a great job so far!!! George
-
Thanks Moonshire There is a dust volumetric effect. To be within the allotted file size, the mov file I had to reduce the render. In the original that's about 260 meg, you clearly see the subtle dust plume. I'm glad you enjoyed it. Hey. My brother-in-law and his friend who originally were going to use this clip as part of an entry to a Discovery Channel contest, have told me they're going to finally finish the short even though the contest is done. He and the other creator/actor in the short who has finally purchased Animation Master, is Funky Monkey. Read his post. You can see his unbiased opinion LOL. George
-
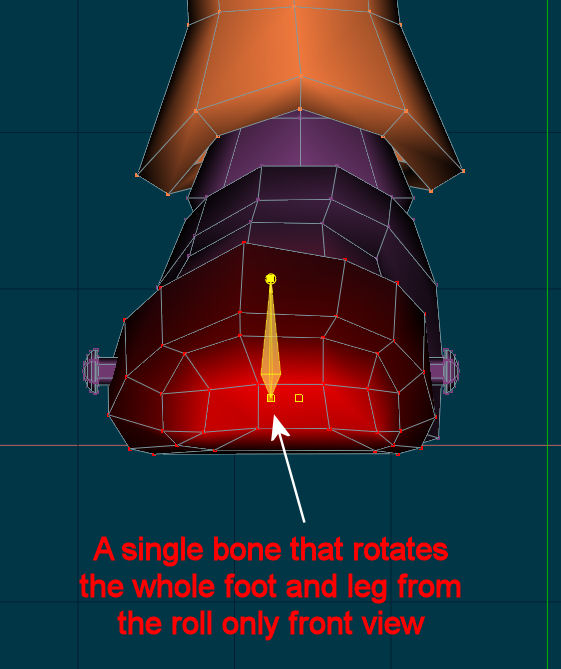
No George, the Posable version of the rig is added on to this...it's some added installation bones and a bunch of additional poses. Mark will post an update that matches this update soon...probably tonight some time. Thanks for the clarification I have a rig control request that hopefully you can add to the squetch rig. In posing the TWO characters there's one movement that a single added bone in FK and null in IK would give more control in the foot setup. In IK it would have to control the whole foot null. In FK it would control the foot, calf and thigh rotation. Both pivots would come from the center of the ball of the foot (like dancers and martial artists do when they pivot on their feet). here are some pics to show you where I mean. In the current rig set up, the heel control pivot point is basically on the heel only. There are times where pivoting from the ball of the foot is desirable. I've had to do this a few times by rotating by the heel then figuring out the translation center of the ball of the foot. I really hope that this control could be added. Here's a mov showing Tin man demonstrating the movement. The only part to look at here is the foot pivot. the hips up would not be part of the control. tin_man_spinning.mov Thanks George

-
Is this the update to the poseable rig that Mark was talking about and do we just replace the poseable 5 finger squetch rig with this one? George
-
Is there going to be a thread to explain how to do this?
-
I cannot believe how easy this is!!!! THANK YOU!!!! OK on to step 5 LOL.
-
OK I got it working but my numbers don't match your's exactly to get the same positioning as in your pics. I take it that's OK though.
-
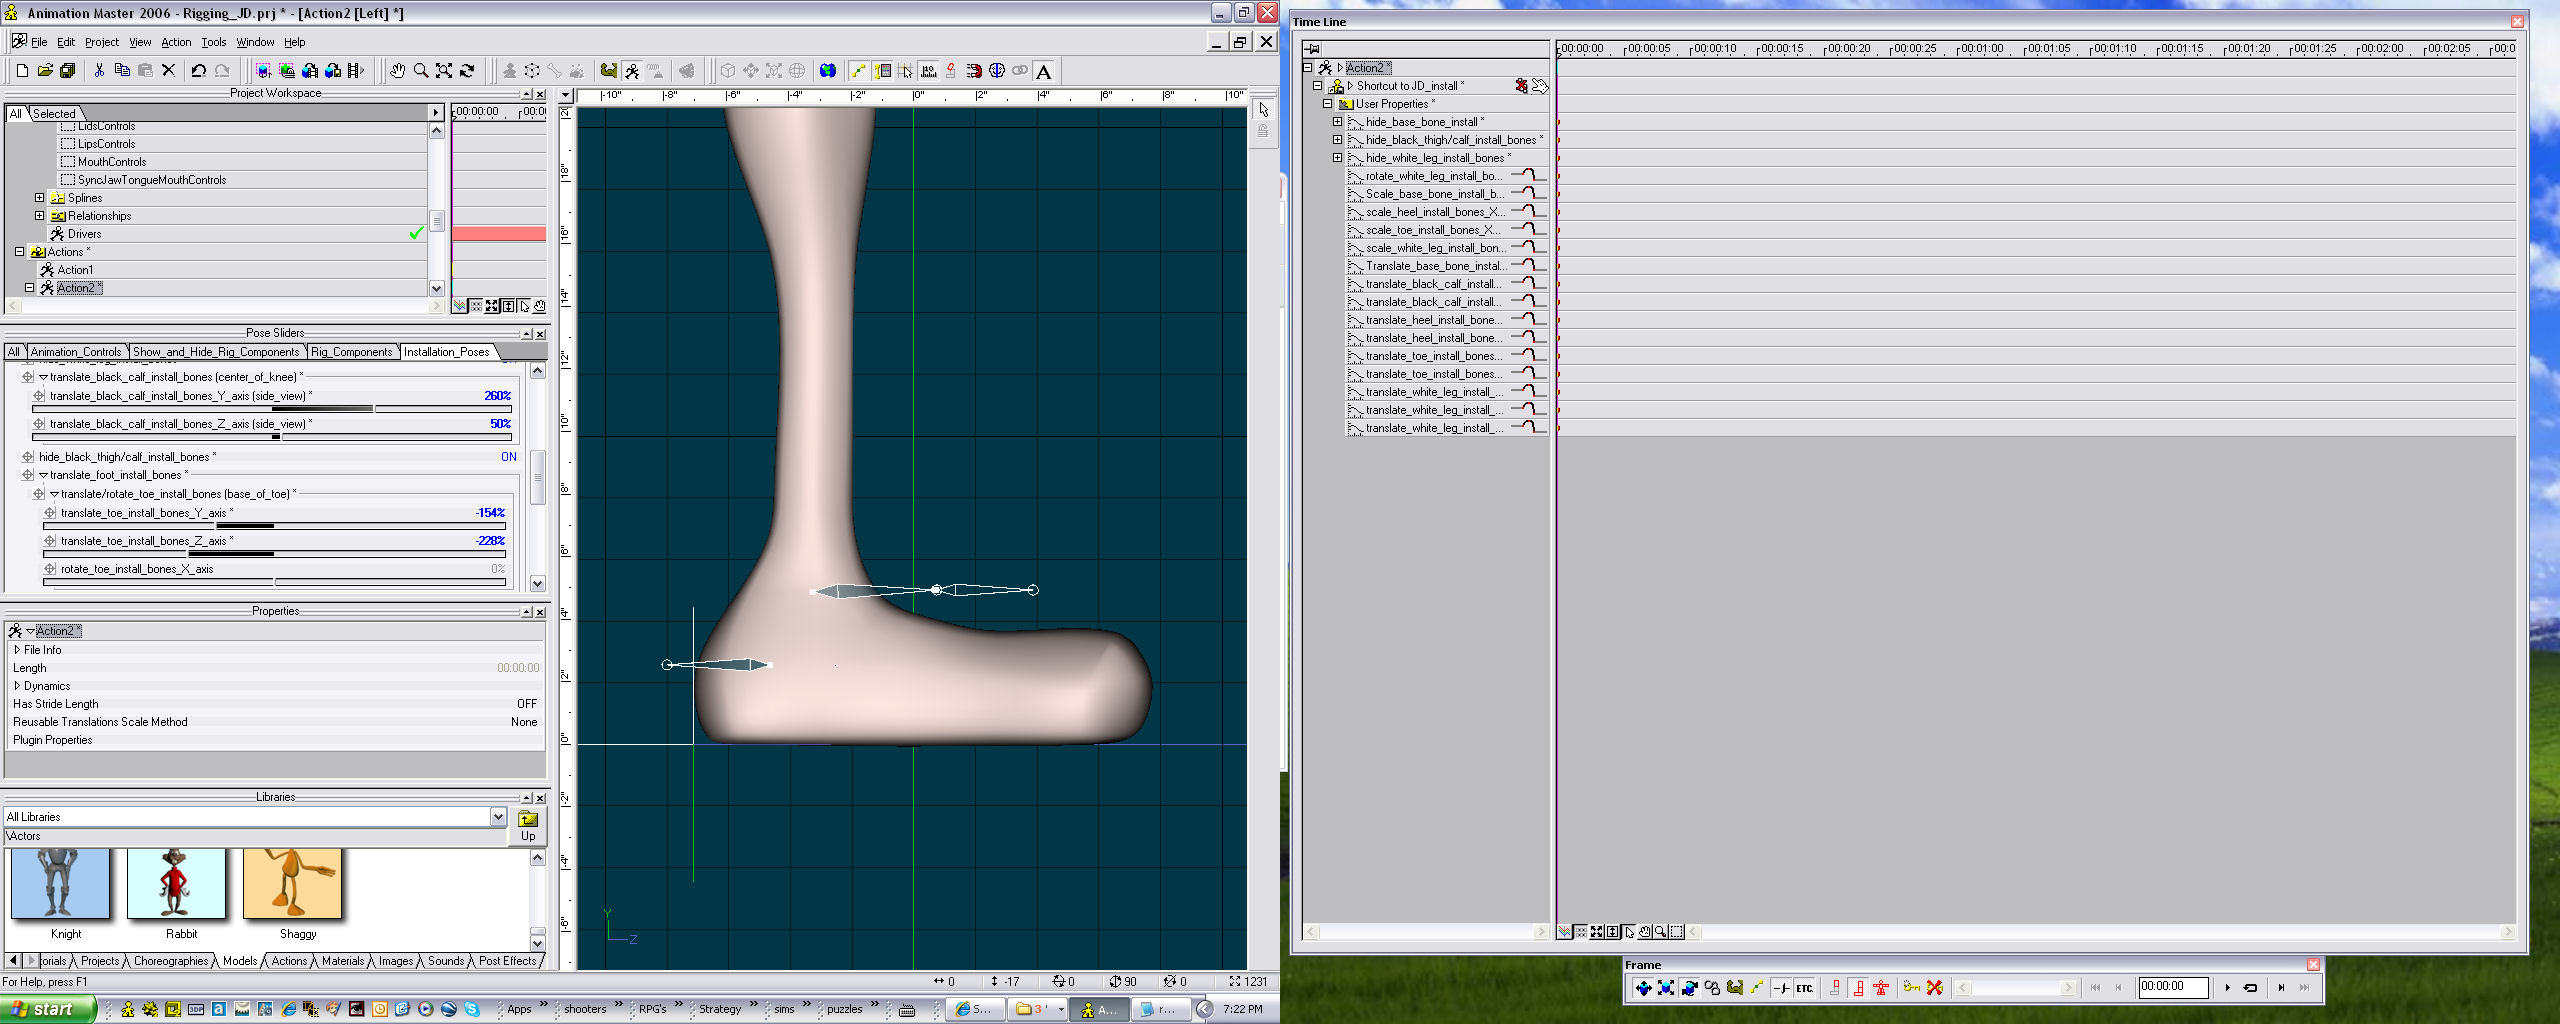
Mark, I'm doing each step as instructed but my model doesn't look like yours in the feet bone area. Did I do something wrong? Here's what my screen looks like. Note the size and positions of the foot and toe bone (I think thats what they are anyway). George
-
So far so good. I'm completely on the same page. I'm moving on to Step 1 Great job Mark! George
-
Sorry I didn't respond sooner. I just happen to see this thread and just now saw your post. You probably have already figured it out but if not, here's what to do: Once you have the tga sequential files created in a folder, in A:M, in the Project Work Space, at the top under the project name, right click on the "images" folder and choose [import - Animation or image sequence...] go to your folder that contains the tga sequential files and click open. Done. Something to think about.... To adjust the imported tgas' start frame: Go to the Images folder and click on the pic representing the imported tga's. go the the properties window and set the start image number and the end image number to set up where you want the tga's to start and end. George