robcat2075
-
Posts
28,298 -
Joined
-
Last visited
-
Days Won
407
Content Type
Profiles
Forums
Events
Everything posted by robcat2075
-
It has something to do with the hook that is in the middle of that spline. Try selecting the points you want from another angle, with the lasso tool and make sure not to include the end of the hook.
-
Since the camera will always be seeing from the same angle, some props could be flat cards.
-
That's a great object for extruding. A great object for spline modeling. Roger is on the right track by suggesting extruding and I think you can do the whole thing with extrusion. For the hand grip portion, study the shape closely and know what the cross section shapes are. Start with the shape at eh bottom of the handle. I bet 8 or maybe even just 4 CPs could shape it. then extrude that once and reshape the new loop to match the shape of the cross section at the next major land mark. then extrude again to the next part. Just giving it a quick look I'd think the major spline rings might land where I've marked in blue, basically where ever the contour starts changing again.

-
Also... the biggest reason to animate in the chor is that you can see how the camera sees your animation. That's all the audience will see and you need to look good for that viewpoint.
-
possibly this is a permissions thing? Did you install as Administrator?
-
I think what you needed to do was save the master0.lic file before you wiped out that last install. I hope you still have it somewhere. In the trash?
-
Remember that PRJs only contain links to their images. I f you put the images in a zip with the PRJ we'll get it all.
-
We'd have to see you do it but my first guess is you have doubled splines of some sort.
-
First rule: keep it small enough to do. As much as there is to know, i still think A:M is the best platform for solo CG animation artists. I have Maya and it comes with a book of beginner tuts about 3x as thick as TaoA:M but after you finish it all you've done is make some boxes, a flying saucer, a jointed robot and a blob with an eye. Everything you do seems to take twice as many steps as it would in A:M.
-
When people were inventing CG animation they probably thought the tricks and shortcuts of 2D would transfer well, but unfortunately they don't hold up. There's something about the preciseness of CG that makes exact repetition more painfully obvious than in hand drawn animation. Extreme repetition was pretty rare in fine animation anyway, it was TV limited animation that sort of got us to accept the notion of characters just walking and walking and walking while they talked. Think of all the walking and talking scenes in Scooby Doo. If you consider well-done animated features like Disney was doing in the 90's they just don't have shots like that. They're stories are more visual so the need for characters to deliver long verbal dialogs ( and yet appear to be not completely still) is greatly reduced. That's a good candidate. That too. Actions like that made the parade scene in TWO possible. Ken Heslip created an action for the leg motion that was used on all teh band members and then created upper body actions for each of the instruments they played. Mark created actions for the bystanders too. Crowd scenes are a good venue for actions. To make the band members less robotic many of them are offset by a frame or two from their neighbors. that helped loosen it up a bit.
-
Yes. Almost all.
-
I think A:M Composite was initially created so A:M users would have some way to use the new lighting buffers that OpenEXR renders could have. Other compositing apps were either very expensive or not up to speed on OpenEXR. If you can make it crash, AMReport it!
-
The things I showed weighting for were examples, but not the only things that can be weighted instead of smartskinned. ON that character just about everything will have a cp weighting solution that works well.
-
Ordering the shots by "Time of Day" may not be felicitous as that may not order the shots in their most useful sequence. For example you probably dont' want three long shots butted together. Can the lights be animated so a complete 24-hour cycle is possible, including moonlight travel? Then if the editor wants to follow an evening shot with a morning one, he can insert a quick timelapse through the intervening night. Yes, that does look better!
-

Smartskin causing bone to jump, problems moving it back
robcat2075 replied to Roger's topic in New Users
I always found the automatic 90° thing alarming but I guess it reminds one of what bone one was working with. -
Have you done the CP weighting first like I showed in the video? CP weighting really is more predictable.
-
Making a change in those settings seems to make some small shift in the pixels but they appear to be the same large size none-the-less.
-
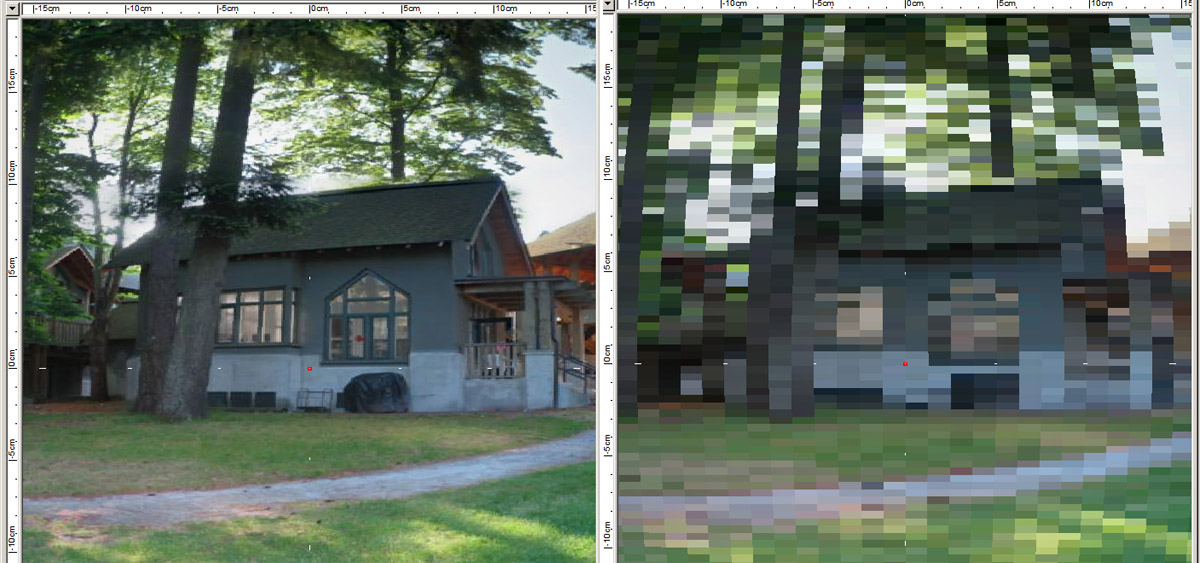
I'm doing R&D. The large image is needed for rendering because, as an environment decal wrapped around a sphere, a small portion of it will fill the camera view at any time and needs to be of sufficient res to fill that camera view. Since the camera will pan more than just that small portion is needed to be on the environment sphere. However... my question is: if it can be shown clearly in real-time before any on-screen render is done, why not after? Here is the before and after:
-
nope, didn't work. I've applied a large decal to a large sphere to use as an environment. It looks good until I do an onscreen render, then the realtime view gets blocky. Even saving, restarting and reloading the project doesn't get the res back.
-
I guess i should have said i meant the real-time view. A render still looks OK.
-
I recall it being discussed here before... did we ever find a cause/fix for large decals that appear fine initially but then lose their res and appear blocky? EDIT: I forgot to mention i was referring to the real-time view.
-
And welcome back to forum-frequenting!
-
was the beard on a dynamic constraint or a cloth construction?
-
Ha!
-
Congratulations! Those look pretty substantial, like they could do some damage.