John Bigboote
-
Posts
6,562 -
Joined
-
Last visited
-
Days Won
58
Content Type
Profiles
Forums
Events
Everything posted by John Bigboote
-

Image Contest, Matt Campbell's workthru
John Bigboote replied to John Bigboote's topic in Work In Progress / Sweatbox
AND--- my image took 2nd place. EXCELLENT! Thanks ever-buddy! I've been holding-off on posting these 2 movies... of my ice-cream cone. I'm the kinda guy that once an image is all set and lit and awesome... I've gotta do an animation of it... even just a camera fly-by always excites me. I remember when the great A:M user Jim Talbot had made his 'jungle queen' image with the tigers, I begged him to do a camera move thru it- and he did! Here, I did a little animation on my ice-cream scene in A:M: HashHut_IceCream.mp4 -
"Summer Memories" Image Contest Winners Announced!
John Bigboote replied to robcat2075's topic in Contests/Challenges
What an amazing production Rob makes of this... always entertaining and well worth the wait! He even had 2 wonderful entries himself. Congratulations to Mark and Bruce! -
Looks like an ol-timey 'swimmin' hole'...!
-
Well- thanks for 'duplicate' I will use it often! Q- why is the matcap shader not included with A:M still at this point- I have to copy it forward...?
-
Where would we be without ya- Sarge? We would be like a foot without a big-toe! (Stripes reference... Bill Murray!) To keep current with A:M and keep it current with my modern workflow- I am forever trying to use it in conjunction with other programs... it is still relevant and can be a lifesaver!
-
I've just noticed this for the 1st time... There is a GPU column in NetRender. I had opened some Render Messengers using my desktop link for V18 NR and saw the GPU tab was unchecked... when I updated my desktop link to the V19 RM all my Slaves are now GPU...? I don't really see any improved render times... this is new!

-
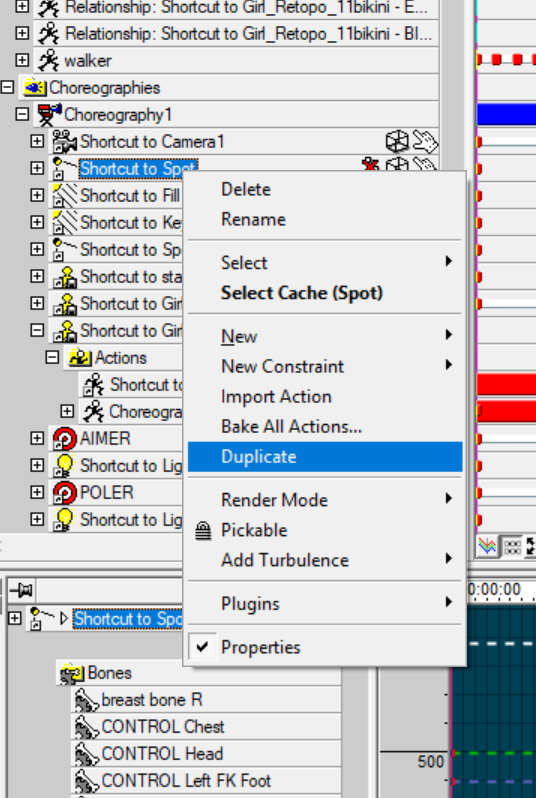
WHEN did this happen? Nice feature! You can now R-click on an element in the Choreography and DUPLICATE it!
-
Well- I was just toying with hair in 19.0 and was crashing on render so I thought- hey! There's a new version maybe this problem is fixed! And low-n-behold... we are rendering! Thank you Steffen!
-
I put a nice Christmas tree in the Contributors Cue... I think. Nice animation- you could slow that way-way down. Quicktime movies seem to have much lower file sizes that the archaic avi format... and lastly- BEAUTIFUL HOUSE!
-
Controlling an image sequence with a Pose or Smartskin
John Bigboote replied to robcat2075's topic in A:M Tutorials & Demos
Great stuff! I need to make time to watch this- useful info! Thanks Rob! AND--- a potentially important gaming feature when you think about it... too bad we have no Arctic Pigs or HA:MR...! -
Yeah- all that stuff! The onion skinning was the best... I think Flash's was similar. The guy I worked with ran a 'paint-box' like system called a DFX (digital effects) system, and he would plug the Amiga in, get a paint cycle going in Dpaint, run it thru a mask and use it for weather graphics... fluid running thru brake lines... anything. Everything digital in those days was 640 X 480 square pixel resolution- we would output to D2 digital-analogue tape format, get it into the edit suites and the film shooter guys would look at it and say 'guess our jobs are safe... this digital crap will NEVER catch on!' When I found out that I could run DPaint on a PC, I went out and bought a Gateway Pentium2 so I could play at home. Then I found a local gaming company that needed animators, they put me on a game that was supposed to be a rival to 'Leisure Suit Larry'... I did a bunch of stuff they loved but the guy kept asking me to 'zip' my files for delivery... I could'nt figure out what that meant and no one would explain it to me so I walked away on that deal thinking it was WAY over my head.
-
I got to play with an Amiga 500 for some time back in the early 1990's. There was a Walt Disney animation program that I could not figure out... and there was Deluxe Paint, from Electronic Arts. Deluxe Paint was an AWESOME animation program and I made many-many cool cartoons... downside being they were all 8-bit color depth... so no anti-aliasing. There was TALK of a forthcoming 24-bit version, but suddenly the Mac burst on the scene with Photoshop and shortly thereafter CoSa After Effects and I ended-up getting busy with those and never looked back.
-
Hey now- ONE of those emails are legit... I know- I SENT IT!
-
FakeAOCPU and FakeAO GPU... I see a forum search (on my end) yields no results... because of the newer SSAO feature the older post-effect may be politically unfavorable here in Hashland, but here's what I know. About 10+ years back, a user named Jenpy wrote a Post Effect that emulated AO really nicely and really fast- this was well before Hash included SSAO as a feature (Screen Space Ambient Occlusion.) Jenpy's was really nice at first because it worked really well and came in 4 flavors... FastAO-32bit-CPU...FastAO-64bit-CPU and FastAO-32bit-GPU...FastAO-64bit-GPU. SOMEWHERE here on the forum are some wonderful samples with-and-without from Nancy Gormezano and myself. What AO brings to an image is a very important and realistic shading effect- pushing small details to great extent. I love using FakeAO and A:M's hair feature- those 2 features play very nicely together. The GPU version was incredible because you could really-really push the effect of AO to extremes- but it had a screen size limitation of 720 X 486 and could not extend beyond. Jenpy had promised an unlimited update but seems to have fallen away from our forum over the ensuing years. The CPU version works at any resolution, and tho it is not as deluxe as the GPU version- it still works very nice and provides some features SSAO does not, like the ability to produce the AO effect in a separate file pass. (SSAO has a feature called 'SSAO effect only' which I imagine will render only the AO... requiring you to do 2 renders- one AO and 1 regular...) http://jenpy.noob.jp/fakeao/fakeao_e.htm I see that Jenpy now charges $25 (did I buy it in the past? I must have!) Both A:M SSAO and Jenpy's FakeAO are very swift renders... adding a second at best per frame render time. I admit that A:M's traditional AO feature takes way too long to render- provides very little if any effect, and has too little controls. I really have to mess with the settings on the A:M SSAO before I can even see it... and AO is a feature (for me) that once I see what it adds to an image- I want more-more-MORE! This is one of the reasons I enjoy exporting A:M models to Element3D within After Effects... their AO feature is real-time (as in FAST!) and you can push it and keyframe it to your hearts content.
-
Isn't there a 'thing' with AO and transparency...? Like a feature... transparent AO? Are you activating that? Have you looked into using FakeAO? One feature it offers is the ability to render your AO pass separately and add it back in in post...
-
That looks great Tore... looking forward to your next 'absurd theatre' episode... what a style! I had to Google shadermap 4: https://shadermap.com/home/ Needs further investigation... might actually get me to start using Normal Maps!
-
Moving locomotive smoke test
John Bigboote replied to R Reynolds's topic in Work In Progress / Sweatbox
Very cool- thanks for the sequence! Your smoke looks good... my eye likes to see the particles continually expand and lose opacity over life, with a random factor controlling the lifetime/size/opacity so they don't all follow-suit. I'll have to look at these new settings! -
Re-visiting this old thread... kicking some life into it because I am excited about this. Had another 'A:M to E3D' job this week, where I needed footage of an old-timey film projector and the client was sold on a certain look and style... the resolution was above HD (some 2500 px X 700 high for a corporate presentation before some 5000 employees) The popular consensus was that I could just 'find some footage of that style projector' to use... which I knew was a million to 1... and- I am an animator, not a google-researcher... so I modeled in A:M and exported as .obj to E3D within After-Effects and animated the camera doing exactly what was needed for our establishing shot. With all the After-Effects lens-flares and additional effects added... full resolution renders are taking less than 1 second per frame- with full shadows/reflections/AO/DOF/fog and PBR materials. LOVE! 3D Projector 1.mp4
- 31 replies
-
- 2
-

-
- render
- alternate renderer
- (and 3 more)
-
Once you see how cool it is to render with 3 nodes- you will want more. Hash has them affordably priced too.
-
I keep shortcuts to both on my desktop (Render Messenger and Render Server.) Maybe you need to try starting-up Render Messenger first to open some cores...? (guessing)
-
Image Contest, Matt Campbell's workthru
John Bigboote replied to John Bigboote's topic in Work In Progress / Sweatbox
STEP 4: The Background and Composition. 3 GRASS (MODEL INCLUDED!) As I did my test renders I felt like the building at bottom of frame was still not grounded enough... so using the same copy-paste-copy-paste technique as above, I made a low-patch blade of grass, and made sure there were variations in size and angle as I pasted... and also made multiple color variations as I went. Grass.mdl
-
Image Contest, Matt Campbell's workthru
John Bigboote replied to John Bigboote's topic in Work In Progress / Sweatbox
STEP 4: The Background and Composition. 2 TREES (MODEL INCLUDED!) I have a repository of trees, I recommend collecting them any time you see a free model, grab it- save it- use it. SO- I added my trees to my scene and test rendered... NOT was I was after. SO- I went online and googled 'free tree obj' and downloaded a bunch of OBJ's... they didn't look right in my scene either... I was seeing too much branches and trunks and not enough foliage. SO- I modeled some tree foliage. Starting with 1 patch, I copy/pasted over and over- building up a nice full volume of leaves in no time. Then, multiplied them once again by bringing 7 instances into my chor/composition and placing/sizing them behind the hut... Tree Foliage.mdl
-
Image Contest, Matt Campbell's workthru
John Bigboote replied to John Bigboote's topic in Work In Progress / Sweatbox
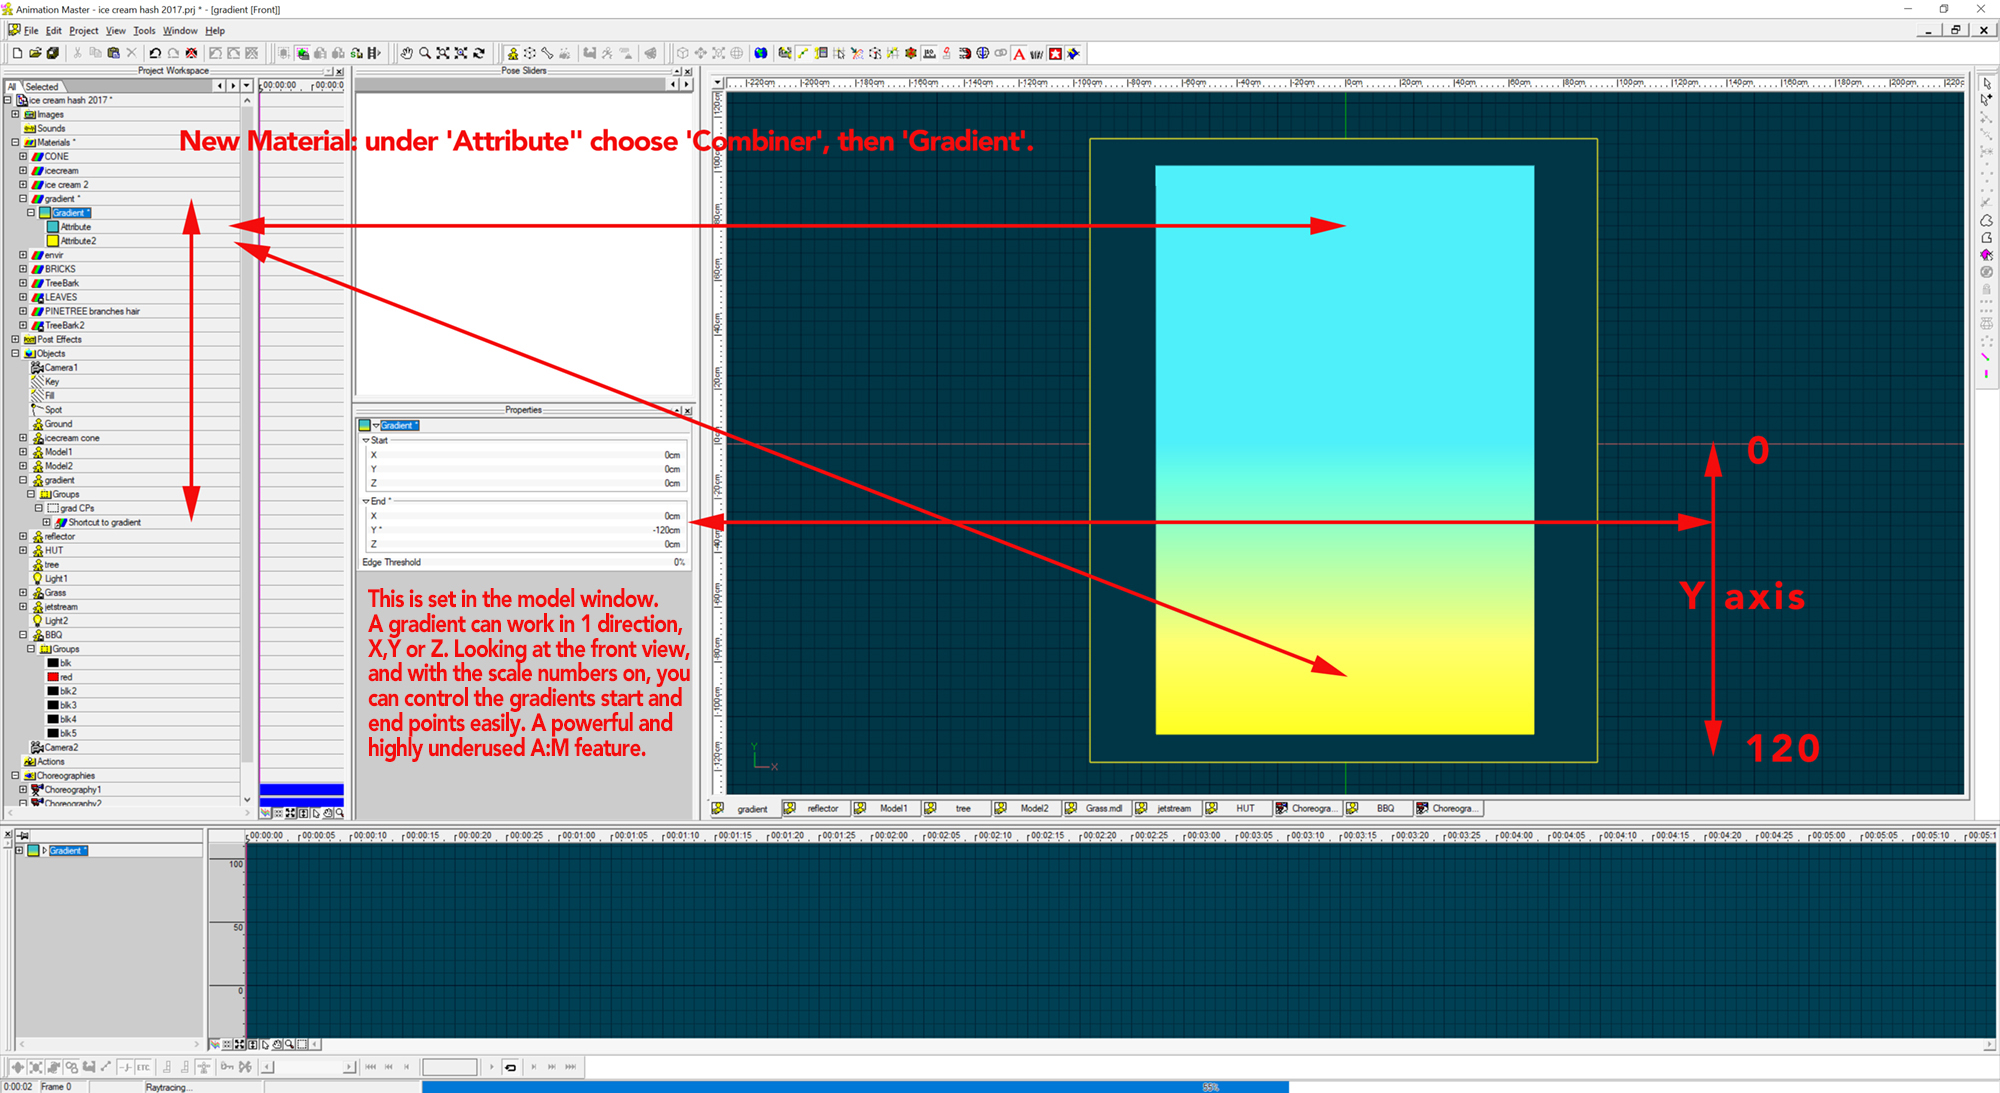
thanks for the comments! STEP 4: The Background and Composition. 1 The SKY At this point, I will make a new Choreography and drag my Cone and Hut in- and adjust their size and Z depth position, as well as start playing with lights. I will be working in a 'portrait' 9 X 16 resolution, so I set my camera to 960 wide by 1280 high... later I will double or triple these numbers for final render- but this is good for working previews. My sketch indicated some background greenery which I think I will need for my image. So, working like a painter, I will paint from the background forward, so I will need a nice sky first. Lots of time, a simple 1 color sky will suffice, but I want my scene to have a sunset or sunrise kind of feel to it, and for that I used a gradient material and set my sky blue and hotter horizon color. I then modeled a simple 4 point patch and added the gradient material, and added it to the choreography and placed and scaled it so it filled the camera and did test renders to adjust colors.
-
Image Contest, Matt Campbell's workthru
John Bigboote replied to John Bigboote's topic in Work In Progress / Sweatbox
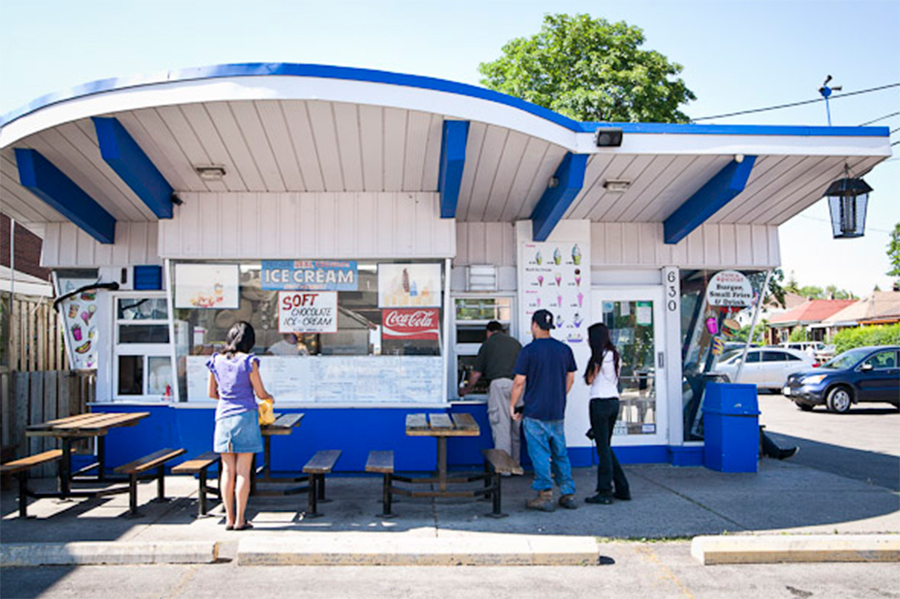
Wow- this is the building I was channeling! Next up... background!
-
Image Contest, Matt Campbell's workthru
John Bigboote replied to John Bigboote's topic in Work In Progress / Sweatbox
Yes! Popular with cheep hotels, shopping center marquis, bowling alleys, drive-in theaters, hamburger stands... a 'Google' image search on googie architecture provides a pleasing eyefull! Very 'art-deco'(in the 1950's definition, not the 1920's...)... bring ON the boomerang formica!