John Bigboote
-
Posts
6,562 -
Joined
-
Last visited
-
Days Won
58
Content Type
Profiles
Forums
Events
Everything posted by John Bigboote
-
Yumps- here, see if you get it. I am in latest, V19.0f AM lightglitch.prj
-
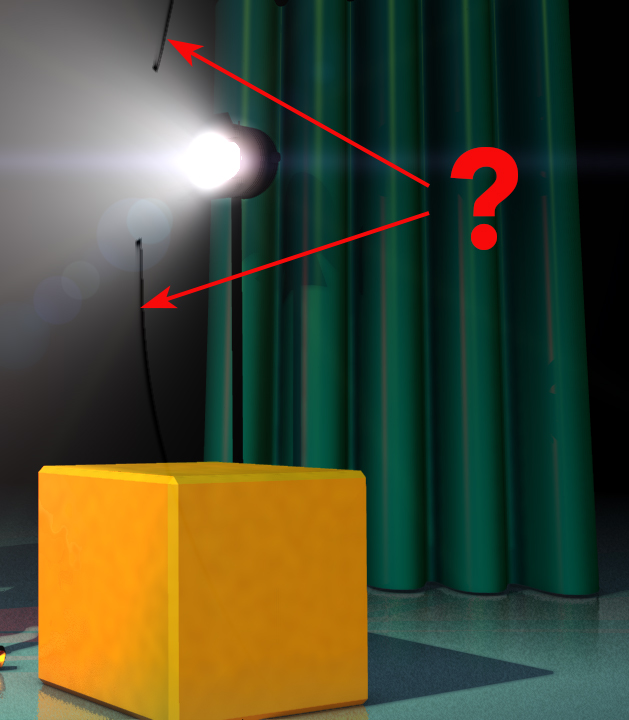
Sorry for long delay, Gerald. I believe it was flat patches- I must have found a solution... but here is ANOTHER volumetric light oddityV2... never saw these before and I played with the lights quality settings and volumetric contrast and brightness to no avail... any ideas on this one?

-
Wow- TV Paint, I had forgotten about that and googled it on your mention... it is from the 'Amiga days', when I was using Deluxe Paint by Electronic Arts. Is it a good program you can recommend for 2D animation?
-
Thanks! The funnest part on that job was coming-up with the expression in After Effects that automatically synched the girls mouth art to the VO. HERE is another one (I am going thru old files...) from 4-5 years ago. A TV spot for a Cancer center which was already advertising on billboards and magazines using the artwork below... they wanted to bring it to life via animation. I cutout components as needed and built a multiplane setup in Animation:Master and comped it all in After Effects. I made 2 spots like this, I need to find the other one. I think they turned-out pretty nice. NowWhat2_test5_Aug1.mp4
-
THANKS! and I see a more recent project has hit the webpage at http://www.sciaky.com/ where a very industrial client who specializes in high-grade 3D printing wanted sort of a 'schoolhouse rock' feel with a little girl showing how easy their manufacturing process is... I did this one last spring. (mostly AE but with some A:M bits.)
-
Going thru old files... Here is a video made Using A:M to make Corporate video fun... 'corporate' meaning- an invite to a bio-oncology seminar where the producers knew they had some yawner material and they came-up with a nifty idea to house their 'self-shot' cameos in an inviting way... making-use of their 'merge' theme. https://www.dropbox.com/s/b7spgccs7vtsrv0/TRANSPLANT%20VIDEO_FULL.mp4?dl=0 I used the 'cartoon car' from the archives... a LOT! TRANSPLANT VIDEO_FULL.mp4
-
 Myself and a user named Ben once fashioned a fisheye camera for Animation:Master using a half-sphere with 100%transparency and refraction that constrains closely to the camera... like a LENS! I believe it is available for download if you search the contributors cue forum for keyword 'fisheye'. You could also look into the 'gazing ball method' where you would aim your camera into a sphere that is 100% reflective- altho- both these ideas will not give you the 180degree angle I believe you are looking for. HERE is link to an animation where I used my fisheye from back in 2008. https://youtu.be/fY9nDwTSrFc
 -
That looks interesting, nice controls... I always just made pose sliders for every nuance like eyes open/close... or phonemes... or smile/pout. I imagine these on-screen nulls are just interfaces for pose sliders?
-
Thanks! The door is off to the side in the center patio area. The house is an old fishing cottage that has been updated several times thru the years- last time in '77- so it is due. This addition would benefit by giving a larger living room area, getting-rid of a leaky wall and terrible entry, and it would allow for addition of a 2nd bathroom. The house has a septic field in the front lawn so any added bath would need a direct access to septic.
-
Good ideas. Another render: added DOF, omitted house animation. 561Lakeside (2).mp4
-
Used A:M to 'arch-vis' a dream I have for an add-on to my house... basically, moving a wall out and making a better entry. The house was built in 1930 and over the years people added-on and connected new sections, the wall I want to blow-out has a huge window on it and is badly insulated- lets a lot of cold in-in the winter... I used Google maps to obtain a satellite plan-view of my home and fleshed-out the walls and rooflines, then made a pose that had the revisions I have in mind and animated it in a chor. I hope to be able to show this to contractors to see if it can be done. 561Lakeside (1).mp4
-
I liked it! Good to see someone is getting something done in long-form in A:M!
-
Community Model- AManda
John Bigboote replied to John Bigboote's topic in Work In Progress / Sweatbox
Reduced lip-size a little, added freckles and a wisp of hair in front... this is a combination of a full IBL lit shot and a standard default lighting setup halfmixed in After Effects... lens-flare by VideoCoPilot. I am finally mostly happy with the hair's collision-detection and interaction with the shoulders. I made a pose that I only turn-ON for the hair-bake-simulation, which brings the dense mesh out into position and tucks away things that could get in the way like the ears and earrings- then I turn the pose OFF for rendering. AManda_talking (2).mp4
-
IBL- Image Based Lighting question on how-to...
John Bigboote replied to John Bigboote's topic in A:M Rendering
You get a good look when you half-mix a regular (default lighting with SSS skin) and a IBL in After Effects. Here I am using 'pin-light' transfer mode at 50%.
-
invisible lawn mower -rough idea
John Bigboote replied to johnl3d's topic in Tinkering Gnome's Workshop
That one is cool, John! I always wanted a lawn where I could put a stake in the center, tie the self-propelled mower to the stake and let it go... How come we don't have radio controlled mowers yet? -
Is amplitude working in latest V19? I tried it and got unusable results... is it picky about the .wav or .mp3 specs?
-
Shadows only render using Z buffer in V18
John Bigboote replied to Simon Edmondson's topic in Animation:Master
Thanks, Rob! -
Community Model- AManda
John Bigboote replied to John Bigboote's topic in Work In Progress / Sweatbox
I noticed... she had lost her 'widows peak' somewhere along the lines... turns-out- setting the 'culling' setting anything less than 50%(default) makes you decal-driven 'density' go away and hair will populate on the entire hair group.
-
Community Model- AManda
John Bigboote replied to John Bigboote's topic in Work In Progress / Sweatbox
Jirard- yep, that is my method too... fixing them 2 by two. Mack- yeah- LOTS of settings, many seem redundant... and I haven't even TOUCHED the grooming tools on this... which are pretty nice in A:M. (I have a force connected to the model found in the bones folder.) that is always 'pushing' the hair back, then gravity does the rest. -
Community Model- AManda
John Bigboote replied to John Bigboote's topic in Work In Progress / Sweatbox
SO THEN I'm getting a last render ready to go over the weekend when BAM! All my(Jirard's) 5 point patch's go away! Crap! Which brings the added joy of having to re-apply all decals that were on those patches in any way...grrr! And some of them just don't want to close no matter what you do... and I see Jirard has a habit of 'hooking' to 5-pointers... which further complicates things. -
Community Model- AManda
John Bigboote replied to John Bigboote's topic in Work In Progress / Sweatbox
More experimenting, shaded low-res render... no baked hair, so the hair calculates at render time(fast)- with the force pose ON and the mesh ON too- but shaded transparent so the hair recognizes it but the renderer does not. EDIT- updated rendered gif. I guess I still recommend baking the hair- it really helps for CD.
-
Community Model- AManda
John Bigboote replied to John Bigboote's topic in Work In Progress / Sweatbox
I should note to anyone who DL's the folder that my latest .prj was AManda_MC_PRJ3... sorry- somewhere along the way I backed-up a version... -
Community Model- AManda
John Bigboote replied to John Bigboote's topic in Work In Progress / Sweatbox
Were the solutions that you came up to address your earlier problems practical ones or do they seem to be more trouble than they are worth? Hi Mack- well, no. I have been 'toying' with A:M hair for 16+(YIKES!) years now... trying for something big. I was a little disappointed in this test seeing the hair 'sink thru' the shoulders toward the end. It was way before its time once(the A:M hair feature) and is still timely. Even watching a Blender hair tutorial I see a guru lamenting after his failed demo that 'you just have to eventually 'live with' the hair penetration that will inevitably occur. https://youtu.be/2YCQLZMuvkE skip to 10min15secs to see the hair fail. Other programs have great looking hair, but don't really work whence animated. Ultimately, I would like to see hair that reacts realisticly under animated conditions, yet will not sink thru geometry when collision-detection conditions occur. My solutions were more scientific than anything... the 'mesh' approach is a reaction to the hair particle needing a dense geometry to react to (theory) so I hide a dense mesh within the character and have a pose that expands it out OVER the skin area while the hair simulation is happening... once simulated, the pose can be de-activated for render. I make the dense mesh by copying the CPs where I expect collision to occur, like the neck and shoulders(and cheekbones) and paste them into a MESH group. Then, I use the Plug-In/Wizards/Push CP's feature to expand the patches along their normal and make a new pose for the result... I then make that new pose a +100/-100 range and in the -100 I shrink the CPs to be out-of-sight gone. There are other theories I chase as well. For instance- there are 2 places where the hair's density can be set in the material: One, in the 'Hair System' and the other, in the 'Hair Emitter'. One of those is for how dense the 'mimickers' or 'populators' should be, and the other for how dense the 'hair guides' should be. The hair-guides I believe are the ones that actually react to grooming and collision-detection while the 'populators' merely mimic the nearby hair guide and even if the hair guide is properly not passing thru geometry, it's populators will because they are just 'offsets' and the offset may place it thru the mesh. Then- there is the hair's 'Control Points' value which can make a strand stiff like a piece of uncooked spaghetti or limp like a piece of cooked spaghetti (hey! this value should be called 'al-dente'!) I would have to consider those points along the hair's length are used by the collision-detection as well. Then- there is the basic dynamic targeting modes, Constraint, Spring or none. Then, there is bounce and friction... I honestly can not say what these effect and have tried values from default...zero, 10,000 with no discernable differences. And THEN- there mis the mysterious 'Cull'... seems to hold some big powers- but how, what...? There is much to explore and many hours to be frittered, warning! Thanks for your interest - let me know what you learn. -
Community Model- AManda
John Bigboote replied to John Bigboote's topic in Work In Progress / Sweatbox
Okay- I am done toying with A:M hair- it is what it is... here is the zipped assets if anyone is interested in seeing settings or learning about long hair in A:M... or just wants a cool model! I borrowed some VO from Scarlett JoHanssen in the movie 'Her'. There is a longer clip in there- I may try some more lip-synch with. I've found that it is not necessary but for Collision-Detection (CD) it helps to bake the hair... the resulting pai and par files I have omitted from the folder because they were 60mb+... so you would need to perform a 'bake' which for this 10 second clip takes about 30 minutes. ALSO- to help the CD, I have a thicker mesh that expands out over the face and shoulders that should be set to (PUSH MESH POSE 100%) and the force that keeps the hair off the face has a pose that can be activated/deactivated as well. You can use any image in the chor settings to light the scene... I will attach the image I used if needed... have fun- hope someone gets something out of this someday... I will return to add a rigged body to AManda someday, maybe. AManda_Loop7 (1).mp4 Jirards AManda (2).zip
-
Could'nt the extra feature of a scaling leg be added easily enough by the end user? In a new percentage pose- Scale the upper leg bone in its Z direction and all bones below it in the chain will scale as well, and then offset the ones you don't want scaled by scaling them back to the approximate size they were... or am I missing something... (I bet I am...!)