NancyGormezano
-
Posts
7,863 -
Joined
-
Last visited
-
Days Won
15
Content Type
Profiles
Forums
Events
Everything posted by NancyGormezano
-
Well you can use both bump & displacement on same surface if you are looking for different results. And using the same image, for both, is probably a wash. Here is example of the using different images for bump & displacement and neither are gray scale, but have enough contrast to have an effect. For the stuff that I do, I rarely use a gray scale image for either bump or displacement. BUT if I were wanting to be accurate or more precise for creating hills and valleys then I would use a gray scale image where white is raised, black is indented, and grey (127, 127, 127) represents no change.

-
Great! Thanks for testing. Was just thinking about this and realized, Yes, I probably should have said to change under tools/options/rendering tab to select "render using camera settings", because I think "render using this dialog" is the A:M default? My guess also, is the project settings are overridden by the user's settings under tools/options. And as well, I should have mentioned to pick filename, type, location for rendering the image, if you don't like the one that comes up when you click "render to file". Thanks again.
-
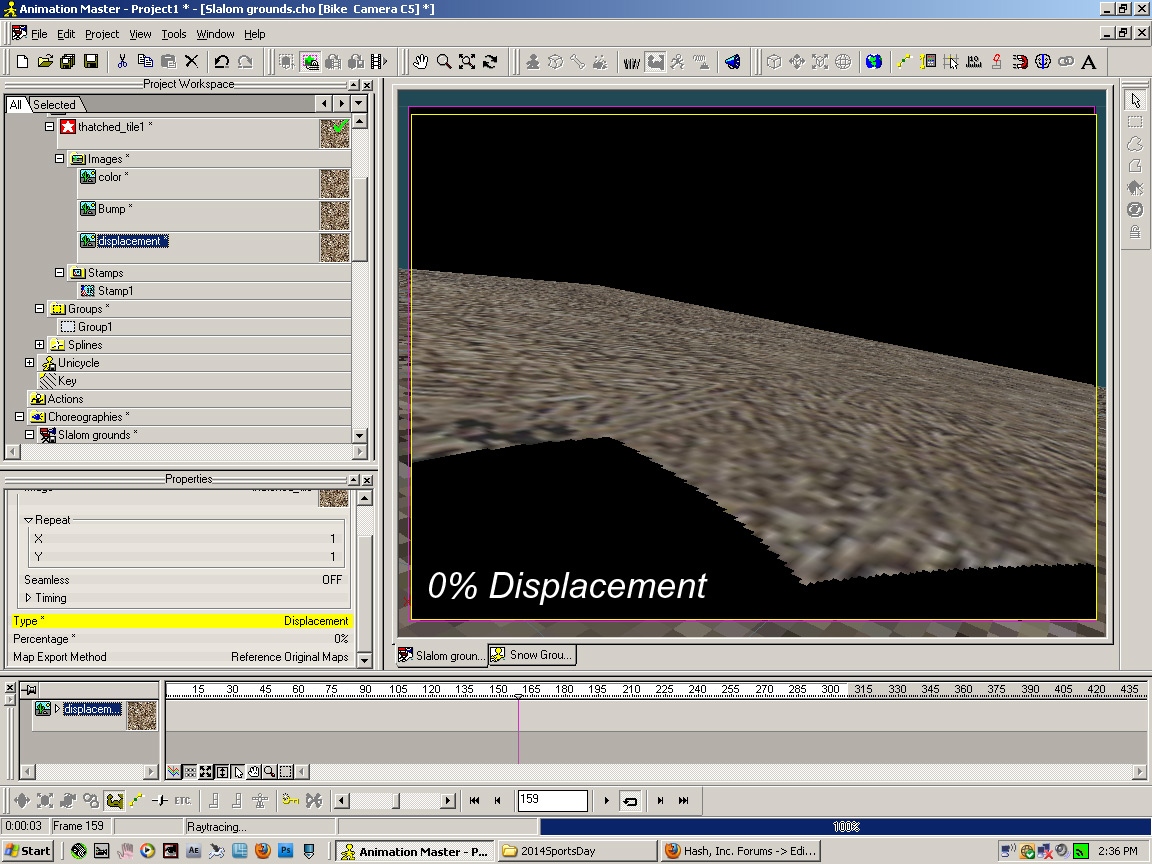
OK - almost sure it's the displacement on the ground plane I ran a quick test - added a color map 100%, moved displacement to bottom in decal container, and even if I set it to 0%, there was an "artefact". However when I changed the type to color = 0%, "artefact" went away. I think it's a matter of camera angle, focal length?, displacement, flat ground combo? (tested in 16b/32)
-
As I just learned, consolidate does NOT work in re linking files, so I had a hard time loading your chor -as A:M could not easily find models, images, materials, etc, so I just canceled most. (What a pain for both trying to provide a project as well as using the provided project - I found it is best to relink manually, if you want receipients to be able to test your situation - ugh) However if I were to guess, I would say that displacement does NOT work very well on BIG flat ground plane type models - even with a grid of patches, and perhaps especially if the camera is moving so fast and erratically, and at certain angles. Try just a bump and color map (no displacement)? I think the randomness, scintillation is due to using displacement. Also I noticed you were animating the path splines over time - was that on purpose? It's allowed, but curious to see if you really meant to do that?
-
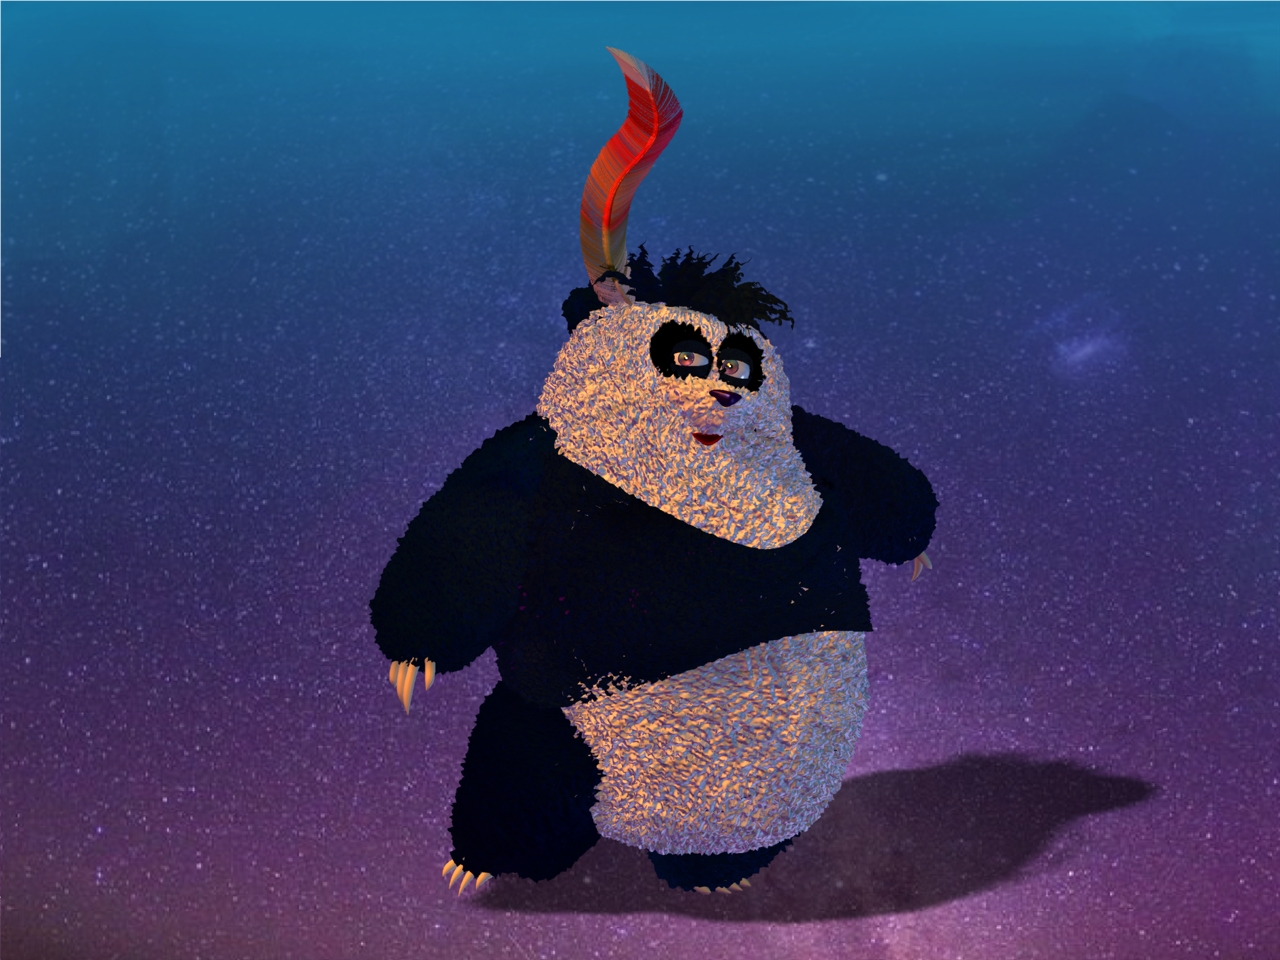
Thanks, Serg, Spleen, Simon! Yup, Consolidate does not seem to do any re-linking of images. So YES, the links to image files in the zipfile were incorrect. So I manually changed the linking and edited my first post here to contain a new zip file with an embedded project that now also contains a chor for the Panda that uses IBL (image based lighting), 5 pass, hair ON, front projected, flat shaded ground plane. And yes I found that I had inadvertently set the color decal for fur =0%, so I changed that as well. It would be great Rodney (or anyone), if you could try that new one please and let me know if something isn't working. Render was created in 16b/32 (no FAKEAO). My render times at 640x480 was 16 secs and at 1280 x 960 - 49 secs. I don't use any color swatches. I go on instinct, personal palette preferences. My method is by experimenting, testing, selecting on whim "very unlikely images" to use for decals and see what happens, so lots of pleasant surprises happen that way. The images are collected from a variety of sources, and contain a selection of colors, patterns that attract me. I also create some especially for each new project. I tend to re-use images from my collection. And I also create my own mix of blended tones, colors in multi-gradient images to use for backgrounds, surfaces. For example - I used an image of an orange rose, with green foliage to color the feather on Panda's head, and the star image (in the background) is also used to color the Panda's Irises. His white furry parts are textured with a paper towel pattern (from a photo I took).
-
Hmmm...I just used the unzipped project, and A:M didn't have any problems finding the images (but I will check tommorrow to see if it was pointing to items in my file structure and not the new hierarchy). Great! The eye target will move with the model bone - so if you weren't animating the model bone, and hadn't constrained it to some other point, then it probably was the reason the eyes were moving all over the place as it was jumping? No need to give it up, just sometimes it's more convenient to aim the eyes differently And here is Panda rendered flat shaded (with displacement and bump values =0%), hair ON, and hair OFF (and no feather) and with default toon line settings, and mouth size more in line with original intent.
-
Hmmm...I am only concerned that the zip/linking isn't working? I understand if you want to delete/change things around. However, I looked at the zip file and the image used for diffuse color of the feather is there in my zip file (D/0resources/AMlibraryobjects/textures/things/roses/orangeTropical%20Twist), I did not use an image for the emitter. And the image used for the diffuse color for the hair on head is there as well (D/0resources/AMlibraryobjects/textures/surfaces/tones/dark blue Castle copy). I did use an image for the emitter (napkin texture), also in the zip file. Yes there isn't any hair applied to the body - the texture comes from using the thatched tile image as a displacement map and bump map in the decal containers: furry stuff except vest and vest color displ bump. Are you saying the displacement in those decals not work? (or did you delete/reduce the displacement?) Or this image was missing? You can constrain the eye target to the camera (or something else). But I prefer to turn off the pose "eyes aim at target" and then move the individual eyeballs to however I want that looks good from camera view. The mouth is quite small. Yes it will look grotesque if you translate or rotate the corners, lips too far. there are no limits on those bones. Thanks for testing!
-
Rodney - That's so weird - I'm not sure what's going on there? (nice jumping, tho) Can you just post a bigger still (just one) - at least 640 x 480, not a gif - can't tell what you did with the gif too small, and also gifs are reduced/changed color space (256) This is the first time that I've consolidated and embedded, so I wonder if that has anything to do with anything. I will re-examine the zip/project. You do have the hair materials in the project? right? Particle Hair is only used on top of head, and on the feather. The body fur/hair is from using displacement (200%) and bump (100%) in the decals. Also can you post your render settings/setup? I don't understand why there is banding from the lights (other than it's a gif)? I did this project in ver 16b/32 (mainly because I wanted to use TSM2) My render settings= 2 pass with FAKEAO (png or tga with alpha =OFF, depth buffer ON, apply post effects = ON). I suspect I could use SSAO in ver 18, and get fairly similar results. particles/hair =ON, ground is flat shaded, front projected, with the yellow background rotoscope Global Ambiance type = Global Color = white, Ambiance intensity= 75%, Ambiance occlusion = 0% rim/klieg light = 100% orange (255, 128,0) with spec, diffuse ON, Z-buffered shadows, 60% dark key/sun = white - 100% spec ON, diffuse OFF, no shadows fill/sun 45% default blue, diffuse, spec ON, no shadows What version are you using? It looks like you don't have any displacement going on (don't know why that would be, other than gif again), and it also looks like you don't have hair on (or as you say it is blackish - so it won't show against dark background, and the feather also looks weird? Maybe also because it's a gif? Did you move the eyeballs?, eyelids? It doesn't look like any lights are hitting the Panda face? I may not get a chance to figure this out until late tomorrow afternoon. But will need more info from you. And I will post a sample chor later if wanted.
-
Thanks John, Robert Here's what the original Panda on Fire model looked like
-
Inspired by Simon's quest for a teddy bear fur texture, I decided to make some bear type creatures of my own. I started with the "Panda on Fire" model from the Hash 2001 CD, mainly because it had a terrific simple body shape, and simple claw/fingers: originally done by Josh Riley, modified by Cabbot Sanders according to the File Info. I changed the eyes, ears, nose, added mouth, eyelids, re-rigged it with TSM2, added Face controls, decaled it to use displacement as the fur texture, added dynamic hair on top, and assorted accessories. Obviously, Panda Monium is a close cousin of the Big Nose Bear species. And because, I stole some DNA, I felt it only right to upload the genetic mutation to the Forum. (zip file/consolidated project contains the Panda Bear model only) EDIT: Uploaded NEW ZIP file/project with IBL test render chor - "Dancing with the Stars" and relinked the images - Hopefully you won't have to search for missing links...let me know if it isn't working please. If you want to test getting the same render results, then under tools/options/rendering tab, select "render using camera settings". When you go to render, pick a filename, type, location if you don't like the one that comes up when you click "render to file". PandaBear.zip
-
Hoo Hooooo! FUN!
-
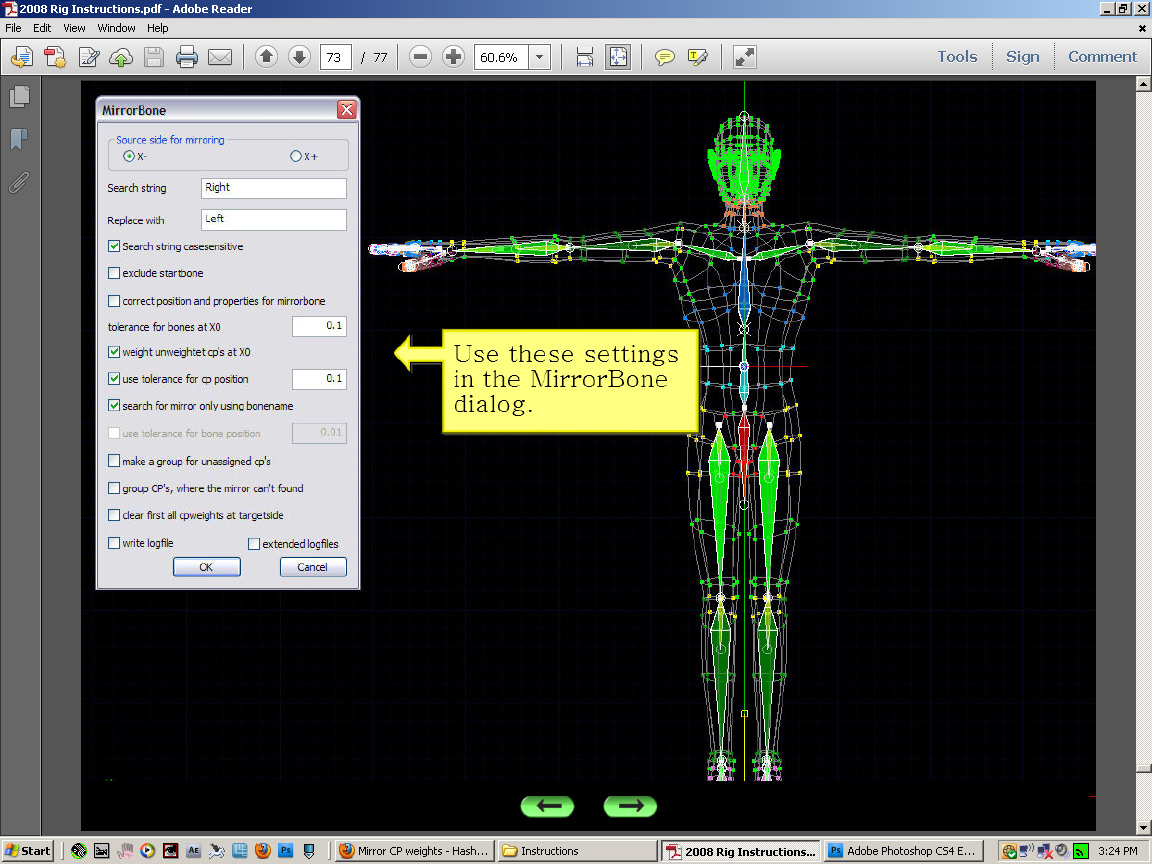
I haven't watched Roberts video, so the following may be redundant: According to instructions for installing 2008 rig (4/20/2011) on page 72, 73 of the pdf, it says:
-
Another? Again? YAYYYYYY!!!! Happy happy day! Hope there are many many more.
-

Painting with Light? It Can't Be Done! Feb 2014
NancyGormezano replied to robcat2075's topic in A:M Tutorials & Demos
Excellent! excellent! excellent!...umm...AND did I mention absolutely excellent? Amazing treasure of good info! These videos are incredibly chockful. You have a wonderful style of presenting information in a simple and easy to follow way. You're a keeper! -
It didn't come off as rude...I just thought you might not be aware of how to upload an automatically looping QT movie without having to make extra loops.
-
BTW, I noticed a bunch of untitled groups with David Higgins (retopologized lady model located here) - and he uses mac version as well. I am going to guess this is a "feature/bug?" of mac A:M (do not know what version he was using). I cannot recreate this with A:M PC versions
-
If you want it to loop, open the movie into quicktime pro, choose view/loop (or ctrl+ L) then save the movie under new name and upload that one to forum. Do not know if regular QT player does this. If you want to compress movie: Again in QT pro, do the compression first (File/export and save as), then open the compressed movie and set the loop feature, and then save the compressed, now looping movie. I like her fashion sense! terrific leggings pattern and sparkley sleeves, neat laces! But, to me, the skirt looks too plastic, stiff. It's probably because of the white specular color and size, intensity. Is that what you intended? Try a different spec color (closer to the skirt color) and perhaps smaller spec size and/or intensity, if that's not what you intended. Also could add a simple, subtle texture, to be consistent with rest of outfit? Also I assume you intend to "colorize/texture/decal" her skin at some point (again to be consistent)? But maybe that is just my taste talking?
-
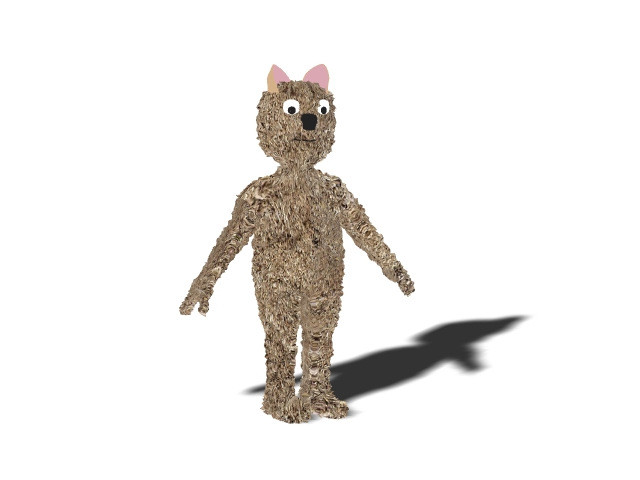
Yes, those small bits of color showing through are a result of the surface distortion that can occur in using a displacement map. I (and you too, I'm guessing) have found that one way to disguise this is to use a group surface color that resembles the overall tone of the image used for the color decal. E.g, in your case: brownish.
-
EXCELLENT!
-
Here is what I QUICKLY did - I decaled the body,head with cylindrical mapping (repeat =3x1), from front view. And decaled the arms with planar mapping (1 x 5 repeat, seamless =ON). Decaled arms from top view. displacement = 200%. NO bump. Got rid of all patch images (ie, set values to 0%) rendered flat shaded = ON (in options for shortcut to model in chor), camera settings toon =OFF and flat shaded with camera settings default toon =ON EDIT added project file - you will have to link to the thatched rug image that was used for the texture. If you use patch images - try it without the bump. BTW, Patch images are more likely to show the borders of patches no matter how you rotate. Even if the edges are seamless, and directionless - the interior of the image used will indicate the patch. Think of a black dot on white ground. Wherever there is a patch, there will be one black dot. Your brain will recognize the pattern. And obviously, the dot will look larger on larger patches, versus smaller ones. Just the nature of patch images. decaledteddy.prj
-
Something is funny with your model. Those untitled groups are very suspicious. When I click on an untitled group in the pws - I do not get any cps selected, and then when I click on the group above it (NB) - the untitled group goes away (as if A:M is repairing something). I can do this 3 times to get rid of the untitled groups. I can do it in ver 17g and 18a. I cannot figure out how you are getting these multiple named untitled groups in your model? Even with leaving them in your model I am able to rotate images and have them stay rotated. Try deleting those untitled groups from PWS by just deleting the groups and then try rotating your images. And you do know that you can have multiple A:M's on the same license? Just copy the master0.lic file from your 17g directory (where master.exe lives) to the same directory as the one 18a master.exe file gets installed. Also image files do not get embedded in projects - you would have to make a zip file and drag the project file and image file into the zip file.
-
I just tried to see if I could make "rotate patch" fail - and I could not in 18a-32. I saved the new model with some patches rotated, it kept the rotations (on the patches that I rotated). I restarted A:M, model was fine It is either something funny with your model, your version that you are using (17g mac) or your technique. Post the model that is funny.
-
One weirdness I notice with your model (but may not have anything to do with your problem) is that you have multiple groups named Untitled. I am not able to create any groups with the same name - I am always given a warning. This has been standard forever. Seems very peculiar. More curiousity: Are you using the "patch group mode tool" or (shift +P) to select to patches that you want the patch orientation to change? and are you waiting for refreshing the screen after you right click and choose rotate patch? Are the normals all correct on your model? And yes 5 point patches are worrisome when using "patch images" Aside from wanting to understand rotating patch images - I have to wonder why you are frustrating yourself by even worring about this, given that the image for fur you are using works in any direction. If it is because of using it for bump, then it is important as to the normals being correct for the patch (I believe), not necessarily for the orientation of the image on the patch (shouldn't matter much).
-
Ack. You can't say that to me. The hunt is just too too alluring. Quick googling of "Holmes Bryant" and new mexico leads me to pages that indicate last known (circa 2012) that he was doing website design, probably living in Taos area (or surrounds) - bills himself as "taoist mountain hermit" (google plus), and may be connected, living? at the Lama Foundation (taos area) - from an archive: Current Lama Foundation website here Someone else can contact them - I've done the sneaky part. He may not want to be found. May Holmes be well and happy!
-
definitely better!