brainmuffin
-
Posts
771 -
Joined
-
Last visited
Content Type
Profiles
Forums
Events
Everything posted by brainmuffin
-
Rob, the low patch modeling on this is awesome! I never would have thought of ending a hook on a 5 point patch like that, but it looks like it works great! This is the kind of modeling I've been striving towards lately, it's just so much easier to rig. One small crit: The point just above his front shoulder looks like it should be weighted to the shoulder bone by maybe 5-10 %, to avoid that little bit of a crease when he crouches.
-
Ooh, a greeble kit? I musta missed that... Cool ship, too!
-
It looks to me like no matter what, it's always the same plates popping. What is it about those plates? Are they reaching pure white on your displacement map? If they are, maybe you should bring the highlights down a little on the map, then boost the percentage of displacement... You could also experiment with the resolution of the displacement map, maybe a higher res would pop less?
-
I seem to remember someone on the forum using a pure white HDRI map above a car to get a similar glossy result, too. Not sure, but I think it was Stian. (agep)
-
If you ever doubt the quality of the animation going on here, check out "Iron Man: Armored Adventures". Your faith will be swiftly renewed...
-
I wish I knew somebody for whom wearing a skimpy outfit was incentive, LOL! Like: "Could you come over and clean my apartment?" "Uh, no..." "But you could wear a skimpy outfit..." "Well since you put it that way..."
-
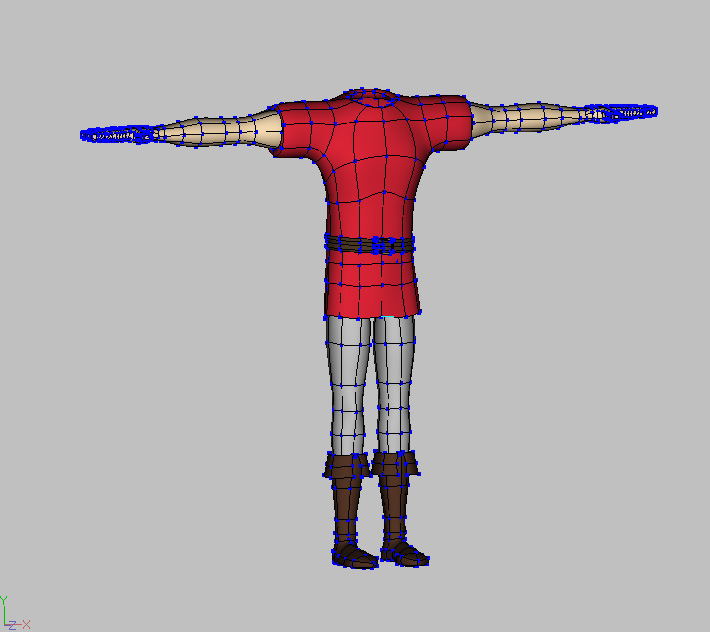
Well, it's probably way overdue that I post a WIP thread on this project, so here's what I've got so far: This is the body for one of the two characters. Today I'll be working on modeling the head, texturing and rigging him. The other character is going to be cloned from this completed model. I'll need to make some minor changes to differentiate the two, like the other character will have longer sleeves, a thinner build, some minor tweaks to the face, and different hair/facial hair. But for all intents and purposes, the brunt of the work is going to be done on this character (Rigging, facial setup, etc) and the other character will just be a duplicate. Set1Test_1.mov This is a test render of the first set model. All the other sets except for one, will just be rearrangements of this set, with some props thrown in for variety. scroll_2.mov And these are my credits. They were all done in After Effects, except the scroll, which was animated in AM. Because the credits are animated, they count toward the final total, so I've got one minute completed out of 3-5 minutes required. So, by this Friday, I have to have the two characters ready to animate, as well as a scratch dialogue track to animate to. I've only got about 3 weeks left to the semester to finish this up.

-
Chibi-style Anime Character
brainmuffin replied to brainmuffin's topic in Work In Progress / Sweatbox
I will definitely keep on this, but I have another WIP for class that's gotta come first. It's due the 17th... -
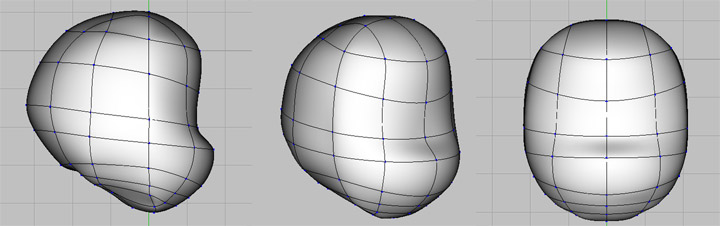
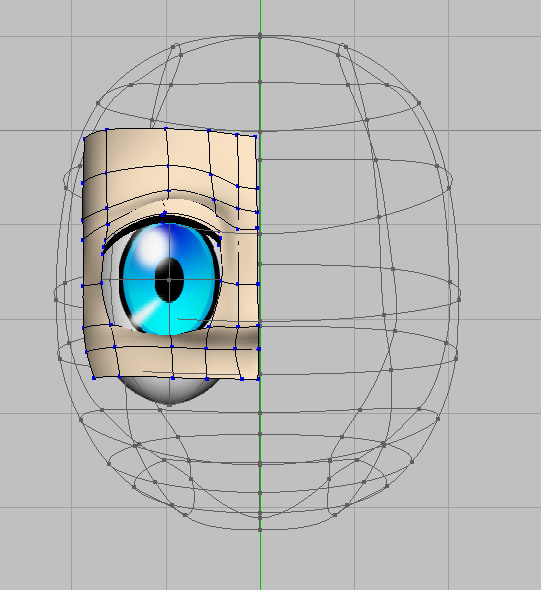
It's been a while since I posted anything... Just haven't had the time to play around. But I'm taking an animation class this semester, so I had a good excuse to start messing with A:M again This is one of the things I'm working on right now. It's not for class, just for fun. I've wanted to do it for a while, and since I left my flash drive with the files for my class project at school, I figured this weekend would be a good time to get started. I'm working on a Chibi-style character. Chibi is the big-head little-body style, like the sprites from the old Final Fantasy games. I'm actually working on an Oppai Chibi character. (Oppai roughly translates as "Busty") This isn't the character I'm making, but these are like the only tasteful images (or at least the most tasteful) of this type of character I could find to post, so you can see what I'm after: And here's what I've done so far: The first thing I did was to create a low-patch head. It's a little lumpy in the back, and the splineage is very rough, but the form is the only thing that matters at this point. This is just a 3d guide to make it easier to keep the shape right as I model: Then I locked the CPs on this group, and made it transparent, to make it easier to work with. I modeled a temporary eyeball, and started creating the face: When the model is finished, I'm going to replace that eye with a fully modeled eyeball (Like the one in David Simmons' tutorial) that I'll use a distortion box to hold it to the right shape for the face.
-
would that work with a decal too?
-
Damn Matt, inspiration is right! I don't think I ever saw the spline renders beforeI I gotta snag them for uh... studying! Yeah! Seriously though, she looks like she'd be easy to rig. Very efficient splineage...
-
Thanks.
-
Ok, so how can i fix this, then? I've been installing the last update of the rig (Not last night's, the one before) into a character. I've got all the bones placed and assigned, and I was about to install my fan-bones. Is there a way I can correct this without having to do all that all over again?
-
Thanks, Holmes! This might be just what I've been looking for. I've been looking for a simple to install rig. I've downloaded it, I'll be playing around this weekend!
-
You're going to want to have some sort of image editing software, though it doesn't necessarily NEED to be Photoshop. GIMP is a good free program: http://www.gimp.org/ And there's project dogwaffle: http://www.thebest3d.com/dogwaffle/free/ And Artrage has a limited but still useful free version: http://www.artrage.com/
-
Dusan, I hope you will be posting a list of which festivals you will submit to. If it's showing in NYC I'll make the hike down there to see it. I said it before, and I'll say it again: This film is going to win awards.
-
I used Photoshop 7 for years with no complaints. I still use it on my laptop.
-
It's not difficult to learn to model in A:M. It's quite a bit easier to learn than polygonal modeling, in fact. Especially if you come from a 2D (on paper) background. It just takes some time, persistence, and patience. It's not quite like drawing, or sculpting, exactly. It's sort of a combination of the two, with some knitting thrown in. Take a look at some of the tutorials on modeling, they'll get you familiar with how modeling works in A:M. I wouldn't say that I'm by any means a great modeler, but I think I could knock out a decent version of that doll in maybe 12-14 hours of modeling. Having a doll or a sculpture to take reference photos of does make things easier.
-
Mark, if you need/want volunteers, I've got some time. Just don't ask me to rig.
-
they aren't the same size. Just looking at the grid in the background it's obvious.
-
Why not try this: Attach the path(s) to the blasters of the firing ship. Then: If the ship that is firing has stationary blasters, constrain the root bone of the firing ship to "aim at" the target ship. If the firing ship has turrets that rotate, then set the turret bones to "Aim at" the target.
-
I had a similar experience. I started with V8 I think. Dennis the dog was on the CD. I played around with it, then put it away. Every once in a while I'd get the urge to try it again, and I'd dig out the CD and try it again. One day I pulled out the CD and it had a small crack in it. After a while, the crack got big enough that the program wouldn't start. I called Hash. They said they couldn't replace the CD, but they would give me an upgrade for $99. Having already paid $249.99 to upgrade a different software package ( that I originally paid $599 for) I saw the bargain and I took the deal. The orangutan from Tak was on that CD. I've upgraded about every other year since then. The fact that you needed to have the CD in the drive to start should really not have been the issue that people have made it out to be. There are STILL plenty of games that require the disk to be in the drive the wloe time the game is running.
-
Here's the deal: For $49.95, you get a license to use 1 installation of A:M for one year. It's a good deal. Even if you wanted it on two PCs (i.e. your laptop AND desktop) it's still probably the better way to go, especially if you're a beginner or just a tinkerer. Let's say you get good at it, and decide you're going to seriously hunker down and create a highly detailed short. If you have a render farm (Several computers you're going to render on) and you estimate that it'll take rather a bit longer than a year. Then it might be prudent to opt for the $299.00 CD version.
-
Yup, Caroline, that's the one! Thanks! Robcat, here's the file. AFAIK, she should be ready to rig. I did everything by hand, too. I didn't try to use MirrorBone to mirror the weighting, nor did I use MirrorConstraints. Babe.zip
-
Cool, I'll try that now.