itsjustme
-
Posts
5,792 -
Joined
-
Last visited
-
Days Won
59
Content Type
Profiles
Forums
Events
Everything posted by itsjustme
-
Looks good so far, Gene!
-
I added about a tenth of an inch of relief to the bricks...I should have done that before my last render, but I was in a hurry. Here is a re-render of the previous image and then another angle to show the bricks a little better. I'll wait for more of a change before posting the next renders.

-
Nosir, I'm not a smoker, but I think the demonizing of people who are is ridiculous.
-
The brick is geometry...that's the decision that increased the patch count by a lot again. I decided that a few thousand more patches wouldn't make a difference, it would simplify how I texture the wall, was easy to model and would ultimately look better. Yessir, everything is going to take a beating when I get to the texturing and figuring out shot composition. Sort of...it's a modification of an actual place. I've simplified a few things, moved a few things around, omitted some stuff and added some things, but I've used some location shots as a general guide.
-
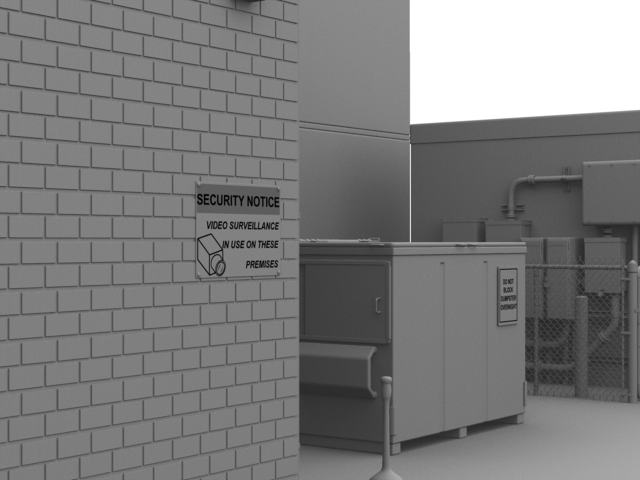
Here's what the set looks like at the end of my work on it today. I still want to add a different type of floodlight above the staircase and a few details here and there, but I wanted to do a few renders to double-check things...I only had time to render one image though. The score is presently 239,183 patches...I made a few decisions that bumped it up quite a bit, but I'm liking the results.
-
Here is a set of floodlights with fixture. No textures are applied and no lights are part of the model...but it is rigged for positioning the lights. To add to one of your models, import the floodlights model and then use the "floodlight" bone in Bones Mode to position with the rotate and translate manipulators while holding down the "Ctrl" key (Windows) so that the geometry follows. This model uses the Porcelain material. If you don't have it, there is a ZIP of it in the first post of this thread. floodlights_08_21_2010.zip
-
Maybe Robert's teapot in this thread will help you with the glossy finish. Hope that helps.
-
Everything looks great, Jake!
-
Seeing your coloring book made me think about whether it would be possible to set up a dedicated page online to color similar images. I found CanvasPaint and it appears capable...just something for me to let ferment in my head for a while and I thought I'd share.
-
Great stuff, Paul!
-
Cool coloring books, Mark! Where did you get them printed?
-
I'm thinking using static camera shots, rendering the background from each camera angle I need once, then compositing in the animated character/characters will work...at least that's the direction I'm leaning.
-
I only had time to do one render this evening, so I'll have to do some more tomorrow to show the rest of the set and how I have moved some things to open it up. For now, here's a render of the chain-link fence I've been working on. It does some serious increasing of the patch count (even with limiting things as much as I could), but I'm still pretty happy with it. If you are keeping score, the patch count is at 158,171...and yes, I'm insane.
-
Looks like you had a fantastic birthday, Myron!
-
Looks great, Steve!
-
Fantastic, Stian!
-
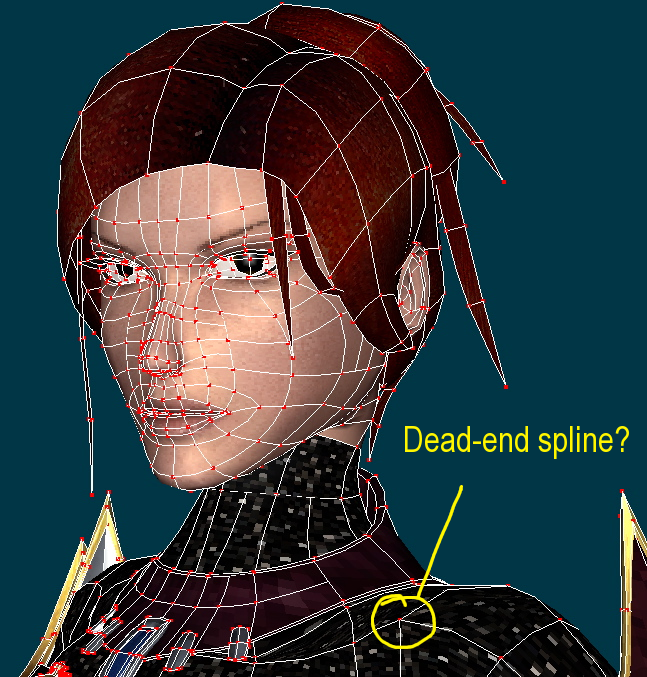
Great looking model, David! The voice of the actress fits the character too. The only thing that I could find that might be something I could critique is a possible dead-end spline...it might just be the angle I'm seeing it at though. Good luck on the project!
-
Recent TV spot done in A:M
itsjustme replied to John Bigboote's topic in Work In Progress / Sweatbox
Great job, Matt! -
Happy Birthday, Myron!!
-
When I change a section to "not peaked" and then hit "undo" it re-peaks the spline but does not return the value of the Gamma or Magnitude...those are reset to the default and have to be re-entered. Hope that helps, Jake.
-
If that is the case, you could try running in a compatibility mode for the rigging process.
-
You're making all of us look bad! I love it, Mark!
-
Porcelain is helpful in mechanical modeling for smoothing three and five point patches (it also does a great job on cleaning up corners). It's no substitute for a good spline layout, but it will help get rid of some concave areas created from non four-pointers and some overall smoothing...it's slight, but noticeable. When I apply Porcelain, I don't adjust the "Normal weight"...I haven't come across splineage that would require anything more than a slight tweak from the material. Yessir, Porcelain works in v15. I don't use Porcelain on organic models, although I know some people do. It would be an extremely rare case for me to use it on anything organic...maybe on a set of horns or teeth, but not on any fleshy parts. The biggest difference in the way I model mechanical objects as opposed to organic objects is that I peak almost everything when mechanical modeling (tweaking the bias' like crazy) and I don't touch the bias' except in very rare cases on organic objects. I also bevel everything I can think of on mechanical objects...it makes a big difference. Here's a quick model with two rectangular objects, one is beveled and one is not. Even in a quick render, the difference is very noticeable. If you apply Porcelain to the beveled object, you'll see a very slight improvement on some of the edges. I actually used a resized version of this beveled example for the doors and lids on the dumpster. Hope that helps, Matt. beveling_example.zip
-
Looks great so far, Steve!
-
Looks great, Mark! One helluva street too!