Search the Community
Showing results for 'snap to surface'.
-
Links Updated Installers: Windows 32Bit Windows 64Bit Intel Mac Intel Mac SSE4.2 Change Log New All: Button "Snap to CP" snap a bone to the nearest cp You must manually add this button from "Tools->Customize->Commands->Manipulator" (Cube with red point and arrow) to add a keyboard shortcut search for "Snap Bone To CP" only active in modelingviews , when the view is in bonesmode Snap the selected bone manipulator (Chain,End,Shaft) to the nearest cp, hidden cp's are excluded from the calculation except of moving the shaft, the bonelength isn't preserved Fixed All: [bug]6609[/bug] Do not select hidden CP function In shaded modes , cp's which are covered by other patches not longer selectable (also not selectable with group or lasso modes), works in all views. It's now configurable , the button must add manually from Tools->Customize->Commands->Manipulator" (filled cube with a red Z) to add a keyboard shortcut search for "Respect Z-Order" at "Tools->Customize->Keyboard" Fixed All: Displaying the correct keyboard shortcuts in the view popup menu Changed All: Export plugins "Generated Modelmapsize" can now be up to 8192x8192 Fixed All: [bug]6610[/bug] Rotoscope not visible in Pose and causes Exception on Delete Fixed All: [bug]6608[/bug] Preview render gamma correction function is incorrect. Desired gamma (== gamma for previewrendering) has now it's own spincontrol for changing the value and also a displayfield Fixed All: [bug]6602[/bug] Input PNG gamma correction function is incorrect. The gamma correction is now done in dependency of the current gamma Fixed All: Flocksystems false icon in chor unusable icons for instanced models removed. Fixed All: Bonemanipulator not refreshed , when the bone length is set in the Length edit field Fixed All: [bug]6612[/bug] Normal indicators display strangely when some geometry is hidden. Fixed All: [bug]6592[/bug] All normals are visible in shaded mode (when display normals is enabled). Fixed All: [bug]6614[/bug] OBJ sequence exporter needs bigger image size options- 1 setting to work for all frames Export plugins extend the resolution for "Generate Model Maps" up to 8192 Fixed All: [bug]6614[/bug] OBJ sequence exporter needs bigger image size options- 1 setting to work for all frames obj export plugin ask only at the first frame , if the filenames for decals should be unique, when a range of frames should be exportet New Windows Only: plugin Imageformat TIF supports save and load , not supported Multiframe Tiff (load only the first frame, save not supported) New Windows Only: Plugin Imageformat PSD (Adobe Photoshop) supports save and load (save only uncompressed) Layer and Masks are not supported (load and save) Greyscale with Alpha not supported (load and save) Fixed OSX: [bug]6575[/bug] Model Geometry Not Visible In Choriography In Shaded Mode (Mac)
-
I think you have the concept backwards. The aiming bone should not be constrained to the thing you want to constrain to the surface. The aiming bone should be a bone in the surface you want to constrain to. The bone inthe model you want to constrain to the surface is not a child of the aiming bone. on the bone in the model you want to constrain to a surface Choose New Constraint>Surface Turn off the Compensate Mode Button if it is on Pick the bone the surface is attached to. In the PWS, A surface constraint will be created in the Chor under the model Select the constraint, then go to the properties window Set the Surface Aim Target property to the bone you want to be the aiming bone In my version of A:M, offsets are created even though I don't want them. Set the Translate offsets and Rotate offsets to zero to make the constrained bone follow the surface exactly Now the constrained bone will go to where ever the aiming bone is pointing on the surface. Don't try to animate the constrained bone. Let me know if that works for you.
-
Checking things out again - But what happened to moving CPs?
ernesttx replied to ernesttx's topic in Open Forum
I think I found it. Snap to Surface was toggled and forcing CPs to snap to another surface when moving them. -
I'm am trying to create a cloud that resembles a cartoonish human face. I've attached a model with a sort of 'bubble-wrap' look and would like to know if there is a way to quickly give a nice a rounded shape to the whole model to which I can then manipulate points to define facial characteristics. I'm open to all suggestions, included starting from scratch with another approach to accomplish the same thing. Thanks. Clouds.mdl

-
does anyone know of a good tutorial on using surface constraints. There is an expanation of how surface constraint are supposed to work in the AM help. I have looked at the explantion many times to see if I am missing anything and I still cant bring myself to experiment with the function. It is not clear in the example if the object I am constraining to a surface has any constrants on it too. Surface normals are mentioned but that is as far as it goes. It would be nice to make a chory action with a car driving over bump ground,
-
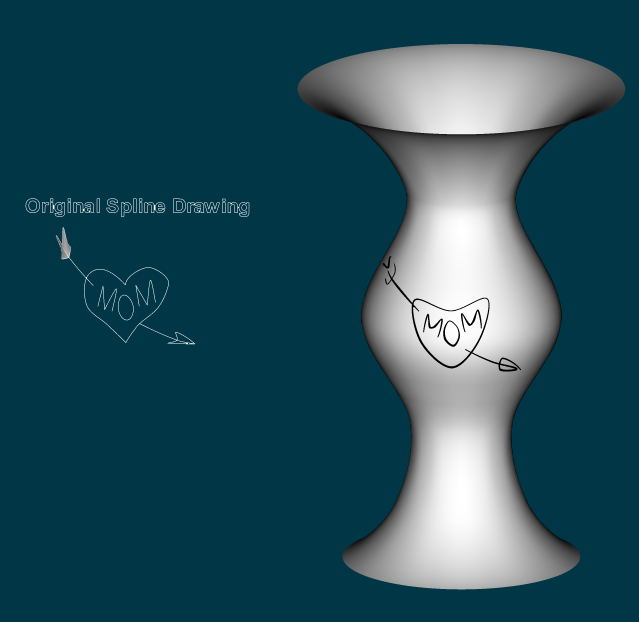
I'm sure there is. Some of those we can probably do right now... we just don't know how to do that already. Yesterday I also tried a cracked glass look but I didn't think it was worth posting. Patches will always be more powerful for getting splines into 3D space but RAL does have some nice uses. I think RAL would need a major rewrite to take advantage of anything much more significant and that'd be a particularly expensive endeavor given that few use it. I read a tech paper not long ago that suggests a way we could fake some of the more powerful RAL stuff by creating the framework ourselves and because with A:M we can often create our own solutions I may just give that a try. There is one aspect of the current RAL that keeps it from being of practical usage in my work and that is the ability to taper the ends of the line. But for this it's fairly easy to just change to patch geometry (see above example all the way to the right). The one tool that I've found to be of most use with RAL is Snap Group to Surface because with that we can get any and all of our splines to conform to an object's surface. The secret to Snap Group to Surface is Named Groups. Just name a group of splines, position it in front of the object you want to have the splines conform, right click and SGSNG! Once in place the easiest way to get tapered lines is to use Sweeper to add tapered geometry to those lines. Added: This isn't hair but follows the same principle of Geobased Hair. What I think is particularly interesting about it is how that we can decal objects with geometry rather than graphics. Note: I don't think we can Snap Group to Surface in a Chor. If we can then we can do those fancy things where objects can appear all over the surface of an object in a few short steps.
-
Can someone help me understand the limitations of baking? I keep trying to bake a model and it just hangs at "Organizing Map Layout". How long should baking take on average? My model has crumple, eroded, and a simiont material.
-
is there a way to duplicate a simple shape randomly across a surface?
-
Well I am still very new to A:M but I have finished the workbook and practiced a little bit on my own but am still very new. Anyways...I am running the newest version which is version 13 point something, Well what my question is, Is how would I go about making a mirro or reflective surfae? Like say a typical mirror in a room or a mirrored reflection off of a car or sunglasses? Do I have to manually "Paste the mirrored image" over the surface? Oris there a way to get the computer to "know" that it is a mirrored surface that reflects? That way it will be better and more accurate with movements than if I did it manually. Because I really waana use this effect and make a character with sunglasses that reflect the landscape and more.
-
tried out surface constraint ..still have to figure out a few things but it works great [attachmentid=12630] this was done by just moving aiming bone in an action ...added some dynamic constraints to get some secondary action...just a bit too fast..but follows the surface here's the project [attachmentid=12632] wireframe view [attachmentid=12633] surface.mov surf.zip surf2.mov
-
Good morning, After extruding an eyebrow to give it depth and increased girth, how do you apply the same surface to the newly added control points and splines? It renders out as plain white. Thank you. Larry
-
I'm working on this very abstracted female model. I'm beveling all the edges. The problem I'm having is that, due to the beveling, I've got some spline "rings" that are very close to each other, and they're creating subtle bands in the surface of the model. In the attached image, you see an example right where the left leg joins the torso. Is there anything I can do to avoid this? I am aiming to animate with this character. I guess I could get rid of it if I peaked everything, but then I don't think I'd be able to smoothly curve things when animating (right?).
-
It's fairly simple. In a Choreography, import a prop. Create a new model and place it in the cho. With it selected, go to model mode (the little yellow guy icon) and click the snap-to-surface button. Use the add control point to click somewhere on the prop and you will begin modeling with your CPs sticking to the surface of the prop.
-
A ground up re-write just for ARM?... I doubt that can happen. Some years ago former A:M programmer Ken Baer told me that A:M has been rewritten from the "ground up" twice in its history. Both times it took six programmers about two years to get it to being stable and usable again. However, compilers are more powerful now than they were back then... Windows 11 on ARM gets big boost with rollout of ARM64EC It's not clear how much work the programmer has to do to to "recompile" for ARM, but maybe this sort of half-emulated/half-native is what could be done. Steffen is the expert, not me. I don't know if A:M runs on Windows on ARM or not. The Microsoft Surface Pro X is an ARM PC. I can't imagine them selling a PC that locks out all existing windows apps but then... a lot of their customers just run MS office apps and those have been made availabe in ARM versions.
-

I'm losing chor constraints between models when I close...
rusty replied to rusty's topic in Animation:Master
I'm not sure I understand your question. Perhaps it is this: why am I attaching a head model to a body model? If so I'll give you the 'medium' answer: Writers and publishers won't pay much for book trailers and so I can't afford to build character models. I must instead use a set of 'virtual actors' from which clients must choose. If they want a custom character, it will cost them. Virtual actors are just bald un-textured heads fully rigged with expressions and flattening poses. Everything else is separate, prebuilt and 'snaps on' to the basic head. Everything below the neck is wardrobe: pre-built, 'Snap-on' outfits. The 'outfits' them selves have Snap-On texture decals and pose controlled additions. Shoes are also 'Snap-on'. Hair is the same--prebuilt hair-dos (all white, no color) with 'Snap-on' pre-developed colors. All interchangeable. Same with face maps: pre-developed face maps for color (white, tan, black, brown, yellow), scars and character age (how many wrinkles). Do to standard head construction you also get standard decaling ( or flattening) poses and therefore, standard mask shapes (granted not in all cases) and so almost all 'Snap-on' elements are interchangeable among all 'virtual actor models' though gender and head shape demand some separation. But I digress...There's a whole lot more beyond 'virtual actors' but this is a topic I can discuss all day. It would mean that an entire cast can be assembled in a day or two. I've been working on all this for 11 years. I'm close to having the processes all nailed down. All of it centered upon and using A:M. If I can't use AM there's a huge part of my life wasted. It makes me dizzy how much I depend on AM. Connecting the head to the "wardrobe" is one of the last things to nail down. r -
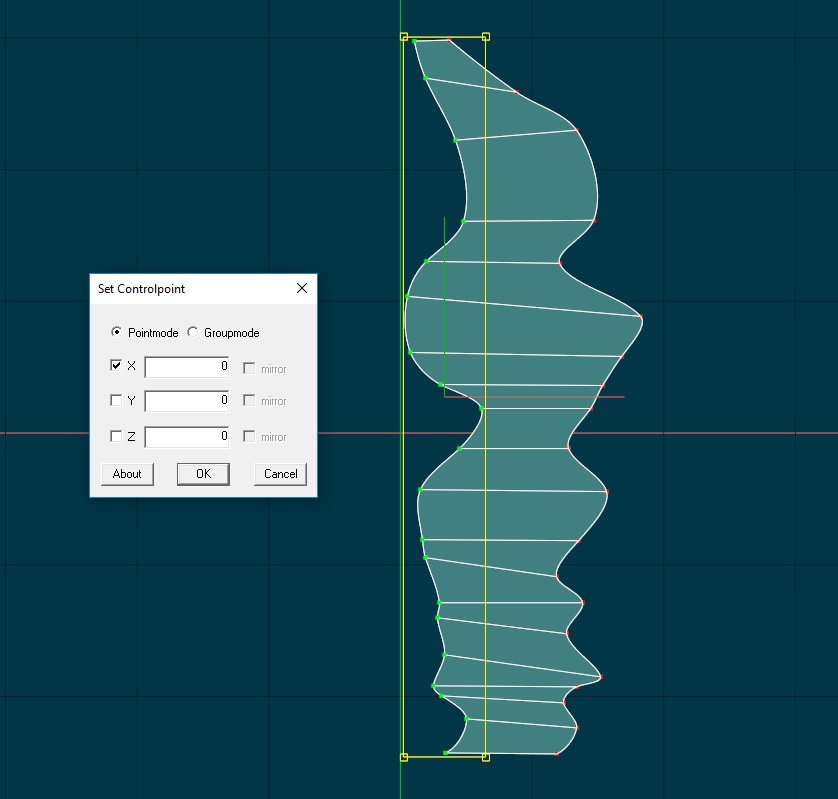
Hey. I selected the splines on the center and then did the steps below. It worked quite nicely. AND THEN CHOOSE THE X plane and keep the number at 000 for X axis. THEN CLICK "OK" and WALLAHHHH!!! ALL THE CPS SNAP TO CENTER.
-

How do i control the direction of Snap Group to Surface?
Fuchur replied to robcat2075's topic in New Users
Very well done Bust just to mention it: "Ist es nicht wahr..." should be "Sollte es nicht so sein, dass..." One of the things that are a little harder to get because the term "Isn't it true..." is not used in that kind of fashion in German . Anyway, to answer it a little bit: As far as I understand it, "Snap Group to Surface" is based on the normal-direction (or the negative normal direction, depending what settings you set in the "CTRL + Snap-Group-To-Surface"-Dialog) of the patches in the group you want to snap to surface. See you *Fuchur* -
Yes, that was always a problem with the exports. What size is your model? Anyway hooks and 5-pointers should be made small and used rarely, which is a good idea anyway. The good thing: If you use something like "UV set smoothing > Full UV Set Smoothing" and the right margins for Bake Surface, it works pretty well anyway, since the surface underneath it is very close to the one covered by the patch. If you might see a small distortion there, but if the 5 pointers are not extremly large, it should not be very visible. But yes, it would be better if that could be fixed. Malo had some nice ideas in that direction but I do not think they ever got fully worked out. Best regards *Fuchur*
-
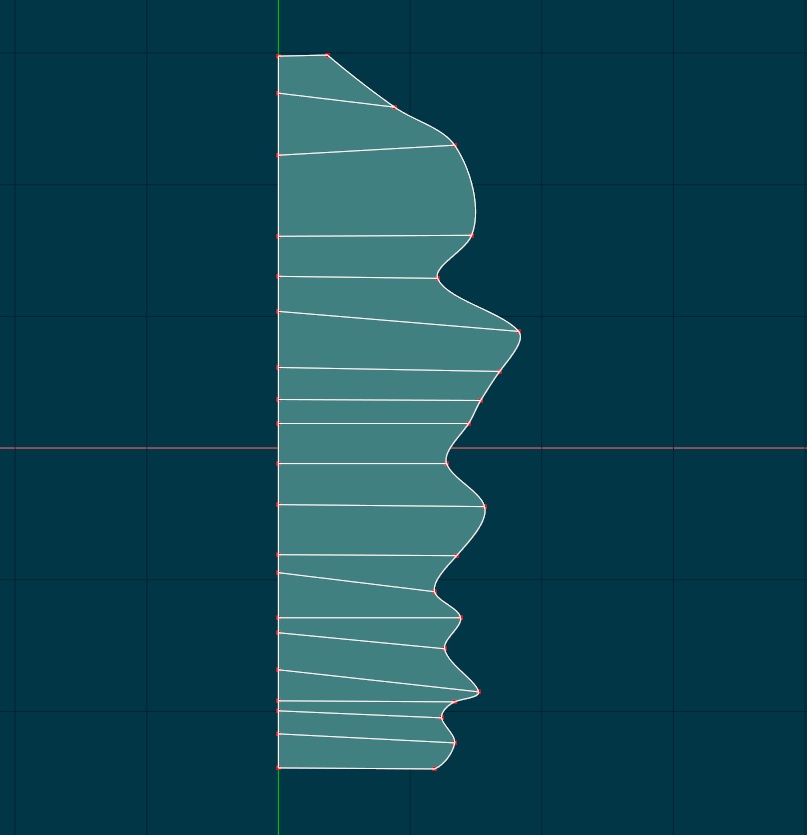
Hi Folks! When I first looked at KeeKat i thought the character had oblong eyes and the pupils were constrained to the surface, upon closer inspection I see that the eyeballs are round and the pupils are constrained to a given space. I have a character that has oblong shaped eyes and i either need to constrain the pupil to the surface or create a textures of pupils that I can aim with nulls. I have included a diagram of the current problem I have with the surface constraints. Although the pupil rotates around the eyeball, the surface of the pupil (image1) never seem attached (image 2,3) my only solution was to add depth to the pupil to create a illusion of uniformity(image 4). Is there away to constrain the surfaces of both objects to each other so they appear to be attached? The other method would be creating decals with a slight bump or displacement that I can move around with Nulls, is there a way to do this? thanks! -Kevin
-
 Dear Animasters, Does anyone recommend a link or process to create soft lighting effects that appear to be generated by a realistic background without using the time consuming GI function or HDRI? Also, to create a crystal glass object and glowing lights through skin, are there any cheats available? As I understand it, AM does not do this effect, so I thought, perhaps someone would have suggestions on how to set up a cheat. Finally, is it possible to do subpixel displacement maps to create subtle wrinkles and skin textures? Thanks, Michael Angelo
 -
How to export from A:M to a game-engine...
Fuchur replied to Fuchur's topic in A:M Tutorials & Demos
What I already asked for as a feature-request is the Retopology-Tool for A:M. I think this is the easiest way to get this pipeline working... If you have a model done outside of A:M, bring it as 3d-Rotoscope (more or less a prop-object) to A:M, use something like "Snap to 3d Rotoscope" / "Snap to Polygon-Surface" in A:M (done already by for example 3d Painter) and model your new geometry around it with splines. The next thing would be to transfer the UV-cordinates to the newly created patch-model (a bit like TransferAW does it with Weights only the other way round) and we would have a very fast and workable pipeline from the polyworld to A:M and of course out again. Any automatic importer has problems with the continuity of splines, but this would be a great way to get around that problem by letting these issues be solved by the user, who is the best guy for the job anyway. The cool thing about it: Most stuff of it is already to some extend available. There are algorithms to track a surface (>Surface-Constraint) there is the possibility to import Polygon-Object (> Props). The UV-part may be a little bit more difficult, but should be techniqually doable too. What needs to be implemented for that would be the possibility to import a prop (uneditable) to a modelling-window or if that is too much trouble: We can although model in the Chor using the prop... so the first thing would to do would be "Snap to Surface" for the mouse. Steffen is working on OpenCL-implemetation these days and very ocuppied with that, but he did assign the featurerequest already... and maybe we would need that to slide over the surface with the mouse... This would be a way to open the two worlds to eachother and I am very sure that this would be a great way to attract more people to A:M and giving us many opportunities to work on projects with other guys, create amazing stuff and be a source of great inspiration... I'd love to see that! But it will certainly still take some time before this can be done. Keep in mind: Steffen is already working very hard on A:M and he does it as a hobby... anway, it may be possible and is the only way I see to connect both worlds (Patches and Polygones) in a useable way. See you *Fuchur* PS: I tested 3d Coat a little and I find it to be a very nice addition to A:M with the lowest price-tag out there for such features especially Voxel-modelling, etc. seems to be cool... So I cant test it, because this is still a little to pricey to just buy it and see how it works with A:M's importer... there were others here who did it... as soon as A:M has the retopolgy-tools I will however very certainly buy it to cooperate with A:M! -

HAIR - No specular effects [solved-ish]
robcat2075 replied to Douglas Ferrin's topic in A:M Rendering
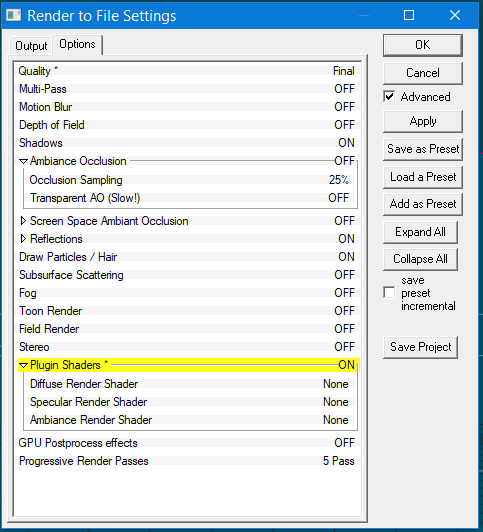
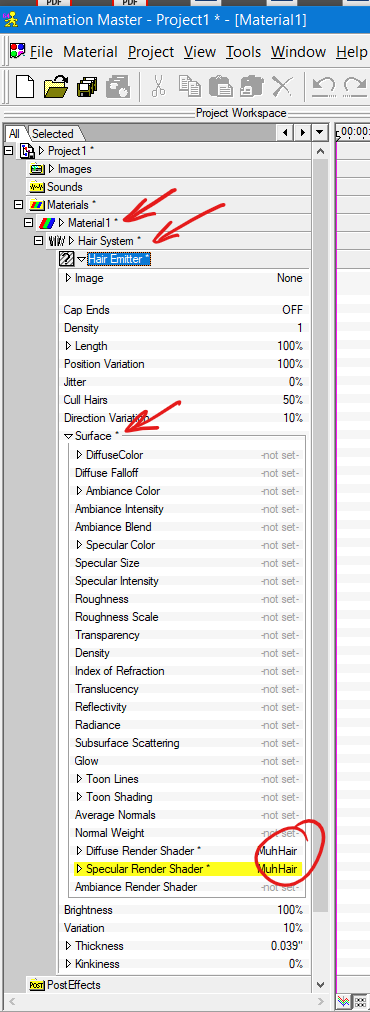
Doug, In the Render settings you just turn "Plug in Shaders" ON, you don't set any particular shader. The two hair shaders only appear as options in the Surface Properties of a Hair Emitter and must be set there.
-
HAIR - No specular effects [solved-ish]
robcat2075 replied to Douglas Ferrin's topic in A:M Rendering
It's mentioned in this post... It's something you choose in Surface>Specual Render Shader -
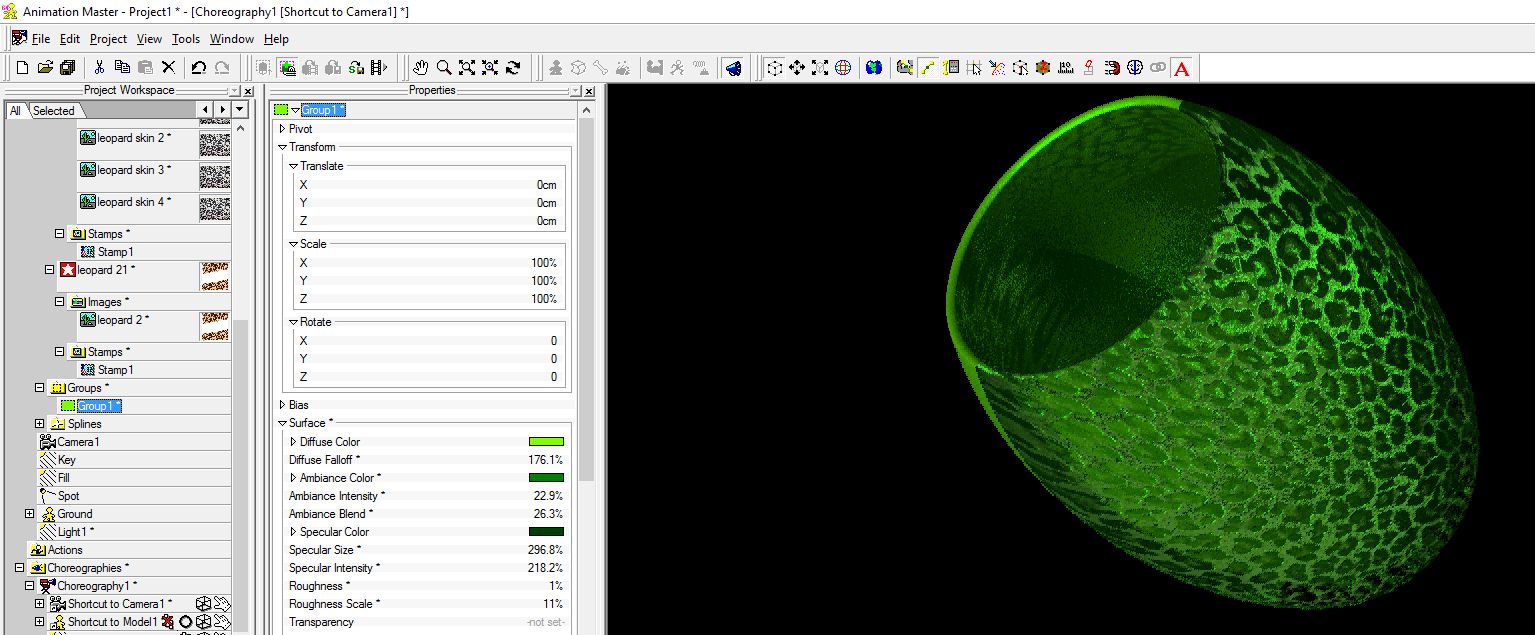
I believe the trick there would be to lower the percentage of the decal to allow some of the underlying surface attributes to show through. For instance, I assume the decal is set to Color (as opposed to Specular, Diffuse, etc.). Setting that to 66% would allow most of the decal to appear while allowing some of the underlying surface through. This could be surface attributes or other decals layered on top of each other. A specular map for instance would allow you to determine what parts of the model are shiny and what are not. An ambiance intensity setting (even if only 5%) would allow you to brighten some areas while leaving the other parts of the surface alone. Layering is definitely a great way to get those surfaces where you want them. Here's a hastily put together example... not of praying mantis surfacing(!)... but just to show the effect of combining decals with surface attributes. In this case I just grabbed two random leopard skins from the internet and started layering. In the attached image I've used the same leopard image multiple times with different setups (displacement, color, etc.) but with none at 100% which allows. Ideally each of these images would be different to gain maximum advantage of that decal type. Way back in the day there use to be a nice tutorial on layering of decals but a quick search didn't turn it up. Aside: Most A:M Users tend to leave the roughness setting of a surface alone but I love to use a setting of 1 or 2 with either really small or huge scale to add noise to a texture. The roughness setting isn't like much because of the unrealistic patterns it produces at higher/default settings. My suggestion for using roughness? Don't use the default setting! In the case of a praying mantis I'd say we'd be looking for some translucency and other effects to give the appearance of healthy green leaves. (i.e. definitely NOT leopard spots!)
-
Thanks Robert, I am very grateful for all your efforts to explain . A very good tutorial! But I dont think I have got it backwards. The difference, as I understand it, between your demo and my constraintsproblem is that I am trying to do this in the model and you are making a constraint between two models in a choreography... I think it could be applied in both situations or is it not allowed to use Surface constraints inside a model? I have attached the part of my model with the constraints problems. ConstraintsProblem.mdl I think all properties are set by the book, but it just doesnt happen... The bone I want to constrain and follow the Surface: Right PupilBone Surface Target: Right EyeSurface Surface Aim Target: Right PupilAimingBone To clearly see the relevant meshes you can select the Groups Right EyeWhite+Right EyePupil and hide the rest. Maybe I have got it all wrong after all...?? For background information: I am trying to make the pupil following the irregular Eye as a boolean cutter. Outside the Eye White and the pupil I have transparant reflective Surface. If I finaly will get the pupil surface constraint to work, the next step is making an eyelid follow the transparent eye surface using the same surface constraint tecnique. (With a separate bone and aiming bone for each spline crossing)