Caroline
-
Posts
1,248 -
Joined
-
Last visited
Content Type
Profiles
Forums
Events
Everything posted by Caroline
-
Good idea, Jason - I changed the date updated, but a few months down the track, that won't help. So if/when there is another update, I will add the version number to the top of the document, and note it in the post.
-
Somebody read my post . Thanks for the correction, Matt!
-
Thanks, Jake, changing it now. I'm surprised if there's not more of that, because when I look at my monitor the right half is on the left Yes, I also turn the maps upside down when driving south. Anything else you can add will be most welcome.
-

need advice on a project please
Caroline replied to TheSpleen's topic in Work In Progress / Sweatbox
Summary of Rigging with TSM 1. Run TSM Builder 2. Run TSM Flipper 3. Assign Geometry Bones 4. (optional) Run TSM Rigger 5. CP Weighting and Fan Bones 6. Smartskin 7. Mirror Bones, Weights, Smartskin 8. Run TSM Flipper and Rigger That's an extract from the pdf you can download from the first post here: http://www.hash.com/forums/index.php?showtopic=32815 You need to do every one of those steps, except step 4, which is only there to check steps 1-3. That is for rigging bipeds, but for quadrapeds it's the same process. And DON'T delete ANY bones - they are all there for a reason -
Aggghhh - hope some other rigger chimes in. If that were me, I delete the fan bones and put them back in again. Or go back to a version where everything worked, and put them back in again. Are you able to post the model? I am sure that it can be fixed, but I can't immediately pinpoint it.
-
I love people like this - he is so happy What about dynamic constraints on the tongue? Holmes' tutorial: http://www.hash.com/forums/index.php?showtopic=29914
-
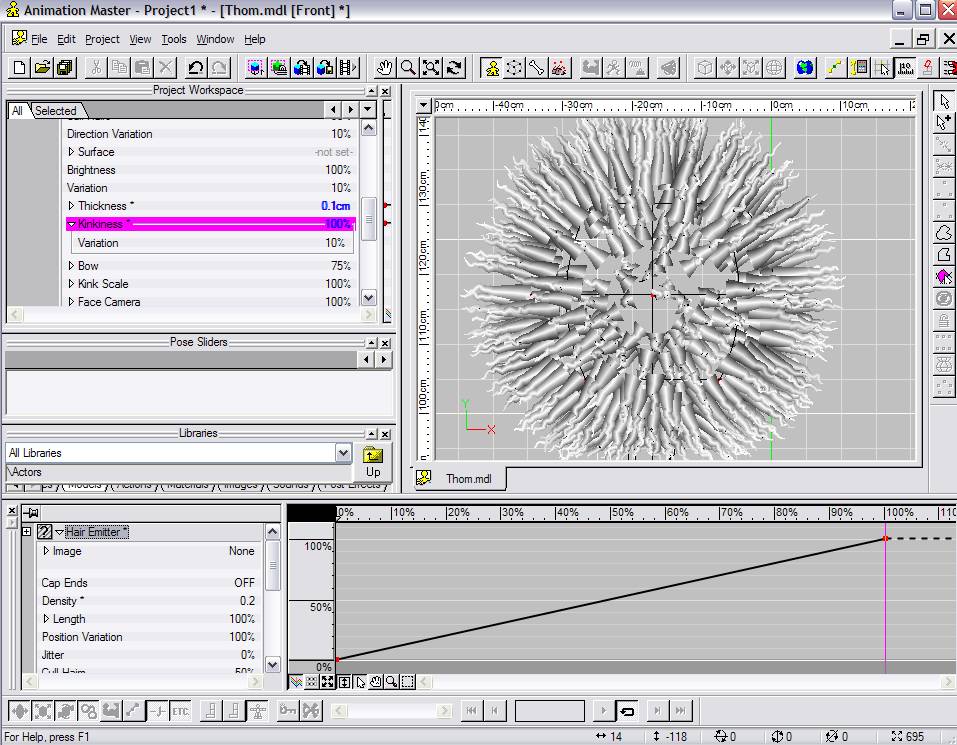
Just click on the property in the emitter. The timeline should change from seconds to percentage. Move the playhead to 100% (or wherever), and change the property in the emitter. This screenshot has length and kinkiness from 0% to 100%

-
My current thoughts - static surfaces - bias good, animated joints - bias bad. Like fingers - around the fingers - bias good, along the length of the fingers - bias bad. Would that be right? River banks - bias good And in hybrid's werewolf model, in the 6-pack area, bias bad. (I'm watching your comments there too, David ) Even though there are distinct lines (maybe not a crease) where there is a bias used, I think the decal will be enough to disguise it.
-
Yes, as demonstrated in your movie, that's what I've been getting, and don't like the unnatural movements. Aha, Rodney - I have never moved the bias of a peaked CP, nice that they go separately. You are right - I should "just do it" . I suspect, as David says, that things like biased muscles won't animate as well, although I guess the bias could be changed in a smartskin movement, if it is important. I shall go and pull apart some more models.....
-
Lol, Steve, your female is what I am trying to achieve. I did not realise that biases had a problem in the past. So that is probably why we do not hear so much about them. By creases I don't mean the sort you get from wrong splinage, just an uncomfortable not-quite curve. Like I was just doing a rib cage and the handles fly off every which way. So I just wondered if that was what everybody gets I shall try Steve's way and try and patiently get the mesh right before I tweak. I just want the "I've had enough of this model - finish it now" button
-
When I model, I never use the bias - I always fill out with splines. I am sure that I should be using the bias handles, but I always seem to get creases instead of the nice curves I am looking for. Do "real" modellers always use bias to get definition? What's the secret to stopping that little handle from slipping out of control all the time? Is the secret to create the mesh as far as possible and only then tweak?
-
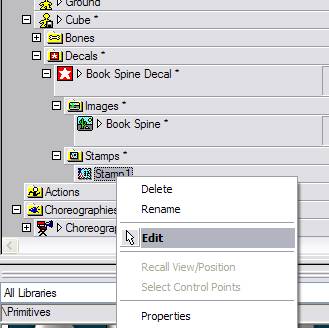
1. In the Modelling window, hide the cps you don't want to decal - before doing the decalling, create different groups with different colours, so it is easy to select and differentiate the different decalling areas. 2. Create a new action, and Flatten in muscle mode. 3. With the action window open in front of you, right click THE MODEL's name (not the action) in the PWS, and choose New > Decal. 4. Apply the decal.
-
Finally. I am embarrassed by the length of time it took me to put together "The Ultimate TSM Rigging" document, but here it is. (At the top of the first post). I hope it is useful to people, and if I have made errors (most likely ), please let me know so that I can correct the document. Thanks.
-
I love your style - the trees look great. I vote for daylight, so as not to miss out any of the detail. (But I can't help you with the lighting )
-
You get to the UV Editor after you have applied your decal like this: You can then move the CPs around on the decal and fit the decal better. I did a quickie here: http://www.hash.com/forums/index.php?showtopic=32752 You create groups, then hide all but one group. Then flatten the group in an action and apply the decal. Then go into the UV editor as in the picture and move the points around. I found it helped using a chequered background, and then substituting the proper image when finished.
-
What about a constraint, like in Exercise 6 when Shaggy holds the door handle? The Enforcement property of the constraint can be animated, so when you need the hand to stay, the enforcement would be 100%, and when not, then it would be 0%. Other than the hands, that looks pretty good.
-
Would this be the door from Ex. 6? Try clicking the bone, and pressing the R key, and then rotate as Ken said.
-
You can hold the shift key down to select multiple groups of cps, or the alt key to deselect. You can also whittle down the selection by various combinations: Select some, press the period . key to invert the selection, press the H key to hide. You could do this several times, then you can Ctrl A to select all currently shown cps.
-
Tools Menu > Options. Choose Folders tab. Choose Libraries from the drop down, and browse to your location where the library file is for v14.
-
Layers work too, as in that mossor.org tute. You can resize and reposition them - 2d flat panels in 3d space. Just make sure they are orientated towards the camera, and you can put them in front of or behind. If the layer is a .tga with transparency, then the transparency will also work in layers. Yes, and sometimes I have done it, because it is too hard to work out everything at one time in a chor, if you have particles etc happening. Also, if you have a background that uses materials extensively, it makes sense to render it for one frame and layer it, rather than have every frame recalculate the materials. It would be interesting to know what happened - maybe you restarted the computer, and that fixed it? (I should have suggested that )
-
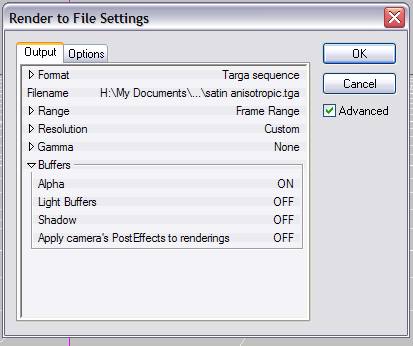
Rendering in Layers - quick tute - nla (Non-Linear Animation) - only for v15: 1. New Project 2. Right click Images > Import > Animation or Image Sequence. 3. Choose your movie or image sequence (just the first frame, all others will automatically follow) for the BACKGROUND layer 4. Import Thom 5. Create a choreography of just Thom, and animate him. 6. Delete the ground 7. Render to an image sequence (tga) with alpha=ON. This creates a sequence of images with black around the subject (the black will be transparent). 8. Right click Images > Import > Animation or Image Sequence. 9. Choose the first frame of Thom's animation. 10. Create a choreography of just your moving text animation 11. Repeat 6 to 9 for this render. 12. Create a new choreography. 13. Delete ground and all lighting. 14. Drag the Words image into the choreography. Choose Rotoscope not Layer for each of these. 15. Drag the Thom image into the choreography. 16. Drag the background image into the choreography. 17. In your timeline you will see this: 18. Click and drag each clip back so they start at 0:00. 19. Render as final, to new file with alpha=off (note check that all your movies / renders have the same final render size - I stuffed up the first time) Try to use image sequences rather than movs or avis, because A:M sometimes does not know the compression codec. Another way of doing layers is here: http://www.mossor.org/Desktop/Tutorials/Layers/layers.html (To be able to read it you may have select all the text by pressing ctrl+A - it is a bad colour choice for my monitor) pdf of NLA here: http://www.hash.com/forums/index.php?showtopic=29222 Final composited Movie: (It's a mess, but it does illustrate! Apologies for lousy background movie clip.) And I just noticed that your name is Randy, not Robin - sorry! tuteNLA.mov
-
ABSOLUTELY! A very valid point. Thank you. I will update the 'final' documentation to include this. Hide before Mirror. I may have accidentally deleted that from the model at some point. The IK controller should not have any cps attached to it, and the right is just the same as the left, but in a different position, so you could copy the left one manually. This would be before doing the final TSM Rigger, as the IK controllers are need for controlling the other bones. Those IK controllers should not be hidden. There shouldn't be any knee bones - what you are seeing may be unhidden fan bones. There is a pose called 1 right knee control, which if you set it to 100%, another bone is unhidden, so you can control where the knee points.
-
Hi Robin - it looks like you may have alpha turned on in the render. This will make any camera rotoscope black (or transparent, depending on the format). If you are compositing with live action, alpha is wonderful, because you can compose a character, render with alpha=on, and then layer him on top of anything, and the surrounds will be transparent. Try turning alpha OFF and see what you get. Edit: actually what you have seems to be different from that alpha problem. I don't recognise what you have done. Perhaps you could utilise the alpha=on feature and render out in separate layers, one for background, one for text, one for people, and then composite the rendered layers together in a final chor.
-
Jake, that model GalaDM-RigStage008l.mdl was an example to Steffen, for a plugin he had written to correct CP weight errors - I did not intend for that one to be an example. Are you at Stage 10? Try downloading the model from Stage 10 http://www.hash.com/forums/index.php?s=&am...st&p=278081 If you have recently downloaded Steffen's MirrorBone plugin, there is a right click (with no CPs selected) in Modelling mode, and choose Plugins > Wizards > Check CP Weights. This will correct any weighting errors that are in the model. If you do not see that option, download the new MirrorBone plugin from http://www.sgross.com/plugins/. This (quoted from that Stage 10 post) is not necessary, as this is now done by Check CP Weights. After the Check CP Weights, proceed with step 2, after the step 1 above, and then the Mirror Bones plugin as described. The Mirror Bones will mirror all CP weighting, so you don't have to assign CPs to the left half manually. Then run Flipper, then run Rigger. Mirror Bones should be done BEFORE Flipper. (Flipper does not do anything obvious, but is necessary as part of the TSM setup.) Hope that helps - this is very frustrating the first couple of times, but once you have done it that couple of times, the sequence of doing things does not change, and becomes easier