HomeSlice
-
Posts
4,676 -
Joined
-
Last visited
Content Type
Profiles
Forums
Events
Everything posted by HomeSlice
-
Very nice images! What parts are not usable for you? Have you submitted descriptions and steps to repeat the problem(s) to A:M Reports?
-
Ouch. Never seen that before.
-
That's looking pretty good so far
-
much better
-
Great video Robert.
-

Render Refresher Course for returning Hasher
HomeSlice replied to UNGLAUBLICHUSA's topic in Work In Progress / Sweatbox
In my experience, displacement maps seem to render much slower than geometry - if the geometry has the same level of detail as the displacement. But other people don't seem to have the same experience as me, so not sure why my experience is so different .... Also, normal maps tend to look better than bump maps, but there is more work involved in making them. One tool that you might want to look at is called nDo. It is a free Photoshop tool that greatly eases the creation of normal maps, wither from scratch or from existing images. http://www.philipk.net/ndo.html -
Look for the link for "Example Face (11/11/09)" In the first post of this topic: http://www.hash.com/forums/index.php?showtopic=34474
-
does look like a tinkering gnome's head
HomeSlice replied to johnl3d's topic in Tinkering Gnome's Workshop
It's Mr. Wizard! If you want it to look more like a gnome, you might shorten the legs and arms quite a bit, make the feet a little larger and give him more of a belly. But he's looking pretty nice the way he is. -
I prefer the feathery wings. Bat wings on a cupid is a little creepy.
-
That's a great background Will. I think it's a great idea to save yourself as much work as possible in the 3D stage. If you have a kick a$$ story, you could even give it the South Park treatment and people would still applaud it. But your artistic talent is definitely an asset.
-
holy crap it's my birthday. I knew it was coming up sometime soon, but it just kinda snuck up on me. Thank you for all your kind wishes. Thanks Matt, but why would I want to keep the nurse at bay? ... unless it's a dude ...
-
As long as I can remember, I always selected the default model bone when i wanted to see if I had any unassigned CPs, because CPs assigned to the Default Bone (black CPs) always flash when you select the Default Bone.
-
But that is the problem I am facing. I CANNOT find and black flashing CPs in my model. That is good. It means all your CPs are assigned to bones that you created. The default bone does not go away. It is always there ... lurking ... waiting ...
-
Look through every pose folder under the model in the folder. Find any channels that exist for the Model Bone and delete them. We had some similar problems with models in Scarecrow of Oz with models rigged in earlier versions of A:M. It turns out there were a few poses in which the model bone was hidden. When we removed those channels, everything worked properly again.
-
Try moving the camera. Does that help?
-
Hey you're branching out! The music kind of reminds me of what Chicago would have sounded like if they had been a metal band. It almost sounds like they are playing "25 or 6 to 4".
-
V14 Updated PS3 Rifle (or just Rifle)
HomeSlice replied to Muff's topic in Work In Progress / Sweatbox
That's what I thought at first. But then I realized the image at the bottom is the rotoscope -
Lovely piece. So cheery and optimistic I would have loved to have heard it read with your "I'm feeling sick and miserable" voice.
-
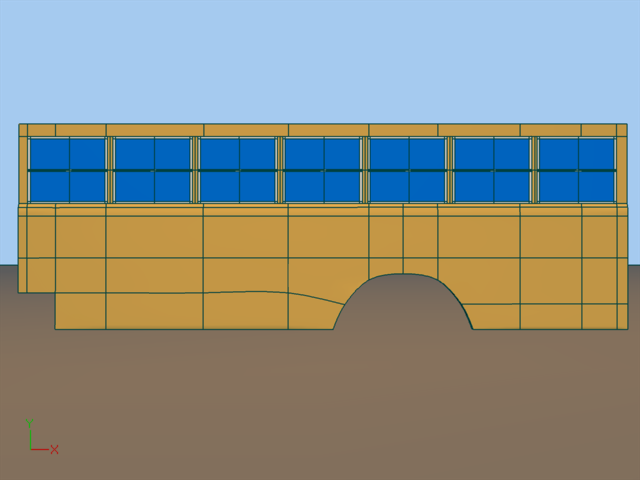
Instead of stitching all your windows into the body of the buss, make a large open rectangle where all the windows go. Then create your window assemblies and just place them into the open rectangle without attaching them to the rest of the body. The roof of the bus probably doesn't have to be attached to the body. It probably has a small rain gutter that runs along the sides. Use that to hide the fact that it is a separate piece of geometry. bus.zip

-
I agree with Robert. I am not exactly a professional animator. I don't work in the industry. I've never worked on a big budget ultra-high quality production. But I do have some animation experience. I've animated on five feature length animated movies so far - TWO and SO were the better ones IMO . Two of the movies used "on screen" face controls and three of them used either pose sliders or attributes which acted kind of like primitive pose sliders (In a different program). I have never animated with a widget like that in the picture Ken posted. In my experience, properly set up on-screen controls allowed me to animate much faster. It is more efficient for me to grab a control on a character's face and move it directly, than to hunt through a list of pose sliders or attributes looking for the control I need. This is especially true if there are many controls. The speed is magnified when I want to blend face controls. With on-screen controls, it is simply a matter of posing the face how I want it. With pose sliders and/or attributes, I have to keep sliding the various sliders back and forth (or punching in numbers) until I get the expression I want. This becomes very tiring after a few thousand frames.
-
Yes .... but why would anyone want to? I think perhaps the reason people build such clunky and inefficient interfaces in other programs is that they don' t have any other choice. Face rigs like LiteFace may not provide as much expression out of the box as that rig, but that's only because I wanted to keep it simple and fast. The more I look at other programs, the more convinced I am that A:M has a vastly superior constraint and animation system ... for those who know how to use it ...
-
The embedded movie doesn't play for me either. WinXP. Tried with Chrome, Firefox and IE. The youtube video on the A:M Films site plays fine though.
-
I've never experienced a problem like that in the latest version. But that doesn't necessarily mean that it is impossible....