HomeSlice
-
Posts
4,676 -
Joined
-
Last visited
Content Type
Profiles
Forums
Events
Everything posted by HomeSlice
-
Those are perfect for a childrens' book
-
It took me awhile to get the connection between the gingermen getting their heads bitten off and Santa eating the cookies ... but I may just be slow
-
Awwwww that's cute Gerry. Nice work!
-
That's funny Nancy. Nine cans, huh? Is Rita, perchance, one of your alter-egos?
-

trying some radiosity fake lighting
HomeSlice replied to thefreshestever's topic in Work In Progress / Sweatbox
The reflective window might be a good place to use Yves Reflective Render Shader (HDRI Mapping). http://www.hash.com/forums/index.php?showt...hl=HDRI+Mapping Be sure to download Dusan's project file for generating a spherical map of your set. It is pretty cool. http://www.hash.com/forums/index.php?s=&am...st&p=295544 -
The spherical constraint is confusing and hard to understand. I don't know of anyone who uses them anymore. In almost all cases, you can use a Euler Constraint instead. Euler Constraints are much easier to wrap your head around. As mtpeak2 said, make a new Action or Pose (I would recommend an ON/OFF Pose for constraints). Assign your constraints in the Pose. Make sure you do not have any bone movement,rotation or scale channels in the pose. Then, in the Model's |User Properties| (not the pose slider window), turn the Pose ON. This will set the pose's default state to ON so you do not have to turn it ON every time you want to animate with it in a new chor or action.
-
Dolly experiment, landscape layers
HomeSlice replied to zandoriastudios's topic in Work In Progress / Sweatbox
That looks really nice. Is that a shaded/wireframe render? If it is, the rock's mesh looks very dense. Do you have some special plans for the rock? Why did you make it so dense? How did you get such nice alpha channels for the trees? Or did you render hair-tree models in AM with an alpha channel? -
I!
-
Just follow agep's instructions. Set the Action to "Repeat" however many times necessary for the length of your chor.
-
My goal for the Face Weighting tutorial was for it to be a helpful guide for weighting with any kind of rig. As you discovered, all those extra steps aren't really necessary with the LiteFace. But if you use another rig, there are Zillions of bones, and finding the one you want in the CP Weights Bone Combo Box is not easy. In fact, it can be downright frustrating. So I figured it would be useful to more people if I described a workflow that would make weighting with a much more complex rig less suicide inducing. However, if you have discovered some way to streamline the process, please outline them and I will see abut incorporating them in an update to the tutorial.
-
Wow Nancy, you have been studying the example model. Dang girl, for someone who tries to make everyone think you have a feeble mind, you are quite erudite! The reason I didn't include specific CP weight info in the Face Weighting tutorial is that they vary *wildly* from mesh to mesh. Even when I re-weight the same mesh, they seem to change. CP weighting is about as inexact as you can get, from my experience. So I thought it would be more helpful to focus more on the process, and on the *how*, than on trying to come up with weights that would work for all (or even a few) face meshes. However, since you are so graciously offering the Photoshop file for the lip weights in the example model, I will add it to the tutorial if you send me the file. Either post it here or email it to me.
-
OK Nancy, I uploaded an example face to the first post on the "LiteFace" thread. The file is named "Example_Face_2009_11_11.zip" http://www.hash.com/forums/index.php?s=&am...st&p=292566 I didn't do any smartskinning, so the eyelids sometimes intersect the eyeballs. I also uploaded a small update to the rig, but you should not need it.
-
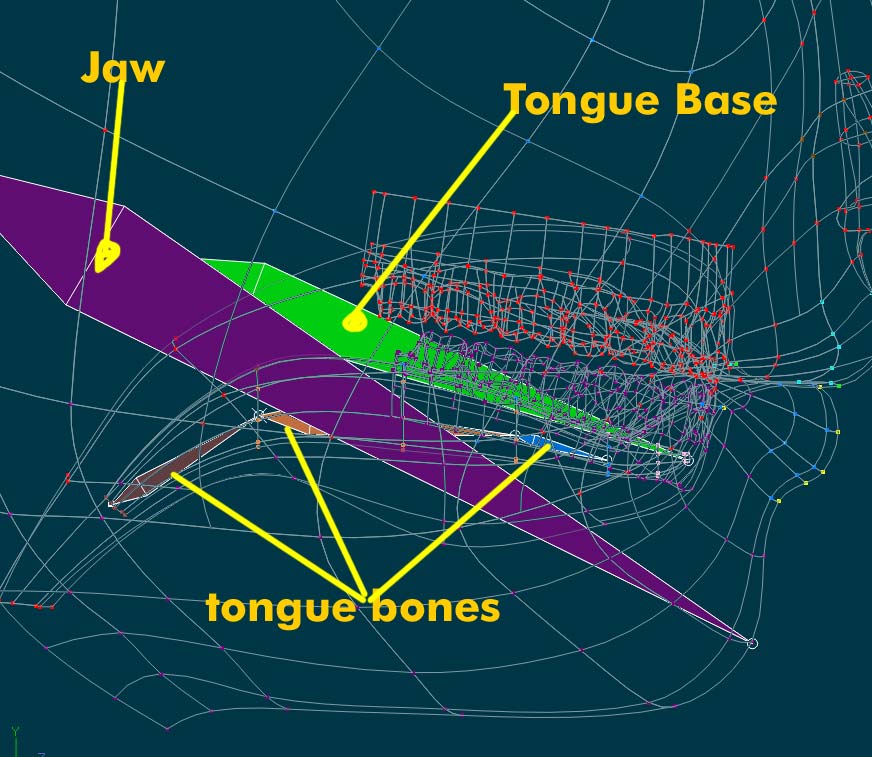
For the tongue, try moving the *Start* of the Tongue Base bone up and back a little bit. That should help it move more in alignment with the jaw.

-
Try making the Camera and the Face Cam Rotate Master Visible at 1% in "Face Controls ( 1-Mirrored / 2-Split )". Make sure they are hidden at 0%. Also try hitting the [space] bar. I'll post a revised LiteFace rig after I've check it out a little more.
-
If you are having trouble with your lower lip distorting when your jaw is open: Face Rigging Relationships > Face Constraint Relationships > Lips Left Lower: Turn "Scale To Reach" OFF in the "Aim At" constraint. Face Rigging Relationships > Face Constraint Relationships > Lips Right Lower: Turn "Scale To Reach" OFF in the "Aim At" constraint. This is good advice for life in general ...
-
I've been looking into the issue with the Master nulls not showing up when you change the Face Controls slider to 1%. It seems to be some kind of culling issue in A:M. If you look at your model from the Front view, then rotate slightly using the "T" key, do the Master nulls show up? I don't know how to fix that. They seem to appear and disappear at random times. I'm not even sure if I can put together a simple example of this phenomenon for A:M Reports.
-
I believe so. Make a new material. Right-click on the Attribute. Choose Change Type To > Plugin > kci:dnd > BitmapPlus.
-
Nice progress! It's looking good.
-
It is part of a light rig. There should be a similarly named Action in the Actions folder. Put the "c1-ico-f1 (8)-m" model in a chor. Drag the Action onto the model. To change the overall light intensity, change the intensity of the "c1-ico-f1 (8)" light in the folder.
-
That's great Gerry! But watching that little girl do the "bump and grind" is a little disturbing ...
-
OK, I just tried a quick experiment and it seemed to work. Save a copy of your model. Open your model in a new Action. In the Action: turn Face > Face Rigging > Face Constraints OFF. turn Face > Face Rigging > Position Control Nulls ON. Move the big Face Controls null farther out in front of the face. Export the Action as a model ( I didn't have to force keyframes or anything).
-
That would be easy to check out. Just make the Tongue Base (and children) a child of the Jaw bone and see if that works for you. It will still Aim At the Tongue Control null, but that null is a child of the Jaw Master so it shouldn't hurt anything. I designed it to work so all the Master nulls are visible at 1% and all the L/R (split) control nulls are visible at 2%. But Ultimately they can be however you want them. If you switch them, it shouldn't break the rig. Probably the easiest way is to : ( EDIT: SEE THE NEXT POST FOR THE EASIEST METHOD ) Save a copy of your model first In the Model window, switch to side view. Place markers at every "control" null. Control nulls have "control" in their names. In the PWS, select the Face Controls null and bring up the Translate Manipulator. Drag the Translate Manipulator farther out in front of the face. Drag each control null that moved back to its marker. You can also change the positions of the *start* of the geometry bones to better match the curvature of the face. But if you change the position of the *ends* of a bone, you either have to re-export the model (with constraints OFF and Place Control Nulls ON) or manually reposition the control null(s) associated with the bone until it is placed exactly at the tip of the bone. The only thing that happens when you export the Action is that the control nulls (the little ones, not the big Master nulls) get positioned at the tips of the appropriate geometry bones. The only two cardinal rules that I can think of at the moment are: Each small "control" null (a control null has "control" in its name) should be positioned exactly at the tip of a geometry bone. Do not move a Master null (a master null has "master" in its name) from one side of the face to the other. This seems to break the MultiD Relationships required for automatic mirroring of facial expressions. If you want to change the way the eyelids open/close or the way the tongue stretches/curls, you can edit the poses for them in Face > Face Rigging.
-
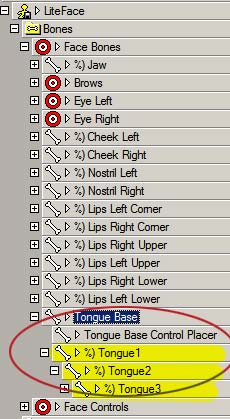
The tongue geometry bones - "%) Tongue 1", "%) Tongue 2", and "%) Tongue 3" - should be children of "Tongue Base". "Tongue Base" is a direct child of "Face Bones". The only thing Tongue Base does is Aim At the Tongue Control null, which is a child of Jaw Master. The Tongue Stretch Master and Tongue Curl Master drive percentage poses. You can find the poses in Face > Face Rigging. This is strange. I tried it with just the rig (no mesh attached) and at 1%, the Master Nulls appeared and at 2%, the split control nulls appeared. Do you see the nulls correctly when you view the model from Front View instead of looking through the camera? Any L/R controls should be Hidden=ON at 0, Hidden=ON at 24 and Hidden=OFF at 48. L/R controls are enabled when th slider is at 2% (split controls). Oh ... sure ... you're going to make me work. OK, I'll try to rig up a face mesh and post it before too long.
-
Hmmm, are we going to see some animation with all these guys? Looks like a great story!
-
Set your building on a ground plane. Make sure it is set it to "Cast Shadows". Set the ground plane to "Receive Shadows" and "Shadow Only" Make sure the Alpha Buffer is set to ON in the camera properties (the camera in the folder, not the camera shortcut in the chor - you can't set it in a camera shortcut) Render to TGA.