robcat2075
-
Posts
28,394 -
Joined
-
Last visited
-
Days Won
424
Content Type
Profiles
Forums
Events
Everything posted by robcat2075
-
Do you mean the text "tooltip" that shows when you hover over the icon? Tooltips can be turned off at Tools>Customize>Toolbars...

-
I have seen it. The PRJ is looking for some asset that is gone or has changed location but the directory window for you to locate it is hidden behind the main screen. A)Try clicking in the windows desktop B )Try opening in another version and ascertain what the problem asset is.
-
On the "stepping off" motion... you can convey a greater impression of weight by having the body continue downward for a bit after the foot hits the floor.
-

run version 12 on newer windows machine
robcat2075 replied to modernhorse's topic in Animation:Master
If you get stuck on something, the forum is here for that and if you get real stuck we have Live Answer Time every Saturday. -
run version 12 on newer windows machine
robcat2075 replied to modernhorse's topic in Animation:Master
A guide to new features introduced since v16 can be found here... -
run version 12 on newer windows machine
robcat2075 replied to modernhorse's topic in Animation:Master
The interface of the program has been consistent since v10.5 Nearly all the old training material will be relevant especially that regarding modeling. v19 will be the last that supports Mac so you definitely want a Windows PC going forward. Get something with at least four cores so you can make good use of NetRender. -
run version 12 on newer windows machine
robcat2075 replied to modernhorse's topic in Animation:Master
My only sure knowledge of the $299 version is that it doesn't expire. It is still locked to the computer you install it on and it doesn't include updates to future version. . I don't know what the DVD contains. I strongly recommend the $79 annual subscription. -
run version 12 on newer windows machine
robcat2075 replied to modernhorse's topic in Animation:Master
Initially, Windows 7 ran the old CD version of A:M fine. At some point updates removed the code that allowed the CD-as-copy-protection to work. Similar updates to VIsta or earlier may have done the same. I don't know. I don't know what the legalities are for Techs installing deprecated OSes. You can always ask. If one shops carefully one can usually buy a retail installation DVD for older Windows versions on ebay. -
run version 12 on newer windows machine
robcat2075 replied to modernhorse's topic in Animation:Master
If you can install Windows 7 or earlier on the PC and it has the CD drive, yes. Windows 7 will require a work-around... https://forums.hash.com/topic/47589-solved-need-technical-assistance-running-am-cdrom-versions/ I have heard of people using virtual machines in Windows 10 or later to run those earlier OSes and the software that needs them but I've never tried it. -
During Live Answer Time today I was showing the Sneaky Eugene animation and Andy (AKA @KingVidiot ) asked if it was possible for the bones to be less curvy. We found that using "Balance Connected" in the CP Weight editor will do something like that. Balanced Connected takes each set of contiguously-splined CPs and gives them all one average of their weights. The result is that each individual skeleton bone retains its rigid shape as Eugene follows his path. This is an overhead view of the result...
-
starting to getting back to animating
robcat2075 replied to johnl3d's topic in Tinkering Gnome's Workshop
Now shoot yourself some video and we can get you in the mo-cap contest! -
A Weight Transfer experiment. Rigged the lo-res version, used Transfer_AW to move that to the hi-res version...
-
- 3
-

-

-
Cap Your Mo! Join the Summer Mo-Cap Challenge
robcat2075 replied to robcat2075's topic in Animation:Master
I've added a note to the top post clarifying that... Entries due in by October 31 -
even in 2002 AM characters could dance
robcat2075 replied to johnl3d's topic in Tinkering Gnome's Workshop
Get down! -
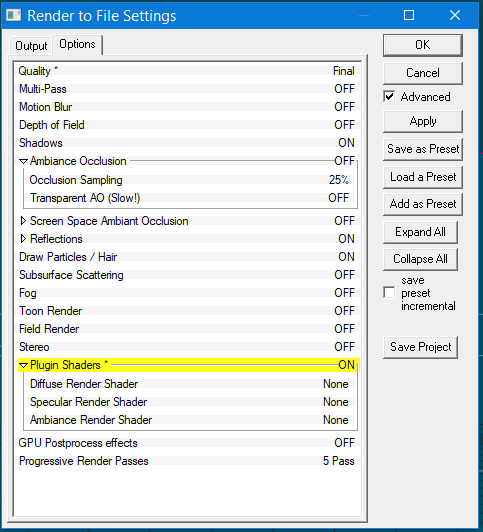
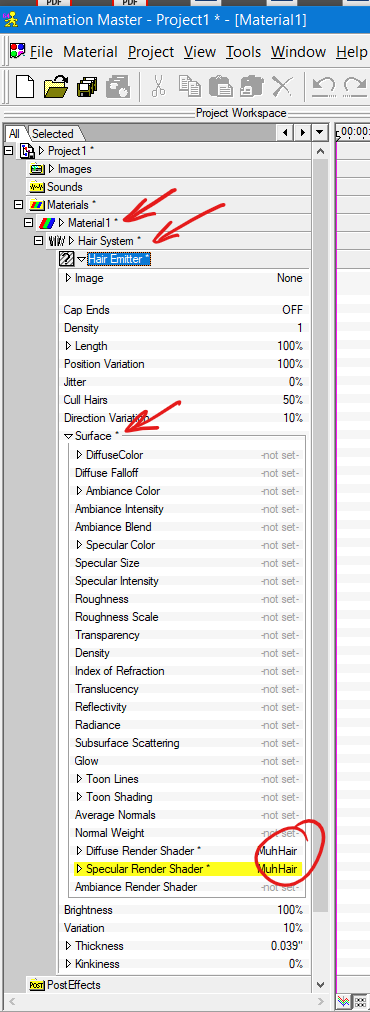
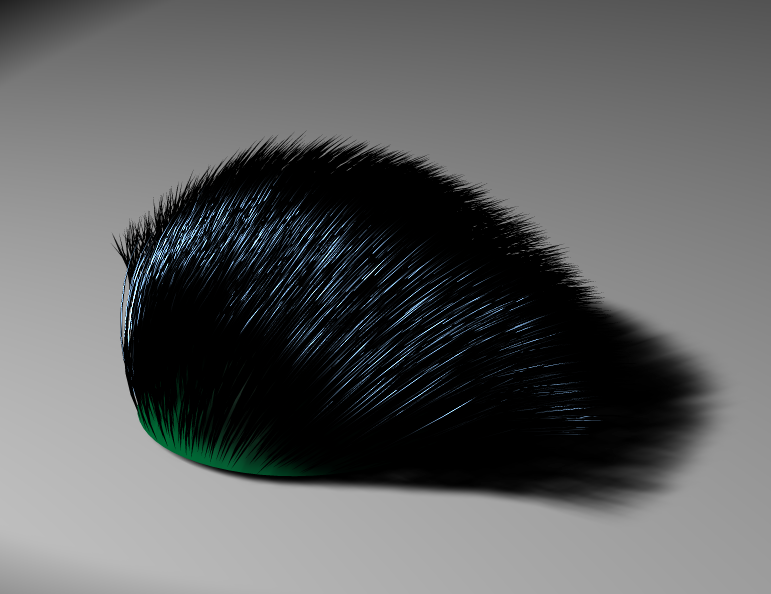
HAIR - No specular effects [solved-ish]
robcat2075 replied to Douglas Ferrin's topic in A:M Rendering
Doug, In the Render settings you just turn "Plug in Shaders" ON, you don't set any particular shader. The two hair shaders only appear as options in the Surface Properties of a Hair Emitter and must be set there.
-
HAIR - No specular effects [solved-ish]
robcat2075 replied to Douglas Ferrin's topic in A:M Rendering
I had never known what the Kajiya-Kay shader was for until I read that thread.
-
A conversation with another A:M-er reminded me of this incident... About 30 years ago I answered an ad in the Dallas paper from a company looking for someone to do computer graphics. It wasn't much of a company. It was just a kid in his apartment. I showed him my AMIGA graphics. He said he was making "shareware" games. "How do you make money if you're giving it away?" I asked. "The game is free but then they pay for more levels," he said. He said he'd call me but that was the last I ever heard from... John Carmack.
-
HAIR - No specular effects [solved-ish]
robcat2075 replied to Douglas Ferrin's topic in A:M Rendering
It has a lot of parameters that are tricky to set right. I used it on my Al Capone Head https://forums.hash.com/topic/40421-possible-human-head-tutorial-subject-al-capone/?do=findComment&comment=371829 -
HAIR - No specular effects [solved-ish]
robcat2075 replied to Douglas Ferrin's topic in A:M Rendering
It's mentioned in this post... It's something you choose in Surface>Specual Render Shader -
HAIR - No specular effects [solved-ish]
robcat2075 replied to Douglas Ferrin's topic in A:M Rendering
Here's a sample PRJ that shows specular on hair in v19.0p hairtestForSpec03.zip This is the standard specular. Better looking specular can be had with the mu hair specular shader but that is another topic.
-
HAIR - No specular effects [solved-ish]
robcat2075 replied to Douglas Ferrin's topic in A:M Rendering
Hi Doug, First make sure that the light that is in the position to cast a specular highlight has "Specularity" ON in its properties. Cool-looking head! -
That is very disorienting to see those jaggies
-
Cap Your Mo! Join the Summer Mo-Cap Challenge
robcat2075 replied to robcat2075's topic in Animation:Master
Multiple takes in one upload DeepMotion gives you three free 10-sec uploads per month, but each upload counts as 10 seconds even if it is shorter than 10 seconds. Since running in front of the camera only took about 2 seconds, I edited four different takes together into one clip. DeepMotion mostly got it right and I'll be able to extract the one or two that I want to use... Notice there is no T-pose in my video. I'll re-use the constraints I made from one of my other clips. -
Cap Your Mo! Join the Summer Mo-Cap Challenge
robcat2075 replied to robcat2075's topic in Animation:Master
Whoops... -
That was spam. I should have zapped it earlier.