robcat2075
-
Posts
28,280 -
Joined
-
Last visited
-
Days Won
407
Content Type
Profiles
Forums
Events
Everything posted by robcat2075
-

The Mystery of the Four-Sided Non-Patch
robcat2075 replied to robcat2075's topic in Animation:Master
Thank you for your investigation, Rodney! -
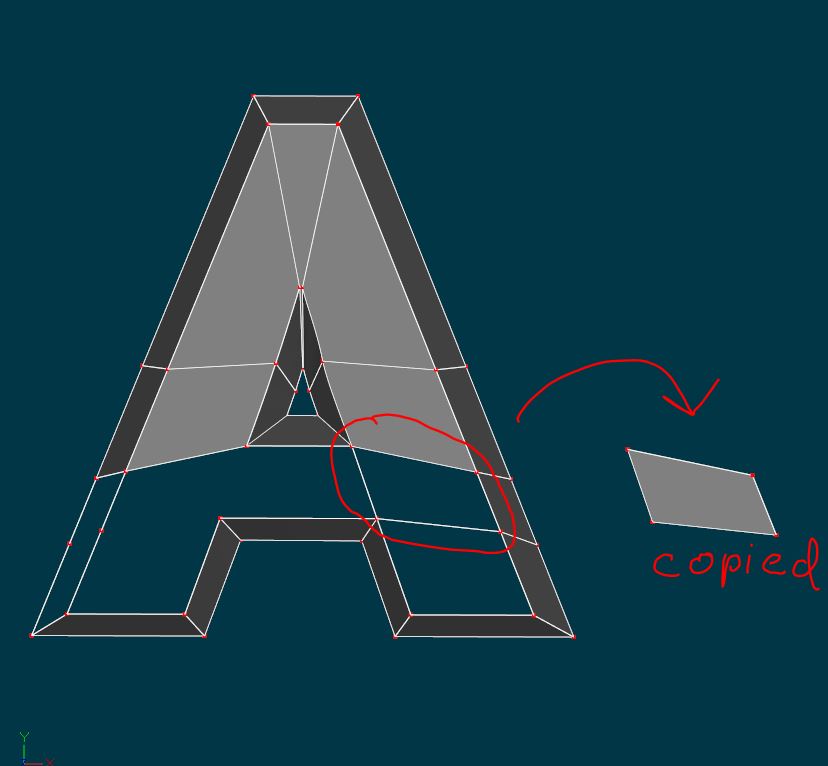
I was resplining an "A" that didn't come out of the FontWizard quite right and have created what should be a legal four-sided patch... four CPs, connected by splines and not all on the same spline... and yet it doesn't fill in. If I copy just those four CPs and paste them to the right they do fill in but not if they are part of the whole mesh. Anyone know what is wrong? (This is not a Hide Backfaces problem) Fixin A.mdl

-
Those look real good, Matt. I thought, "That's too good to be A:M's toon shader" but I'm glad to be wrong!
-
I'm disappointed there's nothing to buy!
-
My first guess is that you're missing the JPG iio file in the import filters folder. I look forward to the next Largent production!
-
Thanks, Kevin!
-
Update animation of my new assistant's drawing
robcat2075 replied to johnl3d's topic in Tinkering Gnome's Workshop
it's pastel-adelic! -
Another warning to update your Flash Player today... Flash: Adobe issues emergency update after ransomware attacks
-
Lucky granddaughter!
-
And I'll remind you to update your avatar.
-
trying to transfert my licences on wine under linux
robcat2075 replied to stefff285's topic in New Users
Use the email address. -
trying to transfert my licences on wine under linux
robcat2075 replied to stefff285's topic in New Users
Sacré bleu! Again with the WINE. -
After a quick test... yes, you can incorporate bias adjustments, including direction and magnitude, in a SmartSkin keyframe.
-
Quicktime, good. The node-based thing is a real turn-off, though.
-
Does it do QuickTime?
-
During Live Answer Time today, >Renumber CPs came up. We found it does change some CP numbers, but for what purpose? Who asked for it and can you explain its intention some?
-
The pad would be where the fingerprint is. Put your hand flat on your desk and you'll see that the pad is facing more down than it is facing sideways.
-
syncing wav file with audio playback in action window
robcat2075 replied to crittifer's topic in Open Forum
What is the sampling rate Hz of the original audio file? Welcome to A:M, crittifer! -
It seems insignificant until we start trying to pose hands to do normal hand stuff and we can't figure out why they never look right.
-
I would do it even more. However, another critical element is the angle of the pad of the thumb. Take a look at your hand and notice that the pad of the thumb will face more down than sideways in that position.
-
My suggestion on the thumb would be to model it angled down from the plane of the palm rather than level with it. An on-the-plane thumb is hard to make opposable for typical thumb purposes and It will be easier to weight the mesh for all the positions the thumb will need to move through.
-
I think the most significant change since around v15 is for tool Options. For example, if you hold down CTRL while you press the Lathe Button, A:M will open the Options Tab where you can set the number of Lathe sections. All tools that have options work that way. Previously I think it was the ALT Shift key for that function.
-
Just to be sure, did you make a bug report for this issue? I can't find it in the Mantis? By the way, any qualified guess on a release date for vers. 19? It is officially issue #6683 which probably will not be visible unless you are one of the excessively-privileged v19 alpha testers, like me. It is "assigned", meaning that Steffen recognizes it and has committed to fixing it. I don't know when v19 will go into public beta, no ETA has been announced, but in the mean-time you can be working on your v19 Mascot Contest entry.
-
Rodney's mention of the Font Wizard brings to mind something I've wanted. The AI wizard is like the Font wizard... it imports a vector outline and can extrude it and put faces on each end. However, it can only import the proprietary .ai format and there are no good low-cost programs that can create and export an .ai file. How about adding an open-source vector format like SVG to the file formats that the AI wizard can accept?
-
He's looking fierce! A bit greenish. Is he a zombie pirate?