-
Posts
7,863 -
Joined
-
Last visited
-
Days Won
15
Content Type
Profiles
Forums
Events
Everything posted by NancyGormezano
-
You don't do anything with the hair files - that is where the dynamic data is saved for the hair. You can now play in real-time with hair on, and you should see how it will render, behave. If you change any of your animation for the model, you would have to "bake hair" again of course. If you don't - it would stay in the same place as before. As for collision detection of hair, John Bigboote, I believe found that many cp's for hair (7?) has better CD and I also believe he has "invisible deflectors" on his models around the shoulders. I personally don't use the CD system for hair, so I can't say anything about it. But his tests look pretty good - I will try to hunt up link. Cloth is another option. I haven't tried that either for hair.
-
I don't know what version you are using, but in previous versions there was a problem, just as you describe. However in later versions, one can right click in chor and "simulate springs - or something like that " (with hair off) first, and the dynamic bones will get "baked". Ie channels will appear. Then turn hair back on and render. Also sometimes dynamic bone movement will look different in real time then after it gets simulated/baked. thanks nancy.... unfortunately this doesn´t do the trick... now it´s just the other way round: dynamic constraints render properly, but the hair just stays completely in place. i´m using v15j on a mac... same problem with v16beta... After simulating springs, you can also "bake hair" - separate file(s) are then created for the hair system(s) dynamics. The file names will show in the chor... this would work in 15e (PC) ... I am not sure about later versions, nor the Mac. Not sure how it is determined where the hair file(s) are created. I believe they show in the same directory as the project file. Unfortunately that means you have to make a project. Which I don't, I only like to work with chors, because I don't like how saving a project will save everything that has changed. I prefer to save things individually. I wish there was a way to set the destination for the hair file. (probably could change it in a text editor)
-
I don't know what version you are using, but in previous versions there was a problem, just as you describe. However in later versions, one can right click in chor and "simulate springs - or something like that " (with hair off) first, and the dynamic bones will get "baked". Ie channels will appear. Then turn hair back on and render. Also sometimes dynamic bone movement will look different in real time then after it gets simulated/baked.
-
Thanks!
-
Wonderful! Happy Holidays to you too!
-
The sss looks terrific with the fakeao! Care to post your settings? I never had much luck with sss. Is it related to the size of model as well as lighting? Can you have decals with sss? I seem to remember the sss group(s) must have certain surface characteristics, as well as be the last ? first? group. Not belong to other groups? It was a long time ago that I played with it.
-
I only use "animation" compression with rendering to QT with A:M. I believe that is NO compression. I will then recompress using QT pro for posting to forum in order to play with quality versus file size issues. I use h264 usually with QT pro. And yeah, my guess is that one has to render a still first to access the depth buffer, and then from then on, can render to QT. Have not verified. I have found that it is not a good idea to do a Render (Q) to the screen when using FakeAO, nor to experiment with turning the post effect on/off/on in the render settings. It is then that the weird fakeao results show up, and will not go away, even when doing a "render to file". I find I have to delete the post effect, and delete any orphan channels created, and re-add it, in order to have it correct once again.
-
Oooo-weee Jimd - that's great! umm...er...if...you are inclined... and...don't run out of energy...and could stand it...er...um...I would love to hear what you would do with my entry...I'm loving your sound work. It's very terrific. (I have the final version on youtube, A:M films with addition of some effects - but the length, timing is the same) No problem, if you prefer not to give it a whirl.
-
Weird. Because I was able to render to QT with beta 5 (PC 32bit). Surprised me that I could because it was reported that you should only render to tga, png, exr to use depth buffer. Perhaps it was a fluke? Character looks good. Doing Shakespere, are we?
-
I love the camera work, choice of cuts, actions. Love the music - Congrats once again.
-
I found that setting AI=100%, AO=0% and having 1 Klieg (% intensity tweaked to taste) with diffuse=ON, spec=ON, NO shadows works well with FastFakeAO. You will have to tweak settings for FastAO according to your models, chor camera focal length here is with no reflections (not sure what Fakeao camera focal length was - probably 70) here is with reflections, but FakeAo focal length changed to 250 (probably too much)
-
Wow! I agree, absolutely super-terrific! (makes me wish I hadn't added any sound to mine...)
-

putting an object (model) into another object (model)
NancyGormezano replied to bubba's topic in New Users
Another way: If you have both models loaded separately, in the PWS, you can just drag one model onto the other. -
1) To make a spline EASILY pickable on a model: name the spline as a group in your landscape model, hide all the rest of the model. Do your path constraint and hold down the shift key when you pick the spline. 2) to switch which car model is constrained to the path without losing the constraint: rename "shortcut to model" in the chor to CAR, then drill down in the properties and change the model reference to the new car model there. path.prj
-
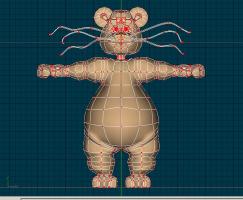
Thanks peeps! Turns out I could use only 3 bones/side for dynamic constraints on the whiskas. My problem before was that I had weighted the roots of the whiskas 100% to the lip corner bone, instead of making it 80% weighted to the nostril bone, and 20% to the lip corner. That made the roots behave better. After futzing with that, I went on to try out dynamic hair. For the hair, I tested both constraint type and spring type hair. I think the constraint type will win with some tweaking. For those who were curious as to the difference between the types - the first example is Spring type, with 20% drag, gravity = OFF. 2nd example is Constraint type hair with 10% stiff, 1% drag, gravity = OFF. In both examples, the whiskas also have dynamic constraint ON - but I think they look a little too stiff, so will probably tweak settings. I am also noticing that FakeAO renders with QT files! yay! (I had thought it was only with png, tga, exr). SpringHair20Drag.mov ConstraintHair10Stiff1Drag.mov
-
Thanks everyone - I very much appreciate your comments! @Bruce McWedgeeMan: I can't believe me. I am amazed that I completely forgot about there being a lion in "Wizard of Oz"... How weird is that? And even weirder, I was thinking of maybe texturing a quilted raggy patch heart on his chest...It's now become very obvious to me that my brain cells have been Hypno-Ozzifried for all eternity. Maybe I'll give him a quilted raggy patched brain instead ?....ooops...uh... Ah Yes. I was going to make each side have a dynamic constraint, along with a control bone (so that the group of 3 can also rotate from the base as a unit, independent of the face snozzle). But in my never-ending and never-clever pursuit of laziness and false economy of rigging-spline-time, I was thinking of only having 1 chain/side for the dynamic bones for the 3 whiskas. I will most likely have to add 3 chains per side. YES, once again, days have been spent, trying to get out of adding extra bones that would have taken me 1/2 hour (if even that) to add.
-

twinkle or something like that
NancyGormezano replied to johnl3d's topic in Tinkering Gnome's Workshop
Tinkie Twinking! (now say that fast 3 times) Nice! -
Character was inspired by a cat we met over thanksgiving. Poor domestic long hair kitty had been given a lion cut by his owner. Was pretty funny. I also wanted a new character to build, learn from...was getting tired of stealing from others. Have to finish rigging, weighting, texturing, yada yada. Not happy with my IK legs. Will be looking at 2008 rig legs and try to incorporate something similar. Not finished with face rig. The mouth whiskers are giving me fits rigging wise. Can't quite figure out how to weight, bone so that when upper nozzle moves, the attached ends of the whiskers move appropriately. Have to add an easy to use tail rig. Have been working in 16beta5 exclusively, and it is performing marvelously. I love FakeAO.
-

gradient mixer controlling material settings
NancyGormezano replied to johnl3d's topic in Tinkering Gnome's Workshop
love it! -
Très bon, bien sur! Je pense que épeler est "to spell" en Anglais. I haven't spoken French in 30-100 years? Took it in high school, college. I too am amazed at how much I do remember. And most amazingly, how much "google translate" remembers for me.
-
Mais oui, mon cher, mais je ne sais pas comment on épele "aiguë"
-
Oooo...neat idea - it's Moiré pattern (yay! I got the acute accent to show!)
-
YUP - looks great!
-

New Childrens Video Finally Completed
NancyGormezano replied to detbear's topic in Work In Progress / Sweatbox
Oooo...looks terrific! Congrats! And yes, the trailer is excellent, makes me want to see the rest.


