NancyGormezano
-
Posts
7,863 -
Joined
-
Last visited
-
Days Won
15
Content Type
Profiles
Forums
Events
Everything posted by NancyGormezano
-
I have it in 32bit EDIT: what shader were you using - I don't get a problem when I turn on plugin shaders
-
I noticed that if I try to expand the IMAGES folder (did not edit your project), it crashes. Yes, something weird about the composite.
-
It causes my A:M to crash 16rc1. I do not have the timelog nor autosav plugins in my hash folder either (I deleted them)
-

clothdisc hits a immovable object
NancyGormezano replied to johnl3d's topic in Tinkering Gnome's Workshop
Yummy. What is making the cloth blob deform before it touches the black spot/thing? It's like an invisible sheild. Is there an invisible deflector or is there a setting for some sort of tolerance? I have noticed when I have tried cloth, that sometimes it appears to float above the deflector (eg the ground). -
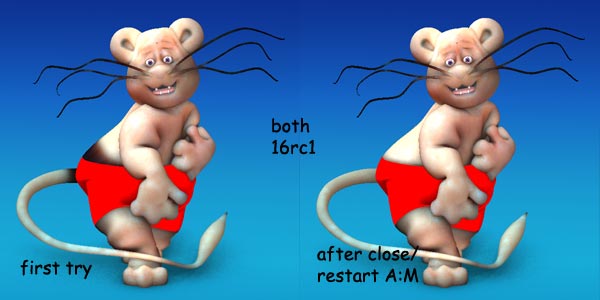
I just tried (I just put some red pants on my nude lion) - and got funny results in 16rc1/32 pc. But after I closed A:M and restarted - I got results same as 16beta5, and what I would expect. Try closing and restart 16rc1 I have been noticing similar funny inconsistent renders with hair & groups with bitmap plus material on the hair groups - these problems might be related, or maybe not.

-
Sounds like a:m report time, with the simplest case you can provide. I haven't tried SSS in 16rc1, but will try to run a quick test later.
-
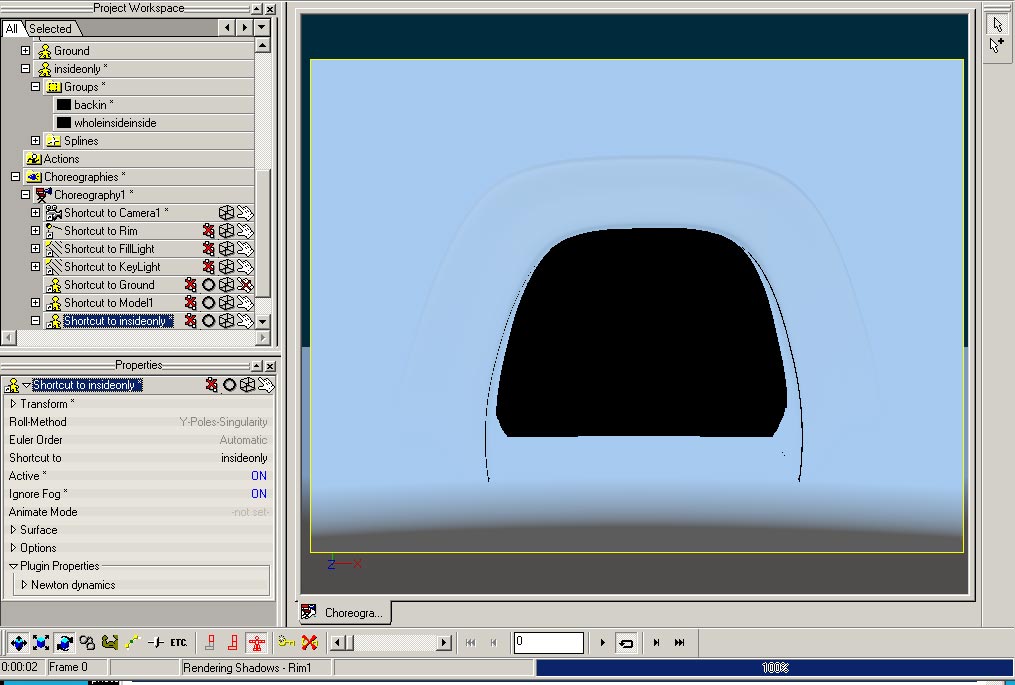
Are the normals correct on the patches that render black? Did this render in any previous version correctly? What is the hierarchy of groups? - What color should the clothes be?
-
We have another winner! Tillykke med fødselsdagen, Tony!
-
That looks terrific to me. Excellent copy, reads very well.
-
Just reposted an old experiment that I did here. It was buried in some other post, which I couldn't find. There are many ways to skin a knee - yuk, yuk.
-
Not a preference really... each method is best for certain needs. CP weighting... for joints that don't bend much or clouds of CPs that are weighted all differently Fan bones... for groups of CPs that all move together like the middle ring of an elbow. SmartSkin... any motion not easily obtained by the above two. I weight the middle ring usually 50-50 between the 2 bones that meet there (eg forearm & bicep, thigh & calf) - works beautifully. I find produces better results than a fan bone. The 2 rings on either side of the middle ring I weight 25 -75 depending on which side, depending on how much influence I want. I'm not seeing a need for fan bones at joints anymore. CP weighting seems much more flexible. Maybe a fan bone works better when the pivot needs to be different (having a hard time coming up with an example) Also not seeing much need for smartskins (for controlling geometry movement). Seems awkward. The best use I see for smartskins (now) seems to be for fancy control type user-interfaces, eg with FACE nulls controlling pose sliders, etc. Then it's VERY, very handy. I'm thinking that CP weighting (a later feature development) can now be used in most cases to solve most geometry rigging issues.
-
Works great. TSM Geometry bones are plain old bones like all others. As I would have expected. So I am wondering why the need (or preference?) to use fan bones or smartskins? As a final tweak?
-
I am curious...Did/does CP weighting not work well with the TSM geometry bones? I am wondering if fan bones, smart skinning is being used as a last resort?
-
Yes! looks terrific!
-
Wow - You're probably the only legit New Year Baby ! Happy, Happy REAL Birthday to you (and Happy happy whatever to the 26 fake? birthday forum members celebrating today!)
-
looks great to me!
-
another way to do fog for the inside: have a separate interior model for the tunnel - with surface color = black (or whatever color), and set property in chor for shortcut to interior model to "ignore fog"
-
I just tried a test - with no decal - with transparency =50%, rendered 2 pass, the depth buffer is wrong/funny. It is a combo of MP and transparency. I do not think the decal has anything to do with it.
-
I can not duplicate getting this result on PC, ver16rc1 32. I have tried with a simple sphere, decaled, with transparency, rendering to png, with alpha buffers both on or off. The depth buffer is always the same, and correct. CORRECTION: I do get a funny depth buffer when I render multipass with alpha buffer on (haven't tried with no alpha) - I do NOT get a funny depth buffer when I render Final/NO multipass 1st image is with no MP, 2nd is with 2 pass EDIT: ps I like Holmes idea! tres bon!
-
I can not duplicate getting this result on PC, ver16rc1 32. I have tried with a simple sphere, decaled, with transparency, rendering to png, with alpha buffers both on or off. The depth buffer is always the same, and correct.
-
I see. Monsieur is going to blow up the house. Tres bien!
-
Usually each scene has to be analyzed to figure out the best method for cutting down on rendering time, and in preparation for compositing later. If your camera doesn't move, then you can render the background once, and in A:M use that Image as a rotoscope projected onto the ground plane. Or you can use it in Aftereffects for compositing. You can render the characters separately (without background) by turning alpha buffer ON. Only those models that are active (including ground plane if active) will be in the alpha buffer and you can composite later. And most likely you will also have to render a shadow pass for the characters as well, if you plan on compositing in AE. I forget the method to do a shadow buffer pass, but it's there. I forget if you set something in the model(s) casting the shadow, or the model(s) that are receiving the shadows
-
Shaggy becomes a little Shaggier
NancyGormezano replied to mouseman's topic in Work In Progress / Sweatbox
The dynamics of hair has definitely improved since ver 14. If I remember, the hair in ver 14 was quite annoyingly jittery (especially if rendered with multi-pass), and there was interference between dynamic constraints and hair. It wouldn't work right if you had both types on your model. That has been fixed, by the addition of being able to bake both dynamic constraints as well as hair. Much easier to work with in real-time because of that, jitter is gone too! I believe there were some changes related to how hair gets colored by procedural type materials, but I don't know since I usually use a decal to color the hair. Much more control, and faster. I am using a 32 bit system, ver 16. XP Pro sp3. -
No
-
Shaggy becomes a little Shaggier
NancyGormezano replied to mouseman's topic in Work In Progress / Sweatbox
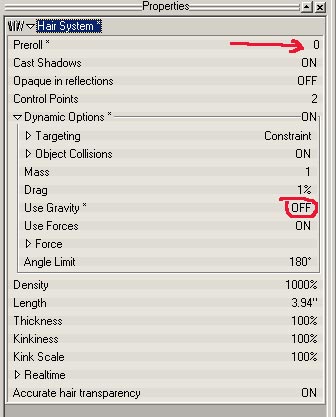
The other thing I would suggest is to set "use gravity = OFF" - then your grooming would be retained. Unless you are wanting it to flop? In which case, why groom? If you turn off gravity, set preroll to 0. You had it at 60. The movie is with your grooming, gravity off, preroll=0, 1 pass, no shadows. ShaggyHair_camh264.mov