NancyGormezano
-
Posts
7,863 -
Joined
-
Last visited
-
Days Won
15
Content Type
Profiles
Forums
Events
Everything posted by NancyGormezano
-
Mark, David - my preferences for what a rig does, and how to install it are just that...my preferences. In no way was I critiquing what either of you did. You both did extraordinarily terrific jobs, without which I would not have been able to steal your ideas, as well as from Holmes and countless others. You two in particular have both been incredibly supportive to anyone who has tried to install either of your rigs. I prefer to understand what I'm doing, and to pick & choose the functionality. I prefer to be able to understand it enough so that I can fix the problems myself, rather than needing to run to someone else. People come and go. Rigs, software gets abandonned. I loved animating with Squetch ver1 on TWO - it did everything I needed. But there was no way I could tweak it for anything other than adding a branch of bones for something independent of basic rig. There was no way I could have dragged a completed rig to a new model, and moved bones around to fit some new geometry. It seemed to have less extraneous bones showing up in timeline than vers 2 (SO). The extraneous bones that show up are usually related to when switching modes of how something operates. Even tho it's necessary for the rig to work, it does make animating less fluid and spontaneous when one has to look at a long list and think.... It interrupts the flow. It's a preference of mine to have minimal bones with channels showing up in the timeline. If any rig did everything I ever needed and it never had any hitches in installation, and it had a minimal amount of controls that show up in the timeline for animating, and ... then I must have died and gone to heaven. Obviously that's almost impossible...I don't care how perfect either of you are. Even my rig has stooopid bones that show up. I was only commenting on how easy or hard it was to analyze a rig, from a user point of view, as well as animate with it. The less bones the better. Sometimes less is more. Especially for new user. User interface is all important. And the most difficult to develop. I have no experience with rigging in any other program, and I highly doubt that it would be easier to modify and understand rigging in those programs as well. It is imperative for anyone who is not intimately familiar with the development process for any rig developed by someone else, to get a top down "management summary view" first , then they can progress to understanding the details. This is not easy to do in A:M with any rig that one hasn't developed, or is a beginner. It is especially difficult to analyze any rig in A:M when one has to scroll thru endless bones opening and closing branches, with bones that have incredibly long names, that appear too similar to other bone names. Or have funny conventions (like TSM). It is especially difficult to keep in ones brain all the properties, relationships, etc that influence the bones when one doesn't understand the methodology or constraint concepts used in a particular rig. They're all different. It's like reading code without any comments, documentation, and without being able to easily see it in recognizable chunks. The 2001 rig was the easiest to understand -as presented in the TAOAM. No installation rig, obviously lacking in some functionality, easiest of all rigs to modify, tailor, tweak, and retweak. I was able to analyze the 2008 rig and break it down into it's component parts, and save those out as separate models (eg legs, arms, spine along with their constraints), that I can import easily into any model. Same with literig. I found that I had to actually print out the complete bone hierarchy and it made it easier for me to see how things were structured in order to break it apart with respective pose/relationships, to make it more of a modular installation choice. The 2008 instructions were extremely CLEAR, accurate, well done. All 75 pages. Yikes. To a user, seeing 75 pages (again I had to print it out first), that list of instructions is daunting and gives the new user the willies. Obviously one just plows thru, and it turns out to be no big deal. I have found problems with exporting from an action after texturing and adding, grooming hair. It didn't always work. Decals get messed, hair looses grooming. I shy away from that now with tweaking already textured, hairified models. I have also found working with mirroring bones, weights sometimes wonky. My models aren't on purpose always symetrical. At some point it becomes easier for me to do by hand than to rely on "black box"
-
Yes (along with orientation, roll, or aim like TSM) and as well, to repeat myself: The function I am looking for is useful also when one is tweaking, modifying the geometry, moving, changing geometry bones and the control bones, relationships already exist, and you want to move the control bones to align again to the appropriate geometry bones - to realign, and get precise, rather that eyeballing or entering long strings of numbers. I typically just import rigs from one character to the other, and then just start realigning the geometry bones, control bones. No Install process necessary. Just a tweaking hell. Or will start with fully rigged character, modify geometry into entirely new character (so I don't have to do major weighting of cps), and then do the tweak dance. And then do the compensate dance. Would be nice to have some auto compensate (zero the offsets ?) method as well. Obviously we've all been struggling along for 10-20 years without these functions.
-
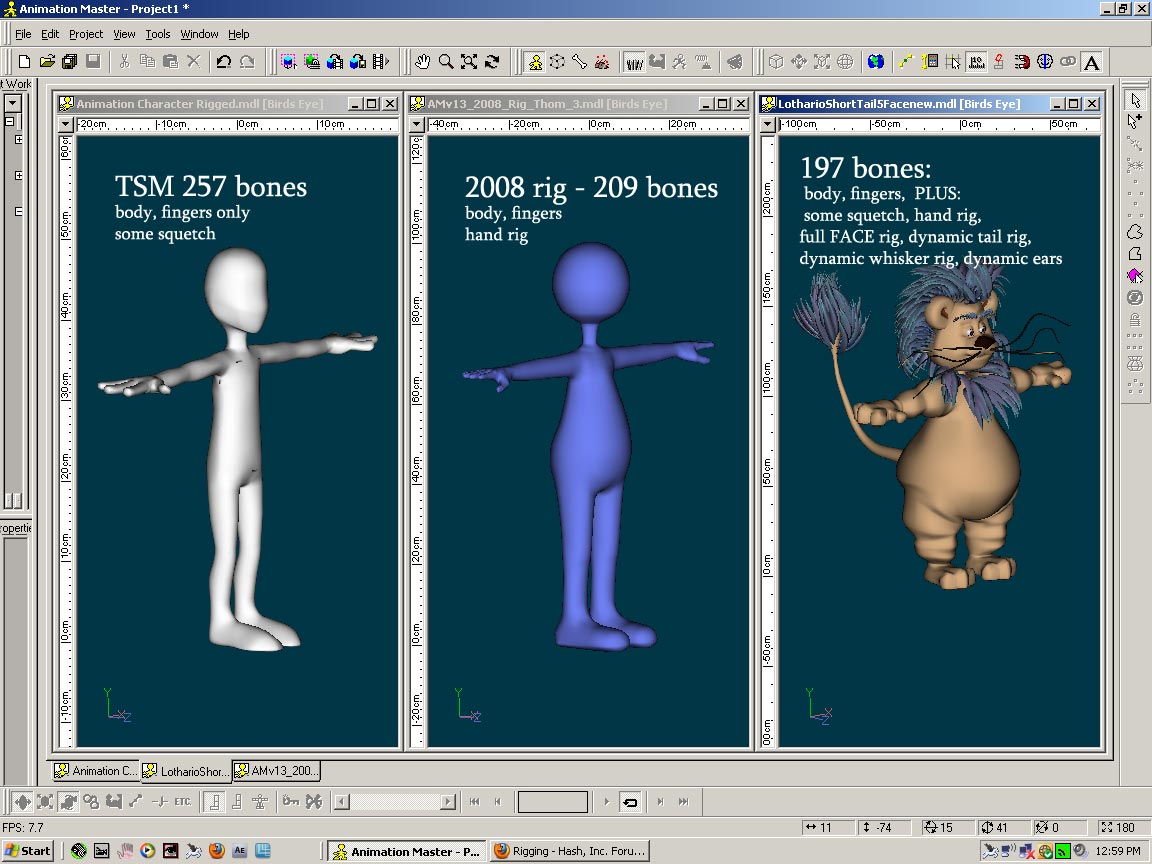
Yes it is - when you have your own rig or understand your rig then it is easy to modify. The problem with TSM is that it's hard to understand. You understand it because that's what you use, have written scripts for, have installed it, modified it many times. I found it overly complicated when I tried to analyze it. There are simpler ways to do what it does with less bones. I found it much easier to analyze and understand the 2008 rig, and the literig. They all do what one needs mostly. It's that some do it with WAY more bones than necessary, or have the bones organized in a way that make it hard to figure out for the user who is not intimately familiar with the how, why of the particular rig. It's a mess. See comparison image. I did not include Squetch Rig - with almost 1000 bones! but also with the most functionality, but most of it never to be used, and the workings only understood by 2-3 people? And way toooo many bones show up in the timeline when animating - way too confusing for me. For my comparison - Lothario (hybrid of literig, with 2008 legs) uses 197 bones and has way more functionality (body, hand rig, face rig, dynamic whiskers, dynamic tail, dynamic ears, some squetch) than the 2008 rig at 209 bones (body, hand rig only) or the TSM basic character with the most at 257 bones (body with squetch). I could even trim more bones out of Lothario (ones that aren't necessary). These extraneous bones only exist because I used part of the generalized install method for Literig and liteface. The reason I would trim the number of bones down is because it simplifies animation, and sometimes these extraneous bones get keyed for no reason and complicate the workspace and confooose my widdle brain when animating. You can duplicate any bone in place by CTRL-dragging it in the PWS onto its parent. You will have to delete the new bone's children that also got copied if you don't want them. Yes I know that - I have used that obviously when initially creating control structures. The function I am looking for is most useful when one is tweaking, modifying the geometry, moving, changing geometry bones and the control bones, relationships already exist, and you want to move the control bones to align again to the appropriate geometry bones - to realign, and get precise, rather that eyeballing or entering long strings of numbers.

-
Didn't know you were looking for input only from beginners, with a standard character. Or maybe just from Gerry? It's not a matter of being stopped dead in one's tracks. The trouble comes for most (especially me, and I believe Holmes also expressed the same dilemma at one point) when they want to modify it. Then they have to understand the resultant overly complicated rig. I don't blame A:M for this. BUT I sure would like to see some real time rigging function (not via constraint, or pose, more like a "snap to") in A:M that performs similar function as the TSM script commands that allows one to create, change a bone or null to have same position (start, end points), and oriention, roll like an already existing bone, null (maybe even cps?) without having to manually do it, or input values. This could help in accurately getting control bones, nulls lined up with geometry bones, and maybe even cps.
-
I love, love, love the simplicity of installation for tsm, and love, love, love the concept of the modularity of adding parts However - what I do NOT like is: 1) TSM is not officially supported in A:M. Can it be used in most recent versions? (ie ver 16 64 bit?). Have to have old version to do install, and use for modifying rig, and saving model. Eventually that will not work any more, as will lose features in model when going back to old version of A:M. Do not want to become dependant on something that will become obsolete, and is not supported. Does it work for MACs (ver 16)? I'm assuming it still works in ver 16-32 bit version? (haven't tried). Will perhaps eventually break when constraint mechanisms change in future versions of A:M. Do not like how it is flaky with relationships - ie error strings (was designed when things were just called poses) Would like to see documentation of script language syntax, without having to hack, guess at. I had been sucessful once before at writing own trial scripts, but last time I tried (maybe ver 16?) couldn't figure out or debug why didn't work. I gave up. 2) Standard TSM rig installs a gawd awful # of bones. My major complaint of all generalized INSTALL methods (lite rig, 2008, Squetch all are guilty, some more so than others). Too many bones in there just to make installatiion process work. Too complicated to tweak once rig installed. Does not use Nulls for control. Do not like other controls it uses. 3) Gawd help you if you install a face rig (of own design) or some other part or modify it to use nulls and then need/want to remodel certain parts, and have to reinstall rig portion, because it's too complicated to modify, debug, understand after being installed.
-
I haven't tried - but I will bet that you don't need to re-install, ie you can keep using your current version. After purchasing new subscription and receiving activation key in your invoice as stated on hash store: 1) rename your current expired master0.lic file to eg master0.bak in the directory in which your current favorite version resides, or else move it out of the directory to somewhere safe 2) start favorite A:M version of your choice, fill in activation code as directed. New master0.lic file should show up in the directory Let us know if that works...heh heh...
-
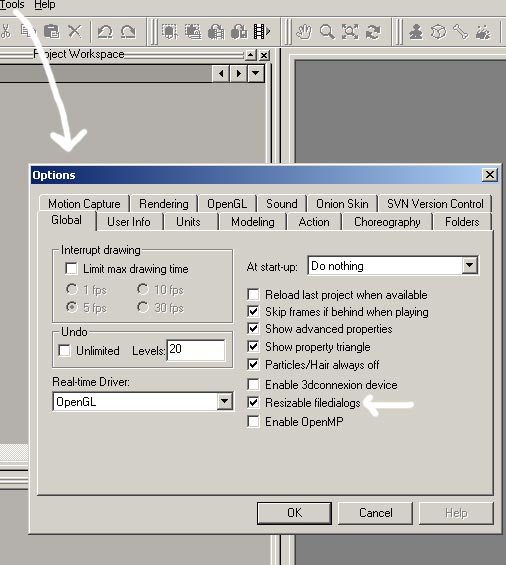
Go to "Tools > Options" and activate at the gLobal-Tab "Resizeable filedialogs" and click ok. Now you should be able to resize the file dialog to be big enough to reveal the filename-field. I dont know why some have problems with the window being too small... most of us dont have to do that. That sounds like you are trying to Open a project rather than save it? But if not: And you are trying to save it and having trouble, do as Fuchur says, and you may also need to restart A:M after you do that (not sure). If that doesn't work - then please show a screen capture of message when you try to save your project or model (do not have to only save projects)
-
that folder indicates version 15.0, in the about hash window it shows version 15.0b. I only have the CD, the serial number is on the CD sleeve. also in the about window it indicates "not activated" Doesn't need to be activated. If you have already been using A:M to model, then you can save your work. There is no separate activation for CD. Don't worry about it. Additionally, I believe you are entitled to download & use latest version of 15 = 15j+ located in post found here
-

My 11 Second Club entry
NancyGormezano replied to John Bigboote's topic in Work In Progress / Sweatbox
You can vote on each one as you are viewing, however your votes aren't counted until you vote/view them all. You do not have to view/vote all at once. You can pick up where you left off. They keep track. -
My 11 Second Club entry
NancyGormezano replied to John Bigboote's topic in Work In Progress / Sweatbox
Admittedly a lot of the comments should be taken with grain of salt. Some comments are more worthy of being considered. Very importantly, IMO, is how well one can critique one's own work. For my own stuff, I can usually see what's wrong, but I am usually too lazy to fix, or usually get bored with the piece. For those with professional PIXAR type aspirations, one has to be soooper picky, persistent. The goal is to be able to make the piece do exactly what someone else has in mind, to have complete control in being able to make those puppets behave! (and not just live with happy accidents). Others are aiming for TV work, which is not so critical, and others, have even less critical aspirations. Obviously different critique criteria for different venues. Most importantly, a lot of these entrants are spending big, big bucks on animation schools and will be/or are currently in competition for relatively low numbers of animation jobs. Part of their animation training is fine-tooning their critical eye. I find the "professional" e-critiques of the winners on 11-sec site to be informative. -
Yes - but takes more than 1 key stroke. Assuming you have imported your model: 1) create also new blank model 2) shift click on the desired parent bone in "your model" - the one that you want to delete the bones 3) drag & drop to blank model parent bone plus it's children are gone from "your model" and are now in "blank model". Delete "blank model".
-
In A:M, I have found that in most rigs that claim to NOT have S&S (eg 2001 rig), one can usually animate the scale of the appropriate geometry bone(s) manually (and maintain volume by not scaling equally all dimensions) to do a pseudo S&S. I have also found that the generalized INSTALL solutions, tend to introduce a level of complexity and way toooo many bones, that obscure and complicate the simplicity of rigging in A:M. They are good if the resultant rig does all that you need, but "May the gawds have mercy on your filet o' sole" if you need to debug, tweak, or add any special functionality that the rig doesn't address. Holmes has some nice basic rigging video tuts specifically designed to address simplicity and basic concepts. Yes, rigging is mind-boggling-disruptive and harmful to brain cells. Seems like I'm always starting from scratch (in terms of recall) if I haven't done it in awhile.
-
Slight real time transparency anomaly in.
NancyGormezano replied to robcat2075's topic in Work In Progress / Sweatbox
Ah yes, so it does! Good clue! -
Yayyy!!! Happy Birthday! May you have a sensible, dignified & safe ...oh wait...uh...never mind...that message was for "last year's" Jason...
-
Slight real time transparency anomaly in.
NancyGormezano replied to robcat2075's topic in Work In Progress / Sweatbox
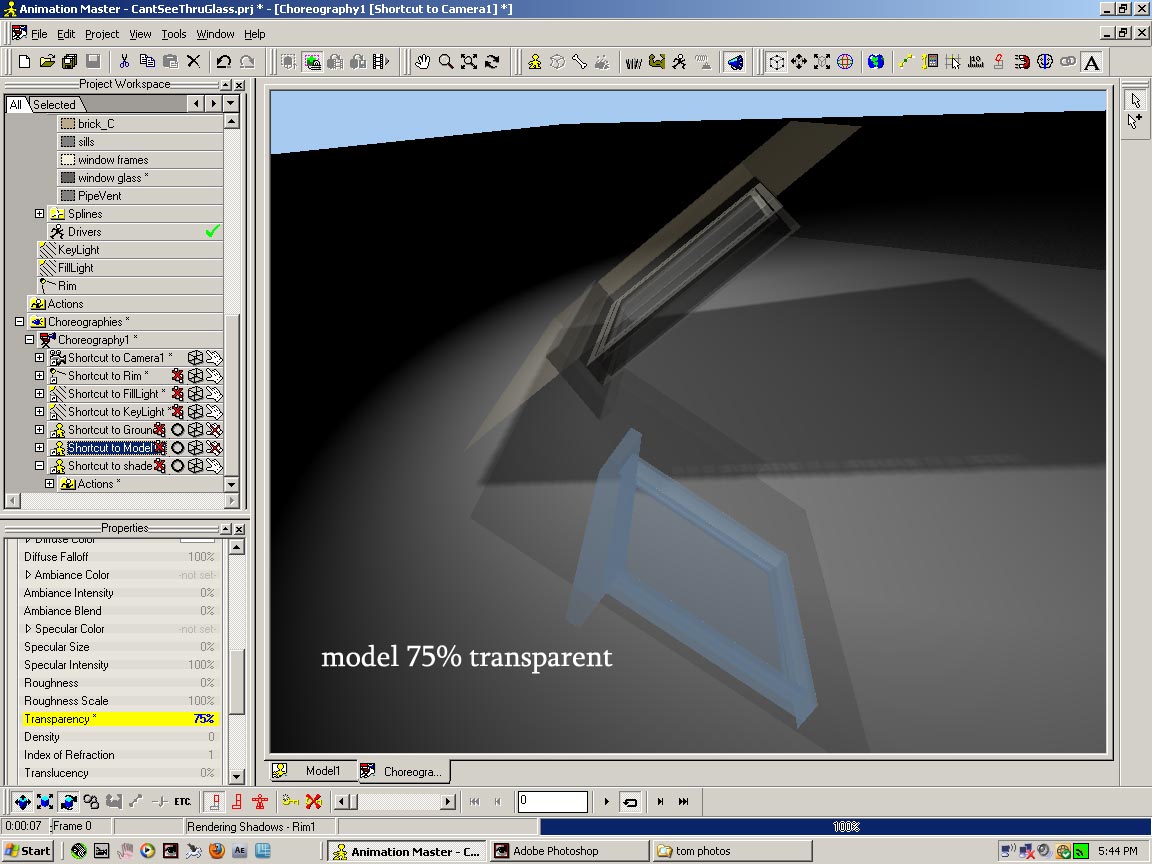
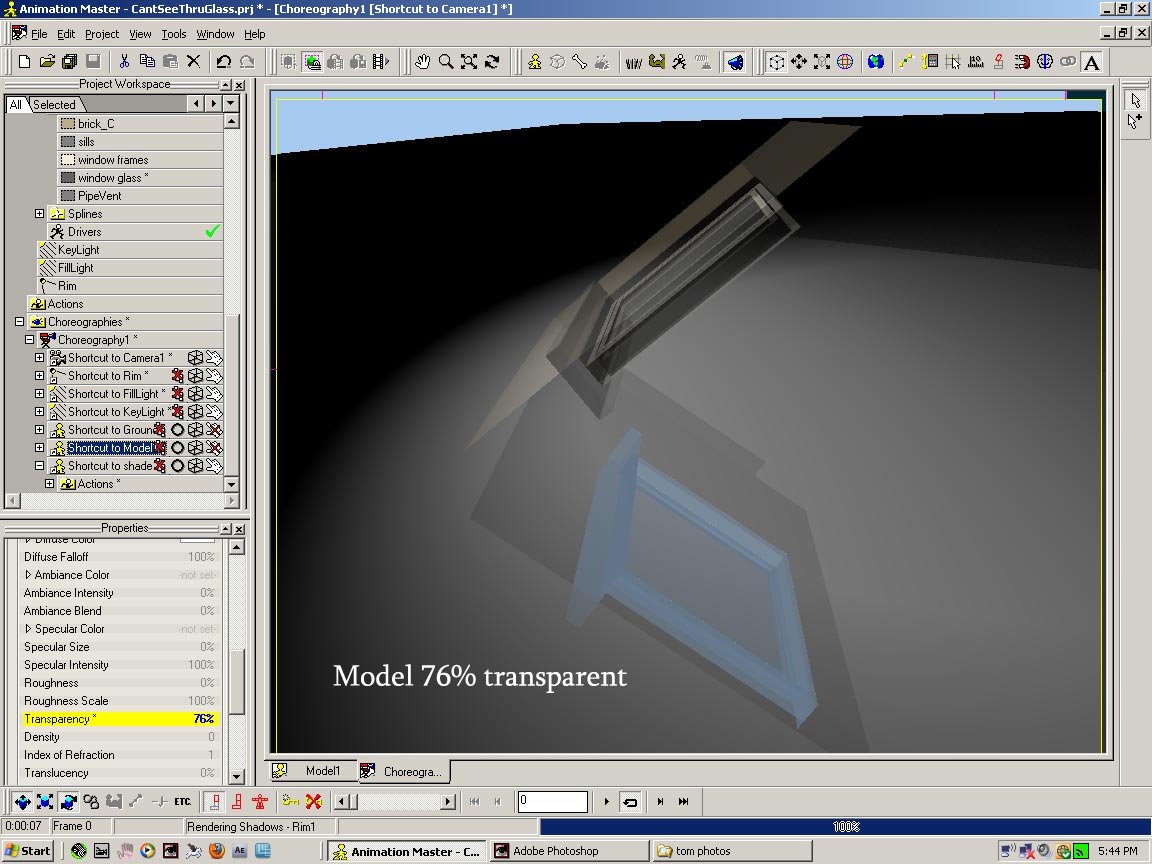
Here's example of popping (I changed a bunch of properties in your models - but in these 2 images the only thing different is that the model goes from 75% transparent to 76%. It's the RIM z-buffered shadows that pop. Other lights are turned off. Ground is 99% reflective in both cases (changed to gray, 100% diffuse falloff). BadShadowsReflectivity.prj
-
Slight real time transparency anomaly in.
NancyGormezano replied to robcat2075's topic in Work In Progress / Sweatbox
Can see shade in directors mode, but not in skeletal. However - if you change the transparency to 100% - you can see the shade in both modes. I also noticed that there was a problem with partially transparent objects casting shadows or reflections (can't remember which) when I was doing my Lothario & Ida dance animation. Image (reflection I think) would pop when it went from partial to 100%. I eventually just moved the camera so it wouldn't show the pop. nvidia gts 8600 -
And/or create a sun spline model, that also has a coincident light (sun type) Or perhaps you want to "paint in" an image of the sun in your background sky image and place your A:M sun light source to be coincident with it's placement. Assumedly you have the property reflection = some percent on the surface that you want to reflect the sun? And it will show up better if there is some specularity set on the surface, as well as in the light. A slight bump map on the surface will help specularity show as well. And yeah - turn on lens flare in the sun light for extra pizazz. But lens flare also takes into consideration the type of camera lens (the properties of the glass, shutter) that you are trying to simulate.
-
Warehouse through the years
NancyGormezano replied to R Reynolds's topic in Work In Progress / Sweatbox
Actually I believe the Turner Classics Movie Channel (here in the US) did an animated CG recreation, and used it as a advertisement/bumper for their channel. I always loved it, was done very well. They had the characters in the diner do some minimal movement. Classy classic. And then of course, there was the Simpsons recreation. Not so classy classic. EDIT: here's one of the Turner Classics Bumper on for Hoppers paintings in CG -
Have you tried yet to reduce rate of emission ? reflections? and then if that doesn't help, shadows? (even tho it's only the RIM light z buffered). I also forgot to say that I turned OFF the Fill light. There is still some raytracing going on. Probably the keylight (no shadows). I think the raytracing is the killer. To get 49 secs for 1 pass 640 x 480 I did the following (and turned off Fill light): I'm guessing collision checking probably has no impact on rendering (only on baking). I did notice as I was playing with the settings for the blobbies that there was alot of wonkiness. ie, sometimes the spline representation for the blobbies would disappear and wouldn't come back until the constellations were aligned properly. I found I couldn't set rate of emission lower than 100 and have anything show up in real-time. However that was last night. Have no idea what it would do today.
-
No. When you bake particles, 2 files are created, and the references to these files is written into the chor under groups for the model that has a particle system (see my screen shot). The files are stored in the same directory as the project. I don't know what is stored in them, as they are not text files (I don't think, but maybe I'm wrong) Keyframes only show up when you bake dynamic systems
-
I got it to bake - and to render at 49 secs for 1 pass. However - I set the index of refraction for the glass = 1 (refraction is usually a render hit), turned off shadows, reduced rate of emission to 150, turned off collision checking of particles, turned off reflections. I do not believe the baking will help the render time that much. I think it's the actual rendering of the blobbies that's the killer.
-
love it! You are soooooo GOOOD! I'm curious as to how you did the net? dynamic constraints? cloth? by hand?
-
non-smooth hair color gradients
NancyGormezano replied to robcat2075's topic in Work In Progress / Sweatbox
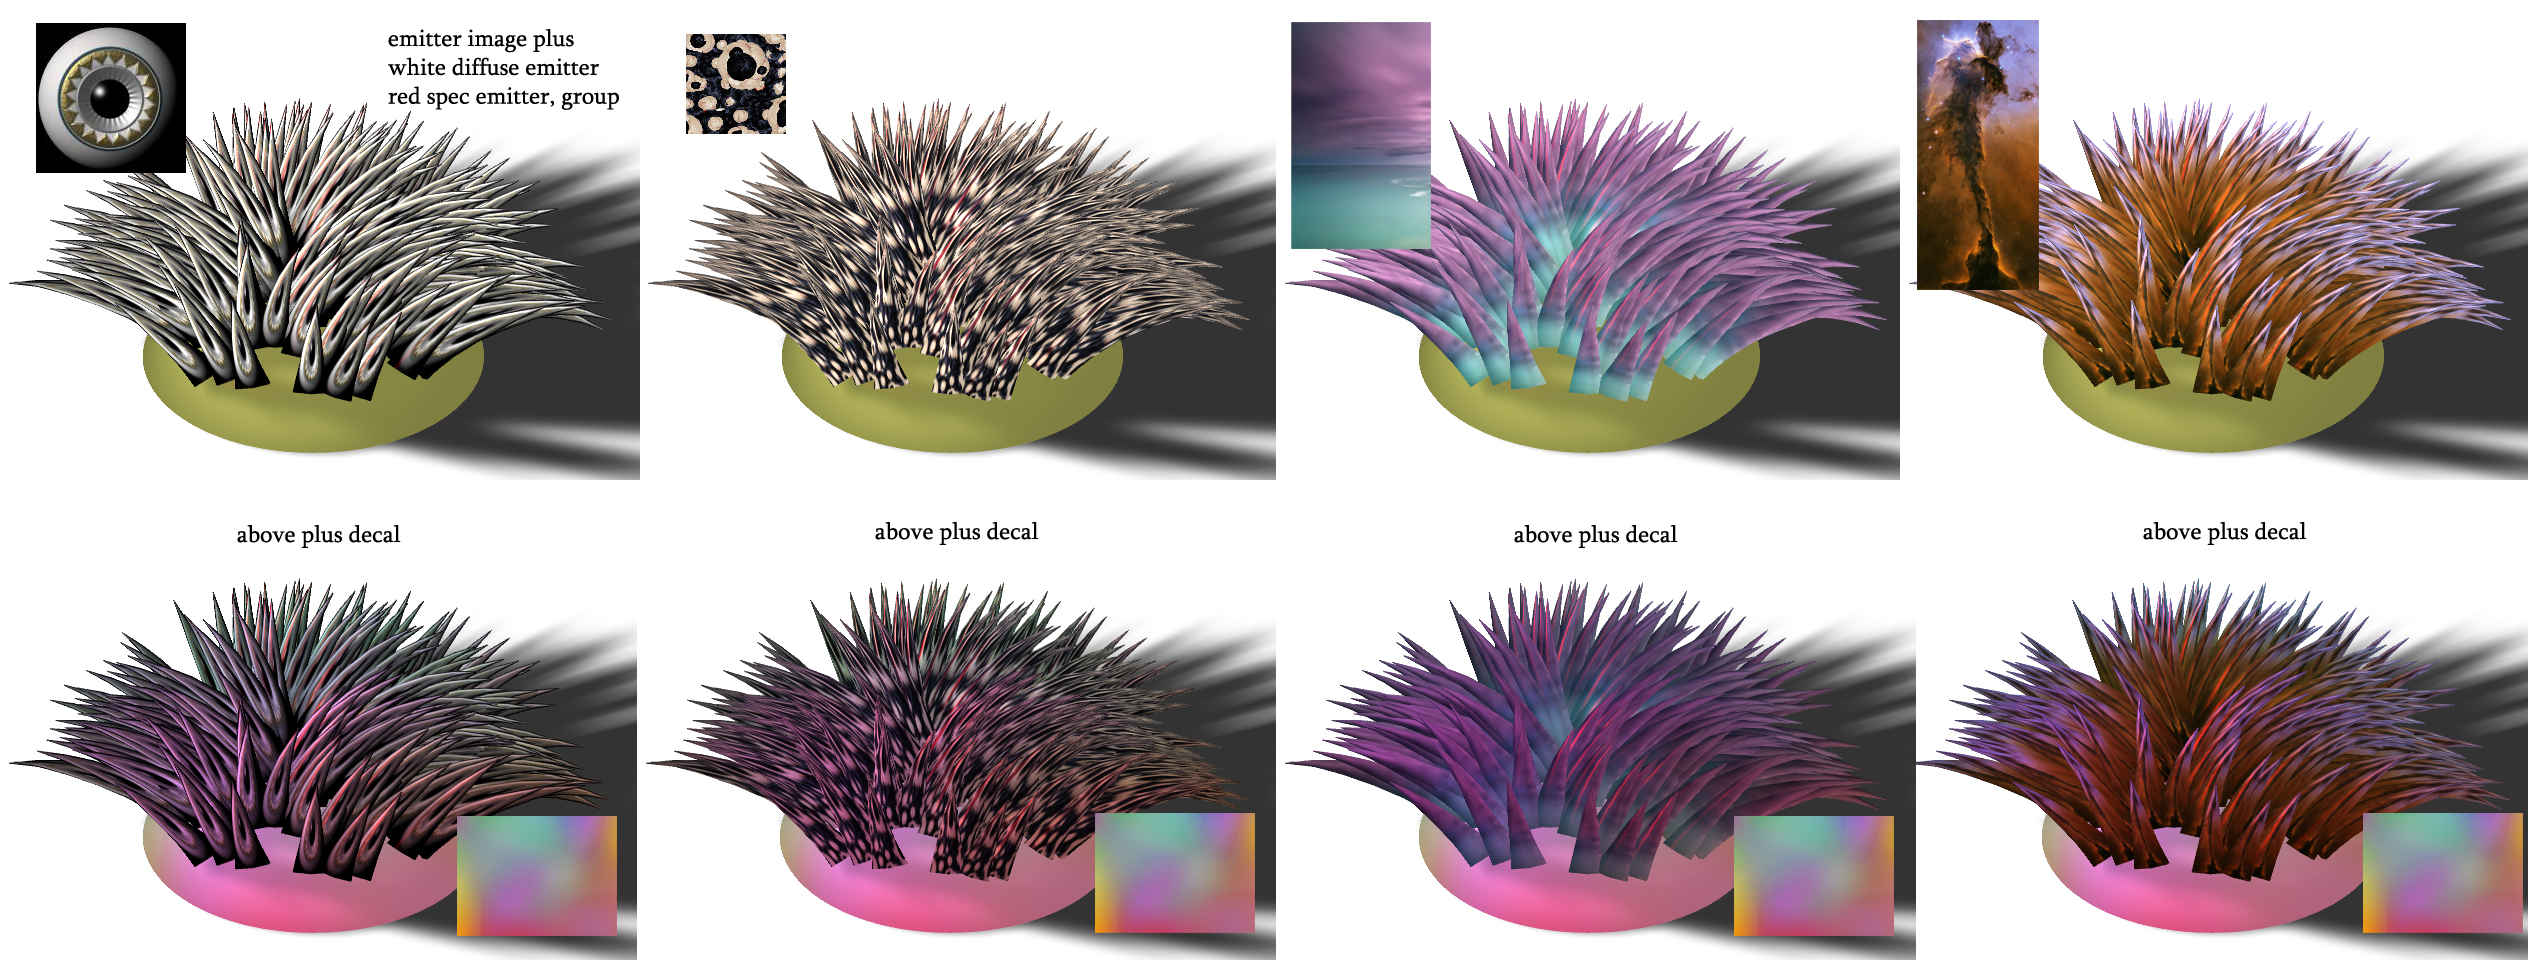
If you really want to do complicated patterns for bird feathers, or animal fur, it is easiest to use an image for the emitter, along with a decal driving the diffuse color of the emitter, for even more variation. There are no limitations in coloring, nor shapes. I wouldn't bother with the gradient. This was done in 16b. 16b has some funnies, that were not present in 15e. In 15, one could combine emitter surface properties plus the group surface properties plus decals correctly (I never used gradients). In 16 there is something screwy (inconsistent) when changing those properties - sometimes works, sometimes doesn't. Very frustrating. Especially when trying to change specular color. I cannot recreate some things that I did in 15 for hair, models in Scarecrow of Oz, using hair materials created in 15. Not sure if I would be able to if I redid the hair material in 16b - but I'm not about to do that. I would hate to see hair change again. I'm sure something new would get broken. I have documented my steps here
-
hoo hoo! hip hip Ray ray!
-
MUST BE? or Must NOT be larger? If "must be" - how much more "must be" larger?