-
Posts
7,863 -
Joined
-
Last visited
-
Days Won
15
Content Type
Profiles
Forums
Events
Everything posted by NancyGormezano
-
Excellent! Quite a collection you got going there.
-

playing with some constraints
NancyGormezano replied to johnl3d's topic in Tinkering Gnome's Workshop
I use QT pro 7.6.9, PC My steps in QT PRO after rendering from A:M (either an image sequence, uncompressed .mov or uncompressed avi): 1) Open image sequence (or .mov or .avi) in QT PRO 2) Optional resize (view/double size) 3) Export (compress - H264, put your other favorite compression settings here) to new file 4) Open the new Exported compressed file 5) Optional change playback speed: Window/Show A/V controls/Playback Speed 6) Optional To Loop: View/Loop (Ctrl L) 7) SAVE to new file (NOT export). Will save compressed, changed resolution, with looping and new playback speed. The order of steps is important. -

playing with some constraints
NancyGormezano replied to johnl3d's topic in Tinkering Gnome's Workshop
Neat John! Thanks! I had a hard time seeing it, so wanted to change some of settings, but then...I got to playing. I took your project, in A:M: increased the lag in translate constraint, added an orient like constraint with lag, added decal (to see body), rendered with motion blur 100%, rendered step 2, multipass 4, soften, 320 x 240 uncompressed. Then compressed in QT h264 and doubled resolution, saved with looping, and twice as fast playback, for mo' blurry, mo' buggy lagMORE100blurStep2MP4softenh264loop2xfast.mov LAGxlateOrient100blurstep2MP4.prj -
You must delete it in 2 places: under model/user properties/pose name and model/relationships/user property relationships/pose name relationships
-
In windows, the zip file contains a file called Installrig.hxt (or riginstaller.hxt?) - that file is placed under the folder HXT (extensions) in the same directory in which A:M is installed, where all files with the extension .hxt live. In windows we just drag (or uncompress) that file to the folder from the zip file. We do not open it from the OS, it is a plug-in that is invoked from A:M bones window - with right click/wizards/install rig I am not familiar with the procedure that is required on a mac. Can you look in your hxt folder where A:M is installed and see if there is something there already called installrig.hxt or riginstaller.hxt (I just looked under my hxt folder for ver 16b and I have something called installrig.hxt - yet when I look in the most recent zip file I see riginstaller.hxt...confusing...)
-
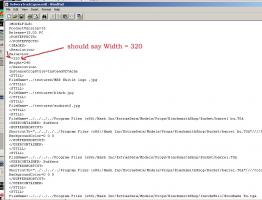
okay - I took a look - I was able to import your model into 15jplus - but I noticed I would crash every time I would try to look at the resolution via tools/options/rendering. A:M go boom. I went thru a variety of steps, and nothing would make a difference until I deleted all your groups. Conclusion: I would suggest that you cleanup/consolidate your groups (don't delete them like I did), something is funny with your group structure/hierarchy, (aside from the fact that there is a gawd awful # of them, and many contain no cps). I suspect that there might be an overflowing of some buffer with so much garbage? The other thing I would suggest is clean up your bones - the cogs in particular cleanup your relationships - get rid of those that don't have anything in them What I noticed and tried to fix before deleting all groups was 1) got rid of residual rotocontainer (in wordpad) - didn't help 2) noticed in word pad that someting was screwy with resolution - tried to fix - didn't help 3) deleted your preview picture - didn't help 4) deleted file position at end - didn't help 5) deleted groups in A:M and saved new model - worked! Or at least I didn't crash when went to check resolution However there is still something funny going on with the resolution, even after I did the above. Whenever I have to track something down, I always start fixing/eliminating those items that look strange. I wish I had something more definitive to suggest. Something else to investigate and eliminate would be your sprite system - perhaps it should be a separate model that is constrained to your truck in the chor. DeliveryTruck1genenorotonopreviewWidthnofilepositionnogroups.mdl
-
Do you have version of truck that worked before this problem occurred? And what did you change? Not sure AM reports are being looked at for ver15. But if can recreate in 16, 17 then that would be helpful. If can't make newest version of truck work, then you will have to get rid of rotocontainers on one of your old versions, and redo any changes you made (but first get rid of rotocontainers). Can you upload or email copy of corrupted truck? (with any materials) - hard to tell without model - but sounds like it got corrupted somehow. If you don't want to upload or email truck, Can you examine the model in text editor - do you see anything funny besides rotocontainers?
-
Some thoughts: Have you tried toggling the advanced check box? Looks like your default unadvanced settings got clobbered? Have you tried Help/reset settings? If you start a new chor, and bring in the truck - do you get a funny screen? If you delete truck from THIS chor that has problem do you still get funny screen? What version are you using? When did this start to happen? (what had you last changed, added, modified, before problem showed up)
-
I notice that you seem to have a case of the evil phantom Rotoscope folders. I do not know if that is part of this problem, but I am guessing your models, materials, chors, projects are stuffed full of gremlins and I would suggest getting rid of the phantom folders (in ALLLL files related to this chor/project) to eliminate the possibility that this condition is clobbering your rendering options/dialog. To summarize: you will have to take each file into a text editor and delete all "rotocontainer" pairs. If you don't, the problem will keep multiplying, and never go away. Here's a discussion on the problem that was happening in ver 15 (and before probably). The problem seems to have been taken care of in ver 16 (haven't seen it since) Can you describe what you were doing right before this problem happened (for anything else to be suggested).
-
Not sure why you are using built in INTEL card with A:M, and NVidia card for other programs? Or did I misunderstand? Perhaps there is a conflict with INTEL card & A:M 64 (even tho it worked in ver13).
-
Like I said - please don't let that scare you. The number of the steps to install the geometry bones in either rig is pretty much the same, it's just that the 2008 manual walks you thru it in excruciating detail, giving you explicit advice on roll handles, and suggested start and end points for the bones. The majority of the 2008 manual is dealing with "scaling and fitting the skeleton". It usually has 1 instruction with 1 illustration per page (over 70 detailed illustrations). It does have some additional positioning steps for "control type" bones, nulls. Again nothing left to imagination! The 2008 rig might be more sensitive to positioning the bones in a hierarchal way than TSM, which might account for the extra detail in instructions. For example: pages 42-69 deal with scaling and fitting the hand bones (27 pages!), one page per joint! each page with an illustration! One page might be translate this bone, next page is rotate bone, next page is scale! In contrast, the TSM manual has 1 illustration for the fingers, and basically just says - scale and fit the hand bones to your geometry, and leaves you to figure out how, with some basic general instructions. Same number of bones, same number of steps for you (no pictures, so brain cells are required). Both rigs do only one side of character, then do a mirroring of bones step, both rigs require weighting of bones, and both have an Installing the control rig part step. IMO, I believe the 2008 rig is more easily tweaked after the control part is installed. A top-down overview (summary) of the 2008 rig installation process, preceding the amazing detailed instructions might help demystify the process some for the first time user.
-
It's the 2008 rig - (looks like last updated in april 2011) and it is located here I am not sure which macs and their OS's and which A:M versions it is compatible, I am guessing it is probably compatible with them all. Mark did an excellent, detailed, accurate document getting through the installation steps. Don't let the 75+ pages scare you, the installation goes by quite quickly.
-

volumetric clouds quick trial
NancyGormezano replied to johnl3d's topic in Tinkering Gnome's Workshop
Oooo...I like those -
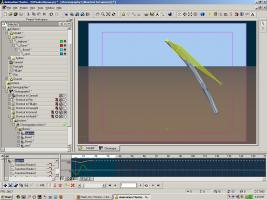
There are 3 different ways to view your animation: real-time, scrubbing, rendered When I say playback in real-time, I mean that you are playing your animation in A:M, and not looking at a rendered QT mov or avi. A:M's "real-time" playback is an approximation - that is the playback is NOT happening at exactly real-time For exact real-time each frame would be displayed for exactly 1/24 sec (if 24fps), only if your computer was fast enough, or not too fast. To approximate real-time, we usually check the setting Tools/Options/ Global/skip frames if behind. This will give you the best approximation to what the rendered timing will sorta look like. However it will NOT be the same as the rendered. If you want to see what it sorta will like (but not exactly) then you should bake first and then play it back in real-time, to get an idea of how the dynamic system is responding. For the 2nd case: If 1) you are scrubbing thru the timeline, AND 2) you have NOT baked your dynamic systems then you will definitely see different results depending on how fast or slow you are scrubbing. See for yourself. Try scrubbing back and forth with your mouse very slowly thru a range of frames, and then very rapidly through the same range - and yes you will get widely different dynamic motion (if unbaked). Yes the dynamic motion of a chain of bones should be the same, after baking. The timing however will look different, if played from a QTmov, avi, or in A:M real-time. No. no. no. What I meant was after baking, you will want to check for stiffness (too loose? too stiff?) as well as penetrations of the dynamic system geometry into other geometry elements in your scene - if there are any, you will probably want to adjust other elements (other bones, camera angle, stiffness, other dynamic properties) based on the baked dynamic motion IE Change your settings, Move things out of the way, hide from view. Unbake, rebake test again, repeat ad nauseum. I usually have a control bone parent (in my example called big bone) that is a parent to the chain of the dynamic bones, in which I use to TWEAK the motion of any penetration of the dynamic chain (after baking). So if after baking I like the motion, but some geometry has penetrated, I can use the control bone to rotate or translate slightly the chain's motion for a couple of frames, and then move it back again when all's clear. That is what I meant by tweaking. Do not try to tweak the dynamic chain results (in my case bone1, bone2, end). Screwy things will happen. The dynamic results are offsets. I believe it use to be one could tweak those results, but somewhere along the versions those channels became inaccessible. I believe they use to be the actual real translate and rotate channels and not offsets at one time.
-
I think what you may be experiencing/describing is that the dynamics look, playback differently in REAL-TIME, and scrubbing compared to the rendered version? Yes there is a difference. (ver16b 32 bit PC) However, I do not believe there is a difference in RENDERED imagery, whether the dynamics have been baked or not. The computation looks the same to me. It also doesn't seem to matter (in this small test) whether it is multipass ON or multipass off Your best bet is to bake your dynamics and then check the interactions, appearance of your animation in real time with the baked dynamics. Make your tweaks according to that. Then go to render. Comp_1bakenobake4exsh264loop.mov
-
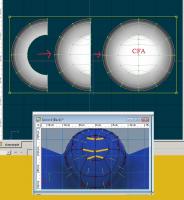
I have found that CFA has problems with 5 ptrs, hooks and other odd endings on the center spline. To minimize problems, I usually close off the top center "hole" by extending the splines to the center spline before cfa-ing
-
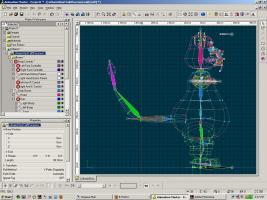
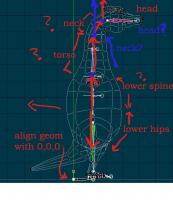
I'm thinking the legs are ok, but the Hip null (as well as lower hip bone) are probably too high. It depends on where you want his torso to bend from. You probably want the torso bone to extend higher, (and the lower spine) and I believe you will probably want the neck bone as well. You will have to decide where/how you want him to bend (with neck, torso, lower spine), as to where you put the origin of those bones. Also I'm not sure if it matters, but I suspect you will want your model and it's geometry bones to line up closer with the model bone, ie at 0,0,0 for less problems installing the controls properly. I've uploaded a shot of my lion model to give you an example of geometry bone placement. A dragon will have different placement, depending on how you want the neck, head to operate. I'm guessing you might want to make the head bone vertical as well, even though the geometry goes horizontallyish. It might make a difference in how the controls work. And so I've uploaded a very confusing marked up copy of your side view to illustrate the confusion, and make it even more confusing as to placement options available for neck, torso, lower spine.
-
beam me up johnnny!
-
Oooo..He/she is very lovely! I particularly fancy the Purple Barney-licious looking one, but with perhaps some cadmium yellow-jello colored polka dots scattered hither and yon. They lied, that's how! Triceratops no Slouch. New forelimb study reveals And then there was that nasty business "is it really a Triceratops or a juvenile Torosaurus?" Oh yes. Those were dark days indeed way back in 2010. I suspect the real question has yet to be asked: What did Tri-toro-saucy-raptor's feathers look like...and could it fly? Ok. Maybe those questions are only being whispered behind closed doors. Trini Lopezeraptorasaurus shall make a very fun TAOA:M modeling lesson.
-
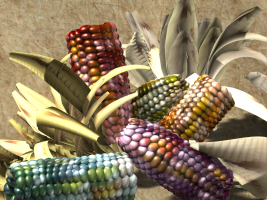
I did it brute force (copy paste, offset until I got one column, copy paste offset that , until got 4 columns, use distort, offset, make 1 quarter of cob, copy paste, flip for 4 qtrs). However I didn't get the nice spiral growth pattern and I would probably use sweeper if I were to do it again (create spiral path, duplicate a kernal, copy result, offset, distort, etc) Color variation was obtained by changing the surface color of the instance and % of the color decal of the cob model in the chor. I used the image of the glassgem corn for the decal, but I would also probably change the image so that the coloring would line up a bit better with the kernels on the cob model if I were to do it again. And I would close off the holes in the kernel.
-
Yes it's true, there aren't any knee targets in lite rig - you aim the knee by rotating the right or left thigh bone
-
Good personality, fun style! Looks like he might be a bit of an ol' grumpy? I like the new legs. I've seen a variety of characters that don't have legs, arms, and it makes me think the animator was trying to skimp on rigging, weighting, posing, animating....ok...maybe, that's probably why I would do it.
-
Looks good! The violet/purple specular worked well to give it a nice iridescent quality.
-
oooo...very good! Could use some purplish specularity on the feathers


