-
Posts
7,863 -
Joined
-
Last visited
-
Days Won
15
Content Type
Profiles
Forums
Events
Everything posted by NancyGormezano
-
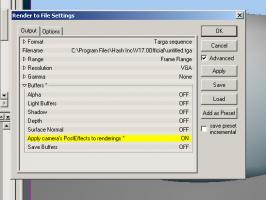
I am willing to bet that you didn't have apply camera's post effects = ON when you went to render (camera/output/buffers) And yes, oddly, the quick on screen render would have shown the post effect even without that being ON
-
It may just be a problem with deleting lights and have nothing to do with AI in combo with props. I put in a bug report (which is reported to be fixed in next version) where there are only 2 bulb lights in the chor along with the ground plane. Sometimes when the 2nd instance of the bulb light is deleted, A:M crashes. If it doesn't crash then the 1st bulb light no longer illuminates the ground (scene is dark) (always). Since I couldn't get it to consistently crash, I'm not sure if the fix will address the crash problem. When it did intermittently crash, I believe I had monkeyed with turning on/off other properties, and/or I may have been trying to play with ambiance intensity before deleting the bulb.
-

It was a dark and stormy night.
NancyGormezano replied to Simon Edmondson's topic in Work In Progress / Sweatbox
Yes, all light types are jittered when rendering with multipass ON. However, if the light is large, the position change will be most noticeable. It is less noticeable with small lights. (This is also true for the camera and DOF). I submitted a bug report, and Steffen said this has been in all versions since 11, or that's as far back as he tested. Currently, the biggest problem is that the position of the light isn't automatically reset back to it's original position, after the multipass render, and with large lights, you will get wildly different results, also depending on number of passes. Currently one can manually reset the position by advancing to next frame, and then back, or trying to grab the light in the window, or some other toggling (shadows on/off/on maybe, not sure?), if you want to retest the lighting with other values for that frame. Or you can render with multipass OFF (lights are not jittered). I believe Steffen said this will be fixed in the next version of 17, but I'm not sure if I understood correctly. He is also considering implementing a jitter % for lights when using multipass. Currently the default is 100%, but eventually one could set the jitter percent to 0%. If the jitter is set to 0, then the shadows could look the same or closer to those rendered with multipass OFF, I believe. At 100% they look the softest (as now). I'm not sure if he has decided to implement this. -
Decaling by hand usually renders the fastest. Not sure why baking materials into decals renders slower sometimes. Maybe it's the size of maps, and complicated mapping that causes an uptick in render time? Also - You might consider using a bitmap plus material on your cave walls - that can potentially give good results for such a generic looking cave texture.
-
Was there any improvement in render time: ie What was the render time using materials, and what was the render time using a decal? Getting your render time down is a matter of whittling away at ALL the potentially unneeded render hogs. If you didn't remove the materials from the models after baking the decals - you will see no improvement, you will probably see an increase in render time. However - that being said - even after removing materials, I have also noticed that sometimes depending on the material and the size of the decal created by baking, and along with the fact that the material is now replaced with with color, bump, reflectivity, etc types for the decal - that the render time may still also go up. Delete all the types in the decal container for everything except color, bump and then see what render time is. If that's still too slow, delete the bump type, or change it to legacy bump.
-
Hmmm... I just rendered a 5 frame sequence to 1280 x 720 (png) of default chor, and then imported the pngs back into ver 17-32 PC. They came in as 1280 x 720. The only thing that occurs to me is: Perhaps your sequence wasn't really rendered at 1280 x 720 ? Check your camera settings in chor when you rendered? check the images in photoshop to see they are really 1280 x 720?
-
Do you still want to cut your render time? Your last response was confusing. Soften option does not kick in for multipass until the number of passes = 5 or more. If you turn soften off, it will speed things up. Are you saying it took either 2:35 for 1 pass? on your machine and 1:06 for you friends for 1 pass? It will take more time, the greater the number of passes. I would assume you intend to do more than 1 pass rendering. 17+ minutes sounded way too high...not sure whose machine that was? The same comments as I posted before still apply for cutting down render time. I'm not sure if they made any sense to you. You might look at if you can get away with only 1 bulb light casting shadows, and the others only have diffuse, spec ON.
-
Sounds like using 2 different computers? 2:35 sounds about right for that size (1280 x 720) render. Are you sure you need to go that large for your animation? Cutting the resolution to 960 x 540 would cut the render time, or even better - 854 x 480 would be good enough. Shaping up nicely - lots to look at. In order to decrease render times - would have to know: 1) what are current render settings? - # of passes?, Soften ON? Try multipass = OFF - see if that helps time. (sometimes does, sometimes doesn't) 2) Using any complicated materials rather than decals? (especially on the wood). Some darksim, or materials that use some sort of "turbulence", or are "deep" can cause long renders. Sometimes patch images (rather than decals) can be render hogs (use to be - not sure about ver 17). Large images (really large) used for decals will sometimes make longer renders (anything over 2000 x 2000 is overkill). 3) Is there any transparency, refraction in scene (eg the windows?) ? The Snow Globe may be a killer time eater if using refraction. 4) what kind and how many lights are you using, (bulb, sun, klieg), with shadows? Kliegs with z buffered shadows are the fastest, rather than ray traced. Zbuffered with low map resolution (512 x 512) is fastest.
-

It was a dark and stormy night.
NancyGormezano replied to Simon Edmondson's topic in Work In Progress / Sweatbox
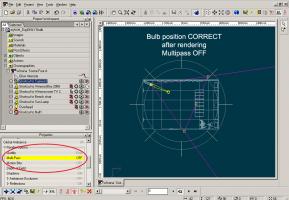
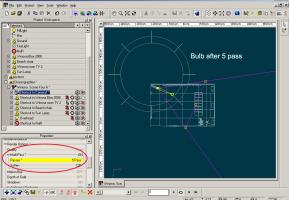
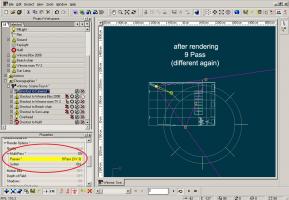
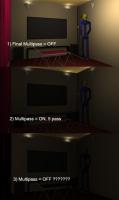
Well Simon...Turns out I can recreate your phantom moving bulb light. In ver 17 32 bit. I found out that if I render your scene with Multipass = OFF, that afterwards your overhead bulb light behaves as it should, ie it's position has NOT changed. (evident from top view) However I found out also that if I change the rendering properties for the next render, ie render with 5 pass, that after the render, the bulb will have moved, even though the position data says it did not, and that any render done after that will use this new phantom position. Which is why my 2nd render with MP = OFF did not look the same as it did as the first time I did MP = OFF (image in this post). I had done 1) MP=OFF 2)MP=ON 3)MP=OFF (which used the new bad light position from 2nd render) I also found out that the position for the bulb light would change differently depending on the number of passes. 9 pass would end up with a different position than 16 pass, and different from 25 pass, which of course would render wildly different lighting results based on number of passes (shouldn't be all that different). The main way to have it go back to the original position was to delete the project (or chor), and reopen it, and the position of the bulb light would go back to original. I'm not sure if toggling something (like shadows on/off) would make it go back to original position (did not try). Hard to debug lighting with this situation. So for now, I would say you might want to render/debug lighting with multipass OFF if you are still experiencing difficulty. I think this is only a bug with bulb type lights. I haven't tested with kliegs or sun type lights (ie, haven't ever noticed this before) Your animation is coming along, and we now see why you may have wanted it to be dimly lit at first. Did you mean for the new light to come on that slow? That's a little odd, but perhaps you have a reason? EDIT: Submitted bug report -

It was a dark and stormy night.
NancyGormezano replied to Simon Edmondson's topic in Work In Progress / Sweatbox
I'm not sure what's going on with your changing position, but it could just be a screen refresh problem...?? I have never ever in the 12 years I've been a user, needed to reinstall the same version of A:M (any version) in order to fix something that appears broken. At most, I will close down and reopen A:M and things will work better (then it's a bug). If it's still not right, then restarting OS and reopening A:M might help (I've rarely done that - could be a problem with leaky memory - A:M bug, graphics card). Most times, it's usually something dumb I've done, a corrupted project/chor/model file or a bug. Others may have found that Help/reset settings works (because they've monkeyed too much with defaults) However, after looking at your project - I have discovered a couple of things (tested in 16b and 17) 1) I left your Overhead light in the same position but increased intensity to 1000% 2) I noticed that for some reason Toon render was set to on? (may have been something I did?) - so turned it off, and I decreased your resolution to 480 x 270 for testing purposes only. Turned OFF alpha buffer, and made only render frame 0 to a PNG 3) in Ver17 32 bit: tried it with Multipass = OFF - looks goodish 4) tried with multipass = On - 5 pass - UGH - I see now what you mean about darkening 5) tried again with multipass = OFF - still Ugh??? why? should have been good 6) could only get it to render correctly again with multi off - by toggling the shadows ON/Off/ON for the overhead light - then it would rerender correctly I haven't reduced your project to bare minimum (nor tried a new project), but my original guess is there is a bug with bulb lighting and rendering with multipass, or else there is something corrupted in your file -

It was a dark and stormy night.
NancyGormezano replied to Simon Edmondson's topic in Work In Progress / Sweatbox
I prefer h264 codec. And I use QT pro for compressing (PC). I find that quickest, easiest to get to a MOV format. For me: I render A:M stills, and if additional post processing required I use Aftereffects to render to an uncompressed avi, then from QT Pro go from avi to h264 compressed mov, or if no post processing required, I import into QT pro the original sequence of A:M stills and compress to h264 mov. To which banding are you referring? pre or post compression of video? If pre: then it's probably something to do with lights? volumetrics? fog? DOF? If post: then it's a compression artifact, and you would probably have to up your "quality" settings when compressing. EDIT: uploaded graphic from wiki on png - showing artifact differences in solid background in jpg and png formats -

It was a dark and stormy night.
NancyGormezano replied to Simon Edmondson's topic in Work In Progress / Sweatbox
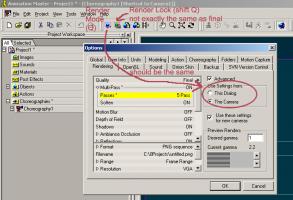
1) What I meant by test renders being different from final is that using the GREEN icon (render lock) to get a test render will produce different results that using the BLUE icon, which should be the same, hopefully, in theory, as your final render to a file. Both on-screen test methods will use whatever render options you have chosen in your options panel (multipass on/off, number of passes, etc), but the quicker GREEN icon will NOT do all the same steps as the BLUE FINAL render. In particular transparency will look different, hair will look different, and probably many other things if you use the GREEN icon. So to do a test of your rendering set-up: use the BLUE icon, or else render 1 frame to a file. 2) yes when you use Multipass = ON, the passes are averaged together. Pick the number of passes that looks good for you, and go with that. In my experience it is overkill, for an animation to go beyond 9 pass. I usually go with 5 pass. having soften on will also add rendering time. You may or may not need it. You might also find in some situations that multipass OFF (ie A:M's other option which is 1 pass plus two antialisasing passes) is even faster and better looking. And YES, it will look different from multipass. So pick one method for your entire animation and stick with it. 3) I see very little difference, between your jpg & tga stills, but it is not surprising if there is. TGA is an uncompressed format. JPG is a compressed, lossy format. If you note the file sizes for your 2 stills, on my system, the jpg is 118kb, the tga is 741kb. The jpg must have compressed and lost some of the info. Yes the jpg looks blockier to me in the illuminated areas. The best bet is to stick with one format only - and uncompressed is always best up until, final compression of the video. But you might consider PNG format as well. I'm not sure how it's done, but I believe it is supposed to be a compressed but lossless format (how can that be? - I don't know) -

It was a dark and stormy night.
NancyGormezano replied to Simon Edmondson's topic in Work In Progress / Sweatbox
I was just browsing on Amazon and found this book: Action Analysis for Animators I know nothing about it, but the pages in the mostly good reviews look interesting, and the author is a Brit! (so how bad could it be? ) What I did notice is that the paperback edition is approx $28.00, but the KINDLE edition is $44.00 ???? wha? Why would kindle edition be so much more? Now, that seems crazy. -
Fabulous! Fun!
-
That's quite impressive. Perhaps that bin-thing on the left could be a talking-bin-thing. Looks like it has 2 eyes and a mouth, ever so eager to spout some Paunky pearls of snarkyness.
-
From googling retina display: Retina display is a Sounds to me one would need to know the size, resolution of the targeted display device (and probably normal viewing distance) in order to know what the final rendered image resolution should be. One to three inch screen held 6-12 inches away requires way less rendered pixels (as well as very young eyes) than a huge-i-mongous projection TV at Old eyes Bill Gates house, sitting in first or last row of home theatre.
-
Here is what I found out, when trying to reattach 2 cps using ctrl +alt + click. It is possible to connect them with drag select only, or even drag select plus alt+click only (no ctrl needed) To test: to reconnect with drag select + alt click ONLY 1) drag select the exactly co-positioned detached cps, 2) while the 2 cps are still lit up, ie. still selected, alt +click on the cps - the other cps to one of the patches should also light up. DO NOT MOVE MOUSE. Otherwise it will detach the newly lit up selected cps. LET GO of alt key 3) unselect the cps by clicking somewhere else 4) reselect by clicking the now joined cps (no need to drag select) and drag to see that they are connected or to reconnect with drag select ONLY 1) drag select the exactly co-positioned detached cps, 2) while the 2 cps are still lit up, ie. still selected, MOVE MOUSE. 3) unselect the cps by clicking somewhere else 4) reselect by clicking the now joined cps (no need to drag select) and drag to see that they are connected I have no idea which way is/was the documented way. But it looks to me that it's the drag select that is really connecting them. I was typing as you posted your video. Thanks for the video - it was a little hard to see (small) so I would have to download and step thru as it was a little hard to really know what your key sequences were as the text went by fast. But I think we've covered that there are ways to reattach cps, way way more than enough by now.
-
I'd love to get that locked down because, unless you've redefined those keys, they should be attachin'. looking forward to the video.
-
I want to see this video. Ctrl+alt+click for me detaches patches. Anything, any combo that has an alt in it detaches patches for me. It could be that I am moving my mouse after ctrl alt click to test if they are attached again. That may be the difference. I will try again. And yes I tried connecting never before connected cps and it worked by just moving the cps on top of each other and drag selecting (no ctrl alt click needed) And yes I saw in the properties panel where one could name a group of cps in the uv editor, and yes I crashed, and no I did not see where this name would show up if I hadn't crashed.
-
I'm interested in trying out the new features--looks like you could save some steps and not have to have as many stamps? My technique uses a bunch of named groups to organize the way you want to split up the map. I don't know if that goes away, because it is easy to look at the groups and see if you've missed anything... Your method doesn't go away. You can still have multiple named stamps, and edit them individually. However, it looks like you can now ALSO just stamp once, then isolate and move the patches in the UV editor. It ends up looking like many stamps in actually just one stamp. Each way has it's advantages/disadvantages. But yes, major new, easier manipulation/control of the CP's in the UV editor. EDIT: I do not believe one can reattach 2 CPs that were never attached to begin with. I haven't tried. But I will. OMG! I just tried and yes you can!!...We can now totally confuse and thouroughly mess ourselves up beyond our wildest dreams!!...yes...hyperventilating now.
-
I should have said that this is how Alt Clicking is designed to work according to Steffen. So keep doing that if you want to separate patches. That is the ONLY way I was using it. This is why I cannot see how your method could work by using alt click to reattach anything. It was designed to detach/isolate the patch so that you could move it, without disturbing adjacent mapping of patches. You are the one who was saying use alt click to attach. That made no sense. But...if it works for you... No. That is not what anyone was asking for. Only you. I will modify your summary with more detail: Disconnect some CPs in the UV Editor first in order to test this, either by alt clicking (to detach a patch), or ctrl clicking on a CP to detach just 1 CP. To reattach 2 CPs again: - Align the two detached CPs over the top of each other, exactly. - Drag Select around the now copositioned, but still detached CPs and move them (slightly, then back to where desired). Unselect them by clicking somewhere else. - Click now on what should be the rejoined CPs. Note that they and their shared spline move together once again to confirm they are permanently reattached. I do not believe one can reattach 2 CPs that were never attached to begin with. I haven't tried. But I will.
-
I took pixelpuckers question to mean that his goal was to get the original mapped adjacent 3D spline/cps back to their original 2D adjacent associated mapping . I edited my reply above, so I'll repeat here: There is no need to go thru cltr alt sequence - which for me just does not reattach anything permanently. Anytime I use alt key, it detaches the patch.
-
For me, Ctrl alt click on detached cps does not reattach them permanently, ie restore them back to original connection. I can select detached/disassociated cps with shift clicks, ctrl clicks, and move them together, but it does not reattach them. An alt click for me only selects a patch, and if I move the patch, it becomes detached from it's surrounding patches. EDIT:Just found out that if I realigned the once detached cps EXACTLY in the uv editor so that the spline lines look colinear, then drag select around the cps, move them as one, unselect (by clicking off the group), and then just click again on the now copositioned cp set again - it will act as if they are permanently connected again - ie their adjacent/adjoining spline/patch will move together. FOREVER more, once again, it seems.
-
I have not yet found a key sequence that will actually permanently re-attach/re-align the cp's that have been detached/unaligned using the UV editor. However if you move the cps so that they are aligned once again, ie one on top of the other and drag select around both cps in the uv editor, the mapping will behave as if they are attached. And if you have done much detaching and it is difficult to re-align the patches in your new modified mapping, you can always make a new stamp with just those patches showing using the same decal container. The new stamp will have the patches realigned, and the 1st stamp that had modified the original mapping will still be available. You can isolate editing the stamps by right clicking on the stamp and choose edit for editing 1 stamp at a time, versus right clicking on the decal container and choosing edit (which will give you access to both stamps at the same time). Hope that made sense.
-
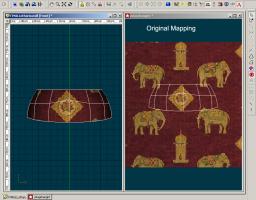
This is BRILLANT!!! Wonderful new improvement. I did not realize the impact until I just tried it. This makes it so much easier to select CPs in the UV editor - as well as to remap the patches/cps to different parts of the decal image without having to restamp the patches. If I am correct, in the olden days of 16b, we would could only drag select the cps, and when you'd move the cps in the uv editor, the adjoining mapped patches would be affected. Now you can detach the patches in the UV editor (only) and move them to another totally different area of the decal image without disturbing adjoining patches. Brilliant Brilliant Brilliant!


