NancyGormezano
-
Posts
7,863 -
Joined
-
Last visited
-
Days Won
15
Content Type
Profiles
Forums
Events
Everything posted by NancyGormezano
-
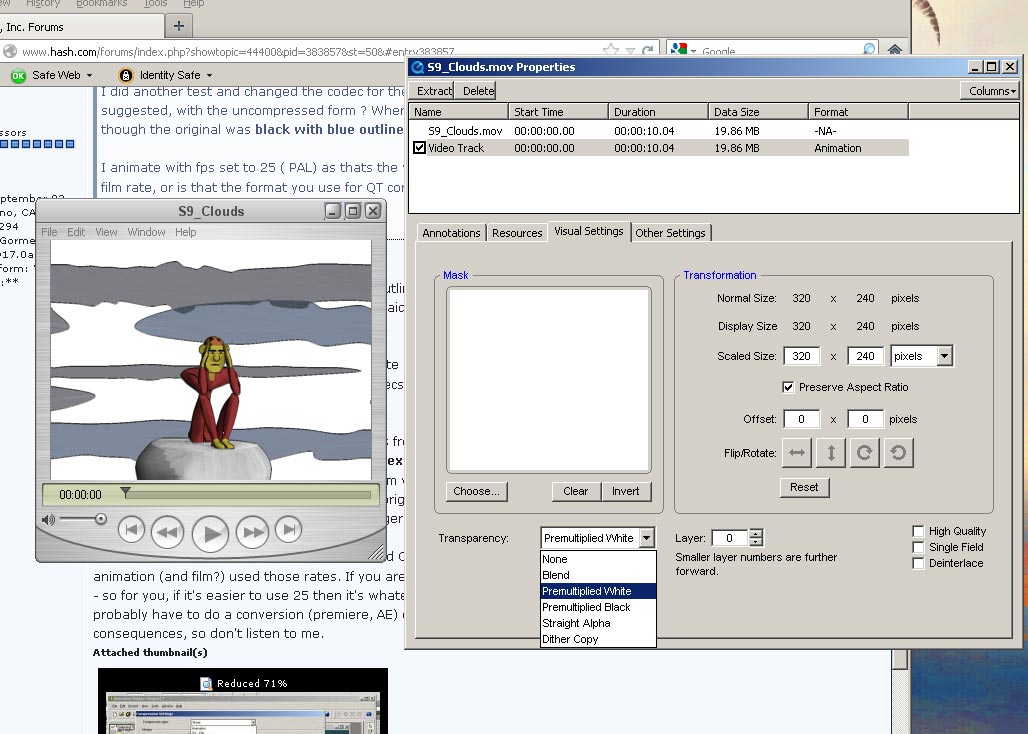
Thanks Mark. Ah ha! now I see what you're talking about. I am now suspecting that your player for QT movies (more recent than mine, and different) has some funny setting. I use an old version of QTpro & player, and when I open Simon's big original file - the transparency settings are set to dither, and the background looks blue, as expected. However, if I change transparency to pre-multiplied with white in the QT player, I get white for the background, if I change it to pre-multiplied with black, I get other weirdness. So it looks like the alpha channel is encoded somehow in the file from A:M, even tho, the option was turned off in A:M, but the player knows what is in the alpha channel, and what isn't. Check the properties of the movie in the player if you can? EDIT: - I just noticed that when I compress Simon's file in QT pro, and re-open that file, that changing the transparency settings has no effect, so that the background does look blue no matter what setting I choose. Yes perhaps the animation codec, and none codec has alpha info, but the others (intermediate, etc) don't. I also just noticed that when I rendered something to mov file (16b 32 bit) with none codec, that file came in with dither in the QT player, and the sky was the color it should be. Changing to premultiplied white caused the imagery to have white background, even tho I had alpha off when rendering.

-
I am still not understanding "black with blue outlines" ? I haven't seen it in your renders - can you do just one frame/still so we can see what you're talking about? Like I said - if you only see it within A:M and it does not show in the final movie- could it be a Mac only display thing? I also don't have a choice of "Apple intermediate codec" for rendering to a QT movies from A:M. It must be a Mac only thing? I've uploaded image to show the options (codecs) I have for creating QT movie from A:M. If I were to do a mov, then I would probably choose none. However, I typically render to frame sequences from A:M (jpg, tga, png). Then I import those sequences into QT pro - save as a file.mov (with no compression). AND then export another version (different name) with compression (with settings that I showed up above). Then I can play ad nauseum with the compression, frame size settings, to find some compromise between size and quality, if I have saved the original QT mov uncompressed. There could be different optimal values for each movie, based on how noisy, or quickly the imagery changes in the original. That's the nature of the beast of compression. I use 24 fps or 12fps (stop mo look) in A:M (and QT pro) - because it's easy for me to divide (2, 3, 6, 8, 12, 24) and traditional animation (and film?) used those rates. If you are delivering to video then you would have to convert somewhere else to Pal - so for you, if it's easier to use 25 then it's whatever works. If I were delivering to video here (29.97 fps) then I too would probably have to do a conversion (premiere, AE) or live with slightly off sync sound? I too am not that familiar with the consequences, so don't listen to me.
-
When I play that large uncompressed file - the background looks blue. So I'm not sure what is the problem? Yes sometimes I have noticed that the resultant file (or frame) viewed from within A:M after rendering, the background will look black (as if the alpha was turned on), but it's not in the actual mov file. Yes, your file size is large because the animation codec was used (from A:M? or QTpro?). Animation codec is essentially NO compression, or uncompressed. When I used QT pro to compress your original uncompressed file, (file/export/options/movie to qt movie/settings/ - I used my default or what was set last-not necessarily required: H264, quality high, keyframe rate 48, frame reordering yes, encoding mode multipass, dimensions 320 x 240, data rate automatic, optimized for download) and I got a file size of 967Kb (down from 20MB). (Don't ask me what all those settings mean, I'm just following someone else's suggestion). Hope that helps in using QT pro to compress your A:M frame sequences or movies.
-
hah ha ha hahh hahahahahah hoo hoo hoo hoo hoo hoo lololololololol etc etc !! ...That comment was good enough to get me out of lurking mode.... But on a serious note...my guess is that some might be...and some mightn't...Deep. I know. Since I participated in both full feature efforts so far: TWO (from almost start to bitter finish) and SO (from bitter start to almostly finished), ...As a hobbyist, I would say for me I'm only interested if the story, characters, art style is interesting to me, because I don't have any expectations about the result (ie making money, being distributed etc). It is important to note that both TWO and SO got FINISHED only because there was someone obsessively devoted to seeing it all the way thru, regardless of who dropped out.
-
Oh no, not another variable! And your cpu is rated 2.66, while Robert's is 2.4ghz
-
I have used it sucessfully in 15j+, but it is broken in 16b(32). I haven't tried it since then, as when I submitted A:M report (nov 2011), I got this reply: Getting dependant on a plug-in is the pits, when the source code is not available. (eg Sumi, Fakeao, TSM, ... what else?)
-
Love your beautiful, fun, new images, but the new signature is a yikes! Much too tall. Could get annoying. Perhaps scale them down to a reasonable eye-catching size but not SCREAMING AT ME height? (Yes, we all have the option to turn off viewing signatures in this forum, if they annoy us, but I don't think that's what you want)
-
here's a thread where I did some testing for different weighting solutions for something like an elbow, knee, shoulder, or any joint that has 3 spline rings, where 2 bones meet at the pivot place Take a look at the QT mov in that thread to see how the joint bends based on each solution. It's all about what you prefer it to look like. And testing it in an action while you do your weighting. My preference is for simple, obvious: The middle spline is weighted 50-50 between the 2 bones (eg bicep, forearm), and the outer splines are weighted 25-75 depending on which side of the middle it is. EG 25 forearm, 75 bicep for spline nearest shoulder, and 75 forearm, 25 bicep for spline ring nearest wrist. Also Holmes wrote another wonderful tut on weighting located here
-
awww...too bad...looks like a fun situation...maybe next time....
-
FYI, I am not able to view your alien image unless I bring it into Photoshop and adjust the levels. Looking at the histogram, I suspect you have the brightness turned up on your monitor, which is causing you to render images that have an extremely limited range of intensities (image is skewed towards black, dark gray). I'm guessing that the corrected image will look too bright on your monitor.
-
So sorry, so sorry to hear this...I hope the sweet memories of the time you shared with your daughter will comfort you and your family in the days to come. My sincere condolences.
-
In my 2001 edition, the angling of the foot for a feminine walk, is shown on page 157. I tried to create the walk cycle in the QT using that sort of "tightrope walking type style" with feet angled slightly out, approximately 10 degrees (rather than straight ahead, or pointing in), to look more like the normal example. I did not try to exagerate the angle as illustrated for a fashion model, stripper or ballerina. I am not aware of a page that shows a pigeon toed example? (pointing inward towards the walking path line). Yes it can be, and it can get boring to watch too many cycles of ANY walk in 1 shot (with same camera angle)...that's why it's better to layer the acting choices for the upper body (head, arms, hands, face, etc) independantly, and asynchronously, when the character is walking for any length of time. The mechanics of the legs & swiveling torso can repeat ad nauseum, but viewer will be (should be) distracted by the story-telling upper body.
-
looks great!
-
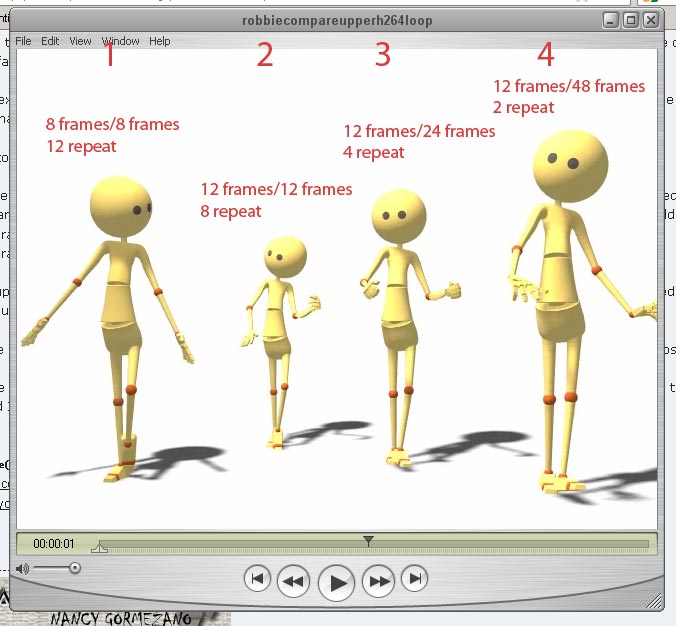
Hi Simon - sorry to take so long to get back to you. I am not a walk cycle expert (I was actually hoping Robert would critique, silly lazy me - heh heh), but 1st, easiest thing I notice is that your passing keyframe does not have the foot angled down - so it gives the impression that Winona walks very flat-footed, and she appears pigeon toed (foot/toes turned in towards line of walking, rather than slightly out). Could be a stylistic choice on your part? If you are intending for Winona to walk many cycles in 1 shot, then I think you are making a lot of work for yourself by not creating a reusable walk cycle action for the bottom half of her. Perfect your walk (in 2008 rig: using the body null, pelvis, foot controller, heel, torso controller) in an action by just doing the 5 major keyframes (8 keyframes for a cycle for both sides), each on sequential frames (8 frames total). Change the spacing of the keyframes if you like a tad to make some things snap or take longer (expand to 12-16 frames total?). You would then only have to change the amount of time that the walk cycle takes in the chor, and you could use the cycle for all different paces, and layer the face, arms, hands, head in the chor for your acting choices. In my QT example - I used Robbie (2008 rig) and did 1) a walk cycle that has only 8 frames, and then 2) changed the timing slightly for making the passing phase take a little longer, for a 12 frame cycle From left to right in the QT (total 96 frames): 1) character using 8 frame walk cycle, taking 8 frames/cycle in the chor, repeat 12, and only the head motion is added 2) 2nd character is using the 12 frame walk cycle, taking 12 frames/cyle, repeat 8, with head, arms, hand motion added 3) 3rd character - 12 frame walk cycle, taking 24 frames/cycle, repeat 4 - head, hand, etc added 4) 4th character - 12 frame waljk cycle, taking 48 frames/cycle, repeat 2 - head, hand, etc added I've uploaded the project, and it includes 3 chors. The one that generated the QT movie, and 2 others where Robbie (& the walk cycle) is put on a path, and ease is used to compensate for the changes in time (how far Robbie gets on the path). You could render those chors to see how that looks. Also, take a look at how the default settings are set for the Robbie model in the pose/relationship sliders and ON/OFF poses. Also, notice how Robbie is CP weighted, and that there are NO smartskins. I took a look at your Winona model (from the project you posted awhile back), and I suspect you will have trouble getting what you want if you don't CP weight it similarly. robbiecompareupperh264loop.mov Walkcycles.prj
-
I have confirmed for myself that I get the bad channels after I do a save (with multiple models selected) in 15j+ PC. It does NOT happen in 16b (haven't tried in 17). However, the bad channels show up only when I bring the saved project back into A:M.
-
First thing I notice is that there is some slipping along the path and her stride length seems too short. The walk still looks a bit stiff, but the hips are definitely loosening up! I don't see any counter rotation of the upper body/spine/torso to the hip motion. I like that you are trying for foot placement that is more feminine (narrower in line, rather than masculine wide) I am not detecting much of a passing pose? I am not sure if you are trying to perfect a generic female walk, or are you also trying to build in some storytelling, acting with this shot, along with some personality of the character? Perhaps this tutorial by Keith Lango might help in another viewpoint in understanding walks. I love keith's teaching style. He says there is no such thing as a perfect walk, and any walk can be developed from 5 blocking poses, focusing first on the lower body (hips, feet) to get the basic locomotion, along with some upper body posture. (The arms, face etc are layered in later for the specific storytelling): 1) heel plant 1.5) hips down, forward (approx 2 frames later), 2) passing 2.5) hips up, forward (approx 2 frames later) 3) other heel plant After getting poses 1, 2, 3 - one would adjust the stride length and stride speed, then add the poses 1.5, 2.5 Next add rotation of hips, and counterrotation of upper body (exact opposite of hips). Maybe show us your 5 poses from the side, and front without scenery, and we might be able to offer more helpful suggestions, opinions in a generic way. Tell us about the personality of Winona, the situation of this shot (what is she thinking, feeling, communicationg) and maybe our suggestions can get more specific for this shot and this character.
-
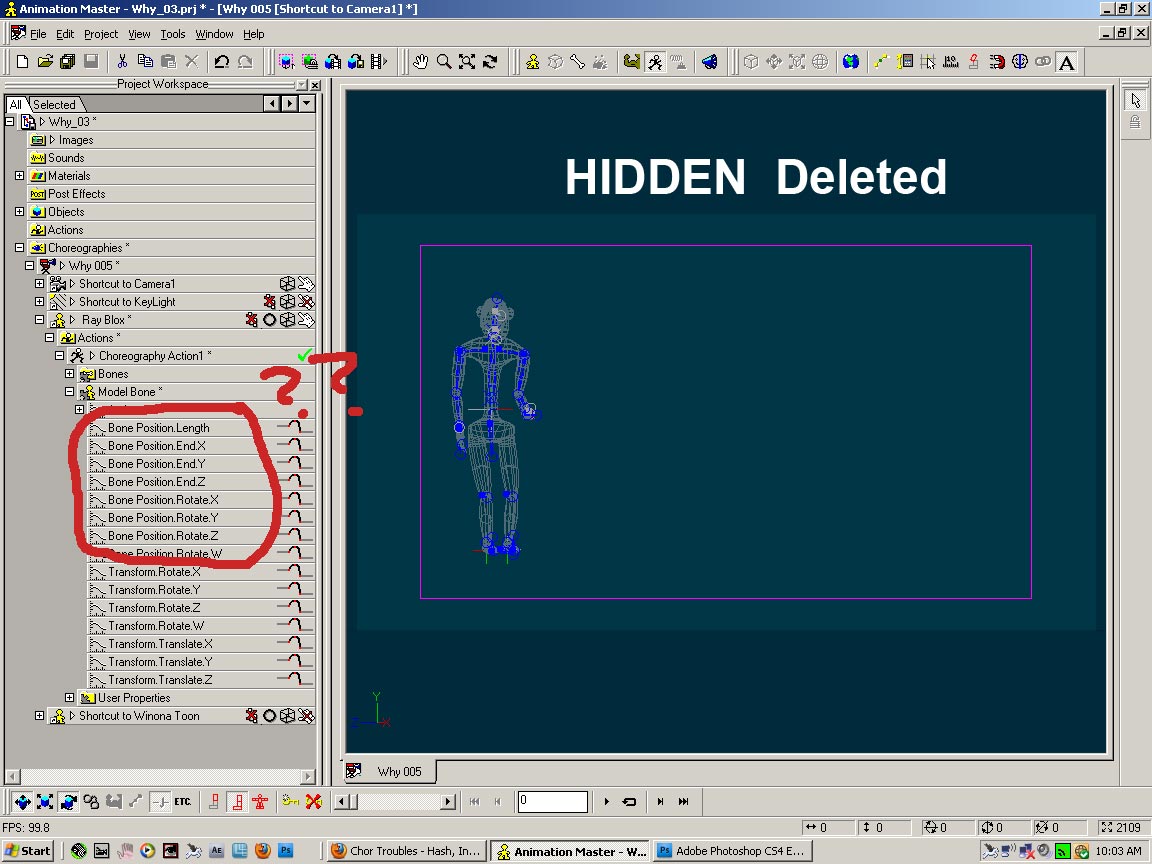
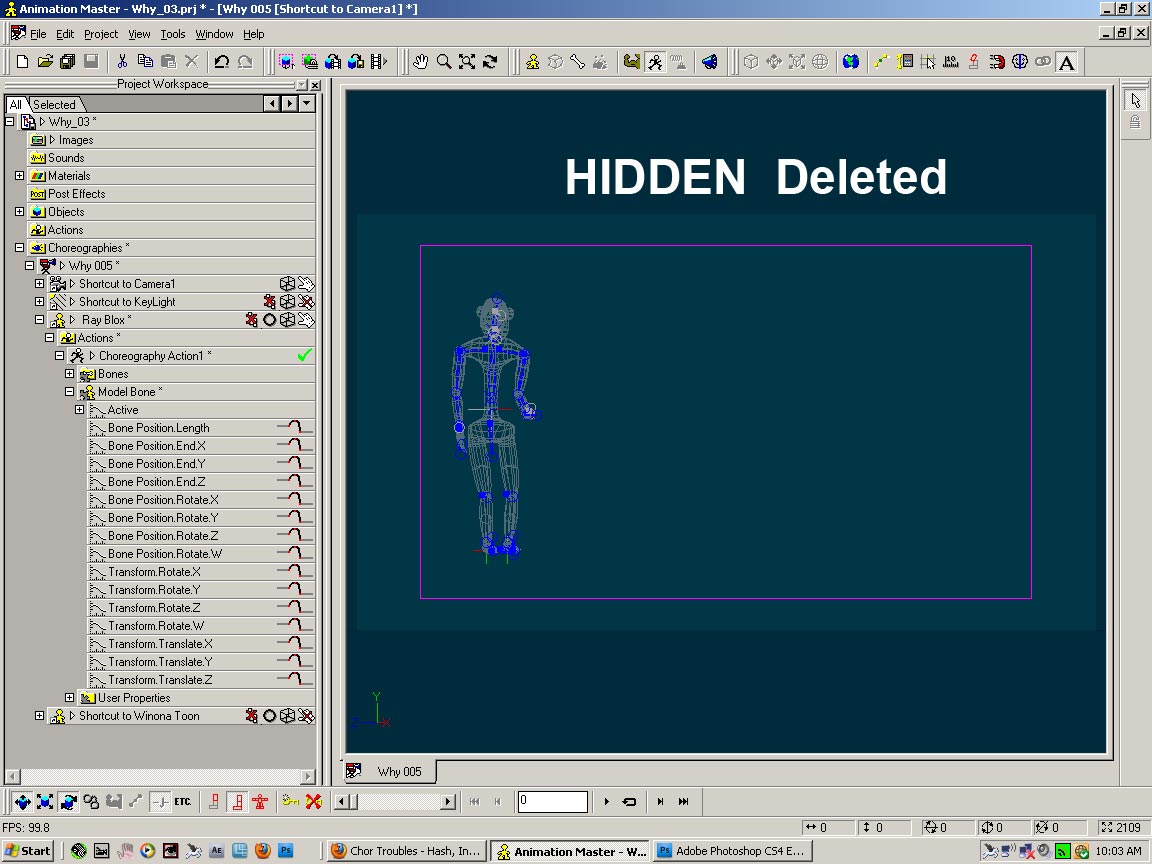
Just realized that you also have the model bone position length, and bone position rotation also changed in the chor. This is strange. They should not be there. Usually, only the translation, rotation of the model bone gets animated in the chor. You should probably delete those channels as well. Were you ever in modeling mode while in the chor? Or had an action open at same time? That might be what caused that. Maybe you meant to go into muscle mode while in chor? (not modeling).
-
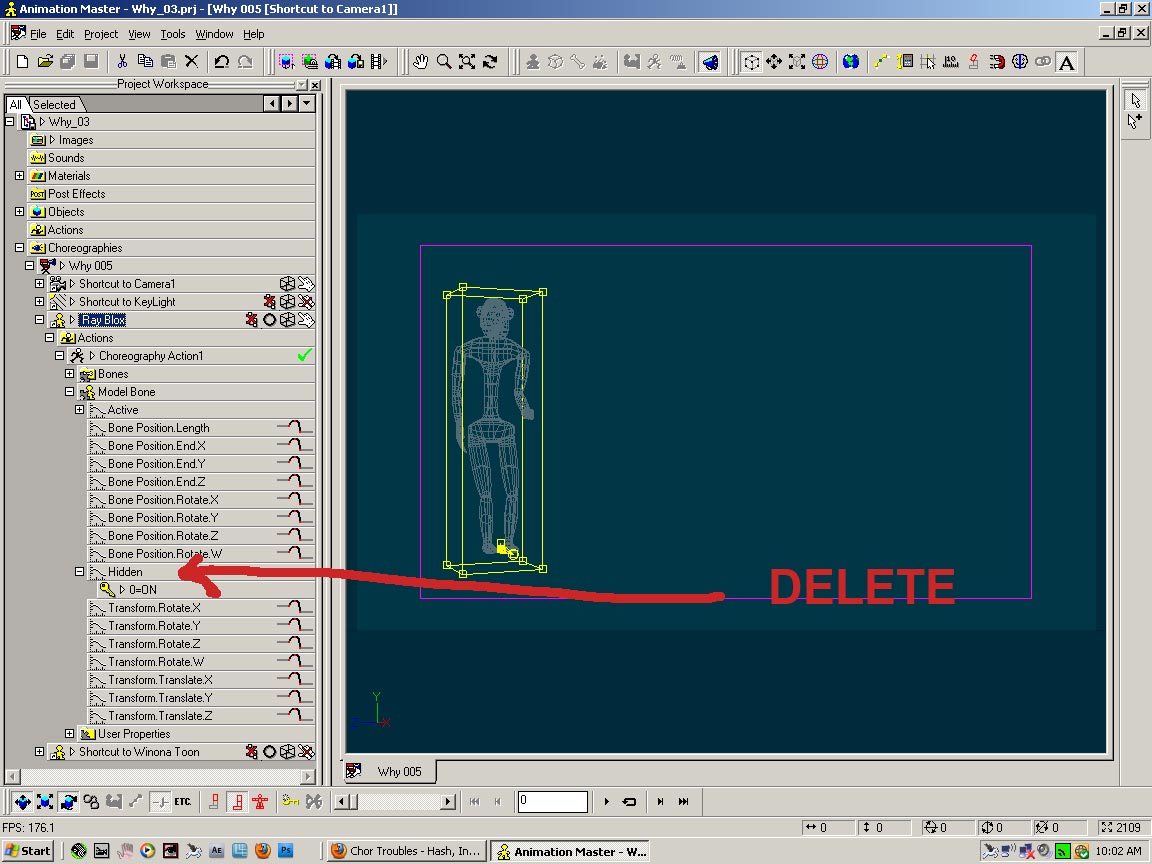
You have Ray Blox Model Bone hidden - delete that in the chor and you should be able to pick bones now (tried in 15j+ PC)
-
Beautiful! Wonderfully clever synthesis of an old artform & new technology. A slight variation - or the slinky chair done with corrugated cardboard. Makes me think someday we'll all be able to print out our own accordian slinky scupltured structures with soon to be available at "Staples". I guess he hand glued each sheet to the next with a "honeycomb" type pattern scheme? whew! (It would make sense that eventually one could program the 3D printer to glue in honeycomb fashion as an option, if you can't already)
-
Definitely reads better. I must admit I wonder why the hedgerow is so thin in width? I think I would prefer it thicker. But I too, like Rodney, find the design of the mid section of your characters strange. So I'm guessing it's a conscious design choice/preference.
-
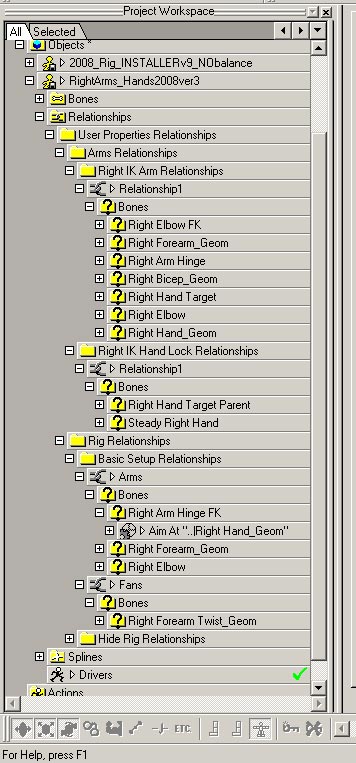
I'm not an expert in 2008, but you would NOT have to reinstall everything. However IF you reposition the geometry bones (and depending on how you reposition them), then most likely as well, some of the control bones for any of the arms/shoulders, would have to be repositioned. AND probably more than likely, you would have to revisit (edit relationship) some of the control poses/relationships for the arms just to make sure that the controls were "snapping" to the right place. ie that the offsets for the compensates were zeroed or were correctly offset. If things aren't working after repositioning the geometry bones, the places to look in the relationship folders would be in the ARMS relationship folders, as well as in the basic setup relationship folder for any arm bone mentions and the constraints that are imposed on them. I've just uploaded an image showing potentially the folders to look at for the right arm only (you would do the same for the left side). I have isolated all the parts of the 2008 rig for myself, and have deleted any auto-balancing type features, so your folders will look a little different (& will include the other body parts) - hopefully you get the idea.
-
Or perhaps have a little bird or butterfly fly-in and land on the top of it to give us a clue that it is a 3D hedge, separate from the far background imagery?
-
It looked all black to me as well, so I brought your png file into PS and adjusted the input levels, to where it more closely matched your description. The input levels were highly compressed. Was your image straight out of A:M? or did you process it further? I also added a white background so that I could see it better. Love the look once it is corrected. Maybe your monitor isn't calibrated the same as ours?
-
I love it when other people get older. Happy Belated Birthday, you ol' antiquarian you!
-
You might like using the volumetric effect mist? Holmes gives a tut, project located here. See page 9 of the pdf Maybe you are using mtpeaks (mark skodacek's) ocean generator? Ocean rig is located somewhere in this thread (not sure in which post is found the final rig)