mtpeak2
-
Posts
5,719 -
Joined
-
Last visited
-
Days Won
1
Content Type
Profiles
Forums
Events
Everything posted by mtpeak2
-
At first, I was going to have all the switches have an on/off pose with a master on/off pose that turns those switches on/off, that's why it has it's own folder, but I got lazy.
-
Ken, the way the spine pose is laid out, it needs to start in FK in order for the switch to work. If I can figure out a way to have it in IK to start, then I'll add it. Nancy, the reason for the Z rotation on the scale to reach switches is that they are percentage poses, the stomach and chest IO are also percentage poses.. The switches have euler limits that allow them to rotate 100 degrees, rotating them 50 degrees will set the pose to 50%. The face switch is setup using rotation to avoid confusion with the nulls of the interface. If you don't want the switches you can just turn them off in the models user properties and save the model as the new default. If you like the IK Squetch, you should try it with auto hips ON. Basicly, bone switches rotate and null switches translate.
-
Thanks again DJ, all switches have been checked, so if you find any more, they're already fixed. Xtaz, the sleeves are there if you need it on you model. This allows the bicep to twist, but the sleeves won't. There is separate geometry bones for the biceps and sleeves. Basicly used for short loose fitting sleeves.
-
Thanks DJBREIT, I set the limit manipulators to ON. I knew I was forgetting something.
-
First problem, you installed the 2001 rig. Next, as Nancy said, it appears you have IK leg setup turned off. It looks as though you have some bone out of position as well. The foot bones need to be pointing straight down in the 2001 rig. And the leg bones don't match up from the left side to the right side.
-
Replacing existing model with another model
mtpeak2 replied to ernesttx's topic in Work In Progress / Sweatbox
Open the right model in the project that has the wrong model. Select the wrong model in the chor and open it's properties. You should see "shortcut to", select the model that it shows and a drop down menu will appear. You can then select the right model. Save the prj. -
Sorry Daniel, I don't know how long that will be.
-
Not my call on that Daniel. A new update will be coming soon. David and I have been doing a major overhaul on the rig (fixing some minor things, updating features and adding new ones). Once we have it ready for a release, I think David will be doing a new installation video tutorial.
-
squetch rig - some looks different as in the tutorial video
mtpeak2 replied to thefreshestever's topic in Squetch - Rig
No. -
squetch rig - some looks different as in the tutorial video
mtpeak2 replied to thefreshestever's topic in Squetch - Rig
All those bones you see are geometry bones, just assign the cps to the bone that fall in the same general area. These extra bones are for the limb bowing feature, plus allowing them to twist. -
Can you post the setting you are using? It appears that your height and width are the same measurement as the step height and width.
-
Delete all the geometry that doesn't have hair applied, scale the geometry slightly smaller and "save as" scalp with hair, or something like that. Now import the scalp model into your full model. Make sure you assign the scalp geometry to a bone in the rig and save. This should work in v13s? (can't remember which version that was fixed in) and up.
-
After simulating the dynamics, you need to turn off the dynamic constraints (enforcement 0%). Also, turning the constraint off in the chor or action creates keyframes on the dynamic bones, you must delete these, they override the dynamic simulation data. You have to do this in v14, v13 you do not have to do any of this. If you have the dynamics setup in a pose, you can turn it on/off from the user properties of the model, under the objects folder. This will not create the keyframes.
-
Very nice lamb and animation. It's a shame the lamb has fleas. The jitter stands out, try rendering with 0% jitter. You also have 100% direction variation with a 100% face camera, plus only 1 cp (didn't know that was possible), this will most likely have the hair flipping all over the place with a moving model and camera. What version of A:M are you using?
-
Can't view it with sound either. The first clip was great though.
-
Jitter is v14, I think. Sorry, didn't realize you were using v12.
-
You can also lower the density and use the jitter option to make it look like more hair than what's there. I would also lower you direction value, for the most part, animal fur is usually pretty uniform in direction. As Luuk suggested, remove the transparency and just taper the thickness of the hair in the timeline.
-
Godzilla X King Ghidorah: Vengeance Project
mtpeak2 replied to Mikal's topic in Work In Progress / Sweatbox
Cool model, looks great! -
Looking real good Tai Shan, keep at it.
-
That looks great John.
-
Problem with hair - Five point patches are bald
mtpeak2 replied to thefreshestever's topic in New Users
Check the direction of the normals of the 5 pointers. -
David, I tried to check out the biped toe add-on, but I got an error when trying to select the zip file. Quad toe add-on as well.
-
I don't know what to tell you, the image I posted was an edited version of the image you posted. So now you are telling me it's different? I am looking at the model in v12.
-
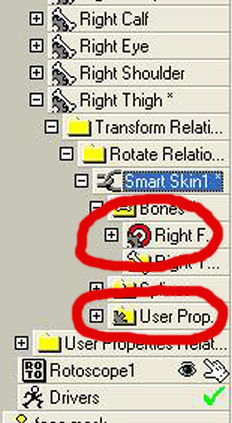
Sorry to take so long to get back to you. Delete the 2 ideas I circled in the image. The version you sent me doesn't have the right foot target in the bones folder of the smartskin, that needs to be removed as well, and delete the user properties folder that is directly under the splines folder.