mtpeak2
-
Posts
5,719 -
Joined
-
Last visited
-
Days Won
1
Content Type
Profiles
Forums
Events
Everything posted by mtpeak2
-
Sorry Jeff, been pretty busy with TWO today (yesterday). It could be done, but it would be easier to go back to your installation action, it gets pretty complicated adjusting bones manually in the rig.
-
I used the chrome and gold materials (dropped on each group) and the skytracer model from the AM cd, default chor lighting. Don't know if that's the look you are after.

-
Just realized, you rendered in shaded mode which will not render reflections.
-
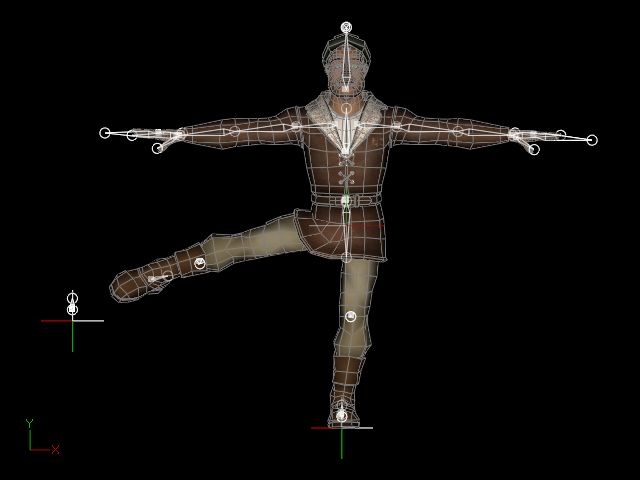
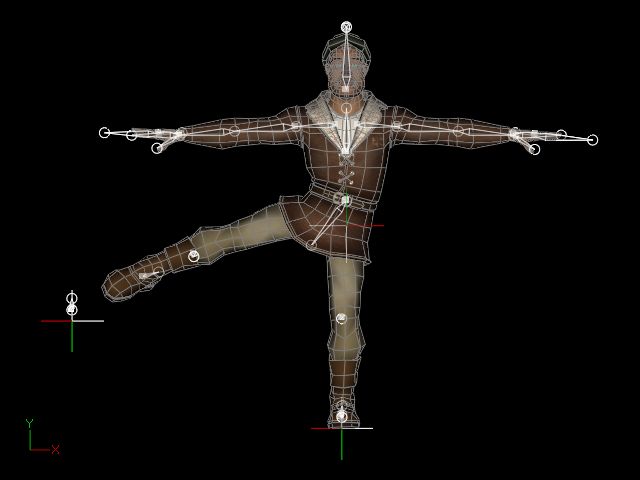
First thing I see as I look at the bone placement, is the shoulder joint, it's too closer to the center of the model. If you look at the placement in STEP 3, you'll see what I mean. You'll never get good arm rotation in the position it's in now.
-
Do you have reflections turned on? Also, it needs something to reflect.
-
The face compensates are in the Animation_Controls>Face_underlying_controls.
-
I took a quick look Jeff. For the mostpart, it's pretty good, but there are a few problem areas. The shoulder/bicep joint could be alot better and the crotch area. The face is hard to tell without both sides done, but from what I can see, it needs work too. I'll try to give you more on this when I have time.
-
Ok, Jeff. You want to do this one step at a time. 1. Assign cps (if a spline ring falls within the bones length, assign the cps to it). 2. Compensate the constraints (using David's text file as a guide). 3. Open an action and and start weighting the spline rings (the closer the ring gets to the base or end of the bone, you'll want to add weighting to the bone it is getting closer to, the closer it gets, the more weight you add) 4. Once you rough in the weighting, you can then fine tune it by weighting single cps or smaller groups of cps (you can weight cps to as many bones as you want, as long as the total percentage adds up to 100%).
-
That looks as though it will work, as far as I can tell from the image.
-
Yes, the pose name says it all.
-
Hey Will, where is this 2007 biped rig? Is it one you created? Is it downloadable somewhere? Curious minds want to know.
-
I don't use it.
-
I'm not sure what you mean Dhar. The hip null? Or the hips lower controller? If you are refering to the hips lower controller not moving with the hip null, auto hips is turn on in the leg controls folder.
-
Rename your image to F1_001_small. Remove the periods from the name, AM doesn't like that. I renamed the decal, relocated the image and saved. When I reopened the project, the decal showed.
-
Just for the record, I didn't say you have to use cp weighting when smartskinning. I recommend weighting first, then if you need to, smartskin. I vaguely remember genocell's problem, cp's were jumping all over the place, why, I don't know. I do not use smartskin (for cp's anyway).
-
Are the images and model saved to your HD? You can't save the model back to the cd.
-
Fabrice Fave has a few tuts. These are a bit out of date, but they still can apply to the current version. The landscape tut still applies, he uses the terrain wizard. The grass tut uses the old hair material, but will still give you some idea on what to do. Here's the link.
-
Between 44% and 64% stiffness, the settlings seems to take a long time. Nothing I can do about that, except for changing the default settings of the pose slider stiffness to say 64% or higher, I don't think we want it as low as 44%. Edit: It's not a problem in v13t. It looks like a v14 issue.
-
That's the dynamics settling.
-
Rusty, all I meant by "bug-free" was the possible dynamic feature, not the whole rig.
-
You don't have to use it, but it does put the hips in a better position and you can still modify the bones rotation.
-
Well, here's the difference. To me the auto_hips looks more natural. I believe you used it on the hippogyraf.
-
Squetch Rigg Video: Discrepancies to the real thing
mtpeak2 replied to Heiner's topic in Squetch - Rig
Just import the posable rig into your model. Now with the rig in your model, create a new action. The posable rig uses all pose sliders to position the rig, you won't have to manipulate any bone. Here a link to the "Getting Started" thread. -
This is a separate version Nancy (Ku-Klip_jiggle model). I did not save over the previous version. If the jiggle is needed for all the other scenes then I'll turn the auto hips off. Auto hips aim the hips_lower_controller between the two foot targets, it still can be used manually. I'm not sure why more people don't use it more.
-
Squetch Rigg Video: Discrepancies to the real thing
mtpeak2 replied to Heiner's topic in Squetch - Rig
Are you using the posable version or the standard installation version? The standard version gets installed in the modeling window, the posable version gets installed in an action. It sounds like you are installing the posable version in the modeling window.