-
Posts
5,412 -
Joined
-
Last visited
-
Days Won
89
Content Type
Profiles
Forums
Events
Everything posted by Fuchur
-
I would say you should buy A:M v15.0. Till now there is no v16, but v15 is different now than it was at the start of 2008. Bugfixing, a few new things like Baking Particles etc. were implemented too and so on. I started with v8.0, got after that v10 and since than every update. A:M v15 is a bit different, but Splines & Patches are still quite the same (of course with a few new features, but the basics didnt change too much). Today you can buy A:M in two different versions: For 79 Dollars as Websubscription (will work for one year on one computer) or as CD-version for 299 Dollars as you know it. Even so the Item was inserted 2007 you will nevertheless get the v15 (A:M 2008 / 2009). As it was in v8 you will have to update your version via the updates. They are nowadays available in the "Latest Info"-Area. See you *Fuchur*
-
I think there were some changes to the way imagesequenzes are handled in v14 with some bugs sorted out... But I can really say what was done there... *Fuchur
-
Have a look at this thread... he is making very very fine models with A:M: Thread "3d milled hash models" *Fuchur*
-
You are so right... money cant buy happiness... Hope it works out for you! Best luck! *Fuchur*
-
Of course I am doing them if someone has a problem and it is often just easier showing people what they can do than trying to explain it by words... I will have a page on my new webpage where I will point to all of these little tutorials here, so that these informations are not lost somehow. Bitte bitte Jake... immer wieder gern *Fuchur*
-
no Shaggy at all. nose and mouth yes are parts though. Maybe Nigel (the old fellow in the suit) for the nose? *Fuchur*
-
Is the light in the bulb? If so, try placing it a little bit under the bulb. It may help. You can although try to change the falloff and the coneangle a little bit (just a few degrees). This may help too. *Fuchur*
-
Be sure to buy a 3d connexion-product. Any other driver isnt supported. So an option would be the Space Pilot or Space Pilot Pro. The smallest possible 3d-mouse available for under 100 dollars is the space navigator. It is available in a personal and a commercial edition. Personal is only for personal use but other than that has the same functionallity like the commercial one. Commerical One 90 Dollars, Personal One 55 Dollars. (April, 18th 2009, http://www.novedge.com/brands/5) See you *Fuchur*
-
No Problem *Fuchur*
-
There are several different possibilities to archieve that depending on which version you own. You could do it with a baked texture which could than be animated like I showed you before. For that use "Surface-Baking" with your material applied, delete the material and blend the texture to the base-color. However this isnt the best way to archieve such a thing but it would work out. 3 other possibilities are discussed in this little tutorial-video I am doing here. Sorry for the bad english... and the bad audioquality sometimes. It is because my computer is old (10 min, about 24 MB, download is zipped, H264 mp4 - needs VLC or Quicktime to be viewed) See you *Fuchur*
-
No... materials can easily be changed. Just the surface-options "Diffuse Render Shader", "Ambiance Render Shader" and "Specular Render Shader" (last entries under any Surface-Properties) shouldnt be changed. At least not to another shader. Shader-attributes arent that critical, just the shader itself. I dont think there are many people who do use the shader-attributes at all so... Most seem to be happy with the Standard-Shader (I would say it is a special kind of Phong-Shader, but I dont know exactly). *Fuchur*
-
Totally easy, have a look at this little video... -> Tutorial: Animate Decal-Image or Color by Pose (about 4 MB, use Quicktime or VLC to view) Most important: Use the Relationship-Action and the Show More Than Driver-Button! If you want to blend different images, use the same technik as in the video to blend between both. See you *Fuchur* PS: Don't try to change shaders with this method... that will very likley result in a crash of A:M. Everything else should be changeable.
-

Semi-Realistic Girl Character "Lany" (Nudity)
Fuchur replied to Fuchur's topic in Work In Progress / Sweatbox
I really don't think there has been a change in porcelain material - but here it is anyway Thank you Nancy... yes you are right, it seems to be the same but one difference: Yours had 100% as normal weight and mine had default. (I think default is 0%). However I reduced the normal weight a bit and at 85% it isnt visible but it is a little bit smoother (most smoothness will be archieved by 0%). So it helped a bit... See you and thanks again *Fuchur* -

Semi-Realistic Girl Character "Lany" (Nudity)
Fuchur replied to Fuchur's topic in Work In Progress / Sweatbox
Can be helpful as a base-texture, but I dont recommend it for final stuff. *Fuchur* -

Semi-Realistic Girl Character "Lany" (Nudity)
Fuchur replied to Fuchur's topic in Work In Progress / Sweatbox
Hi Nancy, could you send me that one / give a link to the material? I think that is the one I am searching for... mine is a quite old one from the last CD-version I have before Websubscription. I think it is the one I am searching for but I dont have TWO / SO access. Thanks in advance! *Fuchur* -

Semi-Realistic Girl Character "Lany" (Nudity)
Fuchur replied to Fuchur's topic in Work In Progress / Sweatbox
Import these images into A:M...drag-n-drop the 'color' one onto your 'flesh' or 'skin' group in the PWS. THAT is a 'patch-image'. It applies itself like a decal fully to every single patch! Now, right-click on the 'images' under the group's new patch-image and select 'new image'... and add the bump image and set it to bump instead of color. Adjust the bump amount while zoomed in and test rendering a section. These images are directional tiles, meaning they can tile together in any direction so you wont need to go about 'rotating' any patch images. Hope you find this useful! A patchimage wont work very well. My patches are not very even sized. That will create distorted images / textures and the repeative nature of patchimages is not easy to overcome there too. I may work with a material or if I overcome the repeative-problem with a bitmapplus or directly with a large-scale decal. Dont know yet. I unwrapped my model, but there is still some distortion that needs to be addressed. *Fuchur* -

Semi-Realistic Girl Character "Lany" (Nudity)
Fuchur replied to Fuchur's topic in Work In Progress / Sweatbox
Hm... the porceline-material has an effect. It is still smoother. So I thought it cant be obsolete.. Just for hooks it has a bad influence for me. Looks like it doesnt seem to recognize the transition of the hook to the "real" patch and thinks there is a normal-direction-change. Somehow I remember a porceline-material which had an percentage-value to determine the strength of the smoothness. Have to search for it. Anyway if I doesnt find it: I plan to give her fist a full unwrapping so I can give here a nice texture-combination. I will use 3dpainter for textuering her. After that I will have a look on her clothing. I am planing to use simcloth for the looser parts and cloth included in the rig for the tighter once. And if that worked out, I have a look at her haircut. I will use the Hair-particle-system of A:M. Dont know yet if it works out, Maybe I will have to use hair-tails (Shift-Key-Hair) for it and if that doesnt work out neighter I will go the helmet-hair-root. For some shots I may although play around with SubSurfaceScattering, but till now I couldnt get it to work in a good way for me. I got it working but when the effect was visible and nice it highly depended on the background-color because the light got in the object that much, that it came out on the other site (or whatever ). But lets see it as it is: These are plans... I dont know exactly if I will find the time to do all of this stuff. *Fuchur* PS: What do you mean with "Flesh-Patch"? A patchimage for the skin or is this something different? -

Semi-Realistic Girl Character "Lany" (Nudity)
Fuchur replied to Fuchur's topic in Work In Progress / Sweatbox
Yes I thought of that... but as you can see in the above image (the one with the shaded-wireframe where I show the normals) it doesnt seem as the normals are flipped... the other site (where I rendered with the progressive-renderer) looks exactly the same and if I render the hook I circled it gives the exact same result -> black artefacts. And it appears on all the hooks but not the 5pointers. I once heard that Martin gave out another porcelan-material which had some 5-point-/hook-issues fixed so I wonder if I use the wrong one? *Fuchur* PS: The interesting thing about it: It looks like the creasings there are only appearing from certain camera-perspectives. Other points of views doesnt show these problems. PPSS: Thanks for the nice comments about the modeling -
I am working on a semi- (to high) realistic (we will see how well she will turn out ) model of a girl. She was modeled from scratch and isn't textured yet (apart from the eyes). She needs some more poses for talking- and emotional stuff, but till now I am quite pleased with her. Before I will go on texturing her, I thought I may adress the porceilan-problem I run into. I tried using the porceilan-material, but I got a problem with hooks there. Anyone knows what I am doing wrong there? The final-rendering is without(!) porceilan which looks okay too, but I would like to use the material to make it even more smooth. Any thoughts? Thanks for your comments... See you *Fuchur*
-
I am always asking myself where you get the patience from to handle that many patches with such care and understanding... amazing Stian! *Fuchur*
-
One of the best codecs is the H264 for Mov-files. It will give you a high-quality, quite small sized file. The bad thing about it: You need to have a modern computer to show it. (It is more resource-needing than others...). Although this is a very good end-codec it shouldnt be used for editing/cutting, etc. It is an endcodec, no inwork-codec! *Fuchur*
-
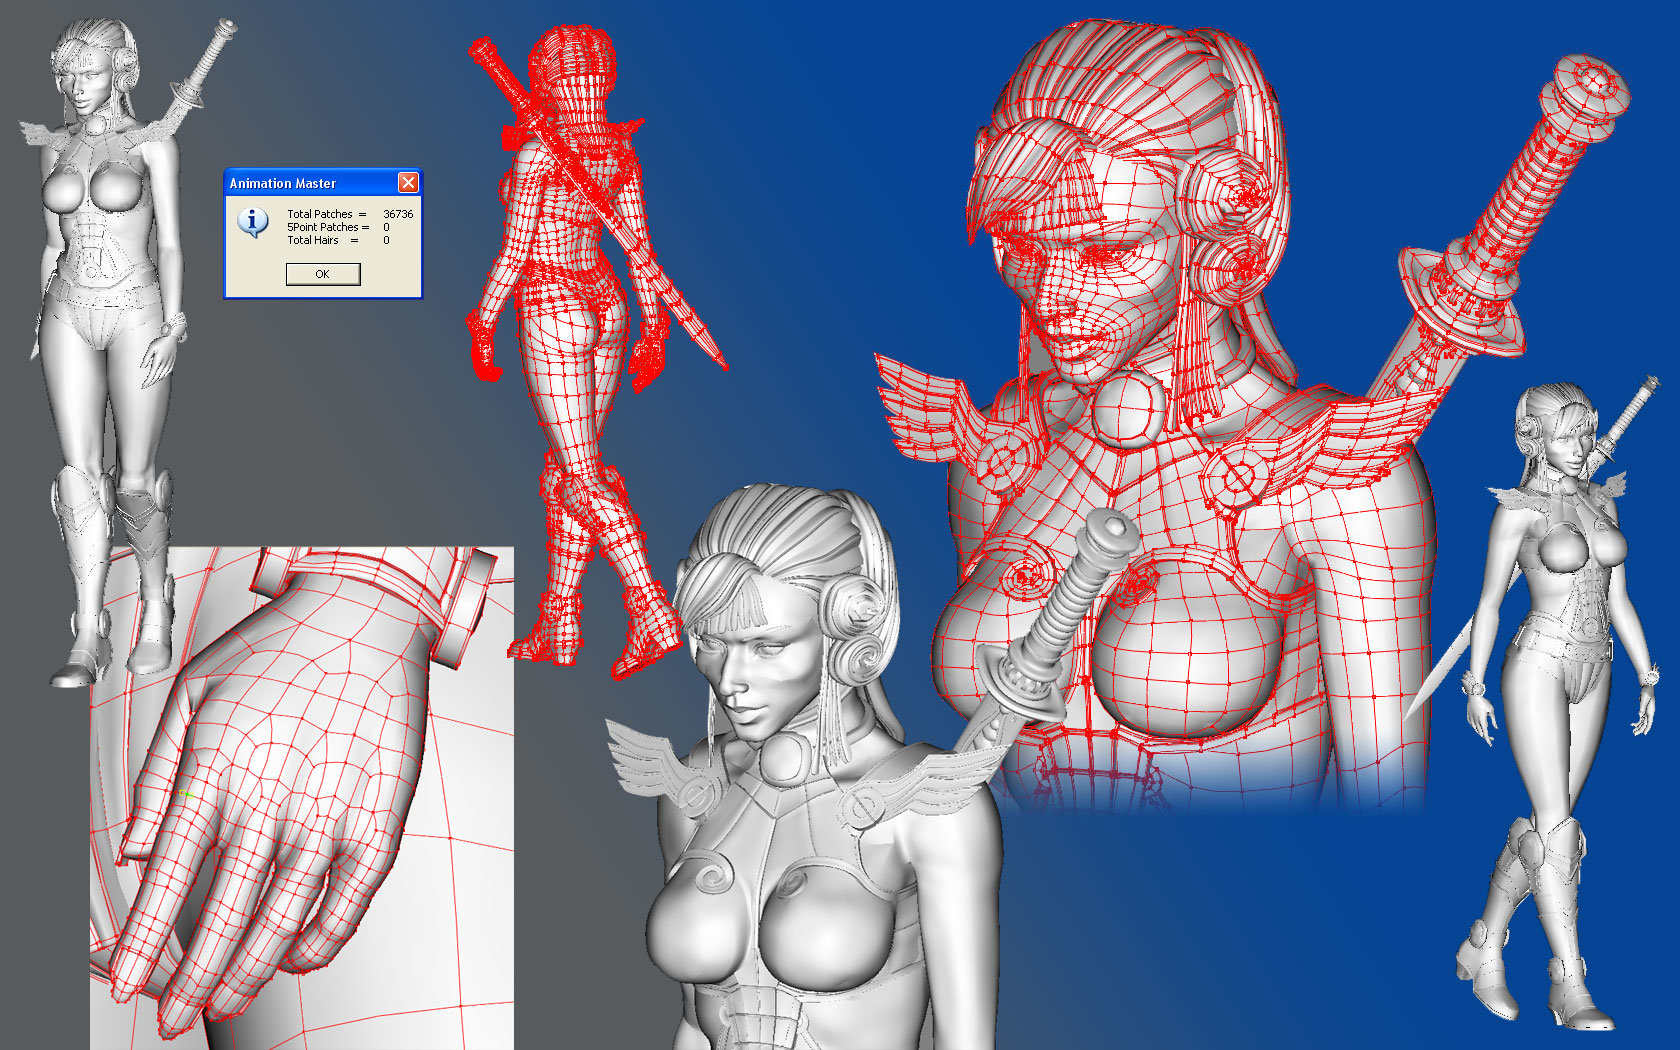
Depends... in the 3d-world-mag (Nr. 115) there is a good poly-model which can be imported to A:M quite well. It has too many patches of course but there are only a few spots that has to be redone like the hands (worst part). But most stuff can easily be re-done with a few hooks or 5pointers and you get the really nice proportions of the human model we got there (which is hard for me to get when modelling by myself). The biggest problem I see in importing poly-models is, that the finding-patches-algorithm is too slow when it comes to many patches. (above 10.000) The image of the model I attached below has about 37.000 patches which is just too much to be handle in a useful way by A:M. It came as an OBJ-file and was modelled with very good edge-loop-techniques. However the finding-patches-algorithm is that slow on my (admittedly very old) pc, that it is not reworkable in a decent time. See you *Fuchur*


