Fuchur
-
Posts
5,412 -
Joined
-
Last visited
-
Days Won
89
Content Type
Profiles
Forums
Events
Everything posted by Fuchur
-
In general you just need to copy the master0.lic-file of your v16-folder to the v17-folder. But nice that it worked that way too . See you *Fuchur*
-
-> "Public beta" . So yes you can, but you need an activate v16 subscription. If you own that, you can just download the installer and install it. See you *Fuchur*
-
Your keyframe-graph-view looks okay? No bias changed and no interpolation that could cause it? Any constraints / Newton Physics, etc. that could result in something like that? See you *Fuchur*
-
You may want to have a look at the ocean rig. It is really a very powerful and cool thing! See you *Fuchur*
-
Hi purple, could you post your project-file so we can have a look at what is going on and how far you are in the tutorial? See you *Fuchur*
-

V17.0 Mascot Contest Voting now live!
Fuchur replied to Jason Simonds's topic in Work In Progress / Sweatbox
You need to send it per E-Mail to support@hash.com. I think that is the way that always worked the best. However the contest is over. All of the entries are well done but one of the entries sticks out for me and is a good and technology-wise quite modern one. We can only vote for those who submitted their work so even if there are images which may be even better, they were not submitted to the mascot-contest and like that will not be the new mascot-images. I would have liked the alien-character as the mascot-image for example (it is really a very cool image) but it was not entered... it would not be fair to just choose anything aside from the contest because someone don't like the entries. To get an unbiased vote here, I will not mention the entried image I am thinking of. See you *Fuchur* -
You dont have to wait for the whole set to render. The blue render-button next to the green one can be used by dragging a rectangle around a part of the scene to render only that (exactly as the green one does too), you can set the rendering-settings to multipass > 1 pass, which will be very fast too and if you need it even faster (showing the particles), you may want to have a look at the shaded-mode too... See you *Fuchur* PS: RAM-usage is based on the scene... if your scene does not need more RAM than 1 GB it wont use more. CPU has to calculate the scene and that takes time. If there is not enough data that needs to be placed in the RAM it wont place more in there. In general you should be able to use all the RAM you have. (I think the newer Mac-OSs all are 64bit, so I am just guessing here. If they are, they can use at least 196 GB of RAM or even more if available. (I think 196 GB is the limit of Windows... I am not sure how much you really can use with a 64bit-system... but that is very easy to find out using wiki).
-
Very nice walk-cycle... like it a lot . See you *Fuchur*
-
You may want to give it some more hope somewhere... all you are saying is, that everybody will die and there is nothing to do against that... somehow I would need some kind of hero or something to be more involved with the story... I am sure there is something like that in the book, but the trailer needs something to give me the feeling that it is worth fighting, etc. Every story has something like that... not the best example but it is one of the most successful storylines I could think of right now: Asterix and Obelix: "The year is 50 BC and the Roman Empire is at its strongest. Gaius Julius Caesar has conquered most of Europe. All of Gaul is under the Roman rule. All? All except a tiny village in the Armorica province, populated by some irksome, indefatigable and irreverent Gauls..." -> and now it starts... There are plenty of other examples, but this is the most obvisious one. See you *Fuchur*
-
I am really not quite sure what they are talking about... of course you can edited Quaternion... it is just curves after all... which one is not really important... even so they need to be handle slightly different... but why shouldnt it be possible at all? See you *Fuchur*
-
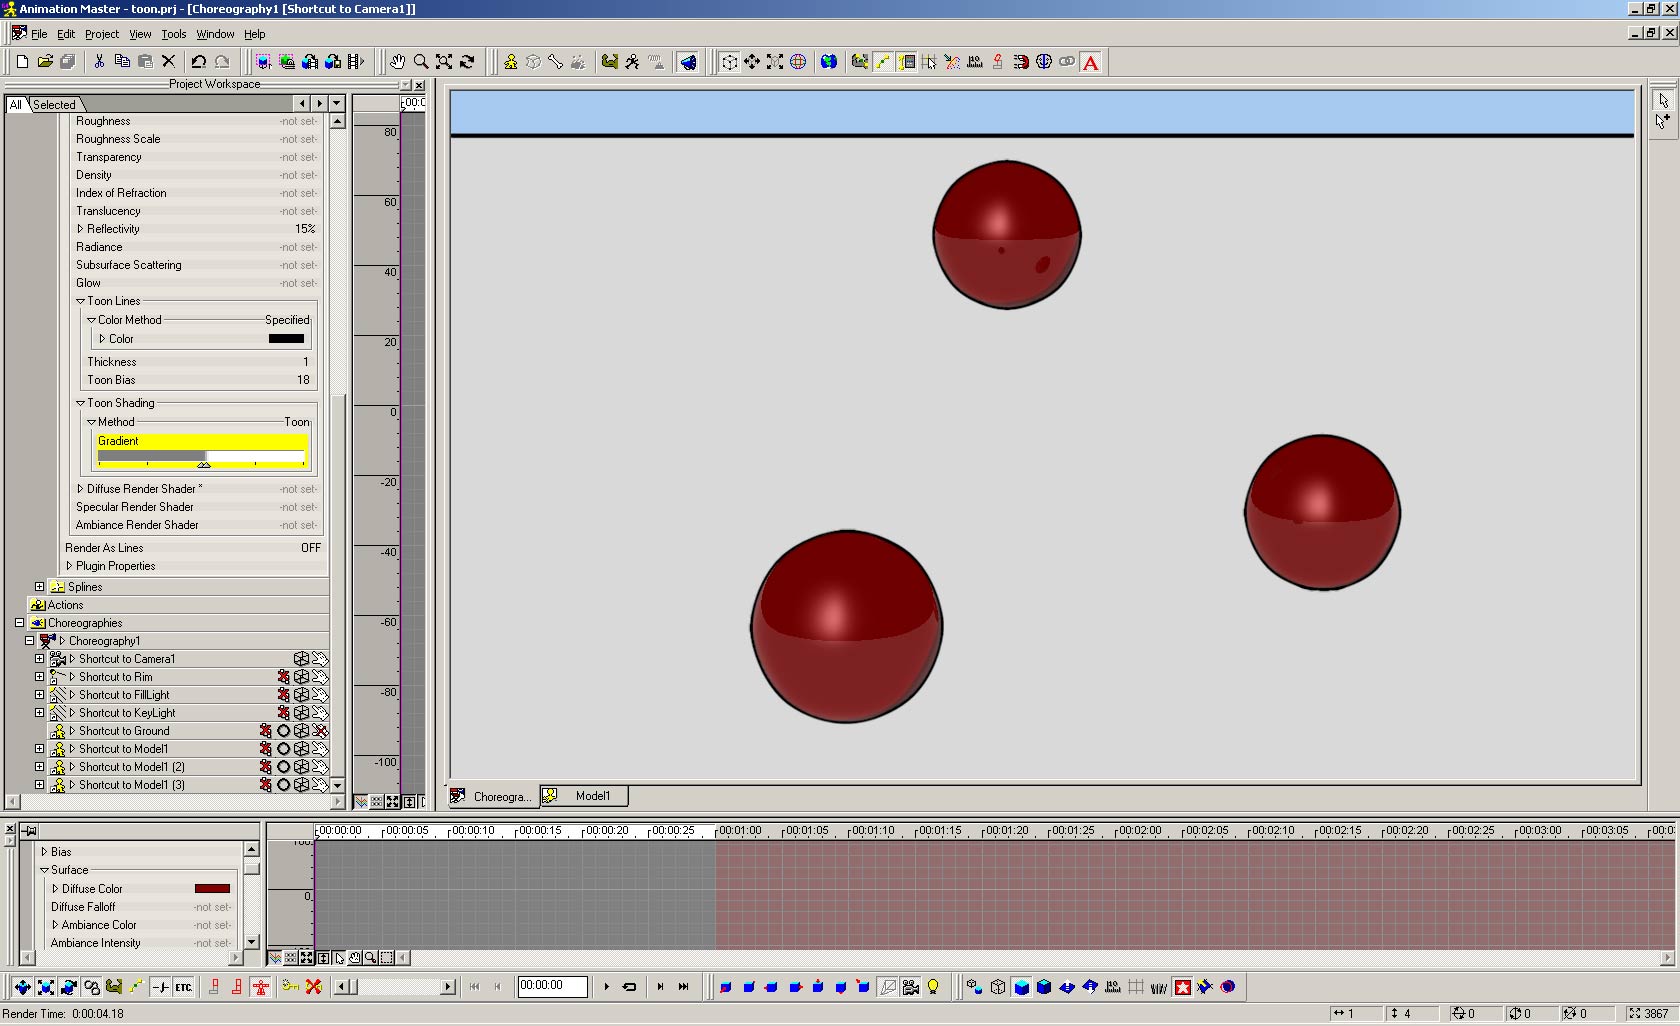
Have a look at this Project. It may help. The project shows some of the possibilities. Use the Renderpreset to see what it can do. It is really easy to setup and quite powerful. Play a little with the settings and you see what is possible. (Be sure to render with the blue renderbutton or render to file, not the green one. Otherwise you won't see the effect.) See you *Fuchur* toon.pre toon.prj

-
Comic-Shaders are some of the best available. See you *Fuchur*
-
Cool looking lightening... very close to the original foto... really stunning. Just to mention it: 3GB Ram (thought it was 8Gb, oh well) -> if you are running a 32bit-windows, you can't access more then 2 (with a trick up to 3) GB of RAM. That may be the reason why you are not seeing all of the 8 GB of RAM you installed. See you *Fuchur*
-
MDD is an animation-format. It cant handle bones but only Vertex-Animation. The good thing about it is, that it really doesnt matter what you animate with. While DirectX cant use (for example) SmartSkins MDD isnt limited there. It is very useful if you want to export Animation-data from A:M to another 3d-programm. (modo for example) It is not editable with the bones in the other programm, but if you do it good in A:M you can use the other programm for instance for rendering or effects. Soulcage Department has posted some test on the forum. You amy want to use the search to find some of them. You may want to try to upload it again. First make a ZIP-file and then upload it. This forum can handle uploads up to 2048 MB (that is 2GB, not 2 MB) if the fileformat is allowed. See you *Fuchur*
-
Just to mention it... from v16 on, A:M offers MDD-Export. Combined with OBJ this can be very powerful. And you should have a look into my signature. I have found a quite easy, cheap and fast workflow to FBX for A:M. See you *Fuchur*
-
Robcat is right. That should cover it. See you *Fuchur*
-
If you experience such a problem, you can always reset A:M to start again with the standard-layout-mode. Can be done by clicking on "Help > Reset A:M" and restarting A:M. You will loose all your manually set window-position and the windows which are shown by default. See you *Fuchur*
-
Something you'll love in v17 is the Spline to Surface tool. With it you can model on top of an existing construct and even change/replace that underlying construct too. It's also great for modeling extra (unconnected) details right on top of a model. Note to those using Spline to Surface in a Modeling Window: I find it best to lock down the template after drawing a small 2 CP spline using the Lock key/icon. Then delete that spline and model over the locked geometry. Of course... make sure you select the Spline to Surface icon before splining or else you'll model a lot of geometry that isn't on the intended surface. Doh! I hate it when I do that. Snap to Surface, not Spline to Surface Rodney, but other than that: Yes, good suggestions. See you *Fuchur*
-
"Copying models" can be done by saving them externally, reembed them, rename them and import the exported model again. Sounds like much work, but really isn't. 1.) on the model > "Save As...". Save it somewhere. 2.) Go to the model in the ProjectWorkSpace and go to the Property "File info > Embed". Klick on it to reembed it. 3.) Rename the model in the PWS (select an hit F2 or > Rename). 4.) on the model-folder and choose "Import". > Select the exported file. 5.) Do the same as in 2.) with the newly imported model. See you *Fuchur*
-
Best wishes and have fun Mark! See you *Fuchur*
-
Wow... you are a true veteran of A:M as it looks like . GridWizard is from you... Welcome back! Hope to see you around here more often. See you *Fuchur*
-
the decal was simply applied..no plugins..but I'm wondering if perhaps a material would be better suited? Is there a quick and "easy" way to use an image as a material, and if so how. I've gone thru the forum and found no tuts, and materials are so far still a black art for me. BitMapPlus or ProjectionMap. One is from Hash, one is from Marcel Brickman -> KCI-group. See you *Fuchur*
-
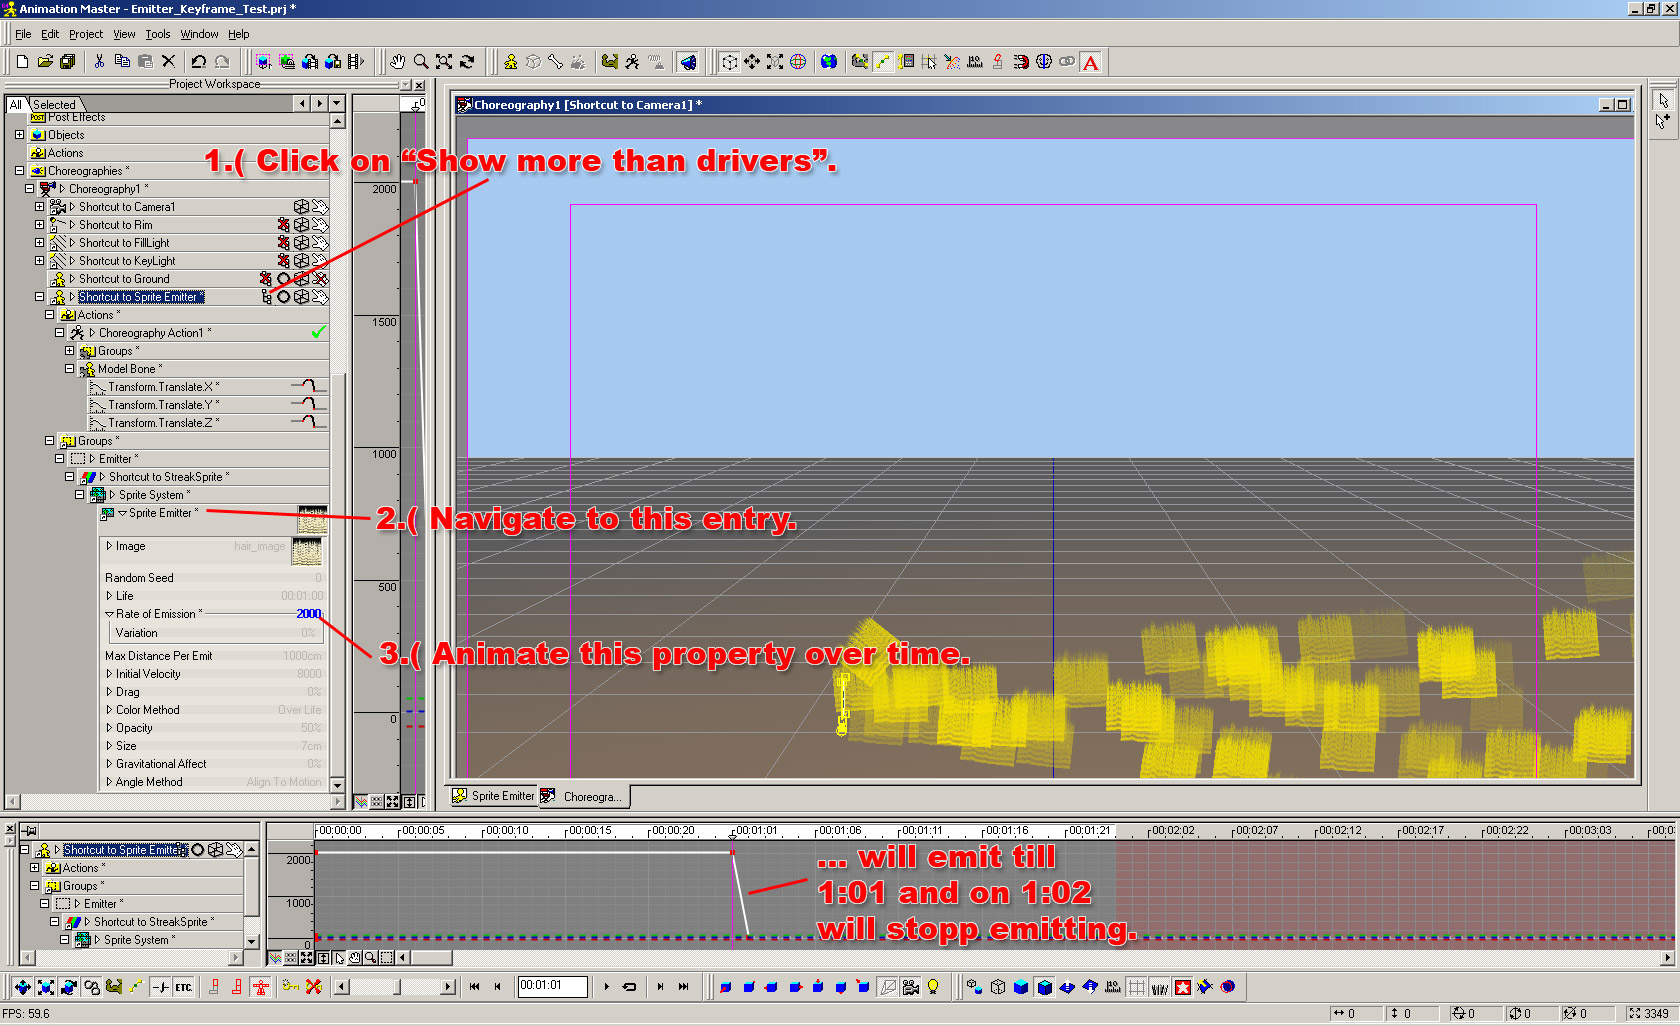
Could you show that from the PWS rather than the Timeline? How about a vid and the project file instead? It's just a quick recording Robert of whats happening so you can see what I'm actually doing. I'v also attached a test project file too. I cant see the PWS fully, but it seems that you are trying to animate at the material itself. That is the wrong place to do it. You need to animate the Shortcut of the Material in the chor. For that you have to go to the chor in the PWS, go to the model with the emitter-material and click on "Show more than drivers". Then navigate to the group with the emitter-material. See the attached image for more infos. See you *Fuchur* PS: Had to use another sprite-image to simulate it, so dont be confused by that. Images cant be embedded into project-files.
-
hhhmmmmmm I still have 3 days I've send in two entries of myself. Hope you guys could make it too! See you *Fuchur*
-
A:M v16 (and up) utilizes multi-cores using OpenML for Finding Normals and a few other functions (where it makes sense). Like that today you can handle more patches in a single model than before. It highly depends on your core-amount and the power of your system and yes you will still run into the problem somewhere. Best is to avoid that by assembling together multiple models in the chor. The new Snap-To-Surface-Feature in v17 maybe helpful there too. There are many changes from v13 on. I am not totally sure what was in v13, but these are the bigger and "newer" features in A:M (not in chronological order): - Speedimprovements (especially from v15 to v16 but also for v17) for both Windows and Mac. (windows-computers seem to perform a little better so). - Netrenderer now included with 4 cores for free and addtional cores that can be bought seperatly for a very reasonable price). - IBL, Ambient Occlusion (with Transparency-Support) and FastAO (> Plugin, actually called "FakeAO" which is very fast, the newest one even can use the GPU-power, but even the CPU-version takes only a few seconds to render with) - Fluid-Particles - Hair-Shaders (additional to the standard-hair-system) - HDRI-Rendering with Buffer-Output - STL-Export (for example used by 3d-printers) - MDD-Animation-Data-Export (to export vertexed-based animation). > for example to get animation-data to Modo) - RenderPresets to share render-settings in an easy way. - Selection-Filters for easier selection. - SubSurfaceDisplacement (I am not sure if this is really new for v13 or if it was included there already). - Bake Surface (> bake Surface-attributes to decals so they may render faster. Includes an AutoUnwrap-Algorithm which is best to be used with 3d-Painter) - Newton Physics (I am not sure if this is really new for v13 or if it was included there already, but they have been improved in v15 if I am not wrong). - 2008 rig, face rig, lightrig - Snap-to-Surface (in A:M v17) - A:M Answers (in A:M v17) - UV-Editor-Improvements (in A:M v17) ... endless smaller and possible bigger improvements I can't remember right now. See you *Fuchur*