MMZ_TimeLord
-
Posts
1,495 -
Joined
-
Last visited
Content Type
Profiles
Forums
Events
Everything posted by MMZ_TimeLord
-
Thank you for that rapid response. If rendering finals for production, I would probably use it then as the hit is only about 30%. That would of course depend upon the scene, amount in frame, etc. Typically, you would not have a huge amount in frame unless you were flying in for a closeup of a bee sting or some such.
-
Question: What is the render hit vs. a simple bump map?
-
Yet another Amplitude plugin test
MMZ_TimeLord replied to robcat2075's topic in Work In Progress / Sweatbox
I would love a crack at this project. Can you give the sample project along with a description of the export format from Audacity? -
Sneek peek of My Steampunkish WIP
MMZ_TimeLord replied to detbear's topic in Work In Progress / Sweatbox
Yes, the old film look if the piece is very nice. Excellent model. Curious though... why the hose to the sword? Flaming sword? -
I can offer to use my six core machine to render some frames if you like... it should speed things up with six netrender nodes working full tilt boogie. Keep in mind the upload and download times for the data. You can send me an email, PM or answer in this thread!
-
I found this information here. So, you are looking at just under double 1080p. Not even double (not really four times, unless you are talking about pixel count) an actual standard media resolution (1920x1080 or 1280x720). So, you figure you could double the horizontal and vertical on a 720p frame and still have a 80~90 pixel border. This would be less than a 4k scan of a standard movie frame in any aspect ratio, but more than a 2k scan. So, even Bluray discs will now look a bit blurry on these displays? I can't imagine people having a large enough Apple display to be able to tell the difference. But, what do I know...
-
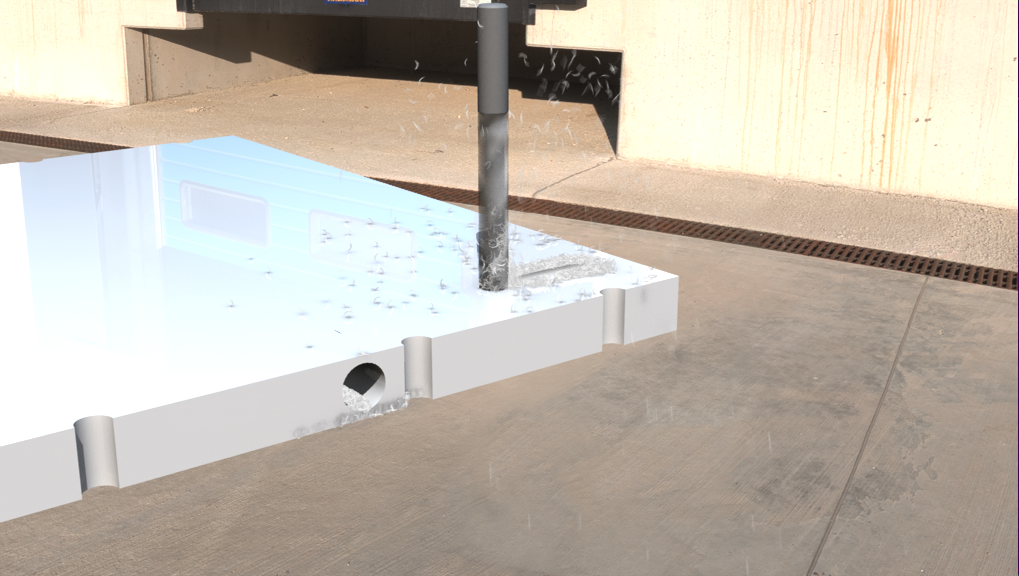
A little drilling and milling for fun...
MMZ_TimeLord replied to MMZ_TimeLord's topic in Work In Progress / Sweatbox
thejobe, You have to rotate the object at least once in the Choreography to create a key. Then right click on the 'rotate' section of properties and choose "Convert to..." and select "Euler" (Pronounced "Oiler"). Then you can set the rotation to say... 72,000 for 200 full turns. Cheers! -
A little drilling and milling for fun...
MMZ_TimeLord replied to MMZ_TimeLord's topic in Work In Progress / Sweatbox
1. It's a design for a HHO cell I'm working on ... still lots to do with it. Not sure it's complete yet, but I wanted a better visualization for my drawings. 2. HAHAHAHA... I totally missed those things turning counter clockwise! LoL! Now I WILL have to go fix that! I think I'll take care of that and adjust the copper, per robcat's suggestion too. Whee!!!! -
A little drilling and milling for fun...
MMZ_TimeLord replied to MMZ_TimeLord's topic in Work In Progress / Sweatbox
Okay, so I think I'm done with this fun little project. For now at least. The device fully assembles itself... wheee! Comments and critiques are encouraged... HDRITest003.mp4 -
If he has Hodgekin's disease, they will most likely insist on a small series of radiation treatments as 'clean up' for the Chemotherapy. This is what they did for me. I was stage 2A "Bulky" before we got the biopsy back and other tests completed. All in all, it was mainly a huge inconvenience for me as I could not work. Anyone in a desk job where they can rest, and are doing mostly meetings, reports, etc. can usually continue working. My work is more physical and also involves possible contact with rodent feces and other fun things. I was not allowed to take that chance because the Chemotherapy compromises your immune system. The Chemotherapy went VERY well for me too, but they still insisted on three weeks of radiation to make sure it was all taken care of. I go back for a follow up PET/CT scan in October to verify my lungs are healed as well as the size of my lymph nodes has either not changed or gone down. I have a video of one of my radiation treatments. (38Mb, too big to post) Under fifteen minutes from before getting on the table to after I get up. The 'static' in the video during the buzzing sound is the actual time of the radiation exposure. Mine was a "Stereo" treatment. One from the front (top) and one from the (back). Where the beams merge is the highest concentration of exposure. Also, they can 'shape' the beam now in the emitter area. Two hundred magnesium 'fingers' move in and out to shape the beam. It was... all in all, uncomfortable at times. Irritating at times. But I had loved ones around me and my lovely bride to keep me smiling. NEVER loose that positive attitude. You WILL beat this. It has already been beaten, you're just not done beating it yet! Enjoy!
-
largento, Just recovered from Hodgekin's Disease myself. Port removed from my chest about a month ago. It was about a year out of work all in all. Six months of Chemotherapy, a hospital visit in there (fevers) and three weeks of radiation for fun. *HUGS* to your Brother. We'll say some prayers.
-
A little drilling and milling for fun...
MMZ_TimeLord replied to MMZ_TimeLord's topic in Work In Progress / Sweatbox
Thanks all. Mainly I'm looking for critiques regarding the lighting and shadowing on the subject. Not really worried about the background just yet. I will probably use a different HDRI setup with a basic set to mimic objects in it. Not quite sure yet. Hopefully the materials are also coming out well. The 90 degree barbed elbows are supposed to be black Nylon. The thickest plates are supposed to be cutting board material (white plastic). I would have to use SSS to REALLY make it look right. The plates are supposed to be sanded Stainless Steel and the gaskets (more shiny plates with slots or more like a square frame) are supposed to be gray flexible PVC rubber gaskets. I'm thinking the gaskets are still a bit shiny and I want the Stainless Steel to have a blurry reflection. The orange bolts are supposed to be Copper bolts, washers, spacers and nuts. Any ideas how to achieve this with the texture on the stainless? I think it's a Darksim Material and only has a 'reflect' property. Not reflective percentage. Thanks again for all your attention to this little project. -
A little drilling and milling for fun...
MMZ_TimeLord replied to MMZ_TimeLord's topic in Work In Progress / Sweatbox
Floating above for now. Just trying out the HDRI lighting setup mainly. I may put it on a platform of some sort. (more modeling... whee!) -
A little drilling and milling for fun...
MMZ_TimeLord replied to MMZ_TimeLord's topic in Work In Progress / Sweatbox
Robcat, Yeah, I only realized the sudden stopping AFTER I rendered this new pass. Nearly ten hours at 720p resolution. Not too shabby. I have corrected those keys to be zero-slope. The lighting is WAY better now in my opinion. Critiques? John, Thanks for the catch on the Additive Color. Turned that off. Also switched from a PNG to a TGA. For some reason A:M still does not always recognize the transparency of a PNG properly. *sigh* Here's a render at frame 665. I actually like the shadowing and the colors now. It's set to a gradient of very light gray to white. Works well I think. Added the HDRI set from the other Choreography and Sun light for shadows. Works pretty well even if you can't really see the shadows in this one... bad angle on the camera. Cheers! Hdritest002.mp4 (Caution nearly 5MB!)
-
A little drilling and milling for fun...
MMZ_TimeLord replied to MMZ_TimeLord's topic in Work In Progress / Sweatbox
Well, I've been doing some stuff NOT related to the drilling and milling aspect of this project. This is part of the assembly animation. I've tried HDRI for fun. No extra lights at all. Small render worked well and only took a bit over an hour to do. (1,020 frames!) I may adjust the lighting (add another light to make the shadows better and give it another go at higher resolution overnight. Opinions? (WIP... not finished animation by a long shot!) Hdritest001.mp4 -
Don't forget, if you have a favorite way of setting up a Choreography, you can make a custom default Choreography like so... 1. Create a new Project and Choreography. 2. Set up the lighting, camera settings, backdrop, etc. the way you want. 3. Save the Choreography out under your own custom name. 4. Rename the original "default.cho" to something like "default.cho.old" or "default.cho.bak" in the V17.0 folder. 5. Copy your custom Choreography to the V17.0 folder and rename it "default.cho". Now when you make a new Project, it will load your custom Choreography. Viola! This can be useful for setting up multiple Choreographies for specific project where settings will be repeated. You can also import custom Choreographies for the same reason.
-
Change those to stars and slow them down and you have your typical bridge view while going through space.
-
It was a dark and stormy night.
MMZ_TimeLord replied to Simon Edmondson's topic in Work In Progress / Sweatbox
Why is it raining in the mirror? (Looks like a mirror that is getting rained on.) Good job with the rest. -
Congratulations on getting v17 out!
MMZ_TimeLord replied to Glob Studios's topic in Animation:Master
Jason, That explains your choice of Avatars. -
Yes, excellent work Steve!
-
Happy, Happy, Happy... BIRTHDAY!
-
That was really well done John. Excellent work!
-
Excellent demos. I agree with Rodney. Keep the second one for the beginning of your demo reel. Keep up the good work. You are learning fast!
-
A little drilling and milling for fun...
MMZ_TimeLord replied to MMZ_TimeLord's topic in Work In Progress / Sweatbox
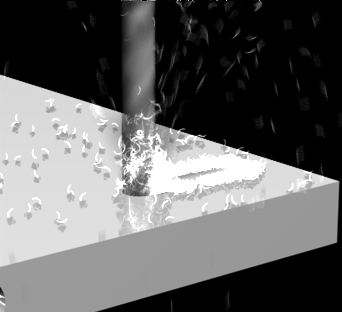
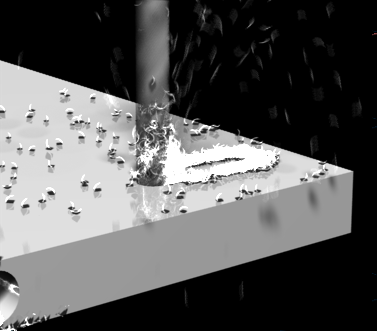
Well, looks like particles will be out if I want any kind of realistic lighting. They do not accept shadows, nor do they make good shadows when that is turned on in the particle system. Here is part of a render with particle shadows off, but some better lighting setup in the scene. Second one has particle shadows on. Again, same scene lighting. Particles look all wrong with shadows in this case. The main thing that makes these look wrong is they don't accept shadows cast upon them and are not truly three dimensional. It's too bad we can't emit models as particles... THAT would solve this problem.
-
MikeV, Remember that you can open the timeline for your animation, select the root bone for the model and in the timeline you can delete keyframes after 15 by drag selecting a box around them. Like so... Timelord_Tip_0001.mp4 This should keep you from having to start from scratch and give you better control over your keyframes and editing keyframes as well. Keep plugging away! Cheers!