-
Posts
1,248 -
Joined
-
Last visited
Content Type
Profiles
Forums
Events
Everything posted by Caroline
-
And you tried Help Menu > Reset Settings?
-
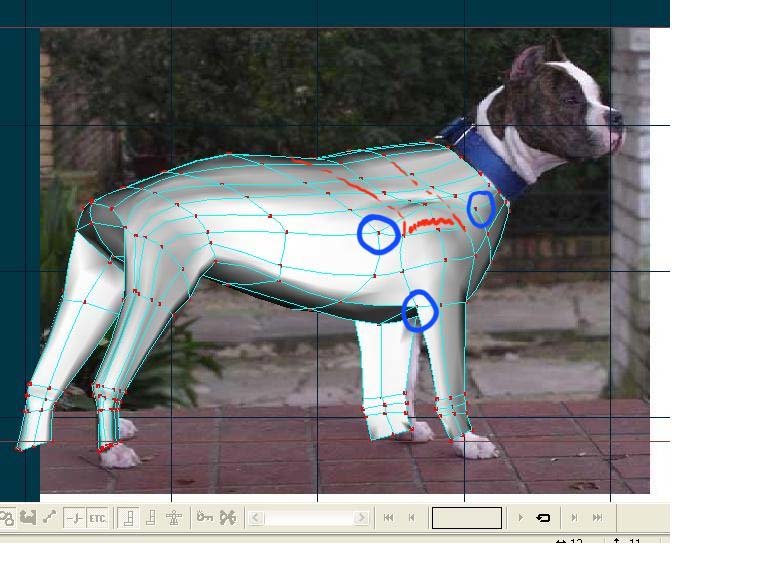
Just a few suggestions The blue circles show splines that are not meeting properly - imagine the most perfect splineage as a grid, where one spline crosses another in a 4 way cross. You have splines dead ending so they meet in a 5 way cross. I'm not sure that the splines you think are continuous actually are - you can check a continuous spline by clicking the spline near a control point, then pressing the comma key. This will highlight the cps on the spline. The circular spline at the top of the front leg is not necessary, you could continue the splines of the leg over the body rather than making this circle. And You might have too many splines going lengthways? There seem to be a lot going into the back leg. And Chris is right - you only have to do half the body, then line it up and copy/flip/attach - do a search for +copy +flip +attach for pointers on how to do this successfully. A good start. Very tricky model!
-
Welcome to splining! I'm not sure what you are doing, so these are the basic steps to laying down splines: 1. Make sure you have the PWS (Project Workspace) showing - that's View Menu > Project Workspace 2. Right click Objects, left click New > Model. 3. Press the A key (or the second icon down on the right) 4. Click. Move the mouse. Click again. Move the mouse. Click again. You should have a spline with 3 control points that you can move into a curve. The next step is to read the Splinemanship Tutorials: http://www.alienlogo.com/tincan/ Does that work for you?
-
To make it less than 23mb, in Advanced Mode, where you set to Render to QT format, you can choose Set. Then choose Sorensen 3 from the drop down, and set to medium. Sorensen does not appear for everyone, so there are other compression formats you could try - mpeg? Good beat, by the way!
-
This 'embedding' is important to understand - on occasion I have been religiously saving my project as 0001, 0002, etc, but my model was not embedded. This meant that it was saved as a .mdl on disk, and each time I saved to a different project, the same model was being overwritten, so I could not go back in time. Also, I keep accidentally overwriting the Hash data I have downloaded. Now on my own small projects I am trying to click Project Menu > Embed All regularly. On a big project with lots of data and different projects using the same data, then that would be impractical, so a good back up system are worth their weight. On my current project, to go backwards and forwards in time, I am using MOGware FileHamster, which keeps revisions of files every time they are saved. This seems to be working well enough for me, but I haven't tested it over a long time.
-
Instead of left clicking the link, try right clicking and left click Save Target As (Internet Explorer). The prj and mdl etc files are in xml format, so your computer thinks they are just text.
-
Frontal like this is how you get to see tennis players in the 5th set 3 games down.
-
This is the definitive 'modelling a face': http://www.colins-loft.net/tutorials.html
-
Sounds like a keyframing problem. You could read this post from earlier today http://www.hash.com/forums/index.php?showtopic=31430 and watch robcat's movie: http://www.hash.com/two/RCHolmen/MakinBone...yInPlaceMP4.mov
-
Hi, Shelley - welcome to the forums! Your site looks attractive - I'll have a wander. The Art of Animation:Master is a great book to get started with, as it will introduce you to almost every aspect of A:M. And it's good that you have someone to work through it with. Exercise 6, I think, was the hardest of all the exercises. There's a special forum for working through the exercises: TaoA:M There is a thread for each of the exercises, and you can tag your offering on the end for people to marvel at There is a video for each of the exercises at: http://www.hash.com/2007web/vm.htm Except, wouldn't you know it, of the hard ones, Exercise 6 and Exercise 11. Looking forward to seeing your exercises as you post
-
I'm playing with making a dog at the moment, trying to work out the movement of the front legs. I think your legs might be back to front - the back legs bend backwards, and I think, although different pictures tell different stories, that the front legs bend forwards, and at the top of the front legs they bend backwards there. Different types of wolves have longer legs - in the pics below, one has much longer legs. Your jaw looks a little heavy underneath too. Also, if you are rendering a still image, it would be better in jpg format rather than mov format. Good start though - I know how hard it is! Reference images: http://www.billybear4kids.com/animal/whose...olfStanding.jpg http://www.dkimages.com/discover/previews/739/178655.JPG This is the one where the front legs look as if they bend forwards: http://upload.wikimedia.org/wikipedia/en/1/15/Duma_roll.jpg This is interesting: http://evasion.imag.fr/Membres/Franck.Hetr...Images/wolf.png A rigging mesh for a different program. I think I will bookmark this page: http://evasion.imag.fr/Membres/Franck.Hetr...on/gallery.html And a great quadruped reference site: http://www.oricomtech.com/projects/legs.htm
-
The bones are supposed to turn blue when they have a keyframe on them. Your problem of being able to move them is something else entirely. Do you have a constraint? If you are constraining the hand to the doorknob, then you will be restricted in how much you can move that hand. Maybe try rotating his forearm / biceps / elbow?
-
When you click on Add Reply, you get a big white area to type into. Below this big white area on the right, you have "Manage Current Attachments" and below that a box and a Browse button. Click the Browse button to find your .prj, then click Upload (next to the Browse) to upload it to the Internet. (This bit is optional, just for formatting your post as you want it) Click in the big white area where you want the link to show, then click Manage Current Attachments, which should say (1) if you have uploaded the .prj correctly. Click the plus sign, and the code for the download link will appear in the big white area. If you are not sure whether you have succeeded or not, you can click Preview Post rather than Add Reply, to see what will be posted before anybody else sees it. I can't find a spell checker though
-
A material and a jpg are completely different things, totally different. You cannot convert a jpg to a mat. A material is "procedural". Which means that it is calculated when the object is rendered. A jpg can be used as a "decal". This is applied to a model. Decals deform and stretch when animated. Materials don't, because they are calculated upon render. What you may be trying to do is apply a decal? Exercise 10 of TaoA:M takes you through a decal. Exercise 14 of TaoA:M takes you through creating a material. The videos of these exercises are here: http://www.hash.com/2007web/vm.htm Basic steps of applying a decal: 1. In a model window, or most people use an action window, hide all the control points that you don't want decalled. 2. Import your image (jpg or tga). 3. Drag your image onto the model 4. Choose Decal not Rotoscope. 5. Size and position the decal 6. Right click the decal 7. Left click Apply 8. Right click the decal 9. Left click Stop Positioning. And there's your image stamped on the model.
-
Double click Actions on the PWS (Project Workspace) on the left. Then choose the model for the Action, if you have more than one model in the project. Actions are reusable. If you have done Exercise 2 in TaoA:M, then the Can-Can action that you apply to the characters is a reusable action. If you create a walk cycle action, then you can use the same action on many characters with the same rig. Homeslice has written a tutorial on creating a Facial Pose, which gives the general idea for poses: http://www.hash.com/forums/index.php?showtopic=29741
-

Who to make the Bottom of a Coat WAVE IN THE WIND
Caroline replied to Nuba X's topic in Work In Progress / Sweatbox
I have no suggestions I'm afraid - the flag tutorial works fine for me on v15. Could it be to do with your machine specifications? I know I did the flag tutorial for TAOA:M in version 13 no problem, as well. Do you have the latest v13? -

Godzilla X King Ghidorah: Vengeance Project
Caroline replied to Mikal's topic in Work In Progress / Sweatbox
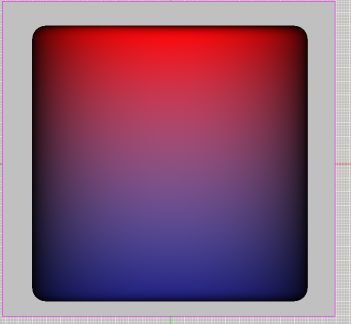
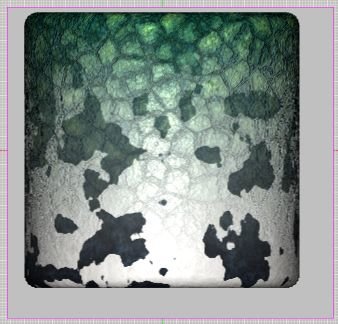
This example does not use DarkTree, but simple red / blue to illustrate the technique, as I don't think that the DarkTree will work in the attachment to the forum. To use DarkTree instead of the red / blue, just change the red attribute in the red material, and the blue attribute in the blue material. Project File: GradientRedToBlue.prj Normally both these materials would be in one single material, with different node levels, but I found that DarkTrees did not like to have two DarkTrees in one material, so I split them into two. The main thing to notice here, is the xyz position of the materials. I used Render Lock Mode (Next to the quick render button at the top) on, so that I could fine-tune, and it immediately renders. Both materials go from Y 50 to Y-50, each material has half colour, half alpha. The red material has a red attribute for the first half, the blue material has a blue attribute for the second half. Changing the Y values changes the blurring amount. I am not completely certain that I have the optimum Y values - you would have to experiment. Make sure you experiment on a simple shape like the Cylinder before moving to a complex shape. Once you have understood the simple red / blue, you can just change the red and blue attribute to DarkTrees This is the dino skin blending to holstein cow. Note - there appeared to be a glitch when I changed red and blue attributes to darktree - they did not 'take' until I changed the other blank attribute to darktree and then back again to blank. -
No Ma'am, not at this time at least. However, I did just notice in the Libraries dropdown list, that there is one called My Library which seems to hold the stuff I have dragged in to All Libraries. So that's cool.
-
The pics show up for me - (great simple models, by the way). The quality of the pictures is not good, though, especially the last one, the girl in pink - she is very pixellated. They do not do your characters justice. What about a render with them all in scene - like: http://www.hash.com/stills/displayimage.ph...um=54&pos=0
-

Godzilla X King Ghidorah: Vengeance Project
Caroline replied to Mikal's topic in Work In Progress / Sweatbox
Masna - Plugins topic started here: http://www.hash.com/forums/index.php?showtopic=31285&hl= -
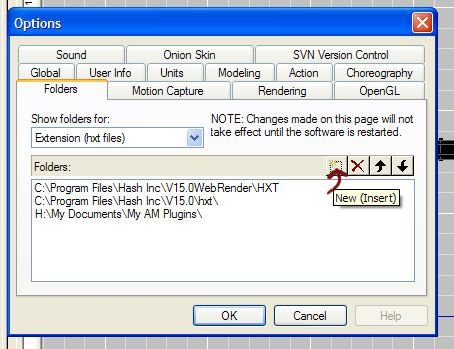
Masna - if your plugins are not showing, check Tools > Options, Folders tab as above, and make sure that your plugins folder is listed there, as C:\Program Files\Hash Inc\V15.0\hxt\ just as mine is.
-
As an example, I will use the MirrorBones plugin available here: http://sgross.com/plugins/index.html 1. Download the mirrorbone.zip file. 2. Right click it and Extract All. This should give you a MirrorBone.hxt file. 2. Right click it and left click Copy 3. Click Start Menu > My Computer 4. Click the Folders Icon on your top toolbar to show a list of folders on the left hand side (If you don't have this, you will have to double click your way down to get to the hxt folder, instead of doing the next step). 5. You need to click the plus signs next to My Computer Local Disk (C:) Program Files Hash Inc V15.0 6. Click the hxt folder on the left hand side, and you should be able to paste the MirrorBone.hxt file on the right hand side. 7. Restart Animation:Master ALTERNATIVE - (I just learned this myself) If you only backup My Documents and not Program Files (as I do), if you remove A:M, then reinstall it, then you will lose all the plugins that you have downloaded. You can prevent this by having a My AM Plugins folder in My Documents. 1. Create MyAMPlugins in My Documents 2. Instead of putting the hxt file in the Hash Inc\V15.0\hxt folder, put it in MyAMPlugins. 3. In Animation:Master, click Tools Menu > Options 4. Click the Folders tab 5. Click the New Icon This will give you a space to put in your MyAMPlugins folder name - or click the 3 dots ... to the right of this space to browse to the folder. 6. Click OK 7. Restart Animation:Master Note - Anzovin's Setup Machine does not seem to work when not in the V15.0\hxt folder, but 3d Painter does.
-
That's what I was thinking too, but I haven't yet created a good enough material to warrant trying that. My poor Jabberwock has been decalled, undecalled, rigged, unrigged, so much that he is very confused. Now he's thinking of having a real felt material jacket, with pure wool socks. Maybe baked too. So, Master Chief, go experiment. If you are very lucky (and young), then you will retain some of what you learn, unlike the old person (me) who has to lose a bit of memory (I was going to say bit of retention, but I'm not quite there yet) to learn something else.
-
No, Rodney you're the best That last image - that's a corker - I just dragged my current project (ever uncompleted image contest) into my library. So easy to find. My question - Those tabs along the library HTML Tutorials/Projects/Models etc, can you add a new tab? Like My Projects/My Images?
-
Yes - Smiley face, USofA flag with stars. Just amazing. Practically all with gradients - I stayed up all night after I watched the Burlap sack, with proper weave - warp under and over weft, etc, with transparency between the threads. I understand the concept, but he talks about 'pivot' a lot, and looks up the value for 'pivot'. I have to work out how to use that - his pivot values are usually totally different from mine.


