-
Posts
1,248 -
Joined
-
Last visited
Content Type
Profiles
Forums
Events
Everything posted by Caroline
-
Tricky - animated gradient material. I suggest you go through johnl3d's tutorial a number of times, because gradient combiners can be difficult to wrap your head around. Trial and Error. treadgradient.mov Key things to learn - when creating the gradient material, experiment with where the start and end of the gradient should be, so that you know how to animate it in the choreography. The model is a long flat square laid right across the camera, and does not move. The transparency of the material comes from half of the gradient combiner. In the choreography, you will need to click the Show More than Drivers icon to show the attributes of the material. Change the start and end of the gradient in the choreography only on frame zero, and the final frame. That way it will move at a constant speed across. Project: treadgradient.prj
-
I don't think so, but you can show the time as frames rather than time - go to Tools Menu > Options > Units, and click the circle next to Frames Elapsed. That may be less confusing, as long as you remember how many frames per second. And they're not really cut in half - American standard, I believe is 24 fps.
-
What a dope I am - Johnl3d will be ashamed of me. Gradient material. I will work on it for a little while then post. But have a look at johnl3d's gradient tute - http://johnl3d.blogspot.com/, in case I disappear.
-
What about having a model which is just a square, which is the dark colour. Change the size of it in muscle mode in the choreography as the tank goes over it.
-
I don't know anything about avi - is it necessary to use that format? .movs are very easy to work with, and you can use the arrow keys to go through one frame at a time, which you can't with avi. Also, with QT Pro, it is very easy to trim and loop. Do you have mpeg-4? On my short test I cut down from 288k (Animation) to 30k (mpeg-4)
-
That does sound rather large. You probably didn't use any compression. What format did you render in? What is the resolution of the movie? You could try changing the render .mov Format > Save Options to Sorenson Video 3, medium quality. That usually renders to a reasonable size.
-
To select multiple groups, hold the control key down and click each group to select it.
-
Good one, John. And here's a displacement map tutorial: http://www.mossor.org/Desktop/Tutorials/Footsteps/index.html
-

Pose verses Action for effect is there an advantage
Caroline replied to johnl3d's topic in Work In Progress / Sweatbox
I guess also a pose travels with the model, whereas an action is independent. Thought - does this mean that you can't reuse a pose on a different model like you can an action? -
Sorry, Al - I forgot to check my little Lamb in the garage. Great job - I bet you're pleased with it.
-
That's admirable work - what about with porcelain? I remember that with porcelain that dint under the left side door disappeared.
-
Yves' lighting tutorial But I can't find the project yet. It may be on the extra CD? Nor Yves' AddOns.zip.
-
An easy way to get things into libraries is drag from an explorer window into the correct folder into the library. It does not automatically pick it up. There was a utility called Library Manager, but it has been archived. Anybody have a copy? Tips on libraries: 1. Tools Menu > Options > Folders > change Show Folders For drop down to Libraries (.lbr files). This allows you to add folders where you have placed your own files. The files can then be dragged into this new library. 2. Often you will have multiple models, for example, in multiple sub-folders. Do a search on *.mdl in the top folder, then highlight all the found files and drag them all at once into the right folder in the library. Make sure that you actually have double clicked on the folder first, do not just drop them on top of the folder picture. Couple of library links: http://www.hash.com/lib/win.html http://www.hash.com/lib/winvid/index.html Now I have a question I have just been messing with my libraries, created a new one called My Library pointing to My Docs\library, and added 200 models, and had difficulty in removing the library. I deleted the .lbr file in C:\Documents and Settings\UserName\Application Data\Hash Inc\Libraries. I tried getting rid of that path in Tools > Options. But My Library is still there in the list (no models since I deleted the library). How can I get rid of it?
-
Not quite sure what you want to know - The Art of Animation Master Exercises 15 & 16 talk about dust and particles. Exercise 16 is better for particles, which is probably what you want. These are really good clouds from Entity, with the tgas too: http://www.hash.com/forums/index.php?s=&am...st&p=263343
-
Keyframes would be probably be best - I have learned that real animation has A LOT of keyframes, but you can also do it with paths, I think. This is fairly advanced - you need to know about paths, and Animate mode, and have a lot of patience. This is a $0.62 tutorial, seeing as John is away. ie. a very quick rendition. bot.mov You can see the path in this movie - at the top of the mountain, the bot's pink legs were digging into the mountain, but by rearranging the points on the path, I could stop it going into the ground. At the bottom of the mountain where I have not rearranged the points, the bot is still sinking into the ground. You need a path with lots and lots of points - I have not found a way to add points to a path, so make sure you put lots of points in there to begin with. Constrain the bot to the path. Change the length of the chor to match the speed of the bot. Drop the walk action on the bot. Set the action to repeat a number of times. Move the playhead to familiarise yourself with the movement. Turn Animate mode OFF - that's the big A at the top right. Move the playhead to where the bot sinks into the ground, and move the path point accordingly. Press the space bar to update the bot's position after moving the path point. Repeat this lots of times until it is not sinking. Remember to turn Animate mode back on. The reason for turning it off, is that you do not want keyframes all over the place on your path. If you turn it off, it will position the path on keyframe zero, no matter where your current play position is. If Animate mode is on, you will get a keyframe where your current play position is, and you don't want that because your path would be moving all over the place. But remember to turn it back on, otherwise your actual keyframes that you want to be created won't be.
-
How cool is that - 3 different answers in 30 mins?
-
No 1 could be done with pose sliders, if you rig the fire truck with stabilizer bones. No 2 - that's what actions are for - have you done exercise 5 Take A Walk, which is a repeating action? A wheel is a bit different from a walk cycle, but there is a video here: http://www.hash.com/2007web/vm.htm Scroll down to Misc - Simple walk and wheel cycling actions
-
No 1 - Yes No 2 - Yes I'll take No 3. 1. New Project 2. Import Thom 3. Group the top half of top, and rename the group GoTransparent. 4. Right click in modelling window, click New > Pose > Percentage. (You now have a new pose window open listed under Actions) 5. Make sure you can see your pose sliders (View Menu > Pose Sliders) 6. Slide Pose1 to 0% 7. At the top, change the mode to Muscle Mode, not Bones Mode. 8. Tricky bit - IN THE ACTION, open all the pluses until you see Shortcut to Thom. Next to that, you will see an icon with a red x, which is Show More than Drivers. Click this, so the red x is off the icon - you will now see the Groups. 9. In the properties for the GoTransparent group IN THE ACTION NOT THE MODEL change transparency to be 0% 10. Slide Pose1 to 100% 11. Change transparency to 100% You should now have a working pose slider to be used in an action / choreography. Finished project: thompose.prj Brilliant Pose Slide Tutorial here
-
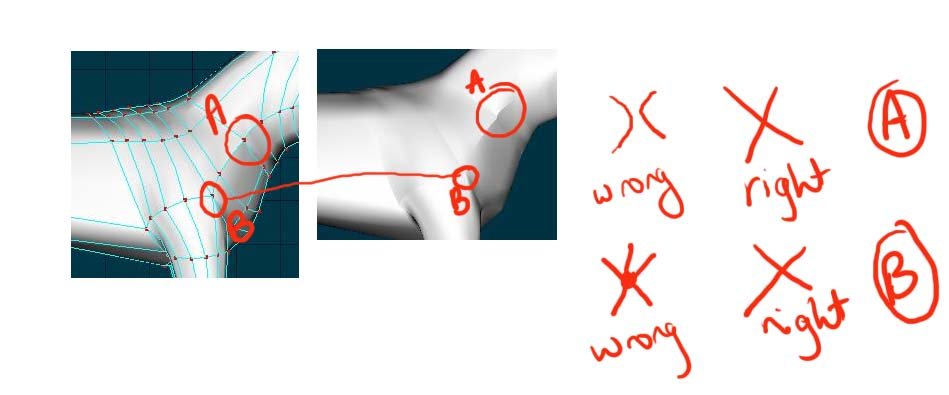
That's looking good - although I still think you have too many splines going over and down the legs. I think you may also need an extra spline or two around his tum if you are going to animate him, because you need to have splines where he will bend. That's why I don't think you need all those vertical splines down the legs, because he doesn't bend that way. But then I've only ever made one dog, and that isn't a howling success , so please feel free to ignore. I think you are getting a few creases where the splines are wrong. But I may be wrong, it's hard to tell. For example, crease A on his shoulder could be where the splines are not crossing properly. and B still has that 5 point thing, which will cause a crease.
-
If you are editing the choreography and moving the control points, then you are in 'muscle mode' in the choreography. You should be editing the model itself, not the choreography. Models shouldn't (usually) have lights associated with them. Choreographies and actions use 'shortcuts' to the model, so if the model is changed, then the chor and action are automatically updated. To edit the model, make sure your PWS (Project Workspace) is showing - that's View Menu > Project Workspace. Click the + next to Objects, then double click your model name. You are now editing the model (as long as you are in Modelling Mode - that's the yellow man depressed or F5). Have you worked through the exercises in The Art of Animation:Master? That should point the way.
-
If you do not have a recent version of A:M (though why wouldn't you? ) I believe you can download and install the free Simbiont plug in from: http://www.darksim.com/html/simbiont.html
-
To use Darktree in A:M - I am assuming that you have a fairly recent version of A:M (12 or 13 onwards): 1. Download and extract the Darktree materials - the Darktree Repository with Thumbnails - you should now have them split out into folders, like na_water. If you have a look in the folder, you should see a .dsts file, which is the material, and a jpg of the material. 2. In A:M right click Materials, and click New Material. 3. Click the plus sign next to Materials 4. Right click Attribute 5. Click Change Type To > Plugin > DarkSim > SimbiontAM 6. In the Properties for this Attribute, click Load DarkTree 7. Find the .dsts file that you downloaded. Apply it like a regular material (as in TaoA:M exercise 14 - Marble). Under the attributes properties, you will find lots of tweaks, so you can change colour etc.
-
Water is pretty hard to do - you could try a search for "+water +material" (without the quotes) Although a puddle is just reflectivity and maybe transparency / refraction? You could try changing the surface attributes, like in this thread: http://www.hash.com/forums/index.php?showtopic=10187 There are the DarkTree materials from http://www.darksim.com/Repository/ with rendered examples here: http://www.pixelburg.com/am_materialtest/d...nt21/index.html There's a fairly complicated tutorial (that I have not done yet) here, using animated displacement maps, I think: http://www.babbagepatch.com/water.htm
-
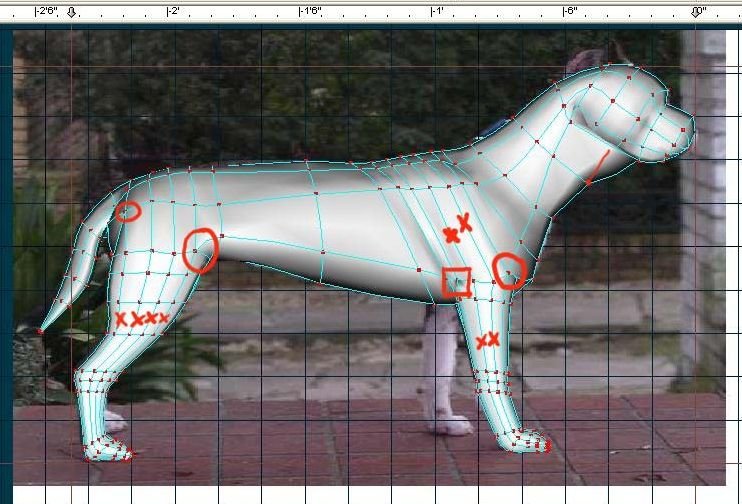
The circles are where you have 5 lines going into a control point, as described in the previous point - these won't lie nice or animate nice. Interestingly you don't seem to have any 5 point patches - these work better than having the 5 lines going into one point. The square is something happening - maybe a flipped normal? Did you check with the comma key that your splines run continuously without breaks where you don't want breaks? The x's are where you might be able to combine the spline - in the back leg change those 4 splines to 2 splines, and the front leg 2 splines to 1 spline. The extra splines don't seem to be doing anything interesting.
-
That giraffe conversion was a good idea - the model looks so much smoother. Although there is still something happening with those front legs. Do you have a picture with splines?


