Caroline
-
Posts
1,248 -
Joined
-
Last visited
Content Type
Profiles
Forums
Events
Everything posted by Caroline
-
There's a great grass tutorial at: http://perso.orange.fr/ffave/e_herbes.htm From there, you can change the photos to make different colours, and lengths. You can also tweak the length of the grass in the choreography, using the hair lengthening tool, and probably animate it there too, but I haven't tried that. If you want different types of grass, you can use an image map for the hair, as described at: http://www.hash.com/Technical_Reference/v110/Hair.htm but that would be harder to make it bend in the wind, I think.
-

Timing Particles Sprites, Streaks and etc
Caroline replied to Darkwing's topic in A:M Tutorials & Demos
??? I used the cube from the primitives, using the top as the emittor. I dragged the cube into a chor twice, so in the Chor I had Shortcut to Cube, and also Shortcut to Cube (2). Using the method described above, I could set each of the cube's emittors independently. (I don't understand the word "driver" in this context either. I shall have to go and surf.) -
Timing Particles Sprites, Streaks and etc
Caroline replied to Darkwing's topic in A:M Tutorials & Demos
ParticleDemo.zip An avi movie to illustrate this - the main gotchas are clicking "show more than drivers" and also putting the interpolation to hold. These are shown in the movie. Let me know if this helps - I'm experimenting with Camstudio - I am amazed that 21mb zips down to 1.8mb. -
The rabbit was a rendered tga sequence from rabbit walk. So my images work. Imported as an image sequence into a new project, then dropped on the chor as a layer, with the expression attached. But I don't know if shaded quality produces a good enough image quality.
-
Onion Skin? Edit: onionskin.mov That's not a very good example - Onion skin only renders in shaded mode. It's got an expression - Image.Frame = GetTime() because onion skin needs keyframes.
-
There's examples of using the timeline for changing thickness (or colour or anything) along a length of hair in the online reference manual: http://www.hash.com/Technical_Reference/v110/Hair.htm (Not sure why it appears to be linking to 11.0 page, I went through v13 help, but it's the same anyway) I vote for a 3d turkey.
-
That looks fantastic. The texture is very realistic. Where the light hits it looks maybe a bit smooth, and the texture is lost. Without knowing anything about it, is this maybe a case for a reflectivity map?
-
There is an XnView plugins page at: http://perso.orange.fr/pierre.g/xnview/enplugins.html Download the exr.zip, extract the .dll file and put it in the XnView plugins folder. XnView now reads my openexr file fine, but I'm not sure if it'll do anything else with them. Thanks for the dll pointer, Richard.
-
Contest Animation - April Fools
Caroline replied to Heath_Naylor's topic in Work In Progress / Sweatbox
I thought the timing was good - I didn't compute what was happening. I did think he was a bit too close. I liked the music and fonts. Tail definitely goes through bucket. I thought the www.uberanimator.com was right in the middle of the action - can it be moved down at all? -
There's this tutorial: Footsteps in the Snow (I haven't tried it though)
-
It looks like your CPs are locked. Click the padlock on the right hand toolbar, then they should be unlocked again. (I like the name of the gun )
-
You could try the links in this thread: http://www.hash.com/forums/index.php?showt...&hl=boolean Great bevels tutorial from Yves Poissant here: http://www.ypoart.com/tutorials/bevels-intro.htm
-
What about AM TerraForm?
-
Change the view - when you put in a light it always goes in at ground level, and if you stay in camera view (1 on the numeric keypad), dragging up and down moves it forwards and backwards. You can use the up and down arrows for fine tuning in camera view, so it will go up and down. But the easiest way is to go into side view (4 on the numeric keypad, or 6 for the other way) and then you can drag it up and down easily. 5 on the numeric keypad gives you a top view. Remember to go into the camera view (1) before rendering, otherwise you will render the specific view you are currently looking at.
-
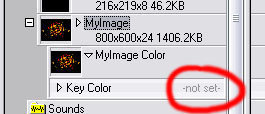
In the PWS (Project WorkSpace) Image properties, you can change the transparency colour of an image. For example if you wanted the white color of an image to be transparent, you would choose white as the Key Color. If you do not want any colour to be transparent, you have to change the Key Color of the image to Not Set: Only the exact RGB color that you choose as the key color will go transparent - if you still want the white around the shapes to show, you will have to change the colour very slightly so that it is not the same as the key color. Cute coloring by the way. (If you are running 13.0p or 13.0q, you will not see the key colour as in the picture - but if you download v13.0r it is there.)

-
If you're asking whether A:M will run at all on dual processors - yes, no problem at all. I'm currently running v13 on my dual core. The only thing is that it won't use the two processors when rendering, only one. You can leave it rendering in one instance of A:M and continue working (on a different project) in another instance of A:M. That would be utilising the two cores. 2gb ram is good - I've recently upgraded from 1 to 2 and I notice a small improvement in performance. Just in summary - v13 is very solid on my dual core.
-
That's great - I hope it was enough to take your mind off illness. It's funny, but after modelling someone, I guess painting them too, you look at them in a totally different way - like you're thinking, how wide is the bridge of their nose, while they think that you're just looking them firmly in the eye, and concentrating on what they're saying. (And I only mentioned the very slight flaw, if it is one, because the rest was so good - I was too picky - apology. )
-
I haven't had this problem, but maybe this link about setting up libraries might help? http://www.hash.com/users/heath/lib.html
-
A 'bulb' is a light - Lighting itself is a very extensive subject, that is something that needs time and experimentation to learn. Short answer about adding a light: You can: 1. Right click in the choreography, left click New > Light. This will create a Light1 object. Go to Objects and change the light settings as needed. or 2. Right click Objects in the PWS (Project Workspace), and same as above. Then drag it into the Choreography. or 3. When you create a new Choreography you get 3 default lights. From the Objects, you can drag a copy of Keylight, Fill Light or Rim onto the Choreography, and it makes a second independent instance of the light. As you want a bulb, this won't work for you, as those lights are Sun and Klieg.
-
That's great skin texture. So the eyebrows are a decal as well - they look real. There might be a bit of bump stretching on a couple of pores at the end of his nose - but I hesitate to say that in case Dushan actually has them.... It reminds me of apprentice's funny cartoon
-
lol - those're mean looking neon font wiz sweeper fish. You must have some good looking fonts on your system.
-
Welcome to the colorful world of A:M and the forums, jairo. All that is possible, but the best way to explain it is written in "The Art Of Animation Master" - you will see it referred to as TAOA:M here - there are exercises on each of the topics. You start easy, and work your way through hard. If I understand what you want, you'll need modelling skills (in the book, you get to model an aeroplane and a giraffe), and rigging skills (in the book you get to put a skeleton into a model). The first few exercises are about manipulating. If you work through that book and do the exercises, you will have a good understanding of how to go about more complex things. You can even submit your exercises in the special TAOA:M forum, and work towards a certificate. If you have any specific problems with the exercises, we are all here to help you.
-
Your jpeg should have worked, though I believe most people use tga format, as it is a lossless format, whereas jpeg will give compression problems.
-
Certain Bones Disappear When Creating Actions
Caroline replied to Dale_The_Bold's topic in New Users
Out of depth here, just a suggestion - Is it something to do with the poses? The right half looks like IK Legs Setup = ON and the left half looks like = OFF. Those poses are available in the Action Window under Poses > Rig > Setup. -
Thanks, Steve - OpenGL is now working, but now has the same "drag to select" control points issue that DirectX had. (That the rubber band is not transparent, but shows another part of the screen). Should I report that? (With DirectX it happened, but if I switched back to OpenGL and back again on entry to the program, the issue went away. That doesn't work now) (And thanks, Steven547, for indirectly fixing my OpenGL thing, sorry for hijacking)