HomeSlice
-
Posts
4,676 -
Joined
-
Last visited
Content Type
Profiles
Forums
Events
Everything posted by HomeSlice
-
Sure, it's "possible", but cloth is not an easy thing to work with. It takes hours of fiddling and re-simulating for something like that. And once you get a decent simulation, you will probably have to go in and reduce (delete) some of the keyframes so you can manually tweak them in Muscle Mode in the end. I don't know of any cookbook style settings that just work. And you usually have to do more testing and simulating with every chor the cloth appears in, even if it is the same model. Save the cloth stuff for the very last part, after all the animation and other stuff is finished. And only use cloth for the bits where it is absolutely necessary. Robcat had some success with a cloth hand puppet he made several months ago, but unfortunately, I can't find the thread.
-
Here are some sites that will get you started: http://www.the-blueprints.com/ http://www.loc.gov/rr/print/list/listguid.html http://memory.loc.gov/ammem/collections/habs_haer/index.html
-
Yes XTaz, you have to use the Woodstock bug in some kind of animation. It's cool
-
It looks like the Hash team was at the New York Comic Con this weekend. I guess they are either travelling back to WA today or they are recuperating.
-
Please let us know how you rig those sleeves, when you get to it. Those look tricky.
-
OK, now they gotta race!
-
Yep, "Epic" is a pretty good word for this one. What?! No Interior?? ... just kidding
-
really, really nice work Stian.
-
Do you mean the flipped bump map renders concave ")", while the original bump map renders convex "(" ?
-
that's very cool Mark.
-
Well, if Steve consistently gets a ~1min/frame decrease in render time, that is really very significant. If each frame of a 5min animation (at 24fps) took 15min to render on his old 2-core AMD processor/platform (i'm guessing he could only render on one core effectively), that would have taken him ~1800 hours to render it. On the new 4-core computer (rendering on 3 cores), it would only take ~560 hours. A savings of 1,240 hours). That seems like such a huge time savings that I'm wondering if I made a mistake in my math. Hey Steve, all that water damage might have actually been a blessing
-
Your artistic style and the extremely simple geometry go very well together. You are a bloody genius in that respect. If your animation holds up, and the story is even mildly entertaining, I think this will be really good.
-
The dynamic constraint wings have a cool wispy look, but the hair wings look like they are keeping the birds in the air better. I like them both. I like the overall timing of the flying action better in the one on YouTube.
-
Wow, that's quite a difference. Would you say the Intel i7 is pretty much responsible for the shedding of a full minute from your render times?
-
Nice! You are getting much better at modeling. Isn't it a good feeling when you can make your own models and be proud of them?
-
great looking bird Xtaz.
-
That was cute Bruce.
-
There is a slight difference in the behavior between using "Blend Mode" and "Transition to Next Action". Here is another movie of the same actions, but in this movie, I used Transition to Next Action. Play the two movies side by side to see the difference. Transition_to_Next_Action.mov
-
Robcat's suggestions seem to be working, so go with those! However, if you still have problems, here are a couple of workarounds: A: Sometimes you just have to cut the camera away for a couple of seconds. B: Lets say you have three actions. On the first two actions, turn OFF "Hold Last Frame" On the bottom two actions, change the blend mode either to "Blend" or "Add". (Use Blend when the actions have keys on the same bones, use Add when they have keys on different bones) Overlap the actions several frames. On frame 0, key the *Second* action's Blend Ratio at 0%. Where the *Second* action starts, key the *Second* action's Blend Ratio at 0%. Where the first action stops, key the *Second* action's Blend Ratio at 100%. Overlap the second and third actions by several frames. Where the *Third* action starts, key the *Second* action's Blend Ratio at 100%. AND key the *Third* action's Blend Ratio at 0%. Where the *Second* action ends, key the *Second* action's Blend Ratio at 0% AND key *Third* action's Blend Ratio at 100%. In the example project and movie, I have a Standing action transitioning to a Run action transitioning to another Standing action. I overlapped the actions 24 frames to better illustrate the smoothness of the transitions. Please see the example project if any of this is unclear. Action_Transitions.zip action_transitions_sm.mov
-
OK, I just tried this again and in 15J+ you have to drag the Pose by the little + icon which appears to the left of the Pose name in the Pose Slider window. AND you have to drop it on the model in the Chor or Action WINDOW. It doesn't seem to work if you drag the pose onto the model shortcut in the PWS.
-
In order to change the default interpolation for every animatable bone in a character, just pose the character on the first frame. (I always use seperate choreography actions for body motion and facial motion) So in the "Body" chor action, just pose all the body control bones. You do this already, so it isn't really an extra step. Then expand the chor action in the PWS until you see a folder named "Bones". Click on the "Bones" folder to select it. ALL the bones that you posed are selected. Switch to Channel View and follow the procedure I mentioned above. It may seem complicated, but after you do it a couple of times, it really is pretty quick and painless. There is a way to automatically set keys on all desired bones without having to pose them on the first frame. I have done this a few times, but found that it doesn't save me that much time. I am sketchy on the exact procedure, but I think it goes something like this. Make a new Pose for your character. Name it something like "Key All Controls". Select each control bone in the rig and enter "0" for all the translate and rotate properties. This creates channels for all the bones. Save the Pose and close it. Leave the Pose's default value in the model's User Properties set to "Not Set". Drag your model into a Chor or Action. Now *DRAG* the pose from the Pose Slider window and drop it onto your model shortcut in the PWS [Edit - you have to drop it on the model in the CHor or Action WINDOW, not on the model shortcut in the PWS]. Channels will be automatically created on every bone. You really should not be keying the Control Points _Ever_ , except for very specific instances where you are doing some kind of special muscle mode deformation in the chor and for some reason you can't set that up in a Pose. Leaving the Muscle Mode keyframe filter activated, and forcing keyframes on on all those control points, adds a ton of unnecessary data that A:M has to process, which will slow your real-time display down and increase the chances of technical problems happening.
-
It would be nice to, for example, tell A:M that every time I add a new camera to a chor, to automatically use Zero-Slope interpolation for translate/rotate keys instead of Spline Interpolation. But with the methods I mentioned above, I only have to change the default interpolation once, on the first frame, and every subsequent keyframe uses the method I chose .... so it really isn't too bad.
-
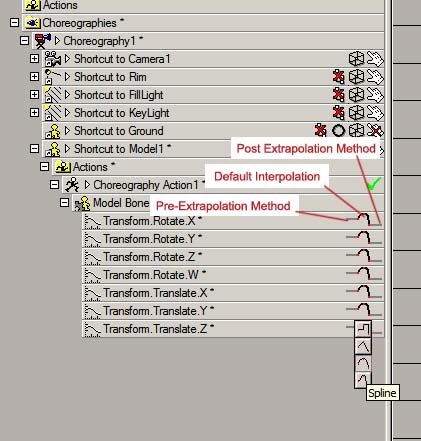
In the PWS, select the channels you want to change the default interpolation for. If the desired channels don't exist yet, you must create them. In other words, there must be at least one keyframe set for the property/properties. Option A: Good for changing only a few channels. In the PWS, under the Choreography you are working in, locate the channel(s) for which you want to change the default interpolation. To the right of the channel(s) are three icons that look like they are connected. Usually they are a straight line, followed by a curved line, followed by another straight line (see the picture). The middle icon (the curved line) is the default interpolation method. Click on it and some new options will pop up. Select the option you want. Option B: Good for changing a large number of channels. With all the channels selected, switch to Channel View in the Timeline. Click once in the Timeline and hit [Ctrl-A] to select everything. Right-click inside the yellow selection box (if each channel has only one keyframe on frame 0, the selection box will be very narrow). And choose Curve > Interpolation Method ... and choose a default interpolation method. Then, double-click inside the yellow selection box. A Channel CP Settings dialog box will open. Make sure the value for "Interpolation Method" is set to "Default". (Sometimes it is blank, or is set to something else).

-
Would be nice if Rodney could move that video over to the Tutorials section
-
Nice model. Thank you.