robcat2075
-
Posts
28,400 -
Joined
-
Last visited
-
Days Won
424
Content Type
Profiles
Forums
Events
Everything posted by robcat2075
-
BTW, I should say that it is very promising that you recognize that your animation doesn't look right. That really is the first step to getting better. There are a lot of people grinding out bad animation who have no clue that it is bad. They don't get better.
-
turn off the brown light in that default chor. Change it to white.
-
Can you at least import the .mov into your Images folder?
-
Kevin Detwiler is successfully exchanging camera data between Vue and A:M using a plugin that Stephen Gross wrote. Hopefully he'll pop in here with some details.
-

Volumetric light overlap question
robcat2075 replied to Eric Camden's topic in Work In Progress / Sweatbox
presuming that just one light by itself renders correctly, then do a pass for each light and composite the two passes. If you have after Effects i think the "lighten" composite mode would preserve the brightness better than a 50% blend. Lighten uses whatever is brightest from two sources. -
zero slope zero slope the keys on the channel for that pose slider. Under user props. in the chor. in the PWS.
-
That's a long story. That's what every animator strives for. Richard Williams wrote a book on that called "The Animator's Survival Kit". He talks about arcs and timing and posing and 100 other things. It's 342 pages and that's short. The briefest thing I can say is start small. Learn to make a great bouncing ball with good weight and timing and build up from there. And learn to make strong poses with your character and build up from there.
-
Great looking shots. I'll look forward to seeing the whole movie someday.
-
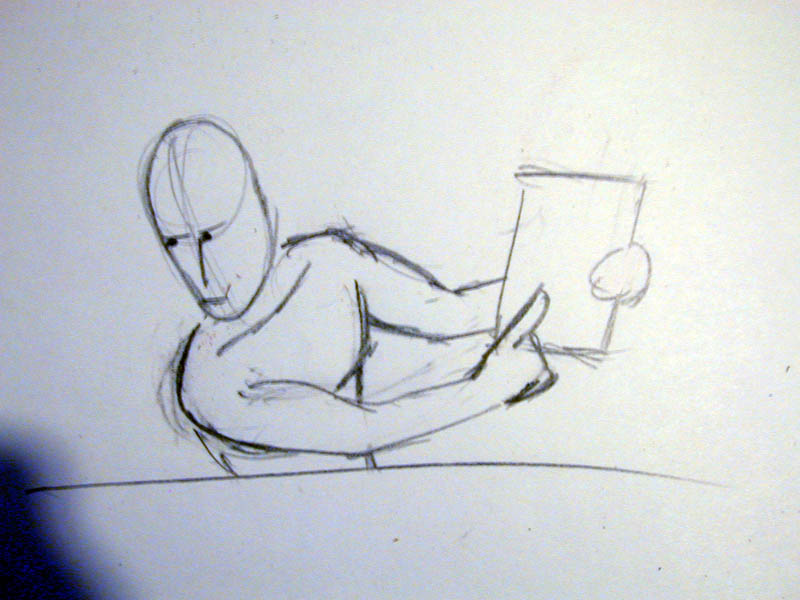
I think that is appropriate for the blocking stage in that it tells us what your essential acting ideas are going to be. Since only his upper half is being used you might move the camera in closer. I agree with the above comments about too much symmetry. I would keep that tablet in his left hand, if only to force yourself to not treat both arms identically and end up with twinned poses. I heard an animator call that "coffee cup animation"; give the character a prop in one hand (like a cup of coffee) that makes it impossible to do twinned poses (presuming he doesn't want to spill his coffee). His torso stays almost exactly straight up for most of the clip. That's making him look stiff. I think there are more expressive ways to do the ideas you are doing. For example, when he points to the tablet (I do like that you bent his finger backwards to show weight) you could lean him into the direction he talking to and hold that tablet up to his side to make it more clear and emphatic. anything to get him off that neutral center-line.

-
That's a challenging motion to do. One thing I think would give more weight to it is to make sure his body mass is centered over his hands while he's pushing himself up. If he had rolled into that handstand quickly his momentum might plausibly be carrying him forward, but he's gone into it so carefully that that doesn't look the case. I also think there's opportunity to bend his spine when he leans forward and when he is pushing his legs up. That woudl loosen him up and help show more effort in what he is doing. good start though.
-
That looks quite successful, Caroline!
-
The particles are so small... wouldn't sprites or streaks work just as well?
-
The only issue with the plugin was that I did find that the bones called "right" copied and weighted correctly, but the bones called "Right" copied, but did not weight (I had unticked case-sensitive). I fixed that by renaming the "Right" ones "right". Is now solved , also the rmweight problem . Stephen, I got the latest version of MirrorBone off your plugins page, but I still find that it is making "left[bonename]"copies for bones that didn't have "right" in their name. This happens on bones that are not centered on X=0. These are off-center bones that appear as if they might warrant a mirrored copy, but that I have intentionally not named "right" so a mirroring program such as the plugin would not make a copy. Sorry to detour Caroline's thread here... I tried emailing, but they keep getting bounced back.
-
I'm always impressed by people like Will Sutton who can make a smooth face and not seem to need to tweak any biases to do it.
-
that looks first-rate!
-
Technically, you can connect them like that, but the "?" spline really needs to be taken out and terminated somewhere else.
-
Generally not. The shapes maybe, with much work. The rig that makes them move, no. that would have to be be redone properly in A:M. Someone is selling expensive A:M models? There are quite a few free characters on your V11 CD. You can also buy a CD of A:M models from Hash, although many of them have been made in V13+ and won't load in V11.1 A:M works best with models made in A:M.
-
If the model looks normal inthe model window, but takes a new position in an action or chor window, then some pose somewhere is turned on. You just dont know it. You really dont' have TSM on in that pic? I see that arm trying to reach the FK control bones and that won't happen unless TSM is turned on.
-
Turn off all the poses in your character's user props and then put him in an action. Then turn your TSM pose on to make sure it isn't doing anything weird. If it's ok, turn your other poses on one at a time until weirdness happens. Then you know what to delete and od over or to try to repair. BTW... you're putting each fan bone in a different pose? Normally you'd put them in one pose so you don't have to turn so many on later.
-
I particularly like the careful transparency effects.
-
You can always put the original script back if the alternate doesn't work out for you.
-
What exactly was the problem? Remember that "advanced fingers" control the last two bones with one control bone. You rotate the blue ring to move the tip. did "adv thumb" show up in the list of things to rig/not rig when you ran Rigger? Normal fingers are fine but you give up individual control of each bone to do poses where the bones are not all equally curved. However TSM "advanced" fingers are not my favorite. That's why I made the alternate finger script that writes a control bone for each finger bone and retains control of the "metatarsals" edit: never mind, I see you figured it out.
-
open up the polygon model. make one other spline somewhere to the side and select just the new spline. hit the lock icon on the right side. (that locks everything that is not selected)
-
Good looking character, is the hair color decal doing the fade around the eyes? Lots of good looking texturing all around. The walk up has a very halting quality to it that I don't think is helping the character's performance. Serendipitously, I made some notes on walks for TWO animators a while ago that address some of those issues. I dug those links up a few days ago for someone else so I'll dig them up for you... http://www.hash.com/forums/index.php?s=&am...st&p=258588 (post 180)
-
"Aim at" constrain the eye bones to your target. And make sure you turn ON the pose in which you made those constraints.