robcat2075
-
Posts
28,400 -
Joined
-
Last visited
-
Days Won
424
Content Type
Profiles
Forums
Events
Everything posted by robcat2075
-
you could apply the animated reveal map to a straight tube and then use different poses for that tube to contort it into the shapes you need. There's probably a way to do this with a material but I haven't thought it thru. This vid shows an animated transparency map on a curvy tube (about 17 seconds in). I don't recall if I used the prestraightened method or not. http://www.brilliantisland.com/demoreels/idl_150kbps.wmv
-
Quickest and dirtiest solution.... model it as in "B" and use either a matierial effector or an animated transparency map to slowly reveal the Blue part from one end to the other. If you actually have to have the blue mesh move along the path then putting a bone at each spline ring and using path constraints to move them is the way to go.
-
I think adjusting bias in modeling and doing it in rigging are two different issues. I haven't had many reasons to adjust bias in an action or a pose as your sample did. I only use bias in the modeling stage. I agree that CP weighting is the main tool for rigging. But I wouldn't tell modelers that bias is bad. I'd tell them that bias is last thing you should adjust if you need to smooth a mesh and that making the mesh right is the first goal.
-
but that's true of anything in CG, not just bias adjustments. Based on your comments I think the problem biases happen when they have been used to force splines into a shape that should have been arrived at by good CP placement instead. When I've used bias to un-crease my own models it's always been very small adjustment of 0 to maybe 3 degrees and i haven't had a problem with moving those around. I bet on your own models ( because you know where CPs ought to be) biases wouldn't be a problem.
-
A:M is full-featured by itself. There are a number of free plugins that add some additional features. A:M has OBJ and 3DS import/export BUT... Most polygonal models are poor candidates for use in A:M. Good topology in a polygonal model and good topology in an A:M spline model are VERY different things. A good A:M model will have far fewer "patches" than a good polygon model will have "faces". poly models made of triangles are generally only useful with a certain type of import called "prop" that does not allow editing. models made with quads are better but will need serious editing to thin them out. On complicated models the amount of editing woudl be daunting for a beginner. Thin Sub-D models are the best candidates but will still need editing to conform them to good A:M splining. A:M is really intended as a complete modeling and animating environment, and not as an adjunct to some other modeling strategy. One of our forum members has detailed a successful workflow here for using ZBrush to texture models originated in A:M. ZBrush-originated models tend to be too dense for use in A:M
-
I'm quite doubtful about the central premise here. Here's why... bias0002MP4.mov
-
There are many details an experienced modeler woudl do differently, but really, for a first time out this is pretty successful. Here are some easy to spot spline errors that I thought we got you to not do on the last exercise Directly attaching the teeth to the lips is probably not a good strategy. When you rig the lips for talking and smiling and stuff they'd be dragging the teeth along with them. I think modeling the mouth in a neutral pose rather than a smile is easier for rigging. But I like the concept of the character, especially the non-symmetrical appearance.

-
Well, the forum rules say we shouldn't be discussing competing products. You may want to give contact information so people who can give you specifics can email you directly. But Poser and A:M aren't really the same sort of program. A:M is a program in which you model whatever you want. But it's up to you to model it. Poser presents you with premade models and some options for varying them. That isn't somewhat easier, it's far easier as long as you only need something within the options they give you. A:M is really for people who want to make something unique and are willing to put the time into achieving that rather than re-use someone else's work. Making something unique is 100x more difficult that re-using something. As far as animating (a whole different discipline) A:M's powers are as good as it gets. I've never seen good animation from Poser. I dont' know if that is because only clueless people use it or if it is genuinely limited in its animating controls.
-
I like the lop-sided eyes. I'm presuming the ear is bit of a place holder right now. The side of the head seems very flat, that's a bit odd. post a wire of the side view so we can see how the splines are there.
-
There may be a way to get smooth without bias. I've been impressed with Will Sutton's models that seem to have no bias adjustments at all. But when I'm using other people's models bias adjustment seems to be the only solution. Can you show an example that does this consistently? I've seen this sometimes but it went away after saving and reopening the model.
-
the default quaternion interpolation will require you to set a key at 0, 120, 240 and 360 to get a complete rotation. A tidier solution for continuous rotating is to go to the properties for that bone>Transform>Rotate>rightclick>convert driver to>Euler. you have to have made one key on that bone for this option to become available then you can set keys at 0 and 360 to get one rotation or 0 and 720 to get 2 rotations and so on
-
There is no brief answer to "how hard is..." questions. It's like "how hard is it to climb the stairs?" Well... how many flights of stairs? how long do you have? what shape are you in? Making a model from scratch will always be harder than using one supplied by a program. Modeling and texturing and rigging and animating an extremely photo-realistic character is an advanced skill. No one in the history of CG has made a character that is 100% realistic in every possible way. a few minutes poking thru the user gallery found some pretty good efforts done in A:M: http://www.hash.com/stills/displayimage.ph...um=1&pos=37 http://www.hash.com/stills/displayimage.ph...m=1&pos=171 http://www.hash.com/stills/displayimage.ph...bum=1&pos=0 http://www.hash.com/stills/displayimage.ph...at=1&pos=11 http://www.hash.com/stills/displayimage.ph...at=1&pos=56 those are all by advanced users, with a good eye for shape and form and anatomy. I'm sure none of those were made in the user's first year. Cartoony characters are favored in animation because they serve the purposes of the story without creating impossible-to-meet expectations for reality. Pixar never has realistic humans in its movies for that reason. If you need a normally shaped human TODAY however, a program like Poser might be your only option. I presume it installs some sort of rig also so you dont' need to know the inner workings of that either. If you need a two-headed cyclops with wings, Poser may not have a practical road-map to such a thing. all in all, I think it's a trade off between flexibility and accessibility.
-
hold down the 4 key (at the top of the keyboard) while you move the CP. it limits the movement to the line the CP was on at that point so if you move it far enough it will move the spline, but for short distances it may not be noticeable. 5 will limit the CP perpendicular to the spline 6 will limit it in/out from the surface
-
Here's a test with one dreadlock on a simple head. dreadtest.mov I couldn't get it to "simulate on the fly" but the baking in sim did work. I had to do that from the front view for the collision detection to work. Simming in the cam view had pass thrus. This is in V13. I don't know how my model or settings differ from yours, but you can look at it to see. Dreadlock.zip
-
Good that all your 2D practice wasn't wasted.
-
Good looking character. Is the sweatsuit drawn on?
-
that works. Very Japanese.
-
I'd try turning Bounce way down and maybe collision radius up a bit.
-
Lotta stuff there! Do you want it day time or night time? The sky looks daytime but the streetlights say nighttime.
-
29.97 vs. 30 is a difference of almost 2 frames every minute. Being two frames off will be noticeable to most people and just become more obvious as the minutes pile up. If you are taking clips of less than 30 seconds into a 3rd Party NLE like Premiere it shouldn't have a problem with those, but I don't know what happens with 30fps productions edited in A:M's NLE are more than 1 minute in duration. Fun fact: 29.97 was a solution for problem that never existed. This long read explains it but basically the notion that the frame rate change was needed to accomodate color was the result of bad guess work by an engineer and never demonstrated to be correct. But it's entrenched now and we have to live with it.
-
Sounds like you moved the red bar of the action so that it no longer starts at 00:00. Select it and stretch the beginning back to the start. An action is only active in the time that its red bar covers.
-
As far as I know A:M doesn't accomodate 29.97 directly. forcing your 30 fps footage to 29.97 in another editing program shouldn't cause an audio sync problem until you reach lengths of 30 seconds or more. What to do over 30 seconds? For most productions individual shots usually don't last that long so there shouldn't be any drift noticeable as each shot in your NLE begins with the audio back in synch. But I don't know how A:M's own NLE handles 29.97. Anyone? Interlacing is a different issue. Normally, you won't choose "Interlace" as an option in A:M. After what stage in your editing process are you seeing the interlacing appearing?
-
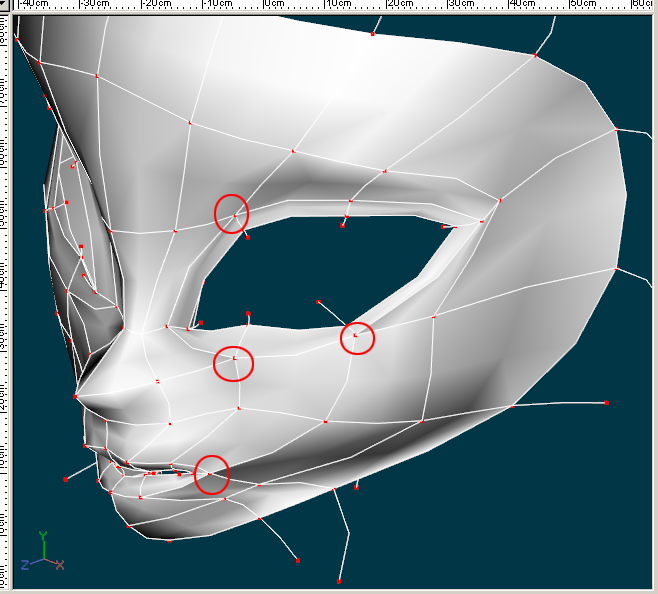
Most of that is pretty good but here's a rule: If you have 5 or more lines running into a CP that will be bad. Never do that. It will always make a crease. Do not do it. Splines should cross at a CP like an X. No more lines should be going into that CP. You have to reroute the extras somewhere else. rerouting: resplineMP4.mov there's also a vid in Spleen's TAOAM giraffe thread that show more about how to reroute splines. face03.zip
-

You're going to put someone's eye out with that thing
robcat2075 replied to robcat2075's topic in Work In Progress / Sweatbox
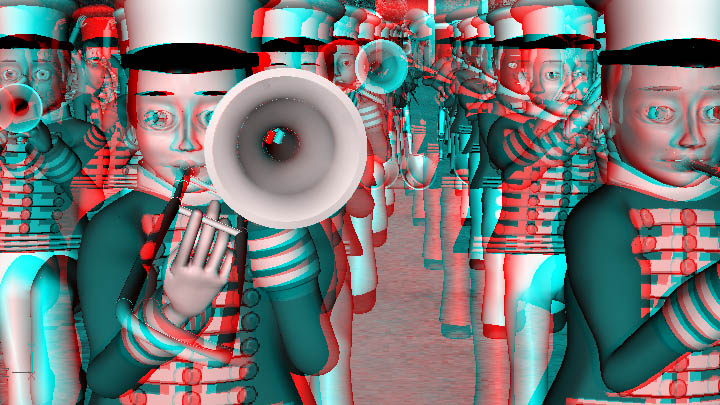
And now, right here, on this very stage is the most sensational, inspirational, syncopational, instrumentational, 3-Dimensional A:M scene I've seen today: 2_01_80 red-blue version cross-eye 3D version Marching Band-imation by KenH Crowd-imation by PFMark Rabbit-mation and camera-mation by me Those are just quick shaded renders but you get the idea. They look best if you full-screen them. You can see what some "final" rendered frames (in 3D!) look like here. Not that I know of. I'm going thru and tidying up the unfinished shots in "We're Off, We're Gone" so it can be in TWO and just decided to do the extra 10% to properly set the stereo options for the camera since I had rather envisoned the sequence for possible stereoscopic anyway. I thought of that too. However, they've devised the situation to make it awkward for independents. Aside from the need to pay someone to convert your movie to the correct digital file format, they charge a "digital print fee" every time your movie is projected. It looks like the anticipated savings of not having to make a film print of your movie for theatrical showing is negated. -
A frame from "We're Off, We're Gone". Put on your red-blue glasses.