robcat2075
-
Posts
28,275 -
Joined
-
Last visited
-
Days Won
406
Content Type
Profiles
Forums
Events
Everything posted by robcat2075
-
I can tell you that he is away on an extended missionary trip. As far as modeling a body it's like any other object, but you really need to start with the exercises in "The Art of A:M" and learn your way around the modeling environment of A:M. It even has tutorials on modeling a character with body and everything.
-

-
Ideally, your walk and talk actions won't have any keys in common. The various blend methods are used to negotiate compromises when they do have keys in common.
-
yes, it is possible. First check that when you added the second action it didn't boot the red bar for the first action out of the way.
-
those chains are so close together in the pic you've posted, they're very likely to get confused on collision. Show a picture of how you have them separated now.
-
Hard to tell from the pic, but just delete the keyframe for that bone at that point and re pose it. Always use the rings on the rotate manipulator ( R ) to turn a bone. don't drag it by the tip. IF you're using FK arms don't try to drag it all by the wrist. use the rotate manip to pose the bicep first then the forearm , then the hand.
-
Possibly it wwould help to start/model them in an outward position so they fall into place and are not starting n contact with anything, which seems to be a big no for cloth simulations.
-
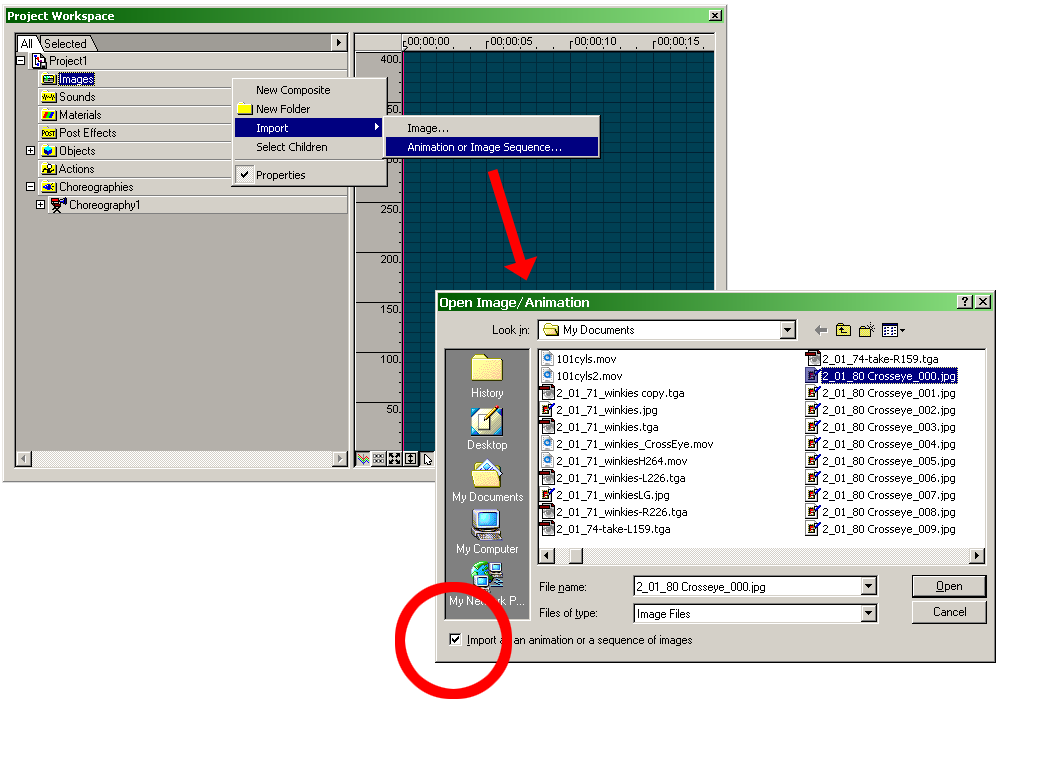
yes. if the images are numbered: name000.jpg name001.jpg name002.jpg... and you select the import animation sequence option they will be imported as if they were a movie targas are better than jpegs pretty much make your image sequence include every $0.01 increment from the lowest to the highest you need. after you've applied this as a decal to your model and saved that and put it in your chor... enable the "show more than drivers" icon for the model (in the chor again) this will make it possible to set properties for the decal (u gotta hunt for it) including the frame being displayed.
-
1) If you un-expand the "bones" folder it will present all keyframes on a single line for easy selecting and moving. 2) vid on keyframing that shows how to avoid unnecessary "Whole Model" keyframes: http://www.hash.com/two/RCHolmen/KeyFrameOptionsMP4.mov
-
I'm impressed with what you got out of stock objects. That's just the sort of thing Hash could use to sell A:M to con-goers. You can animate hair. Don't ask me how, but Mark Allen (PFmark) did it for the shot in TWO where TinWoodman flips a mop up and over into the air and catches it. Hope she's got broadband in that tent.
-
I looked at the before and after... I'm not sure what part is the bad part for you, unless it's the sudden color pop at one point.
-
the ground plane? The default ground is a model that you can texture and resave with a new name. You can scale it larger, but not to infinity and beyond.
-
I'd create an image sequence of this display in a paint program, going from lowest price to highest price, and apply that sequence as a decal to your sign. In your chor you can control the displayed frame of an image sequence. It would be easy to make it go up-down-up-down as needed for your story. And easy to revise the timing of that as you refine your animation.
-
--> QUOTE(Jeff B @ Oct 5 2008, 05:55 AM) 283417[/snapback] Hi all Im Jeff, I live in London UK, Welcome to A:M, Jeff! you can pause those videos, ya know... Another option is to print out pages of the tut you are working on if you don't like screen flipping.
-
Welcome to A:M! That sounds like a great background. That turned out pretty well! you mean as opposed to facial controls? Probably not. You didn't want to use someone else's lazy-ass smile pose anyway, did you?
-
no tut but general tips... middle gray is no bump white is protruding, black is recessed, but a white square on a black background will not have much effect. it's the blurry grayscale transition from light to dark that the renderer really pays attention to to create the look. For that reason, sharp geometric shapes and thin lines are things bump maps are least suited to since they have the least room for the gray transition between light and dark.
-
Walk cycles try to run the length of your chor. When the chor changes length it affects the walk. To stop that use the ease property in the path constraint for the character. Set 0% when you want the walk to start and 100% when you want it to stop.
-
Like in "Predator"? make a copy of the model that is completely transparent and no color and experiement with small refraction index settings like 1.01
-
You mean to not render faces that would not be seen anyway? The renderer already figures those out in the "computing Patch visibility" step. or do you mean back-facing patches off like shaded mode can? No.
-
Dentist drills always remind me of this Don Martin Cartoon http://johnkstuff.blogspot.com/2008/08/don...essence-of.html
-
I believe that was an Anzovin product but discontinued now. They have a note on their site to contact sales@anzovin.com if you have questions about their discontinued products so you might try that. You might also try posting specific questions about problems you are having on this forum. A lot of people here may have answers.
-
there's a tech talk on how to use dynamic constraints http://www.hash.com/forums/index.php?s=&am...st&p=256025 Just do one dreadlock first to find the right settings (there's a lot of trial and error to this) then when it looks right do the same thing to the others.
-
That looks very professional! But you left out the blood-curdling screams of the patient.
-
when you open up the quicktime player and do Help>About Quicktime Player... what version of quicktime does it show?
-
I didn't know there was a way to make it NOT include sound. Sor3 shouldn't be a problem. Try MPEg4 just to see