-
Posts
28,277 -
Joined
-
Last visited
-
Days Won
407
Content Type
Profiles
Forums
Events
Everything posted by robcat2075
-
The Live Answer Time video is up now. The discussion of this question begins at 28:00...
-

Possible to order a replacement CD of an older version?
robcat2075 replied to Strange Voyager's topic in Animation:Master
I look forward to seeing your v8 work! -

Possible to order a replacement CD of an older version?
robcat2075 replied to Strange Voyager's topic in Animation:Master
Hello Jadan! Last time that question was asked I think we found out that Hash no longer has any past CDs to sell for such a circumstance. You MIGHT find one on sale on ebay occasionally. I am doubtful that such an old version will run unless you have computer running the OS it was originally written for. Does v8 run on your PC? You can find the last update for each version, going back to 1998 on the hash ftp site. ftp://ftp.hash.com/pub/updates/ If you browser displays a blank page for that link it means your browser has disabled ftp activity. That's a thing now. If it can't be re-enabled you may need to use an ftp client to make the connection. I'll note that the current A:M is way better than the A:M of 2000. Sticking with v8 or v8.5 is doing it the hard way. -
-

Weird UI behavior after Windows reinstall.[Solved: screen res]
robcat2075 replied to WolfsongCG's topic in Animation:Master
To try: Switch the Tools>Options>Global>Real-time Driver setting and restart -

Weird UI behavior after Windows reinstall.[Solved: screen res]
robcat2075 replied to WolfsongCG's topic in Animation:Master
Are you using a mouse? -

Stalled Trek: The City on the Edge of Foreclosure
robcat2075 replied to largento's topic in The Wannabe Way
I'm sure it will be entertaining for everyone who sees it! -
I don't have much to add... Mostly it depends on what you will do next with the shape. Is your lathed shape merely the precursor form of something else (for example, Modeling an n-gon)? Then you want the number of splines that make it easy to define that next shape. Is that shape going to have some repeating feature, like teeth on a gear? Then you need enough splines to make one tooth x the number of teeth. Is your lathed shape something that needs to be attached to another mesh, like an arm is attached to a torso? Then you want the number of splines to be about the same as the splines you can attach to on the other object. Is the lathed shape the finished shape? Then 8 is a safe choice. Not too dense but enough splines to make a smooth round shape.
-
Kevin, are you using Firefox? I just found out Firefox has turned off ftp downloading in v88 and v89 and will eliminate it completely in v90 https://www.ghacks.net/2021/04/16/firefox-90-wont-handle-ftp-sites-anymore/ After I turned it back on (i still have v88) I was able to access the forum link to AMv15. update: Google Chrome has been without ftp for two years now... https://www.ghacks.net/2019/08/16/google-chrome-82-wont-support-ftp-anymore/
-
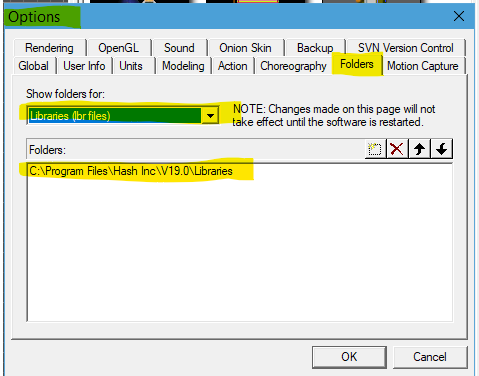
Check that the top menu is set to Hash Library 1 And that Tools>Options>Folders has the highlighted settings...
-
When you say " the tabs on the left side of the workspace" do you mean tabs at the bottom of the Library Window? Nothing is in any of them? Is there a "Libraries" folder in your AM folder and does it have a .lbr file in it? The extended AM data set can be downloaded with http://www.hash.com/ftp/pub/misc/Data.zip It is meant to replace the "Data" folder in your AM folder. Al though the tutorials are written to access files via the library, I have always found it easier to load files in the conventional manner. You can load any file with the File>Open menu. Projects can also be loaded with Projects>Open Images, Material, Objects, Actions and Chors can also be loaded by on their respective folder in the Project Workspace and choosing "Import" to navigate to a file location.
-
It is a known bug that will be fixed in the next version. Something to look forward to!
-
A lengthy Bloomberg article about the recent trend to flatten and simplify corporate graphics, for better and for worse. For instance... Debranding Is the New Branding
-
Try setting the volume in the chor to 99% instead of 100%
-
@mulls When do you need this done? This would be a great Live Answer Time topic.
-
Red indicates the Pose slider you are working on in a window NOW. You can freely move that to see the effects of your Pose. Moving it or leaving it set to a certain value doesn't create any permanent record. If you want a default setting for the Pose, set it in the User Properties. Pink flags other Sliders that have had settings altered while this current Red Pose was being edited. If you move the Red slider you will see the Pink sliders move also. If you have inadvertently created a key frame on a Pose slider while editing another, the easiest way to get rid of it is to go to the PWS folder for your current Relationship and delete the channel named for that other, unwanted Pose. I did a search on "red" and found the relevant passage on p. 74 of the TechRef. It is in the paragraph that begins... "For those familiar with previous versions of the software, the frame number, in a pose or smartskin window, no longer represents the value of the controlling property. Since the controlling property can be a multi-valued quantity like a rotation..." Hash has limited support resources these days. Come to the forum and someone can usually answer a question.
-
Sort of. Normally, any change or keyframe you make while working on a Pose gets incorporated into that Pose, even a setting to another Pose. Normally, when you make a change you want that change to get noticed. But sometimes, you want that change to get ignored. "Define Relationship" OFF is for that. The case in your PRJ is a classic example of the need to be able set a previously made Pose without that getting burned into another Pose. It's a very elite need and it is notable that A:M accommodates it.
-
When you need to have a Pose at a certain setting while working on a second Pose, Turn OFF the "Define Relationship" button while you set the first Pose, then turn it back on before you resume work on the second Pose. Turning that button OFF allows you to change settings without those changes getting keyframed into the current relationship. Forgetting to turn it back ON to do the real work is a frequent... D'OH! (It's a pair of handcuffs)
-
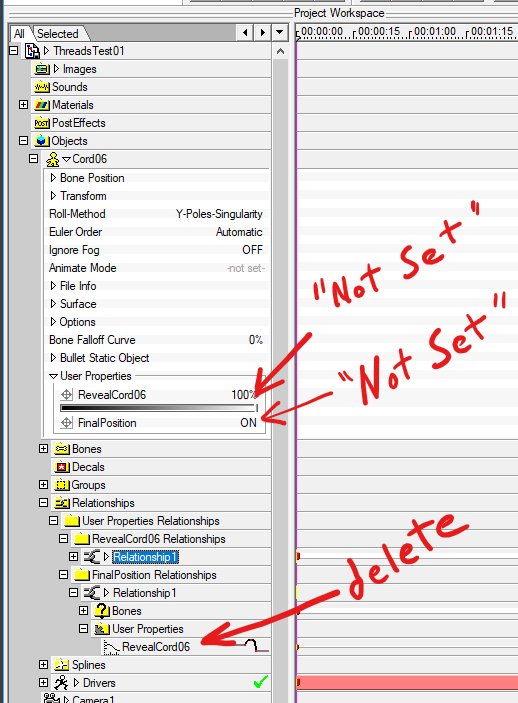
There are keyframes for "RevealCord06" in the "FinalPosition" Pose. There is a way to avoid that but for now... Set the two User Props to RMB>Not Set Delete the "RevealCord06" channel under FinalPosition Relationship then resave your PRJ.
-
I think it is the default setting for the Pose in the model In the properties in the original Model, set RevealCord06 to either 0% or RMB>"Not Set" Since you are making setting for that in the Chor, you don't want it to have a default greater than 0% in the Model.
-
You can find a discussion of the bias handle aimer in the v19o features list...
-
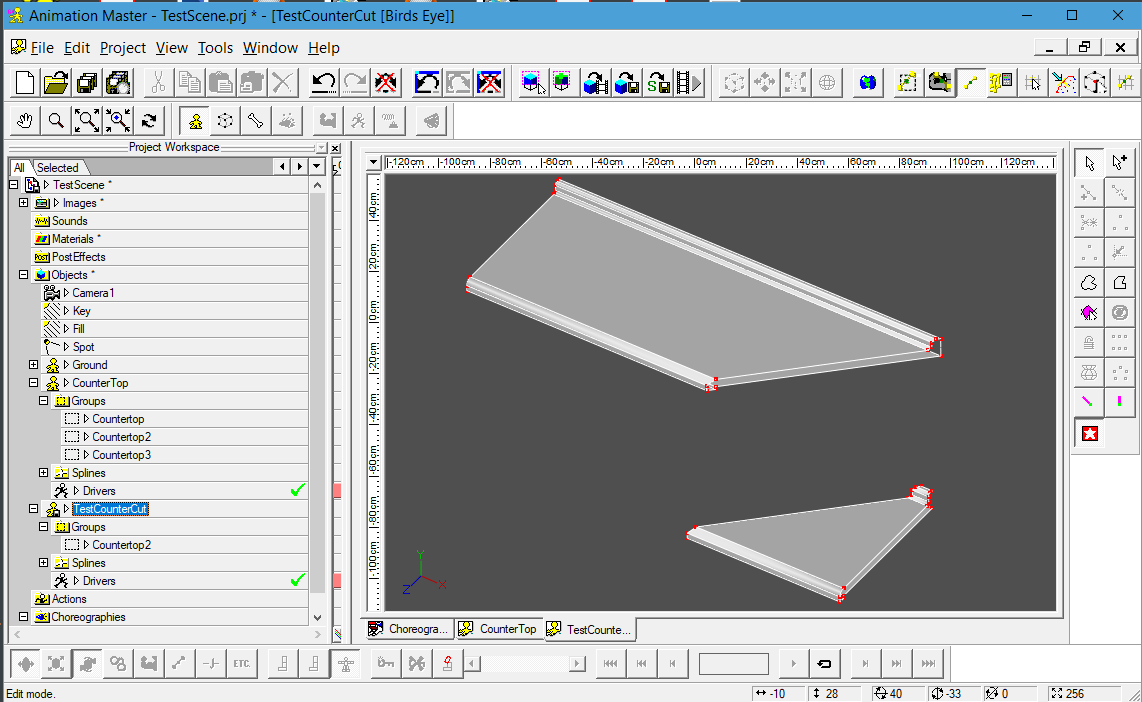
I was able to use Cut Plane on your shape without crashing... TestCounterCut.mdl There is an easier way to get a 45° angle on an extruded shape such as yours... clip5034RotateToAngle.mp4
-
I was able to use it in a simple case. Can you send me the model in a PM and a screencapture of how you have the Cut Plane positioned?
-
The archive video replay is up now. I think we could incorporate that into Pose settings so we could still use one model for each atom. You could make an ON/OFF Pose for each element that sets the size and color... or you could put them all on the continuum of one Pose slider.
-
Here is the result of today's efforts. Thanks for posing the question, Tom! PRJ: MoleculeGrowing006 GrowingStick.prj Render Preset: MoleGrow.pre Animation: MoleGrow.mp4


