robcat2075
-
Posts
28,276 -
Joined
-
Last visited
-
Days Won
406
Content Type
Profiles
Forums
Events
Everything posted by robcat2075
-
In the Radiosity example, I set the Intensity parameter very high...200... so that the effect could not be overlooked. Lower values are probably more typical in careful lighting situations. This compares several Intensities. Note that a 0 intensity looks just like a conventional render. The bottom row is the same images with a 1.8 gamma applied. These fine adjustments are where you want to know your monitor is carefully calibrated and that your audience's monitors are so also... which we never know!

-
There is some similarity in appearance, although the process is quite different. Here is a test scene. It is an open-top box with a sphere inside it. A single kleig light is above and behind the box. The camera is inside the box, pointing toward the sphere and back wall. A conventional render from the camera view gives this result. Every point in the scene is either illuminated by the kleig light or is black, for lack of illumination. Global Ambience (AKA Ambient Occlusion) simulates an infinity of kleig lights from every possible direction. This all-over light reaches more parts of the scene; the surfaces that are more exposed to it are more illuminated and the surfaces that are more "occluded" from it are darker. Some surfaces like the bottom of the sphere and the area below the sphere are still completely untouched by this light and remain black. Global Ambience ON, kleig light OFF: In both of the above cases, if a point is not directly exposed to some source of light, it is unlit and black. Radiosity (other programs call this "Global Illumination") works by calculating light that bounces off surfaces in the scene, as real light does. The blue wall, which is completely hidden from the kleig light , is still illuminated by light bouncing off other surfaces in the scene. Light bouncing off the red and blue walls spill some color onto nearby surfaces. The bottom of the sphere, although cut off from direct light, is illuminated now. Global Ambience OFF, kleig light ON, Radiosity ON: This PRJ has the three chors above. To render them properly, you'll need to do Tools>Options>Rendering>Use Settings from>the Camera AOvRadDemo005.prj
-
No, these were manually randomized. I do recall making a way to get a random value to set once and stick in a chor. That could potentially be used to drive the building heights but would be too random for this scene where I wanted to have taller in back and shorter in front.
-
There are really two light sources. The AO is set to 50% intensity and the sunlight ("Key") is set to 75%
-
Simple grids added for window details.
-
Cubes randomly scaled, Fog, and AO.
-

found another model od old AM cd and did a quick render
robcat2075 replied to johnl3d's topic in Tinkering Gnome's Workshop
His artificial gravity is malfunctioning. -
Looks like they over expanded and "Disney+" wasn't enough of a audience for the expanded output. I bet Disney+ gets sold off to Netflix or just closed in a few years. Too many streamers out there for the market. On the bright side, all the newly-unemployed can put "former Pixar" on their résumé. That will get attention.
-
Tinkering mode caused simple elephant
robcat2075 replied to johnl3d's topic in Tinkering Gnome's Workshop
@Rodney the latest update to Chrome has fixed the problem of John's GIF animation in the first post not showing up. Does it show for you now? -
At the top of the forum is a banner of film frames highlighting interesting A:M work, which was a feature of the forum years ago but somehow got lost in a forum-software up date. Click on a frame and it will take you to the relevant post! New frames highlighting new work will will be rotated in over time. Thanks to @Rodney for creating the code that makes the banner work!
-
Yes, it is the latest official release. I keep v19.0 installed for when I run into a problem that is peculiar to v19.5. If you find something that doesn't work in v19.5 try it in v19.0 and let us know either way.
-
I just noticed the give-away includes VUE itself, the landscape generator. That's a big deal. But I get a download that is an .xls file... a spreadsheet? Does one need MS Excel to use this?
-
I have often wondered if particle emission rates are per patch or per group. Your test project is a good chance to examine this. First, however, I'll note that the two squares in the Chor are not quite equal. DenseMesh is about 100 cm across while SimpleMesh is about 150cm across then scaled down to 62%. Scaling an object will scale the particles it emits so that may explain why Simple has sharper corners than Dense... If I edit the squares so that both are 100 cm across and both 100% scaled in the chor, they are starting to look much more similar... The emission rate in the Sprite Emitter is set to "1000"... It's possible that is so high that an overload of sprites is masking any difference between the two results. I'm going to scale that value down by adjusting the Emission rate in the Sprite System. This value is always a percentage, not a count. Why are there two controls for... the same thing? It is possible to have more than one "Sprite Emitter" as children of the "Sprite System". For example a fire material might have a flame sprite, a smoke sprite and a spark sprite, each with its peculiar settings for many of the parameters we see in "Sprite Emitter". Having these percentage settings in the "Sprite System" lets us uniformly scale the whole effect without needing to edit each emitter. With the emission rates scaled down to 1% we can observe the sprites being born... Frame 0: Frame 5 Frame 10: Frame 15: Frame 20: Frame 25: Even though DenseMesh has 25 times more patches than SimpleMesh, both seem to be putting out an equal number of particles. This is the opposite of what I expected. I thought the number of particles would increase with the number of patches. I thought the lumpy result your original PRJ had for SimpleMesh was because it had fewer sprites to blend together, but it was really because they were scaled smaller and perhaps had less overlap among the sprites. Thanks for inquiring, Tom!
-
Your original question... how to do these morphing clouds in the fashion of my more recent clouds made with noise combiners... I'll have to think about that more.
-
there's a zip with a PRJ in this thread https://forums.hash.com/topic/41565-cloud-fly-thru/?do=findComment&comment=369290 A sprite needs to be custom designed for each shot to appropriately represent the light/darkness/shadow direction that matches the lighting in the scene, so the sprite in that PRJ will not necessarily work for another scene. I recall we did a Live Answer Time where we got a force to blow particles away from a shape:
-
As a first gambit, recall this test from several years ago... Those clouds are modeled shapes that emit one layer of sprites on the first frame, which then live for the duration of the shot. The clouds could potentially be any shape. Since they are sprites one could add a force and turbulence that slowly blows then out of the sculpted shape. For getting into the shape, how about another shot with the force blowing in the opposite direction, then reversing the frames so that the sprites appear to arrive at the shape rather than leav it? Then edit the two renders together.
-
MadFoxResplining.mp4
-
I haven't tried it yet but try this... Delete all the poses and do a test render. Is the spline problem gone? If it is, reload, delete the poses one at a time and test render each version until the problem is gone. That will give a clue that a particular pose might be the problem. Edit: see video below
-
First, try pressing the space bar to force a redraw. Next... does this still happen if you put the character in a chor?
-
found old model and did a bit improvement ,,I think
robcat2075 replied to johnl3d's topic in Tinkering Gnome's Workshop
You've turned The Killer Bean into The Little Dutch Boy! 😀 -
60K... 80K... 100K views for my Heavy Push!
robcat2075 replied to robcat2075's topic in Animation:Master
It took 17 years but my Heavy Push has now surpassed 100,000 views on YouTube! -
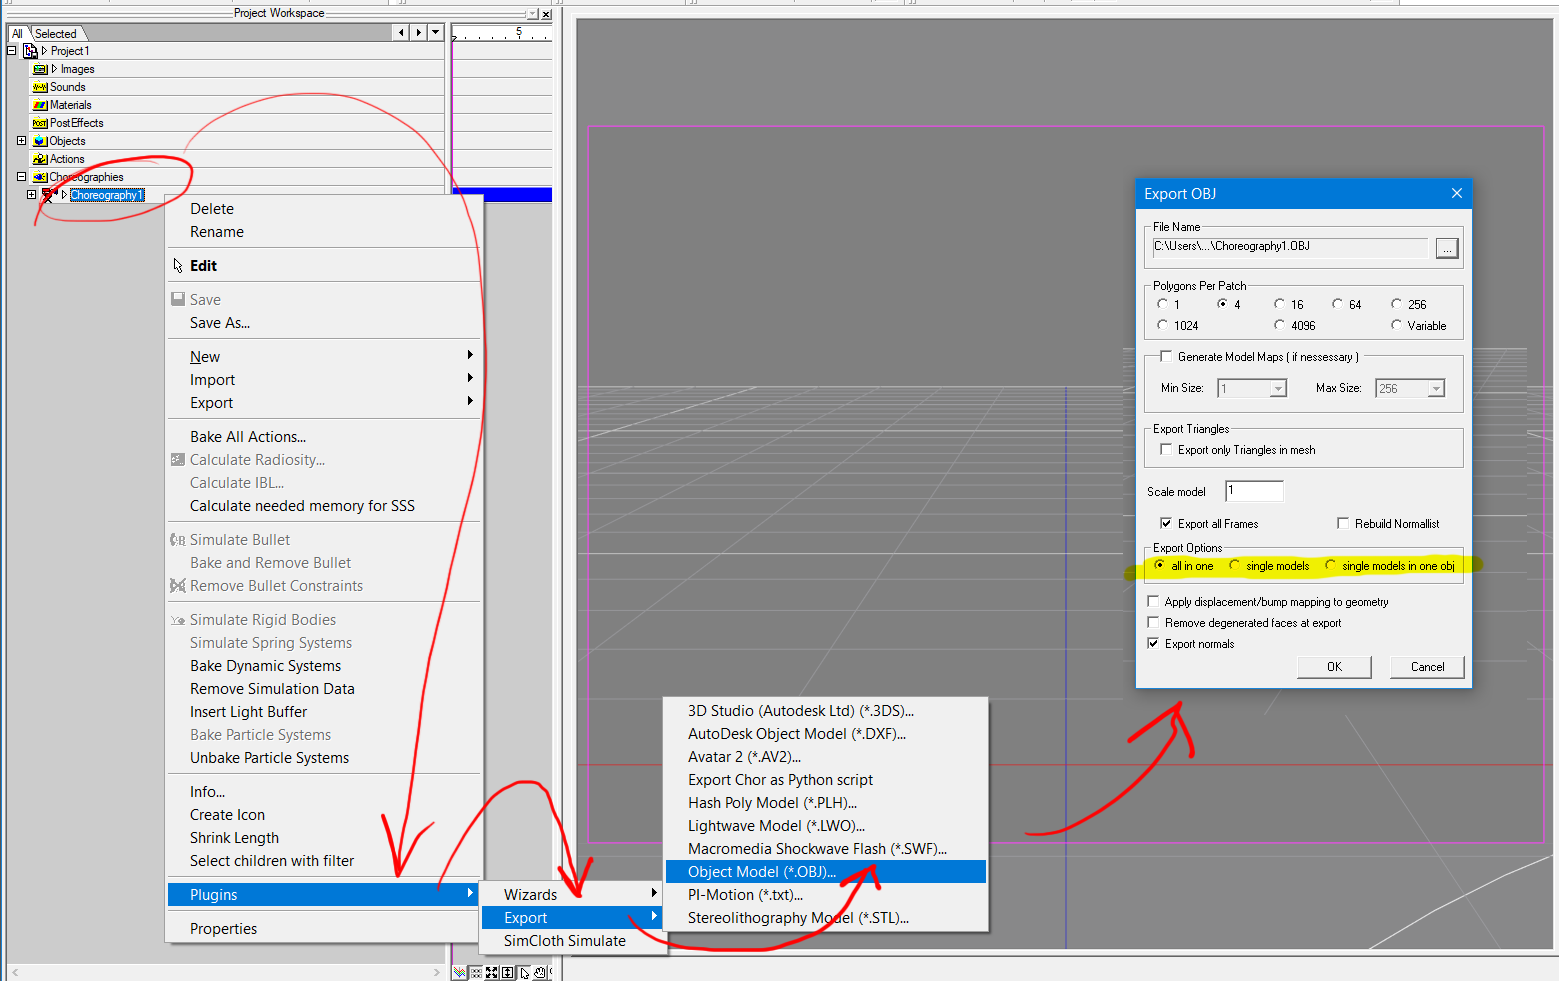
If I invoke the export plugin from a model, that choice won't appear because there can only one model to export from a model. If i invoke that export plugin from a Choreography ( on the Chor in the PWS), that choice does appear because there can be many models in a Chor. Likewise for the choice to "Export all frames"; it is only relevant in a Chor.
-
This?
-
found these guys on an old AM cd
robcat2075 replied to johnl3d's topic in Tinkering Gnome's Workshop
Even Boris is looking good these days. -
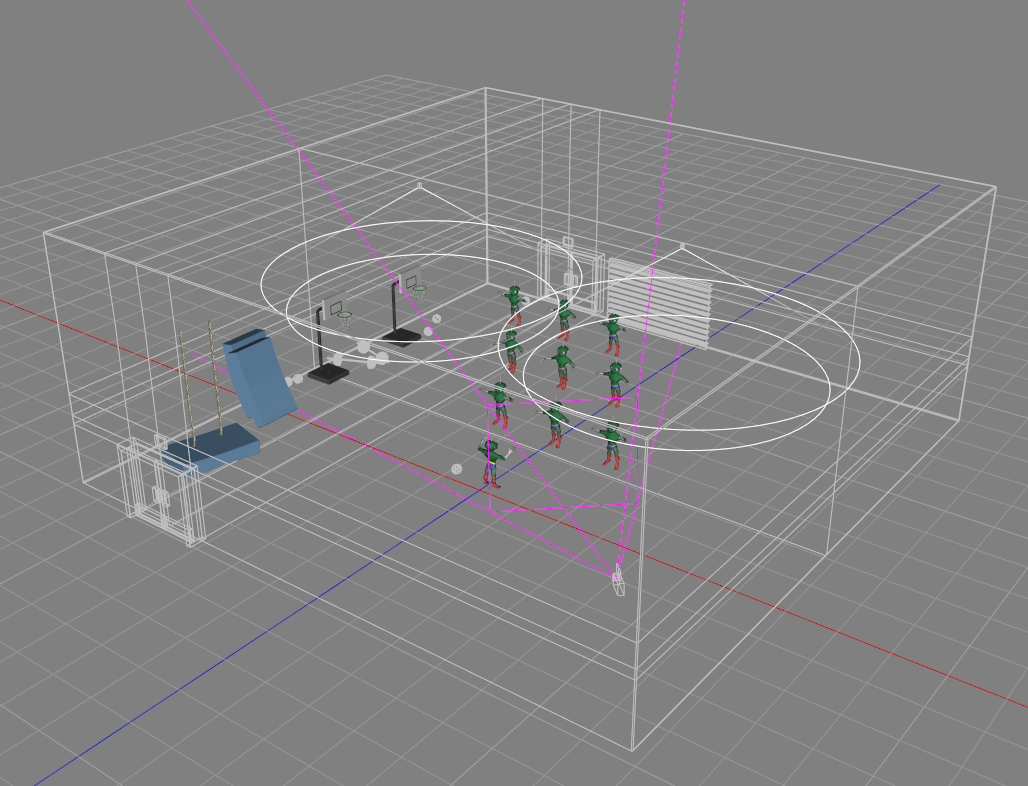
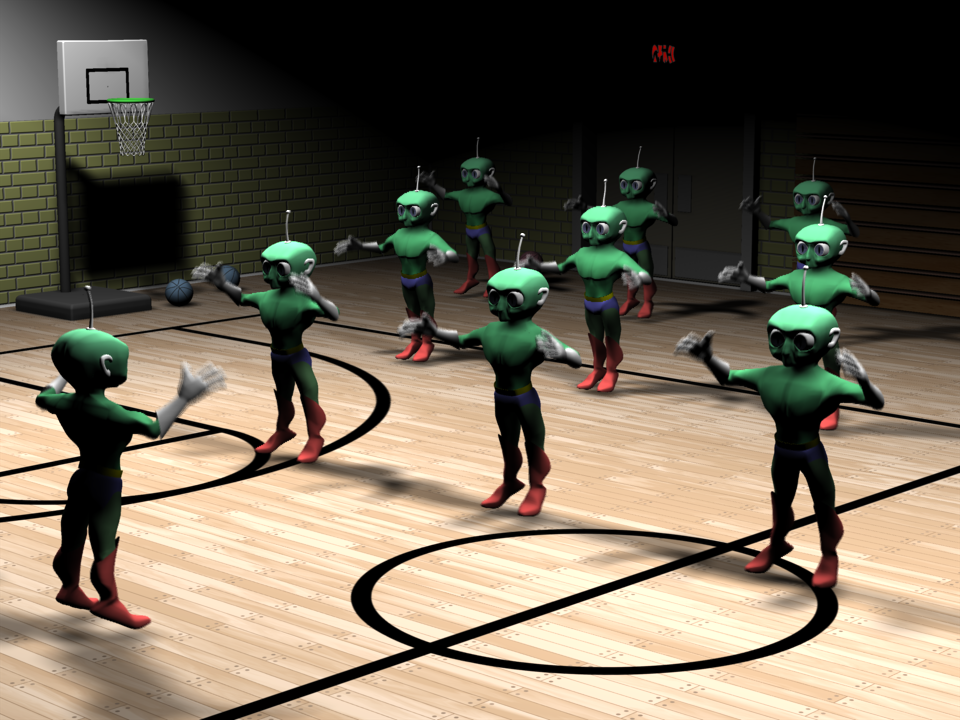
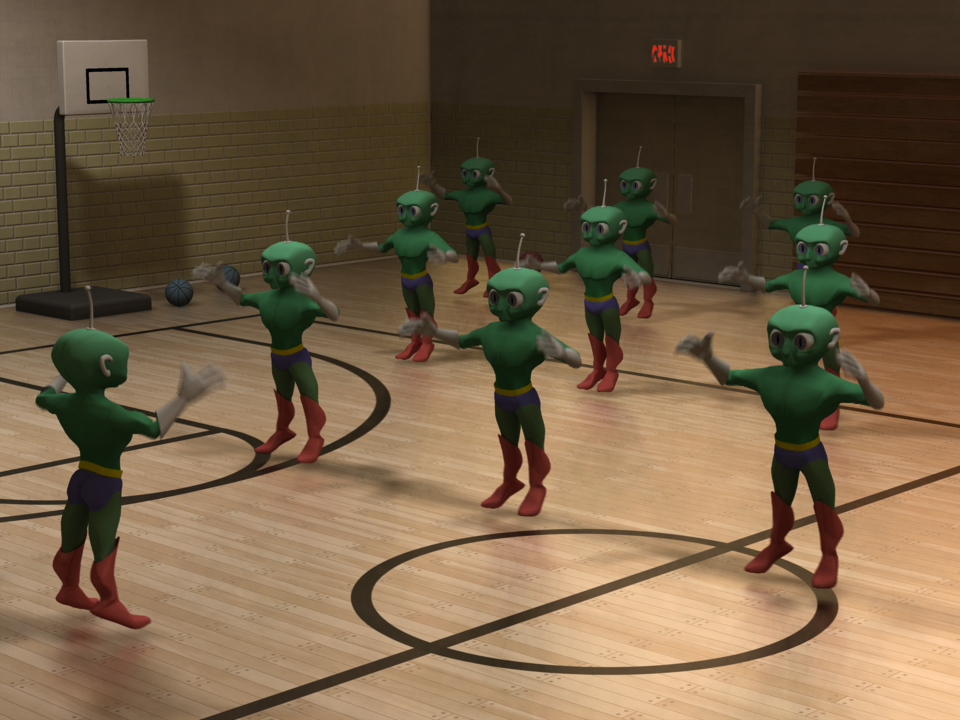
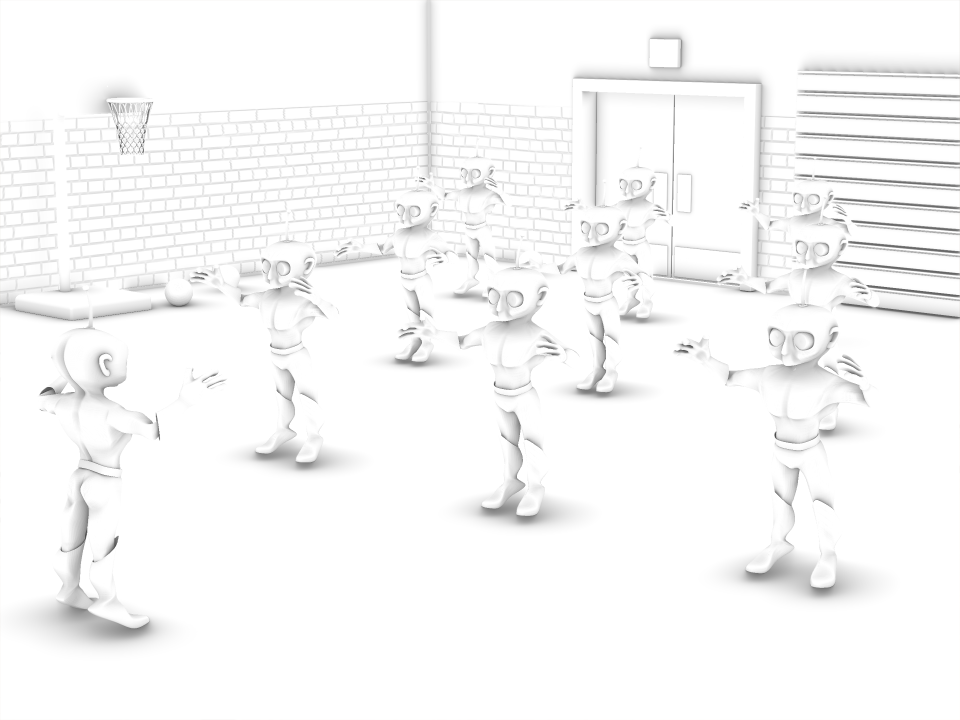
Here is another modern render of one of my old Animation Showdown animations. I added a school gymnasium set and rendered with radiosity. A birdseye view of the chor looks like this. The set is a completely enclosed box with two kleig lights in the ceiling... A conventional render with those two lights gets this... That is very severe. If I were going to use conventional lighting I would need add a number of fill lights in strategic places. Here is a radiosity render. The shadow areas are no longer pitch black and there is visible detail even where the lights do not directly shine. Overall, however, it is too dark for my taste. Increasing the Intensity of the lights so that the charcters were well illuminated caused the brightest spots on the floor to become overbright and clip. Instead I applied a gamma correction to the radiosity render. I''m liking this much better... Unfortunately, the shadowing that was indistinct in the raw render is now ever weaker. To give that some more bite i rendered a pass with ScreenSpace Ambient Occlusion (SSAO)... ... and composited that by "multiplying" it with the Radiosity. I did that in After Effects but an A:M "composite Project" can do the same operation. This PNG alternates "before" and "after"... SSAO has no anti-aliasing so I had to render those at 3x3 times the normal resolution to make smooth versions suitable for compositing. When A:M introduced Radiosity our computers weren't ready for it. Each render took so long that animation was unthinkable. But now with a modern CPU and NetRender it is within reach. My 640x480 test renders for this scene took only about 3 minutes per frame. After i got my settings decided and cranked up the quality, the full-frame final renders took only about 20 minutes each. Get started with Radiosity with Yves Poissant's Cornell Box Tutorial Learn more at Yves Poissant's Radiosity/Photon Mapping Pages