KenH
-
Posts
13,816 -
Joined
-
Last visited
-
Days Won
1
Content Type
Profiles
Forums
Events
Everything posted by KenH
-
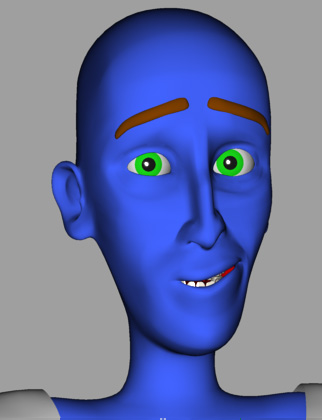
I agree. The nostrils look like fly catcher nets. You might at least think about giving them thicker "walls". Especially at the bottom. I can't see well from this angle, but it looks like he has no cartilidge (perenium?) separating his nostrils. With the hair, I'd suggest thickening the base of the strands to fill in the gaps. Also, his teeth look like a single tooth. Maybe a gap or an indent would solve that. Otherwise, he's coming on good.
-
Should you be in a compromising mood, it would be really helpful if the FACE interface switch was left at least.
-
No. I'd be interested in seeing what it looks like though. Edit: I assume you're talking about a face made up of dots. It can't be done (normally) as cps can't exist without lines and vice versa.
-
That's a shame.
-
Not at all. That's probably the way I'd do it if we go that way. The problem is that an efficient standard is difficult to set without others input. Without that I have to go with my gut.
-
As I say, turning off the switches creates more keyframes than turning them on. Don't worry about it. We'll sort something out specially for the SO characters separately later. (I was hopping some animtors would chime in here to get a consensus early.)
-
That's why I asked how would be the most economical way to go about it. Well, of course, if anyone needs the functionality of the switches (eg IK arm), it would be a "rule" that they turn on the switches and switch it there......not go into the pose window for those things. Even if the switches are ON by default, there's still no guarantee everyone would use them over the pose window......unless there was a rule. Turning them off by default is a preference thing that I think Nancy also agrees with. Some more opinions would be nice. Maybe all the bells and whistles doesn't bother most people?
-
No. I don't want the switches removed. I want the rig to be as free from "clutter" as possible when first starting to animate. It's a state of mind thing and all those "bells and whistles" could become daunting. Once the blocking is done (or before), then the switches can be turned on easily if the animator wants. They'll be invaluable for cleanup in particular where you have to hunt through several levels of poses to find the pose you're looking for without them.....for every character in every shot. The initial pose would need to be checked for each model, but the basics would be there....like master target turned on or arms rotated 90 degrees.
-
Seems to be working ok. I need some input. From animating on TWO I think we would speed things up if we made a "default ON/Off pose" so that (if ON) the character will look normal (non T pose) when brought into an action/chor. These are things we have to do anyway, so I think it makes sense. If we do end up doing that, would it be an idea to have the pose done in the blank rig so that we won't have to set it up in each character after the rig is installed.....and the rotations (of the arms) would be standard across all characters. Here's some things I personally would like to have set up and ready to go in every action/chor: initial pose....arms down/knees bent/fingers curled/feet apart master eye target on ik chest on turn on thumb and finger controller bones eye lids down so not staring turn off switches Opinions/suggestions welcome.
-
Can CAD apps export obj? I've had good experiences with that format in the past.
-
Very creepy. Maybe it has a Silent Hill feel to it?
-
It's the Balance pose. If you set it to 0% in the model, then he doesn't raise his leg. To change it you right click on that pose>edit pose, then you can bring his leg down in there. (Though there's something wrong with the rig installation/rig as when you move his leg down, his other leg goes up.....looks like his left ankle null controls a bone scale in the right leg.)
-
David/Mark, is the rig mature enough now to start putting into the SO characters? If so, how do we get a blank version......just delete the Sam mesh? Also, is the installation similar to before?
-
Woah! Did those limiting changes just add 300kb to the model? It seems so. If they did, I'd also agree they're overkill especially if the animator doesn't interact with the bones regularly/at all.
-
If they're life size, you might add a subtle amount of fog. I agree they seem abit too crisp. Also, the shadows should be softer.
-
You can. But you have to do it within the pose action.....using the "show mode than drivers" red x icon to get at the groups. Once you find the group in there, you can change its color at different percentages.
-
Here's your posts: http://www.hash.com/forums/index.php?act=S...mp;highlite=%2B and here's your predator thread: http://www.hash.com/forums/index.php?showtopic=25000&hl=
-
please take a look at my project
KenH replied to thefreshestever's topic in Work In Progress / Sweatbox
Nice project. 1) I don't have much experience with forces but your test seems abit too fast and strong. 2) Splines look ok. 3) You probably don't need grass further than what you have. See how it looks without. But if you need grass, don't use hair. Maybe a repeating grass image on a patch surrounding the set would do as well. 4) Did you do the dust foot step in the manual? Particles is probably the way to go. -
Ah gotya. You can do this with animation.....by switching off the A icon at the top. With that off, you can make changes to a bone rotation and it won't be keyed. But you can't assign this to bones so they'll always behave this way. But the bones will always create a key at frame 0 (because they're moving) and so be in the timeline.
-
A path should do it. I'd need to see a picture.
-
Using a curved path sounds like the easiest solution. Draw a curved spline in the chor that follows the ground. Delete your model out of the chor and then drop the model onto the spline path. Then drop the walk cycle onto the model.
-
Even handier, there's a triangle icon in the corner of the rulers......you can set the units there. You may need to reset back to cm and change the mirror mode tolerance if you want to use mirror mode.
-
Also, I agree with Nancy that the Switch_setup pose should be OFF by default. It's handy enough to turn on now and turning it ON generates fewer bone keys than turning it OFF. It also cleans up the bones when starting up which is a big inspiration plus when you're facing a blank canvas.
-
Yeah, good point. I see now all the bones that are created when you switch on the FACE interface are interface bones. They even appear if you do it with the FACE slider directly. One of the best things about working with the rig in TWO was there was so little scrolling required in the PWS to access all the bones used. These bones alone possibly double the amount of bones you'd normally see. Why didn't these bones appear in the rig used in the TWO characters? If they can't be made "not to key", then I would favor putting a Z at the front of their name so they're all down the bottom and there's no reason to scroll past them. Ideally, I'd love if bone icons in the PWS could be assigned a color so we can easily pick out/identify commonality. But you can only do what AM allows you to. Edit: I also notice that the FACE slider bone controls the FACE slider in the pose window, but it doesn't work the other way around. That could lead to confusing situations if someone takes over someone elses animation. Though laying down a guide to only use one method could solve that.
-
I'm not sure exactly what you mean by this, but I'm nearly sure it can be done. I'll let you know if you explain it more fully. I agree. It'd be nice if the camera was hidden when the FACE is turned on in an action. I could have sworn that's how it used to be. PS I'm not an AM coder! Edit: Hey Mark/David....would it be possible to replace the FACE switch bone with the Eye Aimer bone at the top. The z-axis of that bone isn't used for anything else is it? If it is possible, maybe it wouldn't be clear....but I'm sure people would learn and it'd be one less bone round the face. Edit1: Just a small thing.....the new blink and target patches and writing in the FACE Interface have their patches flipped the wrong way. Edit2: Ooooo....this is going to save me sooo much time in animation. Edit 3: Cool. If there's no way, then we can just set it in the default settings pose......oh maybe that's something that could be added. A blank on/off pose that's easy to get to so people can just edit/switch it to get all their default starting options. Edit 4: A bit of an indulgent one......if it causes more problems or it's alot of work, then don't even consider it. If you open Sam in a new action and then grab his forearm from the front view. Then drag it down......his elbows should pop up. Is that normal? I would have thought it should drag down with his elbow facing backwards. If you drag it down slow enough, it could be possible. Edit: Aha! If you drag down and move the mouse away from the arm as you do it, then it doesn't pop. Actually that makes sense.....unlike me. Forget about it. Edit 5: I think Sam likes his new improvements!