Fuchur
-
Posts
5,412 -
Joined
-
Last visited
-
Days Won
89
Content Type
Profiles
Forums
Events
Everything posted by Fuchur
-
There are some tools in Photoshop which could do that for you (in the newer versions at least) but if you are happy with it, why not do it in A:M? *Fuchur*
-
Happy Birthday! *Fuchur*
-
Looks as if it was made to be combined with him... NICE! *'Fuchur*
-
Would be new to me, but I have to admit I never tried that before. Maybe if you change the direction of the normals? See you *Fuchur*
-
v16 may be interesting for you, since it will be 64bit and renderoptimised (quad- / n-core-releated)... I think when it comes out, it should not be much of a trouble to go to the new version then. Other than that: There are new things in v15 (specially bug-fixes but although stuff like NLE and particle-system baking but these are not essential to create masterpieces for people with your skill. Particle-System baking can be a timesaver, but it is not essential to create effects. See you *Fuchur*
-
Please let us know what you did to get rid of the problem... *Fuchur*
-
The second attempt is so much better. The first needs much work. The velocity of the motions is unnaturally changing inbetween withour a reason, there are jumps and there is not that much weight in it. The jump is quite okay, so there is a too fast moving at the end (grap the keys for the legs and move them backwards in time while leaving the models position where it is.) At the landing, you should try to use some delay-times / show the inertia. Some stuff moves before other stuff. For example: The legs may have hitten the ground already, but the hands must got down furthermore, because the legs are just slowing the motion down but cant stop it in an instance, etc. *Fuchur*
-
I would call that a successful experiment, Mark! Fantastic looking material! *Fuchur*
-
Very well done... I liked especially the elephants... very sympathic. You are getting much better If you want to improve but for this clip it already works well: - have a look at better textures and maybe a nice lightening. - Put some weight in the animations... for example pushing around the box is a great oportunity to learn that. See you *Fuchur*
-
Are you sure you want a laptop? You get faster machines for less on the using a desktop-pc... Especially in the 3d-sector you will like to have the abillity to extend the RAM and the graphiccard and so on. See you and think about it: Do you really need a laptop? *Fuchur*
-
You could try the velvet shader too... that might help with that sort of thing. *Fuchur*
-
It is quite easy to get the effect in A:M. So the rendertimes are a killer if you ask me... doing it in the post should be much better.

-
Radiosity will increase the rendering-times heavily... You've got more options so... for example: Why not rotate all the objects? Use Spotlights with soft-shadows created by z-buffer-lights, etc. There is no "click and go"-option like AO, but you can create nearly any look with z-buffers too and the renderingtime will be sooo much shorter. See you *Fuchur*
-
How it works: The programm "A:M" itself is not located on the Disc... it is only a "dongle" to make sure you have the right to use A:M (I know that you have). Here is a step-by-step-instruction: 1.) Put in your A:M-CD in the Disc-drive.# 2.) Any autorun that will start should be IGNORED. Cancle whatever comes up AND leave the CD in the drive. (this is important) 3.) Install "A:M 2004 Stuff" located here. 4.) Install "A:M 2004" located here. 5.) Go to your Start-Menu and open A:M using the link there. (very likely: "Start > Programs > Hash Inc > A:M 2004 / A:M 11.1" (dont rememebe exactly, but should be something like that.) Tipp: ANYTIME you start A:M you need to have the CD in the drive . After it has been started you can pull it out. Tipp: ALWAYS ignore the autorun and cancel it. Now A:M should start. Trouble-Shooting if not: 1.) Do you have 2 CD-drives? Place the CD in the other one and try again. Maybe you are tryting to use a DVD in a CD-drive? make sure you arent (it is unlikely nowadays, but who knows) 2.) Are you using the right version? If nothing works out with the link above, you can try to install the version on the disc: - Install "A:M 2004 Stuff" located here. - Go to the explorer and RIGHTCLICK () on the CD-drive and choose "Open in new Window". - Locate the Setup-file on the disc. Very likly it is in the current folder and is called "setup.exe" or "install.exe" or something like that. - Double-Click on it and install A:M that way. - Open A:M using the Start-entry (see 5.) ) IF nothing of that above works, the version may not be functional with the Windows-Version you are using. A:M 2004 is about 7 years old when Win 7 was not even planned. So it may be needed to buy a newer version for Win 7. I am running A:M v15 on a Win 7 64bit-computer and it works like it should. If 299 Dollars is too much for you, you may want to buy the 79 Dollars-Websubscription-Version. It will give you unlimited access to A:M for one year on one computer. See you *Fuchur*
-
You told me: "Happy Cooking!" = "Glücklich Kochen" but I appreciate that too Thanks again guys *Fuchur*
-
And again: Thank you, Vielen Dank, muchas gracias, merci
-
Question: what exactly is an HDR EXR and how do you make one to use as a decal? (I am assuming it is brighter than an 8bit image, but how do you make it? Another question: What is a front project target? Thanks! Quite complex topic... A TGA-file has 8bits per Channel (Red = 8 bit, Green = 8bit, Blue = 8bits, Alpha = 8bits) -> means each can have values from 0-255... So you are limited showing colors and more important brightnesses. With an EXR-file which has (up to) 32bit per Channel you can save many more colors and more important: "brighter areas than white". These can not be seen on a normal display, but they can be used to calculate different effects. You can use a 32bit-image and set the exposure in a way, that even in the darkest shadow there are still elements visible which would not even have been captured with a 8bit-format. Additional to that, an EXR-file can handle "layers" which are called buffers in an EXR. These can in A:M for example store only the shadow of the rendered image, or the effect of a specific light. You are able to manipulate these each by itself and like that you can "change the lightening" in the rendered image without re-rendering. There are other buffers too, which can be handy. It is harder to create such a file so. One way is to create three images (or more) from a camera (the camera need to be at the exact same position) with different exposure-settings. So ony very bright, one very dark and one looking good for your eyes. Combining them will give you a High Dynamic Range-Image (HDR). Saving this one as an EXR and you are done. See you *Fuchur*
-
Thanks again *Fuchur*
-
Hey, thank you guys... I am happy to be here Cheer to you all *Fuchur*
-
Did you try to change your 3d-driver? (> Options > Global). Another thought: Maybe your graphiccard cant handle textures which are bigger than a certain imagesize? *Fuchur*
-
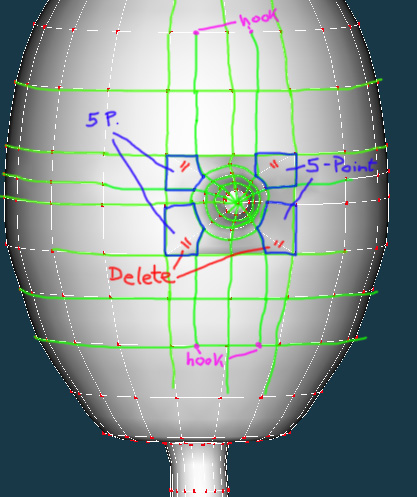
Have a look at the image provided... it should give you a much better surface. All in all, you are using too many CPs for such a simple model and a quite uneven number of CPs on the nose-rings (so you may need that, dont know)... See you *Fuchur*
-

RACK 'EM UP! a music video in progress
Fuchur replied to John Bigboote's topic in Work In Progress / Sweatbox
Nice one Anyway you should do something against her breasts shearing (at about 2:01 for ie) and her behind should be a bit more round... Mister Nigel could look up / around a bit smoother in some of the sequences (seems unnatural). Trying given him a slight arc when he moves his head. His head-movement should not look like this: ()-()-()-() But like this: (ignore the _) ()________() __- ()- () - Hope you understand what I mean. The first look around of his head at 14 seconds is nice an smooth with ease in and out. At 2:06 there is some jumping around of his hands. But all in all it is working and looks fine Keep up the good work! *Fuchur* -
It may be something different: If you create a new pose by yourself and you already put your character into a chor you sometimes have to click first on the Tab in the Pose-Slider-Window ("All" for example) to see it. This is a refresh-thingy and doesnt mean that something is broken. *Fuchur*
-
Steffen Gross is the main-programmer of A:M nowadays and although created the Resurface-Plugin. You very likely downloaded the plugin from his website. (have a look at my signature) However I dont think that he has the time to port the plugin to v13. It is possible that this plugin is only available for v14 and up. I would commend to get the new websubscription (v15 and it will very likely include v16). See you *Fuchur*