Rodney
-
Posts
21,649 -
Joined
-
Last visited
-
Days Won
119
Content Type
Profiles
Forums
Events
Everything posted by Rodney
-
Andrew, I recall your 'Sev Trek' being popular about the time my interest in Animation:Master was on the rise. My memory says that it was just after 'Cheese Wars' was popular in A:M circles. When Mark Largento's Star Trek parodies started to take off they brought your efforts to mind. If you haven't seen his work... definitely check it out. He also has done a lot of work on 'The Wannabe Pirates' which harkens back to some other efforts circa your Sev Trek's timeframe. There are some other works from that era that have fell off the radar that I think would be popular if they were given new life. I'm glad to hear that some financial success followed your efforts. It was a wonderful time when relatively few people had access to quality software capable of creating CG animation of any level of quality. And definitely not at any reasonable price! I'm also glad to hear you have the rights and wish you much success in getting your work out there for a new generation. Here's hoping your work gets seen by lots of folks to appreciate. Did you also do the Sev Trek comic strip? (I might have answered my own question as I see John's signature on a few)
-
Who better to demonstrate the Dreamworks pipeline for making Animated films than the penguins of madagascar. Learn it. Live it. Love it. Then... go make another animated movie. xhttps://www.youtube.com/watch?v=5CbG0d_tnSg
-
 Very interesting. Some kind of sci fi sharp metal vortex show. The .MOV is definitely the way to go. Had to open the AVI with VLC as everything else played it pure black. Of course Win 10's media player doesn't particularly like to play anything.
 -
Excellent questions Matt. In watching more of the videos it's clear to see they've put a lot of thought into Paint and Stick. My concern would be just how innovative can they be (in the new Adobe Animate) without breaking functionality of scripts like these? I see that the program/script does reportedly run with AE6. I wouldn't mind having a full fledged drawing program tailored to animation (like Toonboom Harmony or TV Paint) but I'm not up to spending $1000+ to do that.* I've used Toonboom's Animate and while it's nice in some ways (love the self healing/cutting lines) I'm not a fan of the overly cluttered UI or the approach to keyframing. As such I haven't used it for much animation. I see that the price (that isn't yet the price) now says $199! As of 10 Feb the price is back to $99. There is never going to be a shortage of things to spend our money on. *Although, most high priced products do have subscription models these days which make it a little easier on the (short term) contents of the wallet.
-
When Simcloth appeared I set aside the old cloth system and it's been years since I've used the Cloth Wizard. It's definitely something I need to find time for experimenting.

-
Here's a texture that is moving more in the right direction. Another random image, this time leafy texture used over and over again with different settings (and pasted as a decal as a reversed/flipped image). This image gets it's specularity from the cylinder's surface attribute although one map controls the size of that specularity. At a guess I'd say that some finish of diffuse or specularity is the 80% solution to your texturing. I like the look of the basic texture you have on the wings. That'd be really nice if that could be made to be a little layered with translucency.
-
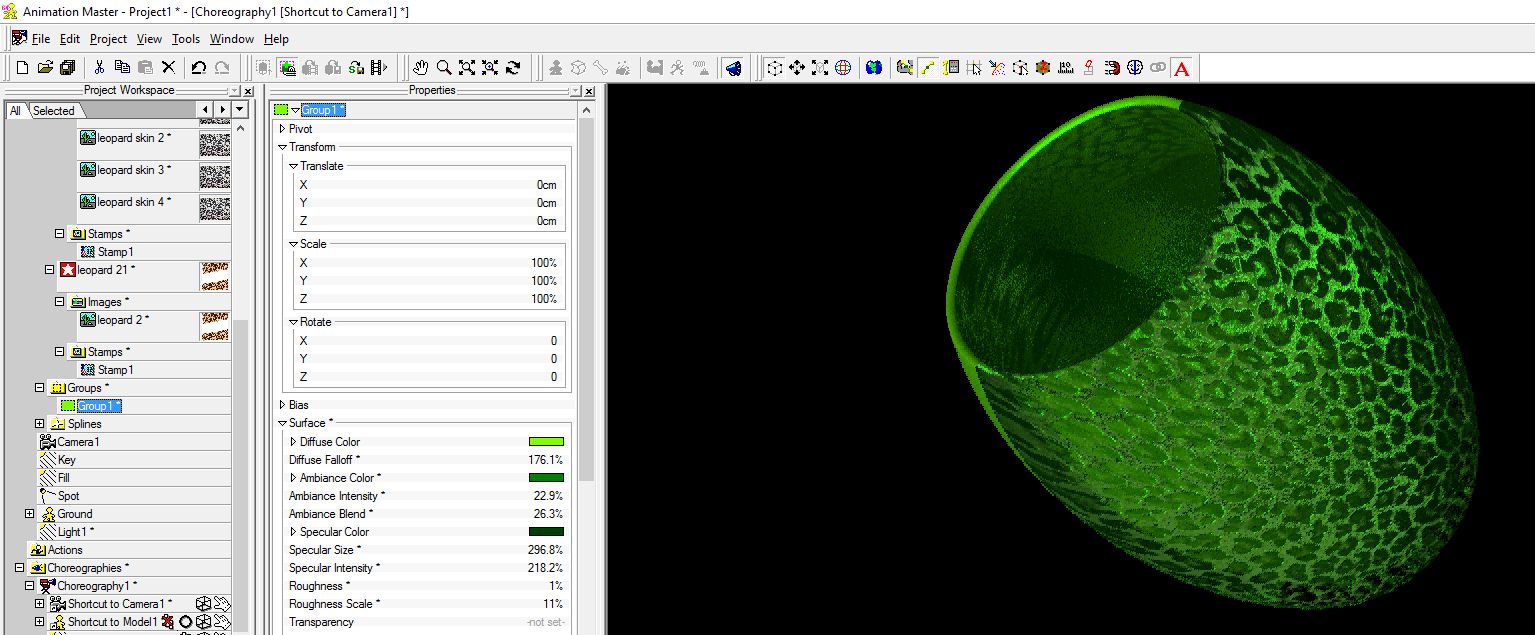
I believe the trick there would be to lower the percentage of the decal to allow some of the underlying surface attributes to show through. For instance, I assume the decal is set to Color (as opposed to Specular, Diffuse, etc.). Setting that to 66% would allow most of the decal to appear while allowing some of the underlying surface through. This could be surface attributes or other decals layered on top of each other. A specular map for instance would allow you to determine what parts of the model are shiny and what are not. An ambiance intensity setting (even if only 5%) would allow you to brighten some areas while leaving the other parts of the surface alone. Layering is definitely a great way to get those surfaces where you want them. Here's a hastily put together example... not of praying mantis surfacing(!)... but just to show the effect of combining decals with surface attributes. In this case I just grabbed two random leopard skins from the internet and started layering. In the attached image I've used the same leopard image multiple times with different setups (displacement, color, etc.) but with none at 100% which allows. Ideally each of these images would be different to gain maximum advantage of that decal type. Way back in the day there use to be a nice tutorial on layering of decals but a quick search didn't turn it up. Aside: Most A:M Users tend to leave the roughness setting of a surface alone but I love to use a setting of 1 or 2 with either really small or huge scale to add noise to a texture. The roughness setting isn't like much because of the unrealistic patterns it produces at higher/default settings. My suggestion for using roughness? Don't use the default setting! In the case of a praying mantis I'd say we'd be looking for some translucency and other effects to give the appearance of healthy green leaves. (i.e. definitely NOT leopard spots!)
-
Forum Like System (Troubleshooting) - Problem Resolved?
Rodney replied to Rodney's topic in Open Forum
That appears to be the default error most forum members get. The fix is *supposed* to be: set the number of positive and negative reputations that users from this group can give per day But first I have to find that setting. ---------------------------------------------------------------------------------- Edit Hold the phone... and delay your likes... I think I just found the setting. Give me a few minutes to set things right. --------------------------------------------------------------------------------- Update I'm sure I missed a group or two but most folks should now have more than a fair share of likes. In a pinch, should anyone ever max out their daily quota of likes (which is somewhat unlikely) they can always temporarily or permanently remove an older like. Then wait for the next day to regain a full quota and spread more likes. -
I'm still receiving reports that the like system isn't working for folks. The issue on my end is that I don't see any setting that is restricting the use of likes. If you would be so kind... Please like this post and comment if you cannot get it to work with the nature of the error. You can comment if it works as well but that will be assumed by the number of likes. Added: I don't see the 'like' option (presumably) because I'm the originator of this post.
-
This relates to Tore's post on Scene lengths. Assuming a local variable isn't the cause... Can anyone tell me why this Chor Length defaults to 70? Recommended test: Open Project Crack open Chor (keyframe/dopesheet mode) in PWS Adjust Chor length to 50. Save Reopen I would expect the Chor length to adjust to the longest Chor Action (normal behavior) or stay at 50 (optimal). I can't see why it comes back as 70. If it doesn't open/stay at 70 for you then perhaps there is a local variable stored that is a root cause. Update: Just as I was posting I looked at the FPS of the Project and if set to another unit (say 24) that will result in a different Chor Length default (56). While that may answer my question I still don't know the underlying... why... The Chor Length (if manually set shorter than the longest Chor Action) is defaulting to the FPS x 2.33. The only thing I can come up with is that 2.33 might have been chosen as an acceptable (average) short shot length and then hardwired into the math that computes the minimum Chor Length. Cpuld it be possible that A:M is grabbing the 2.33 from the wrong data field/location? Why is this Projects Chor Length defaulting to 70.prj
-
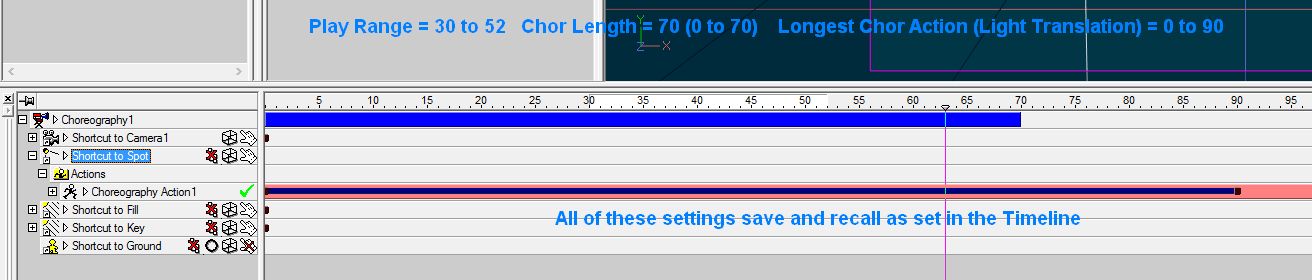
Sorry this has been so frustrating. The problem I'm having on my end (and why I'm seeking common definitions so I know we are talking about the same thing... and I'm sure Robert is doing the same) is that at present I'm seeing every setting recall from a saved file on my end. Another reason is that we want to be able to articulate a proper report should we encounter a bug that can be replicated. In short we want to fix the problem but we aren't exactly sure what THE problem (and/or your problem) is. There are two exceptions to the rule of being able to recall saved settings I am investigating at present. One appears to be a refresh issue and the other has to do with saving the file under the same name (I recommend saving incrementally... adding a number or letter to the filename.). If you are not saving the Project with a new name you might try that as that is returning saved settings for me no matter where I can a setting. This doesn't always appear to be the case when using 'Save' but I can't reproduce the results on my end which is why I've been trying to dig deeper into the mystery of what is going on here. This IS NOT the default way Projects/Chors save their Chor Lengths. I'm just showing that ocassionally it can be done. Why we would want to do this is an entirely different question that has more to do with desired workflow from individual artists . So, that would be my suggestion if you aren't doing it already; save under a new Project filename. I only wish that were the case. Hang in there Tore. Nancy said: As near as I can tell, Tore's desire is to be able to have the Chor length stick to less than the length of the Chor Actions without changing the lengths of all the Chor Actions for every object. I'm able to do this but (I think) only when saving under a new Project file name... which doesn't make sense to me... so I'm investigating. Currently I'm able to get the settings to stick everywhere even in a standard save under the same name. Added graphic of the various setttings that save and are properly recalled (this also demonstrates that a Chor Length can be saved/recalled as shorter than the various Chor Actions):
-
That's what is commonly referred to as the play range. The play range does define your (real time rendered) scene. Where things can get confusing is that (rightfully so) the Chor length and the Play range are not always the same. As an example, we may have three copies of the same Chor all with different play ranges (representing different renderable shots within that same sequence).
-
I specifically developed the approach with cloth in mind and (as I recall) it worked fine. The key (with cloth) is that the original model is flat. The cloth simulation then picks up from that.
-
Here The Spirit demonstrates the technique with animated images and transparency... sprited transparency.mov
-
My memory recalls that it had something to do with compositing so that makes sense. Yours was one of those instances where by posting your results and THINKiNG that I knew your approach I explored a completely different approach. And the answer to that other approach is: Multiple Light Projections (with or without image gels (rotoscopes) There are a few 'tricks' that have to be used in order for the light not to bleed to the other side of the mesh as well as a caviet on use of projected images. For relatively flat meshes the process is rather straightforward: (All within the same model) Create mesh Place one light (klieg) on each side of the mesh. Adjust as appropriate (to maintain a mesh that is as flat as possible). (Then make all mesh curvature adjustments in an Action... I haven't tested poses but those should work) The lights can be placed outside the model but in many cases that defeats the purpose of adjusting the mesh (in an Action) while maintaining the two sided projections. This could be done via constraints but when the lights are inside the model they get automagically constrained for us. A second trick (more often than not) is required to keep other models in a Chor from receiving the projections on our target mesh and that is the use of at least one Light List. This takes advantage of the fact that when a light list is first created we have the option to exclude other lights from models without light lists. A specific downside to the approach is that meshes cannot be overly curved without risking bleed from the other projection. A possible solution to that would be to add additional lights to account for those specific areas. Another downside then is that the target mesh in most cases will need to be a separate model. In order to be of much use in animation this will require constraining that mesh to another object in the Chor. In most cases the model itself should not be adjusted but rather adjusted in Action or Chor as this will maintain proper light projections to maximum extent. In other words, the adjusted mesh doesn't lose the projections as easily when the original model maintains its flatter (or linear) curvature. The issue I was having with the image reflections related to trying to add the image directly to the light rather than the intance of the light within the Model in the Chor. The image appears to be applied correctly to the light but it isn't. The Tech Ref got me back on track with regard to Right Clicking on the Light and selecting New/Rotoscope. I'm not sure why we can't just drag and drop an image onto a light... but that's just not how it works. And while I haven't experimented much the colors and images can also be animated. Edit: An added 'gotcha' I'll have to investigate... light gels within models don't appear to save. As such they have to be re-reattached upon opening the Project again. Ah the joys of living on the cutting edge.
-
It should be noted... It'd probably be easier to create the same/similar effect with two meshes slightly offset.
-
Here's a couple renderings working as it should.
-
Ha! User error. A quick trip to the Tech Reference got me headed in the right direction.
-
That's what it was. It was an image of a Disney character. I was planning on trying a flat color next to see what would happen..
-
My sympathies to you and your family too John. Hang in there. This has been a year of heavy hearts.
-
Removing the image the proper reflections show up... (please excuse Shaggy's exhibitionism.. there's a pass through of his cape/butt) At least I've got that side of the issue isolated.
-
When I try to apply an image I get some odd stuff. In the attached there is an image applied to red side. No image on blue. The reflection appears to be of the color's inverse (?).
-
Here that patch as Shaggy's cape. I've run into a problem with images/reflections on the patch and I'm still investigating that. Straight color works fine in the reflection as seen in the attached.
-
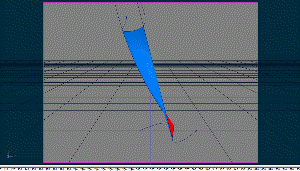
A few years ago Robert posted an example of texturing of a patch where opposite sides show different materials, textures, etc. I'm not sure if we every found out his approach but for a little while I thought I had it figured out and did some exploration of my own. Here's a very basic example that colors opposing sides of a patch red and blue. The dangling splines are there to provide some curvature on a single patch which would otherwise be straight/linear.
-
Please don't try that out on your original project files.... I cannot be responsible for errors that may cause! Sleep well Tore!