Rodney
-
Posts
21,633 -
Joined
-
Last visited
-
Days Won
114
Content Type
Profiles
Forums
Events
Everything posted by Rodney
-
Thanks for the heads up Roger. I've used Digicel before but found the lite version a bit too restrictive. I don't think I would recommend anything below the Studio release except for basic usage and/or trial purpose. (The lite version Is currently only $20 so well worth that however) For those that want to get good at using Digicel Flipbook, Jason Ryan;s video tutorials (many of which are free) do an excellent job of running through operation of the software and as workflow that assists with creation of CG animation. Jason has a lot of useful previews related to his paid tutorials also.
-
I don't know much about this but saw it and didn't want anyone to miss out if interested. Apparently there is a free online animation course from Futurelearn. Here's the write up: https://www.futurelearn.com/courses/explore-animation I don't have specifics but according to the article I gleaned this from the course is free for the next month only. It appears to be part of a bid to get more interest going in online classes after a $200K investment from Creative Skillset.
-
I'm not sure what your setting on Multipass is but I find that cranking that up a little will also help to blend the shadows. Not quite related and it may not apply in this case but an additional blending trick I've been using is to turn up the transparency just slightly on the ground plane so that the camera's background color bleeds through to ground (as seen by the camera). Of course you have to turn off the Alpha Channel in order to get that to work BUT if using the alpa channel (in the case of comp'ing ) you can then easily change/tint the sky and ground to any color you want just by switching out your background. And this will of course work best with a background that is either a solid color or blurred considerable.
-
And have we noticed that some folks love that stuff... even prefer it over highly detailed (read: more realistic) movement.
-
Strangely interesting... xhttps://www.youtube.com/watch?v=XahbqLdCVhE
-
This topic is certainly timely. Last week I downloaded a trial copy of Toon Boom's Storyboard Pro. I'd post the initial storyboard I created with it but... um... er... it's pretty lame. I'm tempted to post it just to encourage folks to post work of their own. Not that the forum is setup for it (outside of posting in the WIP forum) but I love the idea of reviewing dailies. It keeps us plugging away at our stories. I doubt I'll purchase the software but it's nice to know it's available if I need to go that route. I'm leaning more toward drawing splines in A:M and (as you suggest) scanning in drawings to rough out the story. One of the projects I'm currently working on has a lot of input from kids and I'm having a blast developing characters and a story with them. I set up the basic framework but am trying to let them drive the main story. I pay the kids 25 cents a design for their drawings (if they are selected for use in the story) and they are currently making me poor! I'll be posting some of that related work in my Tuckertown topic or perhaps in a topic of its own. If I submit a mascot this year it will very likely be a character created for use in that project; one that was initially sketched directly in A:M (I think I referred to that character above). As a collaborative project with kids that don't have access to A:M and would probably struggle to use any similar software, drawings on paper is the perfect route. I just jumped into A:M a few minutes ago and modeled an R2D2 wannabe from one of the kid's other drawings. We'll probably have to adjust that design quite a bit more in order to be able to call it our own. But it went from drawing to textured model in very short order. Creativity is fun no matter what the approach.
-
I just experienced one of the reasons I'm not yet ready to jump right into the animatic stage (it's hard for me to call it previz because everything before the images are there is pre-viz; story sketches, layout roughs, etc.). I thought I had a good continuation of the scenes outlined above with villain launching into air from top of building, then shooting a blast of energy down toward the building. Somewhere in the process though my attempt to (simply!) translate and scale a sphere (the proxy for the blast of energy), something went wrong and that sphere refused to work the way I intended. While a few frames from the entire sequence would be useful as representative stills, after some 30 minutes I still don't have that shot roughed out and I find myself at the point of wanting to scrap the whole setup and start again. This when I know that in just a few short minutes I could have drawn the scene out in rough animation. (It's certainly not hard to draw an expanding circle) Grrrr... It's enough to turn a mild mannered wannabe animat.... storyboar...previ....WHATEVER THE HECK I CURRENTLY AM... into a nefarious villain!!! But... good may still triumph over evil and win the day. I watched the video Tore linked to and think I may be up to giving it a go again.
-
I get stuck at every point of the process but then again I enjoy the process. Apparently more than the completion. Attached is a quick down and dirty previz of a shot from the superhero story I just outlined. It just took a few minutes creating a few cubes (without tops/bottoms even) and adding a sphere. If not clear it's a shot from street view at the first appearance of the villain. From this I can easily see the next few shots forming in my mind. Villain rises into air above building. Camera closes in on villain so we get a good look at him Individual shots of S-team members entering building/scaling side of building, flying toward villain. Shot of team member A inside building w/ shaking walls, loose props falling to floor. (OS voice over of team members throughout as they coordinate attack on villain) Close up of villian in rage/evil laugh etc. Villain powers up/FX bubble outward (esp. down) Building tembles and begins to collapse Team member B (flying) overconfidently says, "Houston, I think we've got a problem." ignores villain/starts flying toward building (anticipating he is going to keep parts of it from toppling into street below onto crowd of people). Shot of team member C inside building realizing what is happening as voice over (telepathic voice for team leader/primary coordinator) yells inside everyone's head, "Everyone out of the.. (building)." Voice doesn't complete sentence. Final word obscured by foley/crashing. FX/smoke billowing outward from (mostly) bottom of building Team member B is seen trying to keep building from falling as weight of walls/debris crush down on him. Close up of Team member B face as he begins to panic and is engulfed by debris. Medium shot of Team members D and E inside building as walls and ceiling rain down on them. D trying to sheild E from falling debris. Both fall under its weight. Dust approaches camera and obscures everything Rumble fades Dust fades Pan across piles of concrete and steel as everything grows eerily quiet with only slight wisps of dust moving. look up to GV.mov
-
I'm sure it helps if the story is fairly locked down. If it has a script even better. And... okay I won't say 'You can do it!" but... hehe... As someone who can draw you've surely got to know how easily a few lines on paper (or in a computer program) can be to put into place. Believe me, I'm trying to skip the storyboard stage but am too easily distracted by elements of the story that aren't nailed down. As an example, I recently started to work on a 'story' for the mascot contest. This story will result in a still image... should be easy enough... and it was going well at the very beginning as I roughed out the essence of the main character with splines in A:M. I *should* have stopped at the initial stages of where the character was still drawn in 2D. He looked exactly what I needed him to look like at that moment from from the camera's perspective. But then... I started to think in terms of the final scene being in 3D and away I went into the realm of detail that didn't need to be worked on at that stage. When I finally took a break and sat down on the couch I grabbed one of my trusty (empty) sketchbooks and decided to draw the story-scene as if it were a comic book cover. In no time at all everything fell into place, and as changes occurred I adjusted the drawing. Then I scanned the drawing into the computer and did a color comp so that I'd know (basically) what the final scene might need for lighting and texturing. All of this took very little time as well because I wasn't spending a lot of time trying to perfect anything. (Disclaimer: I did get distracted and decided to make a decent comic book cover with logo... so that did take more time than necessary) Now, the big plus that I see of the approach you are talking about is that once you've previs'd your shots you've already got a great head start on breaking down and animating the story. You don't have to go back in and do those basic steps because you've already accomplished them. That is a great time savings! So, what am I saying here? I'm not entirely sure. Maybe its that I'm not disciplined enough to refrain from delving into too much detail too early in the process of previs? That's surely part of it. I think more than that is that many of my ideas aren't fleshed out enough to begin with and therefore are still back in the initial brainstorming phase. An example of this is what I would call my 'superhero story' that begins with the introduction of a team of superheroes facing off against their number one enemy. In continuity, they've fought him many times before although those are battles the reader has never seen. Almost immediately, the villain brings down a skyscraper on top of the team crushing them beneath tons of steel and concrete. In comic book page time we've only got to (maybe) page 4, maybe page 6 or 8 if more exposition is needed. What happens from there? Well, for a lot of that I've only got bits and pieces. I know who dies. I know the effect of the event on everyone to include the villain. But that is just the initial setup. It isn't the main story which still needs a lot of work/brainstorming... pre-viz. Now we can note that what I've described as the into to that story can be previz'd pretty straightforwardly. Need parts (or proxy) of a city. Need a building (or proxy) that will (eventually) collapse. Need (at least proxies) of all the team members. Need (at least a proxy) of the villain. That all can be previz'd in A:M. But I can't previs the next few sequences because they haven't been formulated. I'd have to skip ahead and grab bits and pieces that are currently disconnected from the underlying continuity. And diving in to previs without at least an outline/skeleton of a plan is probably not the best way to formulate those sequences. Not at least when a few words or doodles hastily scratched on paper will work better/faster. Of course those words can be typed into a program such as Premiere or (fill in the blank with your favorite software for such things) almost as easily as they can be put down on paper. That's where experience and such come into play. This is a lot of words from me to basically say, "I'm working toward what you are suggesting but am not there yet!" And In case you can't tell, I'm enjoying the exploration.
-
Thanks for that Mark. A great subject to ponder. A few thoughts of my own.... To date most systems haven't been able to skip the storyboard stage because... From the AWN interview: The interview goes on to say in the same paragraph how they were dealing with the issue when assets weren't immediately available for use: So in the end, they don't set aside the storyboard process so much as assimilate it with the next stages (blocking/animatics). There is another aspect of this that keeps me going back to the drawn storyboard and that is the ease of placing/refining a concept. It may only take a few seconds to draw that idea but finding something similar/acceptable might be nigh impossible. It's been said that there are two primary factors in creating anything that is revolutionary; time and distance (timing and spacing anybody?). When either or both of the two are drastically reduced the stage is set for innovation. For the lone wolf production (such as Wannabe Pirates and the like) where the vision is held by one person it may be adequate to temporarily place a sphere or cube in the place another object will eventually occupy. This helps us better envision (in context) that thing that will eventually exist in virtual reality. Although showing that rough draft is sure to get confused looks, "What is that throbbing cube?". "That's not a cube that's Deek Feeder darkest lord of the universe!"
-
For those of you wanting to move your A:M work into the communal online world and perhaps eventually make a few $ in the process here's a platform that is in early stage of fielding and yet considerably mature underneath the hood. https://www.otakhi.com/pages/overview Here's a current look at the repository: https://www.otakhi.com/pages/home.php This would be for those of you that like to use code as a key component is three.js (javascript) but the platform states that writing javascript is "purely optional**" as the modular approach is designed to be drag and drop. My guess would be that a trip through a program such as Blender would be required to get your assets into three.js. There are some demo videos that provide excellent overviews of spline path animation, particle physics, etc. Diving in without watching these videos is not recommended as it would be hard to infer how to proceed from the UI alone. oTakhi is likely not for the faint of heart or that don't care to join the otakhi community but it does demonstrate a direction online animation is heading. The folks behind oTakhi appear to be positioning themselves to take advantage of shared community resources on the internet with an eye for commercial potential. This is headed in the way of some of my research interests and of such is of interest to me. It's also the space (literally and virtually) that companies like Adobe are moving into. We will likely see a lot more of this type of thing in the future. **Writing code would be entirely optional if every component you ever needed and setup already existed to drag and drop into your projects. As this is very likely not to be the case writing of code is not going to be optional to anyone that wants to be creative.
-
I really like your character design artwork. Great style, expressive and very unique!
-
Nice. I remember that episode Mark! (I miss those Wannabe Pirates!) I had forgotten about the specific special effects you used of course which is a good thing. Everything to the aid of telling the story. I recall that as one of the techniques Keith used for the Roadrunner and Coyote although I think he use a variety of techniques. Hiding parts of a model is sure to be easier than creating a new model (for each arm and leg) from scratch and the rigging it with special setup. Although, I'm guessing a simple arm or leg wouldn't be too hard to setup... duplicate... scale to opposite side etc.
-
Shhhhh... keep this on the lowdown. Recently I was plugging Don Bluth's effort to get his traditional animation project off the ground and this relates to that in a way. How? Way back when, at Don's Masterclass one of the attendees was Keith Osborn who near the end of the course showed me a few secrets of a then hush hush project; Warner Bros Road Runner and Wile E. Coyote when they were first making the move to CG. The highlight of the animation was Keith's work with smears, duplicate limbs, etc. which were all pretty hard to do in most software in that timeframe. Well, seeing ample opportunity to spread the word on his approach and technique, Keith has published a book titled, 'Cartoon Character Animation with Maya' that covers his approach to cartoony action with an emphasis on those special effects most prevalent in highly exaggerated animation. So here's the hush hush that you can't tell anybody else... No, it's not that the books software of choice is Maya... that's pretty clear from the hugely gianormous text stating MAYA on the cover... it's that the publisher has posted some very useful resources to accompany the book to include some very nice video tutorials. Of course, these resources are specifically intended for those that purchase the book so if you find the material to your liking I'm sure Keith will appreciate a purchase, review, feedback or some token of appreciation. But... Shhhh... you didn't hear none o' this from me! LINK Look for the Resources tab for the videos, etc. Disclaimer: I have not yet purchased the book so I cannot say how useful the text is outside of Maya specific workflows. Some of the more technical aspects are sure to be quick page turners for A:M users. However, most books of this type try to cover a broad enough range to satisfy users of any software and workflows can be adapted as needed. So if you are in the need of some tips for cartoony computer character animation this book might be just what your animation needs. If anyone has the book please let us know how useful you find the information contained therein and should I purchase I will do the same. The videos I have viewed thus far have been very well presented and are well worth your time and attention.
-
Wow. Seriously impressive. Love the detail.
-
Andrew, I recall your 'Sev Trek' being popular about the time my interest in Animation:Master was on the rise. My memory says that it was just after 'Cheese Wars' was popular in A:M circles. When Mark Largento's Star Trek parodies started to take off they brought your efforts to mind. If you haven't seen his work... definitely check it out. He also has done a lot of work on 'The Wannabe Pirates' which harkens back to some other efforts circa your Sev Trek's timeframe. There are some other works from that era that have fell off the radar that I think would be popular if they were given new life. I'm glad to hear that some financial success followed your efforts. It was a wonderful time when relatively few people had access to quality software capable of creating CG animation of any level of quality. And definitely not at any reasonable price! I'm also glad to hear you have the rights and wish you much success in getting your work out there for a new generation. Here's hoping your work gets seen by lots of folks to appreciate. Did you also do the Sev Trek comic strip? (I might have answered my own question as I see John's signature on a few)
-
Who better to demonstrate the Dreamworks pipeline for making Animated films than the penguins of madagascar. Learn it. Live it. Love it. Then... go make another animated movie. xhttps://www.youtube.com/watch?v=5CbG0d_tnSg
-
 Very interesting. Some kind of sci fi sharp metal vortex show. The .MOV is definitely the way to go. Had to open the AVI with VLC as everything else played it pure black. Of course Win 10's media player doesn't particularly like to play anything.
 -
Excellent questions Matt. In watching more of the videos it's clear to see they've put a lot of thought into Paint and Stick. My concern would be just how innovative can they be (in the new Adobe Animate) without breaking functionality of scripts like these? I see that the program/script does reportedly run with AE6. I wouldn't mind having a full fledged drawing program tailored to animation (like Toonboom Harmony or TV Paint) but I'm not up to spending $1000+ to do that.* I've used Toonboom's Animate and while it's nice in some ways (love the self healing/cutting lines) I'm not a fan of the overly cluttered UI or the approach to keyframing. As such I haven't used it for much animation. I see that the price (that isn't yet the price) now says $199! As of 10 Feb the price is back to $99. There is never going to be a shortage of things to spend our money on. *Although, most high priced products do have subscription models these days which make it a little easier on the (short term) contents of the wallet.
-
When Simcloth appeared I set aside the old cloth system and it's been years since I've used the Cloth Wizard. It's definitely something I need to find time for experimenting.

-
Here's a texture that is moving more in the right direction. Another random image, this time leafy texture used over and over again with different settings (and pasted as a decal as a reversed/flipped image). This image gets it's specularity from the cylinder's surface attribute although one map controls the size of that specularity. At a guess I'd say that some finish of diffuse or specularity is the 80% solution to your texturing. I like the look of the basic texture you have on the wings. That'd be really nice if that could be made to be a little layered with translucency.
-
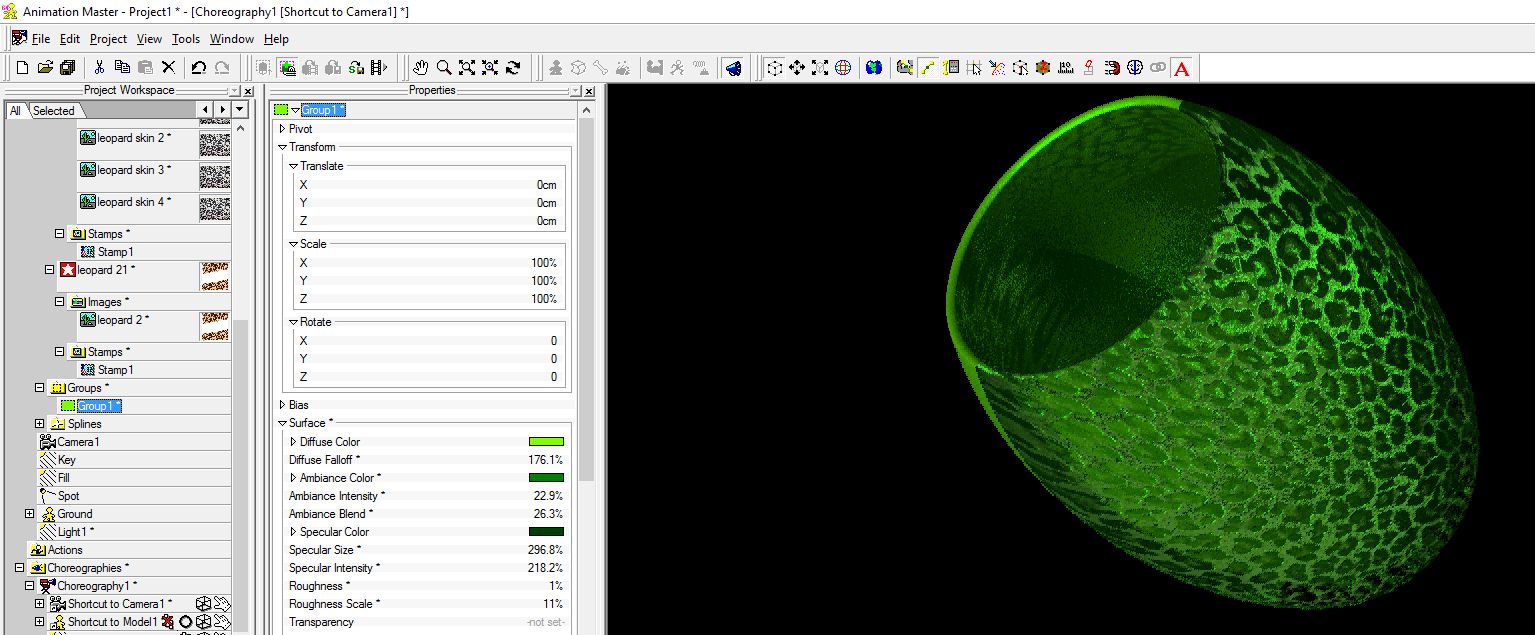
I believe the trick there would be to lower the percentage of the decal to allow some of the underlying surface attributes to show through. For instance, I assume the decal is set to Color (as opposed to Specular, Diffuse, etc.). Setting that to 66% would allow most of the decal to appear while allowing some of the underlying surface through. This could be surface attributes or other decals layered on top of each other. A specular map for instance would allow you to determine what parts of the model are shiny and what are not. An ambiance intensity setting (even if only 5%) would allow you to brighten some areas while leaving the other parts of the surface alone. Layering is definitely a great way to get those surfaces where you want them. Here's a hastily put together example... not of praying mantis surfacing(!)... but just to show the effect of combining decals with surface attributes. In this case I just grabbed two random leopard skins from the internet and started layering. In the attached image I've used the same leopard image multiple times with different setups (displacement, color, etc.) but with none at 100% which allows. Ideally each of these images would be different to gain maximum advantage of that decal type. Way back in the day there use to be a nice tutorial on layering of decals but a quick search didn't turn it up. Aside: Most A:M Users tend to leave the roughness setting of a surface alone but I love to use a setting of 1 or 2 with either really small or huge scale to add noise to a texture. The roughness setting isn't like much because of the unrealistic patterns it produces at higher/default settings. My suggestion for using roughness? Don't use the default setting! In the case of a praying mantis I'd say we'd be looking for some translucency and other effects to give the appearance of healthy green leaves. (i.e. definitely NOT leopard spots!)
-
Forum Like System (Troubleshooting) - Problem Resolved?
Rodney replied to Rodney's topic in Open Forum
That appears to be the default error most forum members get. The fix is *supposed* to be: set the number of positive and negative reputations that users from this group can give per day But first I have to find that setting. ---------------------------------------------------------------------------------- Edit Hold the phone... and delay your likes... I think I just found the setting. Give me a few minutes to set things right. --------------------------------------------------------------------------------- Update I'm sure I missed a group or two but most folks should now have more than a fair share of likes. In a pinch, should anyone ever max out their daily quota of likes (which is somewhat unlikely) they can always temporarily or permanently remove an older like. Then wait for the next day to regain a full quota and spread more likes. -
I'm still receiving reports that the like system isn't working for folks. The issue on my end is that I don't see any setting that is restricting the use of likes. If you would be so kind... Please like this post and comment if you cannot get it to work with the nature of the error. You can comment if it works as well but that will be assumed by the number of likes. Added: I don't see the 'like' option (presumably) because I'm the originator of this post.
-
This relates to Tore's post on Scene lengths. Assuming a local variable isn't the cause... Can anyone tell me why this Chor Length defaults to 70? Recommended test: Open Project Crack open Chor (keyframe/dopesheet mode) in PWS Adjust Chor length to 50. Save Reopen I would expect the Chor length to adjust to the longest Chor Action (normal behavior) or stay at 50 (optimal). I can't see why it comes back as 70. If it doesn't open/stay at 70 for you then perhaps there is a local variable stored that is a root cause. Update: Just as I was posting I looked at the FPS of the Project and if set to another unit (say 24) that will result in a different Chor Length default (56). While that may answer my question I still don't know the underlying... why... The Chor Length (if manually set shorter than the longest Chor Action) is defaulting to the FPS x 2.33. The only thing I can come up with is that 2.33 might have been chosen as an acceptable (average) short shot length and then hardwired into the math that computes the minimum Chor Length. Cpuld it be possible that A:M is grabbing the 2.33 from the wrong data field/location? Why is this Projects Chor Length defaulting to 70.prj