-
Posts
21,630 -
Joined
-
Last visited
-
Days Won
114
Content Type
Profiles
Forums
Events
Everything posted by Rodney
-
Hey Paul that's looking really good. It has a game feel to it. You should throw stuff together more often.
-
Does this 'problem' apply to Bones or just geometry? Rather than rotate the geometry can you assign a Bone to it and then rotate in the manner you want?
-
Very nice. I really love the 'toon realism'.
-
For Cloth simulation you may need that extra geometry. If you don't have it the result can be a lot of pass-throughs. With more splines/patches the solver can produce the desired results. It looks like in this case however the extra detail was the driving force behind the extra geometry.
-
Consider it done. (Steve Sappington has a theory and I think I believe him; pinned topics don't get read often)
-
Nice. Great progress. Regarding the FPS... Are you setting the FPS in the Project File properties (in the Project Workspace)? I'm not sure if this is what you meant by setting the FPS in 'preferences'.
-
Same thing I thought several years ago when TSM2 was first released. Once you encounter the problem/solution though its easy to remember isn't it? To someone as use to rigging as Raf Anzovin and crew it may not have occurred them that others might not immediate see the answer. But... I gotta tell you... it sure had me stumped! So like you I asked here in the forum and it wasn't long before I got the answer. I'm under the impression you can safely delete those but... um... save a backup first!
-
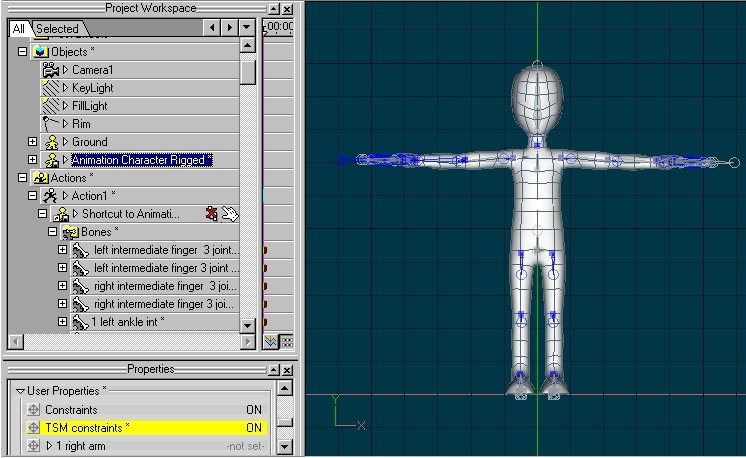
Its been awhile but I think I remember... The TSM rig must be activated. There is a constraint setting under User Properties that must be toggled to 'On'. I hope this is your problem. I know it threw me for a loop the first time I used a character with TSM rig installed. My thought at the time was 'why not leave that setting toggled 'On' from the start'. There was some reason that wasn't optimum as I recall. Edit: The first TSM rigged character I loaded had the constraints already on. Maybe my poor memory at work here but perhaps still worth looking at the settings...
-
I knew I was going to regret typing that. RE: The girlbot! Nice update. I like the silver (highly polished chrome) girlbot.
-
I like. No crits thus far. So far... so good! Edit: Okay... one crit. The side view looks to thin to me considering the mass we see from the front. Its just a 'gut feeling' thing... so feel free to ignore but I think adding a little more mass front to rear would convey more sense of weight to his head. Perhaps if you moved all of the splines of his face forward a bit?
-

Pre-made Actions and choreography actions
Rodney replied to MasterFunk's topic in Work In Progress / Sweatbox
Outstanding news. Someone who is reading this topic right now doesn't know it yet but they are about to be thanking you. Because you posted your problems here you've answered their questions about Actions too. -
It may make a difference in which character you use. With a few the stride lengths could be refined a little more. If this is a character you set the stride length for (i.e. you created the walk cycle) you might want to look again there. Thom and the Rabbit are the ones set up and tested for the most accurate walk cycles straight out of the box. (Note: I'm guessing a bit here) A common mistake people tend to make when first creating walk cycles is to move the character forward or backward. The character should remain at the same place. This might relate to your footing as well if the heels don't strike the right place.
-
Sounds like a hit to me. I look forward to seeing more as your WIP progresses . Side note: A bit weird perhaps but as I revisited the song in my head (I guess it IS a bit catchy) I kept seeing our hero following a live action girl (hey... she's cute!). The ultimate Robio and Juliet? Hmm... lets see... he chases after this beautiful girl thinking 'could this be the one?' and at the end of course... she isn't. But... at song ends... a cute little robot girl passes by him and regains his attention. Just running with your idea... not trying to distract you. After you all get rich then you can hire all the sexy models and Live Action/CG it for the second video.
-
There are a lot of 'search and replace' tools out there (MS Word does a fine job too and allows programs to use Visual Basic). Running a search for 'command line search and replace' on Google I found this utility with the unlikely name of FART (Find And Replace Text). Never used it though... As it is open source that might help in creating/modifying the needed tool. Of course the source file would have to have the bones named in such a way that the FART tool would find and replace them (i.e. null_bone001 might prompt the appropriate renaming of the segment tag. Also, perhaps... if a bone can be made to appear as a Null... it might negate the need for the Nulls in the first place? (This would most likely be a feature request) The command line utility I googled: http://sourceforge.net/projects/fart-it/
-
Hey Michael! There have been quite a few changes/enhancements but I'm sure you'll transition well. Great to see you again.
-

This was my entry for the May Mechanical contest
Rodney replied to Eric2575's topic in Work In Progress / Sweatbox
Eric, That was a nice touch you added in the final composite too. (the driver wandering over to look and the camels!) Having seen tanks and camels in a similar setting I certainly got a kick out of it. The detail of the model is self explanatory... outstanding work. There was something in the contest image that I felt detracted from the piece. The tank didn't appear to be touching the sand. As I recall it may have been mostly a shadow thing. I'd guess if you had more time you would have nailed that and added more sand displacement around the treads too? Any insight you can share on that aspect? -
My system is on the fritz. I try to play your animation but see a video from Jason Ryan's Animation. Weird. (Maybe a cache thing on my end?) Edit: Got it. hehe... cornbread. I take it you did the voices too?
-
Did you miss the announcement earlier today? Martin Hash officially announced "Scarecrow of Oz" as the next film project. My advice? Get involved! Read the script, see the film's progress thus far and thoroughly explore the world of animation and filmmaking with A:M as you only can by being involved in a feature length film!
-
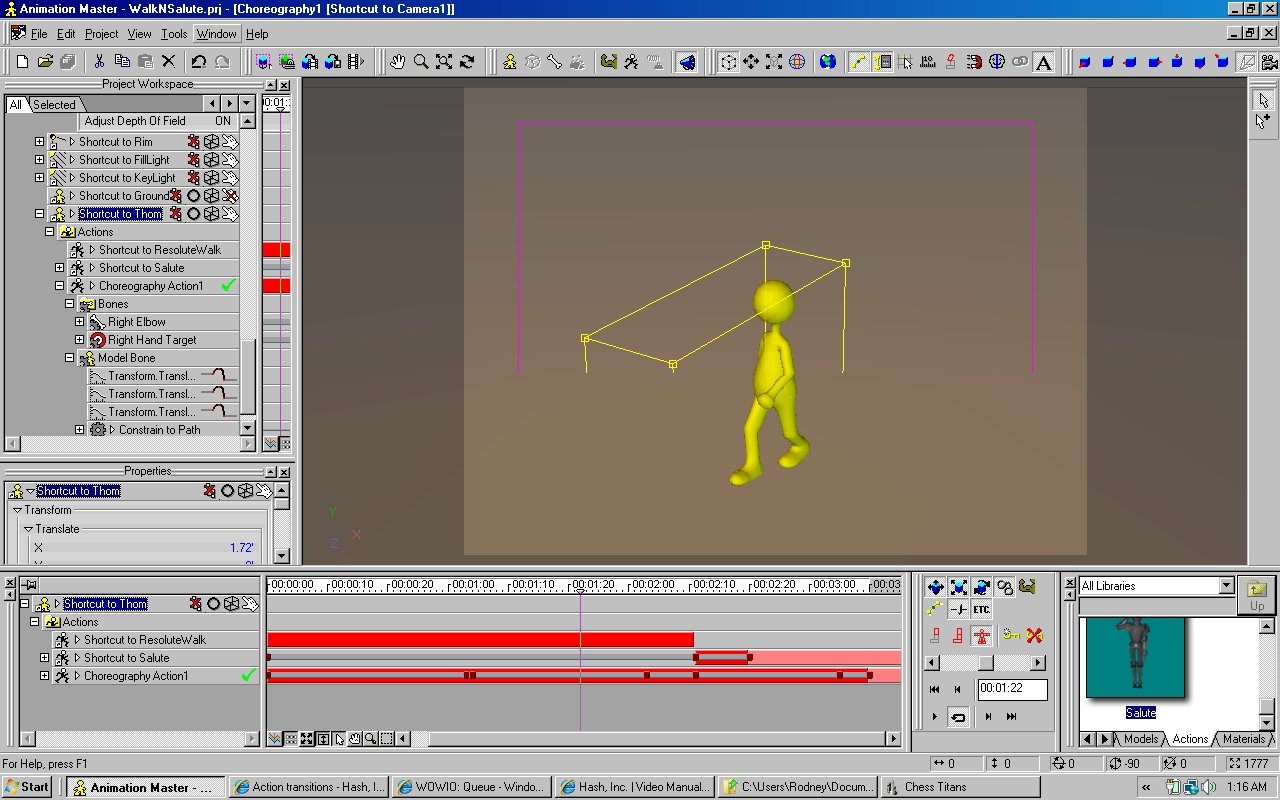
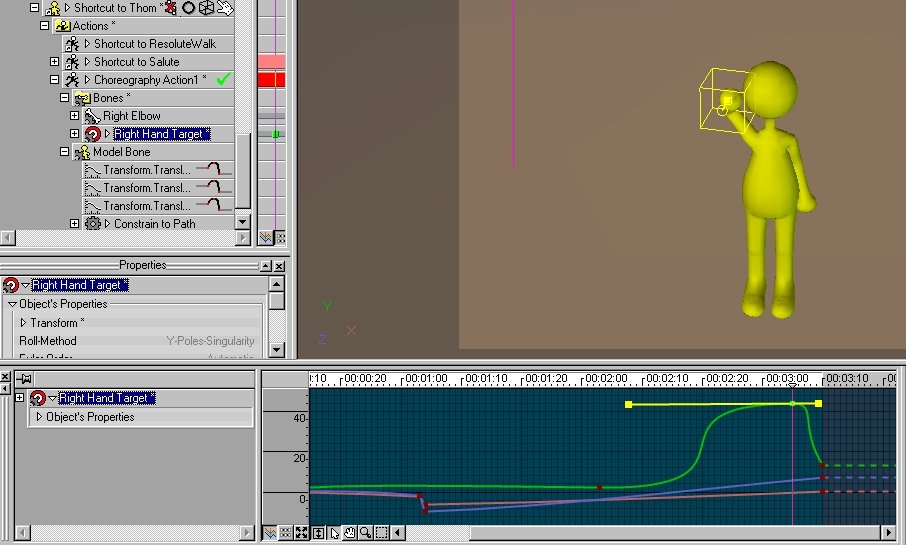
Purists will probably suggest getting away from paths entirely but thats the example I'll work with here. Attached is a piddly little project file that you can pick apart. Not sure it is worth looking at but... have to start somewhere. I'll call it "Walk and Salute". It should be noted here that in this example I'm not specifically keying keyframes. A:M is doing all the work for me here. Exception: I did jump into the timeline at the very end of the action and adjust the spline curve to get a better snap in the salute. I switched to Channel View/spline view to adjust that (see below). Sidenote: If you were to keyframe... in order for keyframes to stick you must activate the bones that you plan to key first. This is often done on frame zero by moving the bone and putting it back in its original place. Notice here that the first action (Resolute Walk) has its Ease set to 100% on the frame where I want Thom to come to a halt. With the second action "Salute" I played with the Ease to find the basic salute within the action that I wanted. I then pushed the salute a little further by editing a third action (the Chor Action) which automatically blended my edit with the underlying actions. Not Pixar stuff by any stretch of the imagination. See that Green Tick Mark on the Chor Action? If I wanted to add or adjust either the Walk or the Salute actions instead I would have to select one of those actions. Hope at least a little of this makes sense. I really have no idea what I'm doing. Added: To add a little life to the shot I also constrained the Camera to Thom's head via an 'Aim At' Constraint. Robert Holmen definitely has videos linked here in the forum that discuss keyframing. Mandatory reading ...eer... watching. WalkNSalute.prj
-
Eric, This won't satisfy your need but might be a decent introduction towards your solution. At the very bottom of Hash Inc's video tutorials page there is a video called "Path Ease - Walk then Wave". As I say... its an introduction. http://www.hash.com/2007web/vm.htm I believe here in the Newbies forum is a link to another video, this one by Robert Holmen, that goes in depth even more. I'll try to wrangle that one up or perhaps Robert knows which one I refer to. One way of gaining the experience you need is to experiment with two different actions in the Chor (just as you are now doing). Note however that you generally do not want to be in the same Action when you are editing. Note that little Green tick mark in the Project Work Space (find it!). That tells you which Action you are in and editing. One thing to consider as well is that you might occasionally want to leave a gap between the two Actions. This isn't always desireable of course... some might say never... but if you leave a gap inbetween the Actions A:M will make the transitions for you. If you go into Dopesheet mode in the Timeline, thats the view with the bars versus the view with the splines, you might see the blends/transitions better. I hope to find a little time this weekend to play in A:M and I'll try my best to post some examples of basic workflow. Robert... you out there?
-
Al, I am impressed by the level of quality and attention to detail in this model. What else really is there for me to say. You done good. Real good. You may not have won but that sure was and is a winning entry.
-

Pre-made Actions and choreography actions
Rodney replied to MasterFunk's topic in Work In Progress / Sweatbox
Before you save the project for sharing you'll want to select 'embed all' from the Project menu. This will save all the models, actions, materials and such (not the images) in the Project. If you only want to share parts of the Project then you can delete or substitute as needed. Note: Do not do this with your original file... rather do this as a means of backup. You may not want to embed everything in your original file. Without having the Action or Model with the project I'm going to guess you have to adjust the Actions properties under the Choreography. Right now the Action may be set to 'Replace' where you will want it to "Add' or "Blend". Still guessing here but we are closing in on the solution slowly but surely. -
Hey, if you can model them I'm sure someone will be glad to rig them. I'd volunteer to do it myself but you actually want them to be animatable! I've still got a long ways to go myself to get there. Keep on modeling. The rigging can come later.
-
Gerry, Seeing your Bugbots come to life, even if its only one of them for now, is really a treat! Its almost as good as having the action figures to go along with the comics. Don't you dare stop! I want to see this bug jumping right off the 2D page in full fledged 3D action. Are you going to rig him with TSM2, the Squetch Rig or create something new?
-
Beautiful work Marcos. Thanks for that wireframe! Incredible stuff.


