Rodney
-
Posts
21,630 -
Joined
-
Last visited
-
Days Won
114
Content Type
Profiles
Forums
Events
Everything posted by Rodney
-
Sweet. Looks great! I understand the needs of the scene dictate. One could hope for a lightning strike or two to light that darkness and reveal a bit more of the creature. (Of course we want to see more of him!) On the other hand I'm not sure I really need to see the creature that is about to eat me. Best to end it quickly. The model speaks for itself. Intense. With sound and rain effects the intensity of the scene will play very well. Nice desert pic too! He looks so tame in comparison to the darker pic.
-
...and if that dont work as you expect it to... You could always draw the path again. 'Tis quick to do! Drawing from top view should keep the path at the same height all the way through.
-
Good choice Mark. Wink will work well for you.
-
Hehe. I like. Very nice. I look forward to seeing where you take this.
-
Aha! At last we have proof. Stian has found a way to clone himself. Thats the only explanation that can account for how he can keep producing such high quality at such a quick pace. (well... cloning himself... and using Animation:Master) Beautiful model/Impressive walk cycle Stian! I assume this guy is going to make it into a live action scene?
-
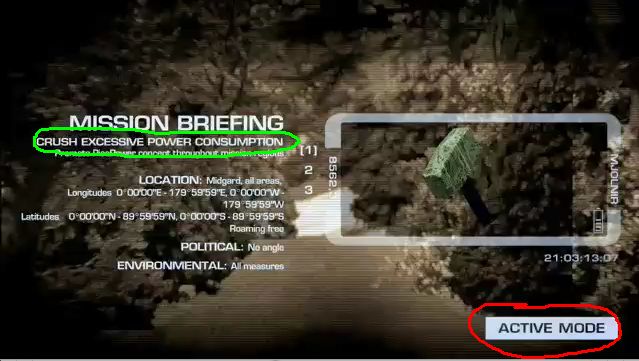
I couldn't stop watching it. In fact, I watched it over and over again. The music... the imagery... the whole package... captivating. I think there was a subtle reason I kept watching though. In hindsight I think I missed something important on my initial/subsequent views. If I had to suggest just one thing it would be to have the letters flash on the heads up display on the left, the words "Crush Excessive Power Consumption" and/or move the flashing 'Active Mode' button. The trouble with the current setup is that attention goes to the flashing 'Active Mode' button and away from the text at the left. This would be okay except that the time that it takes to try to find what is important in that text on the left isn't sufficient. Before the brain has an opportunity to understand the sequence has moved on. I think having the 'Active Mode' work as it is now but being joined by a flashing "Crush Excessive Power Consumption" would communicate the important text effectively. Great... Great... Great stuff Stian, Eivind and Runar!

-
Nice. I hope you get a chance to see it in action up on the big screen in front of all those fans.
-
Hey Bruce, its great to see you posting here. I can only speak to my own experience and haven't used Macs at all. There are more A:M users on Windows than Mac but its been that way all along. I've found A:M works on my WinXP machine very well. Vista on my laptop took awhile to track down specific display driver updates. Running on 1GB RAM also took its toll. Vista really needs 2GB minimum. Most computers probably don't come with less these days. Bottom line, Vista needs more resources than that little first-generation Vista-ready laptop could deliver. If you have a newer system you'll be fine. I believe the general consensus is that its turned into a job fair.
-
Thanks in advance for this effort Mark. Having a premade pose such as you describe would make using BVH motion much more accessible right out the gate.
-
That worked out quite well Steve. It reads 'zombie' to me.
-
Mark, I really need to learn to video capture this stuff. It figures, I can't reproduce what I saw. It was most likely user error or a fluke. I wasn't going to mention it but thought Chris's description pointed to the same thing. I won't speculate further. If I see it happen again I'll capture it and post it here.
-
Doh. I just went back and read the rest of the posts. I see Chris (mouseman) mentions the same thing about the hips. That's a great start to 'It's a Pitch' too Chris!
-
That was what I thought was the most ideal pose out of my first animation with Robby. As it was a simple run through without a specific objective I didn't think the rest was worth posting. I'll see what I can do. Hey... if there is a chance that animating with his rig will keep Mark happy I'll just have to animate more often! I'm finding Thom is a real joy to 'animate' with. Mark, There is a difference between animating the Nulls in Robby and Thom. I was going to post more about it but the right words didn't come to me to explain it. With Thom the hips can be rotated without activating the Rotation Manipulator. That doesn't seem to be the case with Robby. Probably something I'm missing on my end. Haven't played again (yet!) today.
-
...and the new Thom is really a treat to work with too.
-
Heh heh. I like Robby. He's a fun guy. The rig was (thus far) very easy to figure out. Very intuitive. Thats a winner Mark.
-
This is an old topic (circa 2004) that forum member Aman Trivedi popped back up into view. Lee Anderson has been away from the computer and 3D for quite awhile now. He's out spreading the good word as a missionary. What does this mean for us? Its unlikely we'll see the model as a download anytime soon. Sorry. I understand that miracles do happen in missionary work. So don't give up hope!
-
You ain't a kiddin'. I tried to (somewhat) reverse engineer your setup to demonstrate in a video. I didn't care for the results so... didn't post it. I've attached the MOV file for grins and giggles. Hopefully its not entirely worthless. I added an Aim At constraint to aim the camera at Shaggy but I didn't toggle off compensate. So the camera only so so follows Shaggy. Ah well. Back to the drawin' board. CameraKeyframeHold.mov
-
Hey J.W.! Click Here for the results of a search using the words 'UV Editor' here in the forum. You will find similar results searching on 'Texturing' and 'Decaling'. That should help get you started. After reviewing and exploring give us your feedback. That's how we all learn.
-
Talk about your squetchable character! One word came to mind while viewing your latest animation: 'soft'. I don't often equate that word with CG characters (or their arms). Looks like success to me. If it matters... the second word I thought of was 'pudgy'.
-
Robert, If you crack open the Timeline (View / Timeline) and select the Camera you should see John's keyframes. In order to keep the Camera from moving you will most likely have to change the Intrerpolation to [Hold].
-
The simplest answer is... don't. The most popular methods of camera movement are: 1. Set up multiple cameras and render the sequences out separately. Then assemble the sequences together. The principle here is that not everything needs to be shot through the same camera. 2. Move the same camera to each new position you need it to be in. In short, animate it. This works for tracking and panning and moving shots. 3. Use a combination of the first two methods. Combine shots created by multiple/animated cameras. The driving factor appears to be organization. Ask yourself how you would best like to organize your Project. If its a small group of sequences with limited changes you can do it all in one camera. If its a large group of sequences edit them together outside the camera. ------------------------------------------------------------------------ Additional Info you didn't request but you're getting anyway. ------------------------------------------------------------------------ Lets assume you have a 300 frame sequence with three camera changes. Behind the scenes this is what will happen regardless of the method you use. - Camera renders sequence 1 - Camera renders sequence 2 - Camera renders sequence 3 All sequence are combined Assuming each sequence is allotted 1 second you could set up A:M to render them all out in the correct sequence. In this case lets use three cameras. - Camera A renders out sequence 1: Frames 00:00:01 through 00:01:00. - Camera B renders out sequence 2: Frames 00:01:01 through 00:02:00. - Camera C renders out sequence 2: Frames 00:02:01 through 00:03:00. Use A:M or other program to assemble the sequences together. You can set up a single camera (Camera A) to render all three sequences as well. You'll need to know a little about the Timeline and Interpolation to make it work as you will be animating the camera's location. It's not difficult to do (See JohnL3D's post below). The most important thing here I think is to get your sequences rendered. Once rendered you can do all kinds of things with them. Using A:M's Non Linear Editor capabilities you can work in transitions, cut to different sequences, reverse sequences, add special effects... you can edit those sequences as you feel the need. Say on Robert. There is much to be learned about filmmaking!
-
Thank you! I've been meaning to post that information for quite a while. It should be noted that these Preview Images are not confined to Models. You can with minor exceptions use the same or similar methods in preview images for Actions, Materials and Projects, Tutorials etc. Basically, anything that can be added to a Library.
-
There are two preferred ways to do this. Both are very easy to implement. Method 1 - Create (Right Click and generate your Library Icon) Right Click in your Modeling window Choose [Create Icon] Save your model This method has the advantage of being very fast. Note: If you don't like your Icon, reposition the Model and generate a new icon. If still not satisfied try Method 2 to get exactly the Preview image you want. Method 2 - Assign (Add an Image via File Information Properities) Open your Models File Properties Open File Info Click on the Preview Image or Right Click and select [Assign Preview Image]. Browse to the location of an Image Select the Image Save your model This method has the advantage of being more precise. You can place anything you want in the image. Technical Note: The Preview Image is embedded in the file. If you fail to save your Model the Preview Image will be discarded. See attached images for menus used in the process.
-
There is a tutorial on installing Libraries but there isn't any installer for the Extra DVD. If there is/was I'm confident you can find the installer on the DVD very easily. Look for a text file in the root directory of the DVD. It will outline how you can use the DVD. (My DVD drive is out of order so I can't check right now)