Rodney
-
Posts
21,633 -
Joined
-
Last visited
-
Days Won
114
Content Type
Profiles
Forums
Events
Everything posted by Rodney
-
Now that you are having great fun with that angle... I turn on you again. One thing to be mindfull of when closing your story is to avoid pursuing the easy out. I think you are safe here but... I want to illustrate my thoughts on the subject if I may. Its very common for an element early in a film to reappear at the ending. Actually, its very hard not to do this in storytelling! The danger is in telegraphing or allowing your audience to anticipate the ending. In other words, the principle of Anticipation can be both a good and a bad thing. In animation you generally want to anticipate the activity so that the audience has time to view and understand the purpose. Generally, in storytelling you want to do the opposite, don't let the audience know anything more than you want them to know at any given moment. This makes the ending, or twists and turns in the plot more fullfilling (the audience is filled all the way full by the time the film ends). In such a short film as yours you play this well. There is no reason to think the clown has anything to do with anything through the film. The audiences attention is quickly grabbed by something familiar (the gasoline stand) and the activities going on there. The clown is (in my estimation) completely forgotten. You've delivered that part really well! Now the danger is in following the easy way out at the end. Think about that ending... then think again. If the idea came too easily then it most likely will not be the best ending. I think immediately you have the opportunity to seal the deal on your first film by altering the audio alone. Adding a laugh track as the credits roll for instance. For that first film that'd make for a very satisfying ending. The clown is not seen and yet simultaneously clues the audience in while grabbing their interest with a desire to learn more. At that point you've got the audience right where you want them. But... can anything else be added from there? Can anything else be done? Yes, I think so... but be careful. First, think in terms of economy. What would be the best bang for the buck if you had limited time/money to spend on this? I think the auditory laugh is a safe bet for you there. Beyond that you can go just about anywhere (if you got the budget for it!) Remember Pixar's outtakes where the audience got to see more of the characters at the end of their films? People loved those almost more than the movies themselves!!! You want to know why? It was through those innovative flashbacks that the audience got to relive the experience, learn more about the story and see 'old friends' again. I think there is an opportunity here to explore more of the story with that clown. But again... be careful. Whose story is this anyway? Do you want the clown to overshadow the main character? If not then you might want to play that whole clown aspect down. This is where the ending with an offstage laugh might pay off again as it leaves the main character's status intact. Note: I am not suggesting you abandon what you've added to the ending just now... I am however suggesting you consider what you can do with that to take the tale (your original one) even further. Think about opportunities for subtlety... if you are going full out one direction... make sure you go the other direction (anticipating the action and the storyline) first! Daniel... I love what you've got already so trust and follow your instinct. All this is just words. As you can tell, I really enjoyed your film. Rock on! (Apologies for the length of the post... it was much shorter in my mind!)
-
Daniel, Thank you for taking the time to relate your experiences. Feedback is extremely important (especially to the newbie in us all).
-
Daniel, I watched the first time without the sound and thought it was terrific. Watching again with the sound... I think it nears the element of perfection in storytelling. What you've got here is more than just a nice short film. Its the very reason we are all here; to tell stories with 3D animation. That you've accomplished this in such a short time... an tribute to you personally. I loved it. In your next project spend preproduction time learning about lighting and texturing and you'll be dangerous. In my opinion there is only one glaring omission in this film; the Clown needs to be seen (or heard) again at the end. Bravo. More of that please!
-
Mark, I've gotta say... This image (and your work in general) goes beyond 3D into something else. Beautiful imagery.
-
Bravo! I don't mind that level of quality resolution one bit. It provided a nice TV production feel to it. What a great addition to have for the comic strip! Encore! (Okay... maybe you can rest up a little... you've earned it!)
-
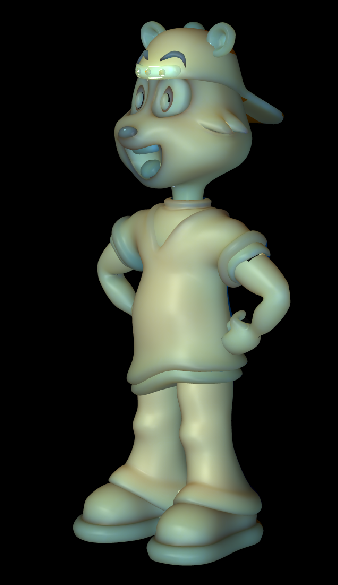
Sorry to hear about your troubles. I hope everything works out for you things get back to normal quick. I wanted to post a quick shout out to you for this very awesome character. I've been using your Panda to conduct some lighting and rendering tests and he's made it so much more enjoyable. He clearly knows more about lighting and rendering than me! Both you and your Panda are an inspiration. Thanks so much for sharing him. (...and you've reintroduced me to SSS. Thanks for that as well!!!)

-
I don't think your subscription expired but... it is possible. (The first of last years websubscriptions are beginning to expire so if you purchased a websubscription one year ago that would apply to you.) To renew just visit the Hash Inc store and purchase a new subscription. It should take 15 to 20 minutes from start to activate your new subscription. Even less if you are familar with the process. The activation code will be delivered to you (in the store and via email) at time of purchase.
-
RAM can help to free up processing of -real time previews- and such but it has been said (and I believe it) that nothing speeds up rendering like a faster CPU. I'm sure there is a point where better and faster CPUs generate negligible benefit in comparison to something 'almost as good'. I'll yield to the experts there. Unless something has changed... final rendering is all about CPU processing speed. Your most dramatic speed increases of course will be those that take into account your production goals. Developing effective organization, workflow and such will (I think) be more valuable than any piece of equipment you can purchase. I've used both and like both but I've found a good mouse to be better equiped for use with A:M (a lot easier to surf the net with a mouse too IMO. Now if you are drawing a lot more than modeling and animating... totally different story. For drawing and painting I prefer the tablet by a very wide margin. (Probably gonna upgrade mine soon as my Wacom pen is broke)
-
I think it looks real. (as in 'perfection')
-
Justin, That surely must be art because I did not understand a bit of it. (You can't get quotes like that from Rolling Stone magazine so... leverage it!)
-
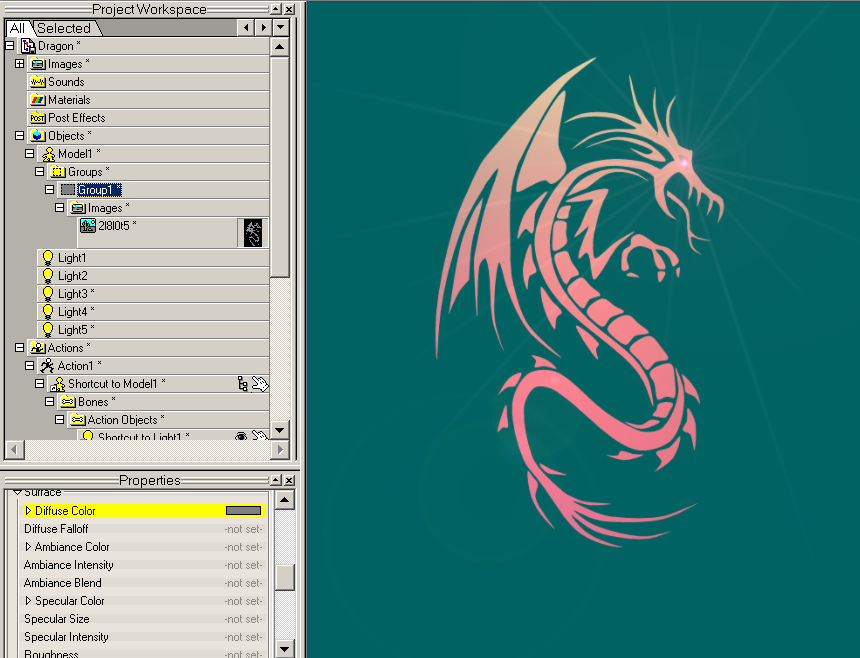
Apologies for messing with your dragon but I thought he'd look nice in color. I was going to render out a flickering flame-like lens flaring thingy... but apparently I've surpassed the the level of my competency here. The lens flare doesn't show in final render and not enough time to investigate before work. Of course to get a similar lighting effect on our objects we could just light a 4 CP patch and then use that to decal the objects in the scene.
-
...and we can leverage A:M's considerable power to relight and recolor existing images. Special Effects included!
-
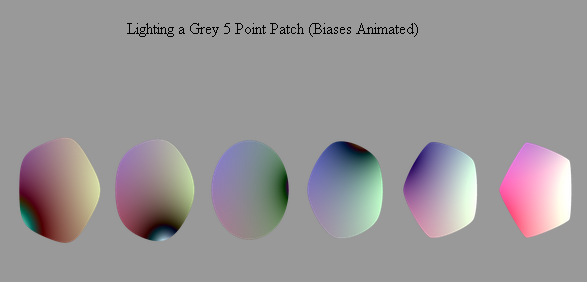
Nice dragon! You demonstrate nicely why there is no reason many of our decals (even animated decals) can't be made in A:M. Lighting can be used to nice effect on flat geometry too. The only real 'trick' to the art seems to be starting from a mid gray tone or darker rather than white. Starting from a white object is hardly ever a good idea as its hard to get brighter than white. The attached is a 5 point patch animated over 30 frames (6 frames represented at 5 frame intervals). The only things animated is the one white light (with a negative value) moving over the top of the thing and changing of the patches Bias Magnitude values. Four other lights placed near the patches CPs provide the other color shifts. Edit: Should have said... the brightness of all the lights were animated throughout as well.
-
I was reading these last few posts... thinking... "what are they talking about. He didn't donate the model. What are they talking about???" Then I read through all the posts again. (Looks like I missed a very important post!) I had been thinking that everyone should study your splineage and now they really can. What a wonderful contribution. Thanks!
-
While I personally prefer the first (darker) one for its mood, I'd say that within context this last one looks better. From the perspective of being underwater in a tropical place and the lightheartedness of the piece it does at least. ..and BTW... I saw your contest image rotate through the forum images! I was going to link that pic in here but it escaped. A quick search in A:M Stills didn't turn it up but I know its there! That last image you posted... sweet.
-
Now that is an outstanding character. Wonderful rendering as well. Very nicely done. (Render to PNG with transparency! Hint. Hint.)
-
Looking great. (and watching it come together piece by piece has especially been a treat) That you've got this 'holiday special' coming together from initial conception to release with such high quality in one month... now... that's impressive. Go get that deadline!
-
There are literally hundreds of metals out there so I will assume you mean a 'Chrome' effect. If not the variables will change but the basic requirements should stay the same. For chrome effects there must be something in a scene/set for the reflective metal to reflect. Anything will do (images, 3D objects whatever). The optimum effect is usually generated with sky colors (blue or light colors) at the top and ground colors (browns, blacks or dark color) on the bottom. If you get into HDRI imagery then that becomes the trick. The HDRI imagery is wrapped around the camera and reflective objects in the scene reflect that imagery. So there are two primary requirements for -chrome- metal: Reflective surface and Something to Reflect. My 2 cents. A:M's materials in the Library cover all the major material effects.
-
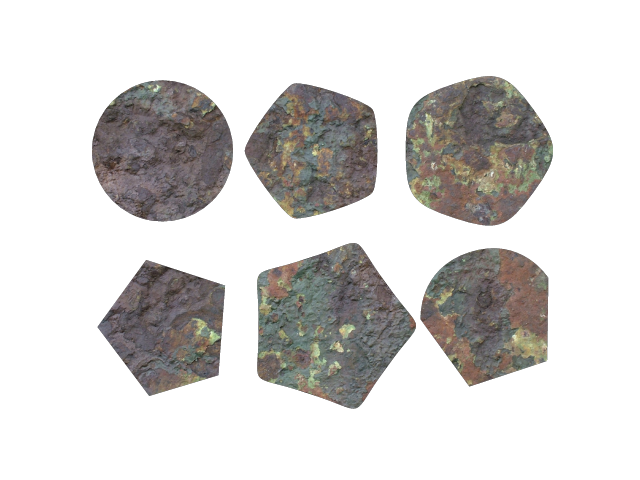
There is a lot of ground to cover here. I hope this fits into Jared interests. I've thought about adding a short tutorial on the AM2SWF plug but really didn't have enough to offer the discussion. I have had some success with it. Its interesting that the issues with AM2SWF are very closely related to the Capping that is being discussed. Simple shapes... no problem... but as the geometry gets more complex the 'what ifs' do too. Rather than drone on about such things I'll offer some insight into something that may be of use. Five point patches work really well for a variety of shapes and... once you've collected enough shapes you don't have to remodel the basic shapes again. You just have to arrange them. Try this: - Lathe a cylinder from a 2 point spline with 5 cross sections - Delete the bottom circle (this will leave the top 5 CP circle) - Select the 5 CP circle - Note that the 5 point patch icon comes on - Make the circle a 5 point patch - Rotate to face the screen/camera head on Now you can adjust the magnitude of the spline to form a variety of shapes (circle, stars, pentagon, flowers and other odds and ends) that weren't possible with a standard 4 point patch. Any valid patch (3, 4, 5 or as stitched together) will help produce the shapes you need. In cases where the Bias throws the splines off a little, adjusting the Ambiance color and intensity in the Group/Models Surface Properties assures you'll get one solid color. Watch that Gamma setting too. I've found it works best on zero for 2D imagery. Note: Apply decals last or you'll get disconfiguring in the decal images. Hide geometry you don't want to have continuous applied to. Its not the moon but it is another method to create 2D shapes and images with A:M
-
Interesting. Odd too. (Not you... the corruption!!!) I've used some pretty big images so I don't think its that. Try another test! If Dumb Monkeys have the right... I plead the 5th Amendment.
-
In what way is the model corrupted? I ask as I've never seen a problem with Library Icons before. Is it possible you are mistaking the additional image information added to the model as corruption? I must assume by corrupted you mean to say it won't open. I've never seen that before. The Preview Image (Library Icon) data is stored in the resource in all cases but one that I know of (Tut files reference an external image). Projects, Models, Chors, Actions, Materials... all of those... maintain their data between the .../ tags. This can be found near the end of the file. As the Preview Image is added to the file the file will change. It will grow in size by the size of the Preview Image assigned. To answer your question then... this is where one could access the image data in Base 64 or whatever. Vern and I investigated using this data years ago with the Extra CD but... we weren't smart enough to make it work. I should have read A.'s response a little more carefully or at least linked to another Library Icon topic. One of the reasons to use the File Info properties Icon assignment is that the Right Clicking 'Create Icon method isn't always available for every resource. If its there however the Right Clicking method works much quicker and you usually get better image quality.
-
Congrats Robert! Alice should be proud.
-
Thanks A. If even one A:M Users reads your explanation on Library Icons it could change the course of history. Revolutions may start small but once they gain momentum...
-
I'm pretty sure the plugin your refer to was Circus Media's Cap plugin. I'll have to check but the version I see is for v10.5/v11. It does not play well with current versions. It should be noted that it had limited usage for complex shapes. For complex patterns its better to just use the Font or AI wizards with only the Face setting or stitch splines into place. If the code is/was available perhaps it could be updated for use with v15. I like your 2D/3D Jared! Attached is the CMcap plugin for reference: CM_Cap.zip
-
While no one has mentioned it specifically here, I've been getting a vibe for some time (years?) that some additional focus on Modeling techniques and tools used in A:M would be a topic of interest. Like 'Sets'... 'Modeling' is a huge theme. Surely no one thinks they know everything there is to know about Modeling and yet its a subject of interest to everyone who has ever launched A:M. Perhaps best of all... everyone can contribute to that theme. Everyone has or is developing their own favorite modeling techniques. As Modeling falls into the subset of 'Sets' (placing objects into our scenes) it might set the stage for success in our effort? I'm leaning toward 'Modeling Techniques' as the inaugural theme.