Rodney
-
Posts
21,633 -
Joined
-
Last visited
-
Days Won
114
Content Type
Profiles
Forums
Events
Everything posted by Rodney
-
I don't know where I was when this topic was posted but it sure wasn't here. Wow! You've done some great work with hair Mark. I so need to use some of this. Count me as one of those people, I sure didn't know that MatCap shaders could be used with hair. Thanks for bumping this up Tom! If my memory serves correctly Matt included it with the Mach V (Speed Racer) project so look for it in the project files on the Extra CD (not sure if it's on the Extra DVD but it should be).
-
I hear ya. Normally I would but I don't think I've actually used Sony Vegas. If I have used it, I would have to conclude that it didn't measure up to FCP and Premiere in my experience. Since it is so well considered I don't think I've yet tried it, therefore I cannot recommend it personally. FCP and Premiere I have used and can wholeheartedly recommend either. If/When I get a chance to try it out I will!
-
Need more Treeeeeeez! We love you for more than just your plugins. So come visit us more often. Happy Birthday Marcel!
-
You'll have to make a proxy model of yourself... you know.... for those long shot full figure effects. I don't want to scare you off but the episodic nature of Epic Gamin' might make it perfect as a Special Projects topic here in the A:M Forum. You are already leaning heavily into production and that might help to keep the A:M related aspects focused. Note that I am NOT suggesting Epic Gamin' itself move here. No way! BlipTV appears to be a perfect place for that. Maybe more of a "Making of Epic Gamin'" where others enjoy the show and regularly provide feedback. Of course we can do that just as well in this WIP thread too. No pressure. Something to think about. If the WIP ever gets too unwieldy it might give you some room to breath.
-
Thanks guys. Hmmm... sounds like still very much a work in progress. As I get time I'll try to investigate to see if they've been able to improve upon it since last year. Thus far I am of the opinion that for the really big projects programs like Final Cut Pro and/or Premiere are about the only videos worth investing in. If I would have just bought one of them years ago I would have saved quite a bit of time investigating the alternatives. I'm fine with that now because I don't have any tight deadlines or big projects to edit. There are a ton of video editors (free and paid) but very few pass the basic usage test.
-
Now you've got me curious. How often did everyone click on the vintage A:M Films link when it was in a prominent place?
-
Dan, If you already use another program to edit your EG episodes together you should be able to use that to smash your sequential images into a .mov. Most of the better editors can even use images sequences directly. I'm thinking mostly of program such as After Effects or Premiere but others as well. The thought being that if you've already rendered the images out separately you might be doing yourself a disservice by smashing them together if the program will actually work better with them as separated imagery.
-
There you are... interacting with 3D characters on the screen... how many people can say that? You are living the dream. Keep it up! I really like your sense of setup and how you are leveraging your current understanding of computer animation... I'd say optimizing even. A great example of this is how you introduce your co-host and then she interacts with you through voice over the course of the show. No need to actually animate her in those scenes. As your knowledge and proficiency increases she'll be able to interact in ever more complicated scenes. Way to leverage A:M's capabilities and turn constraints into solutions for EG! I assume you script and storyboard each episode? My other question would relate to Gwen... or the voice of Gwen. Is she having fun with this or what? She can pretty much be anything she wants to be. Excellent episode!
-
That is great fun! Do you know if Shaun ever completed more of those? I know he had planned to create a whole series. He's come a long way since first pushing his mouse into computer animation. One of Shaun's recent jobs was on 'Open Season 3'. He's also an instructor at Animation Mentor.
-
Longshot here... I don't have any insight into this except to say that this might be due to your screen capturing software. My thought being that the software -could- interfere with how A:M senses your mouse's location. If this occurs when your screen capture software is not activated then it's probably something else.
-
Stephen's film is a great piece to study and not just from the aspect of animation. You can readily see the care he took in the design of these characters and sets. The sound alone is entirely captivating (close your eyes and just listen to it). Story and conflict. Mystery and intrigue. Elements that engage all our senses. The use of opposing elements to enhance our sense that the environment is changing. Movement from out of the cold toward the heat as Stephen keeps directing and diverting our attention Our growing sense that all is not well... dark shadows, locked door, sharp knives... all heighten our apprehension. Stephen expertly directs us exactly where we need to be as our empathy with Briar Rose increases. ...and then he breaks away from all of that and gets silly. Stephen is not just an artist. He's a genius. It's not the software that makes the movie... but I'm glad Stephen made this one with A:M. I think my personal favorite part of this film is at the very end with the credits. Just when I think I know what is going on Stephen manages to recapture my imagination.
-
I'm bumping this topic up because Stephen Millingen's 'Briar Rose' is playing at the top of the forum. Even today, it's still a piece of outstandingly tremendous work. Highly entertaining too! ...and in case the info is not easily found... this short was created in A:M v11.
-
This isn't exactly A:M Films material but it is a great interview with one of the programmers of Animation:Master. In just a few short minutes Ken Baer covers some of the basic philosophy behind A:M and explains why it will be a better fit than other programs available. Those that might be interested in purchasing Animation:Master should check it out. Ken Baer is now an independent programmer but five years ago he was know as Hash Inc's enlightened marketing guy. If you live in the US Northwest and are a fan of the various brews on tap you may have even used his custom application to locate the finest spirits in the Portand area. He still hasn't forgotten his first love in programming; computer animation and rumor has it you may be hearing more from him on that. Time will tell. http://vimeo.com/101185 Original video source: www.themovieblog.com
-
Oooo! Nicely done John! I love the first two. The third betrays its effect a bit more readily... but still nice. Here's hoping your computer stays online!
-
Yay! Yves's website (which when last I checked was offline) is currently online: For those of you that really want to look deeply into A:M's lighting his site is well worth your time. http://ypoart.com/index.html Here is a link to his now classic tutorial on lighting: http://ypoart.com/tutorials/lighting/index.php You'll find lots of useful information and resources at site. This may be old news to some but if it serves to help even one person improve their 3D rendering... Just go now and visit his site.
-
It is. Of course the time will vary depending on the length of your sequence.
-
Dan, You can use A:M (the 32bit version) to perform your conversion. The steps are: - Open A:M - Make sure your Project Workspace is open - Bring in your image sequence via Right Clicking on the image container (Don't forget to select the check box that says "Import Image as Sequence". - Once the sequence is imported Right Click on the image set and Select "Save Animation As". - You can change this to any available movie format or image sequence. Done. Prior to v13 you had to use the alternate method (still also available in A:M) of bringing in your sequence as a Camera Rotoscope and then re-rendering that out to the .MOV or .AVI format. A little background to help you better understand: I was under the impression that Netrender could render to .MOV but I was resently corrected on that. Netrenders focus is distributed images and it needs separately rendered images to do that. The fact is that *usually* you *always* want to render to sequential images. (There are a lot of good reasons for that) All versions of A:M up until the 64bit version can render out to and save to .MOV format but due to issues with Apple Quicktime 64bit there is no option for that. The good news is that you can use v16 32 bit to convert your sequence. There are other options to convert images sequences outsideof A:M of course. More about those as needed. Hope this helps.
-
Hey Bobby, Did you find the solution to this problem (or manage to find a successful way to get your Sprite System to freeze)?
-
Is anyone familiar with the Lightworks video editor? It went open source a year or so ago and phase 2 of their release is to provide source code to potential developers. http://www.lightworksbeta.com/ Windows only at this time. Sorry.
-
That is looking awesome Marcos. Dare I say much more than I anticipated!
-
Here is something of an extension to Robert's Project file. The attached Project file consists of 5 (very) rough poses. These poses are not fully refined but form a starting place from which to work. There are several things which you may find worthy of noting here: - The Poses are set on Frames 0, 1, 2, 3 and 4 - The Chor length (in this instance) is set to 3 Seconds. - Stretching these 5 poses out from 5 frames to the full 3 Seconds (90 frames) would have Shaggy moving but not 'animated'. This is the point where the ideas of animation really start to form and transform mere movement into motivated performance; character animation. - Perfecting these (storytelling) Poses helps determine how the final animation will read. Proceeding on before these Poses are finalized will likely produce frustration, especially if anyone else has to work with the scene. For instance, if the hands aren't properly placed on the door handle... if the feet don't stay planted firmly in place. Smooth and effectively communicated animation begins here in the Blocking/Posing stage. TaoA:M's earlier exercises deal with creating strong Poses that 'read' and yet those who work through TaoA:M often treat each exercise as completely separate, as if they have nothing to do with each other, when in fact they've set in place the building blocks with which to proceed. At this stage it will be well worth the time to consider what will be moving and what should be steadfastly stuck into place. To my way of thinking these Contact Frames are critical to the scenes timing and therefore need your undivided attention and emphasis. Consider also where each item is coming from and where it will be going to in the scene. Rather importantly, these contacts form the timing of your animation. If you need to snyc your animation in any way (sound track, music, lipsyc, dancing to a beat, etc.) you'll be needing this. If Poses and placement are the keys to effectively timing your animation (and they are... literally) how something moves from one place to another is the where the actual animation will be. It's the interpretation, interpolation and inbetweening (the spacing) of the scene. A thought for your consideration: In traditional animation we could probably get away with having three keys but with CG it helps to have five in order to assist with our analysis during playback of the scene. Note: At the last minute I adjusted the first frame of this project file (frame 0) to have both of Shaggy's feet on the door. Originally I had him posed with one foot planted on the ground and one on the door as if he was in the last stage of stepping up onto the door. My rationale for the last minute change is that it'd take Shaggy a lot more than three seconds to transition and then finish out the scene. The_Door__s_Stuck_ShaggyAtDoor__5_Poses_.prj
-
Only if you compress them in a .zip file. .MOV format is acceptable and preferred for uploading movies to the forum. There are several reasons for this but I confess I don't know them now. One might be that AVI isn't a online streaming format... so it to be served up by the server in a different way... retrieved from the server but not for viewing... only for downloading. A small quibble: It's free to download.
-
I sympathize with you. Long long ago... after my boss promoted me out of job I looked forward to doing every day to one dealing daily in the deepest and ugliest elements of human nature, my boss asked me, "So, How do you like the job." My reply was along the lines of, "It's a love/hate relationship; sometime its the best thing that ever happened to me and sometimes it's the absolute worst." (Actually, I probably said, "Chief, it's a love/hate relationship." and he supplied the rest of the conversation. He knew exactly what I was talking about. I'm glad your wife is supportive (if not sympathetic) of your need to pursue something you enjoy doing so much. It's sure to be a sacrifice for her, so remember to thank her in little and big ways, often. ...and smile a lot.
-
You could accomplish that by selecting the forearm bone and moving that forward. That will make Shaggy's arm muscles appear to stretch against the pull of the door. This is an effect you cannot get by merely aligning Shaggy's arms and placing his hands on the door. The other classic method is to animate the Door knob being pulled outward. Either way the primary gain to be had is a sense of weight, solidity and force. In traditional animation this is often accomplished by drawing straights verus curves. In this case the straights being observable in the upper arm, forearm, hand and doorknob being pulled. While the curve is demonstrated in the curvature of Shaggy's hips, spine, neck and head as he exaggerately pulls back and yet somehow... ridiculously... still fails to open that C@#$&! door! Added: Nice demo Robert!
-
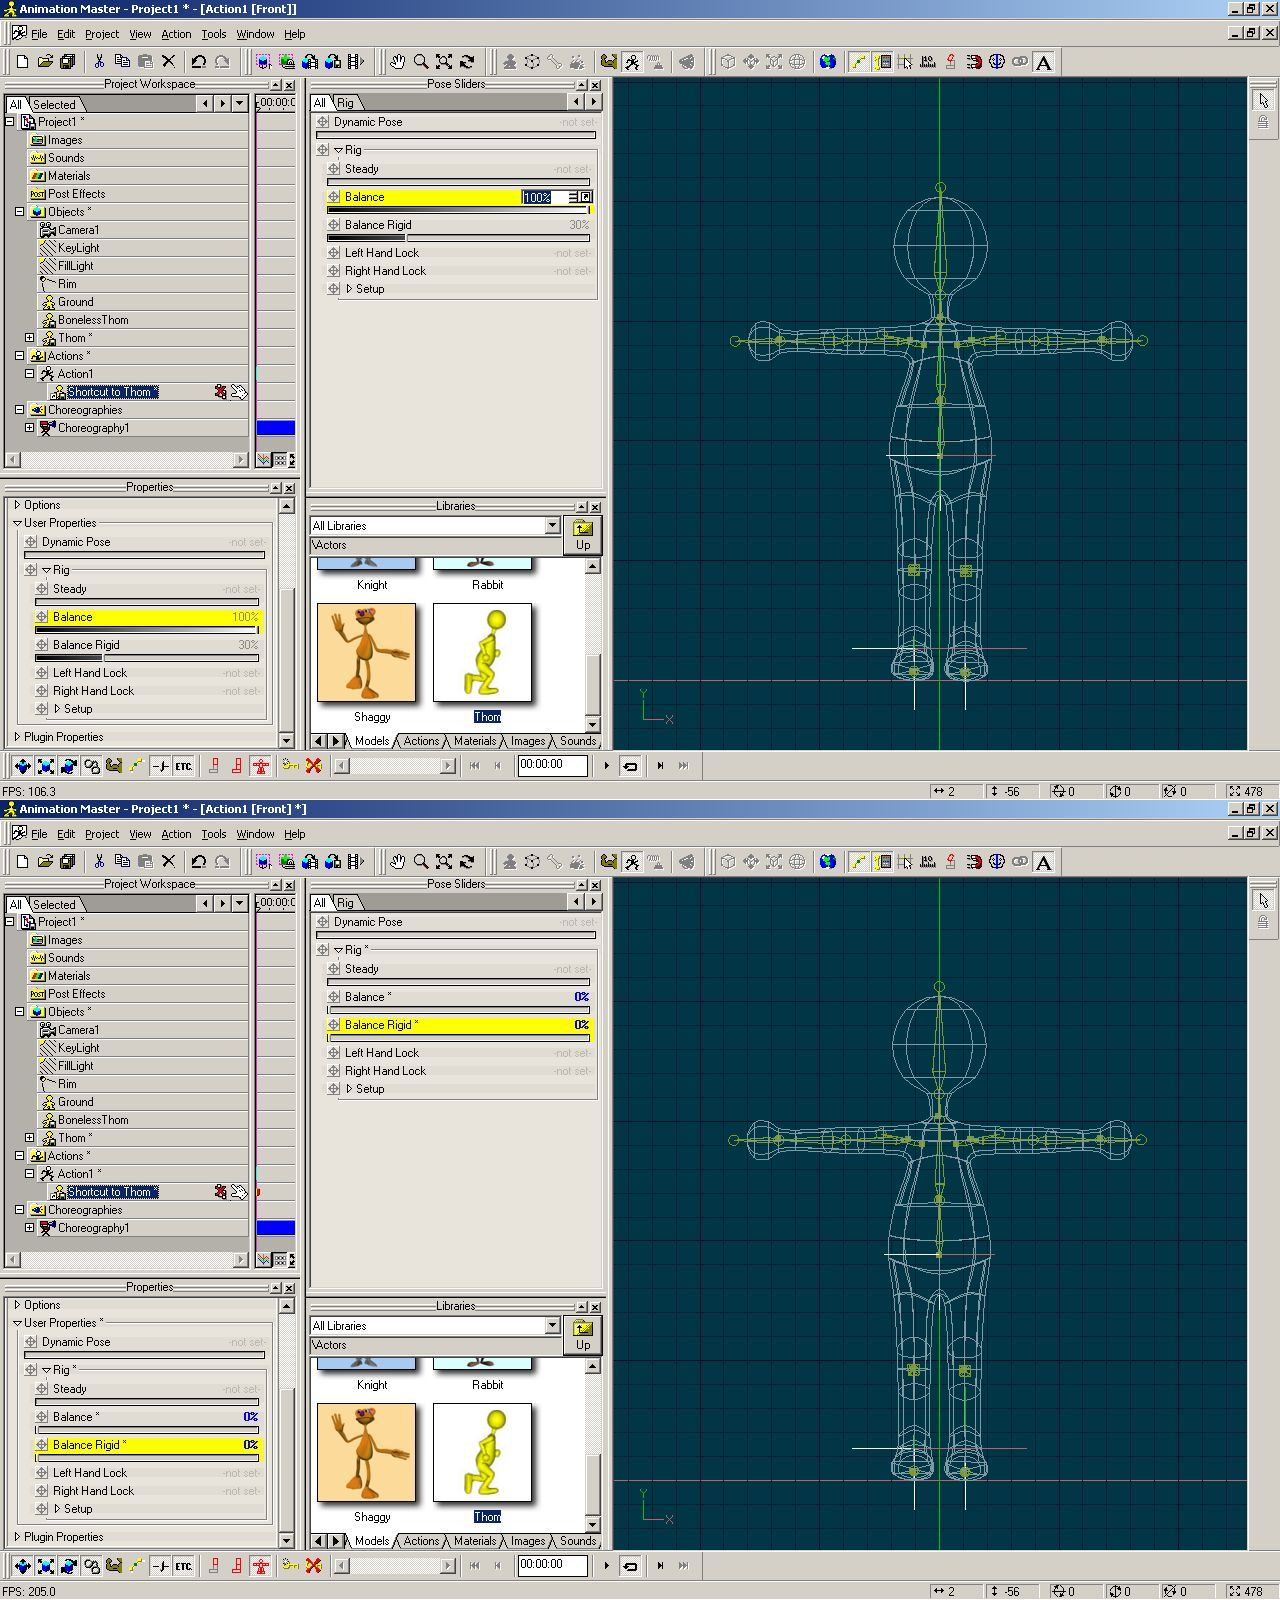
It is likely you have run afoul of two Pose Sliders that control the balance of the character. They are named Balance and Balance Rigid. You'll find them under User Properties in most of the characters used with TaoA:M. To locate these: - Select the Character in the Project Workspace - Open User Properties - Open Rig - Adjust the Pose Sliders to 0 Percent on Balance and Balance Rigid. This should free the character up to (properly) defy gravity. In the attached screen captures I've used Thom but Shaggy's setup should be similar.