Search the Community
Showing results for 'snap to surface'.
-
Thanks, chaps. Zack, I decided to keep a shade of blue for the color scheme. In the end I want a number of these characters, each with their own outfit/hair/hats/colors. But it was good to experiment with it. And ja, I need to do something with his surface. I tried to make each eye with four regions - brow, cheek, upper lid, lower lid. Each spline in each region is controlled by an individual up/down slider taken from a master squash pose. Apart from some odd creases, it seems to work. In the very beginning I lathed him, Modernhorse. Then I did the "draw an outline and extrude" trick for the eyes and made the mouth spline to spline. I'm really learning a lot about modeling in the process, so his mesh is (to me) a mess.
-
Lol, I have a Mini Cooper S and I don't think that the spokes on my wheels are even that thick. I think the wheel looks great. What about displacement maps? I don't have any real knowledge of them, I only know their basic function. I suppose that the edge surface would have to be VERY patch heavy to allow for displacement maps. Just a thought, Wade
-
I don't think bump maps are up to the challenge of simulating such sharp edged features as treads. At least not at an arm's length inspection. However they do work well for the softer sidewall details. Tread pics I've found that the problem with modeling treads with splines is you can't make the sinusoidal edges of the tread edge too sharp (by reducing magnitude) because then the overall curved shape of the tire surface starts to break down into individual facets. After a few weeks of experimentation, the fairly smooth treads shown in the above example were my compromise solution. There is still some creasing but I find it tolerable. As shown in the third example image, I also tried to model the style of tread that has individual, interlocking tread grippers that I found on an adandoned tire in the nearby woods. It avoided the facetting problem but the tire model alone was 2.6Mb. Even I can't justify that level of overkill. If you're still interested I can send you a chunk of modelled tread and you can play with it yourself. BTW; I hope the body of your car is made of a new light weight alloy (styrofoam? ) because your spokes look kinda thin to me.
-
Nice work, Carl! If I may offer an odd suggestion, I would recommend that you don't animate a thing if you're making a modeling reel. Not implying that the animation is bad, 'cause it's not...some of it is quite good, actually..., but for a modeling reel, the people watching it generally don't care to see it animated. In fact, animating the models may actually be a distraction. Reviewers want to see the detail of how the model is built, and it's tough to focus on specific areas when it's moving around a lot. Some of the other suggestions already made are quite valid. Definitely show wireframes, and show more texture...sometimes a modeler is also called upon to texture their creations, so a progression from wireframe to shaded to textured is quite appropriate. Another tip re: the typical "turntable" shots. Instead of having the camera move around the model (i.e. your dino head), rotate the model and leave all else static. The problem with a moving camera is that by the time you get to the rear view of the model, the lighting is such that the detail can't be seen. By treating it more like a true turntable, where the model is on a rotating surface and the lighting and camera remain static, the full detail of the object can be more clearly presented. Keep at it!
-
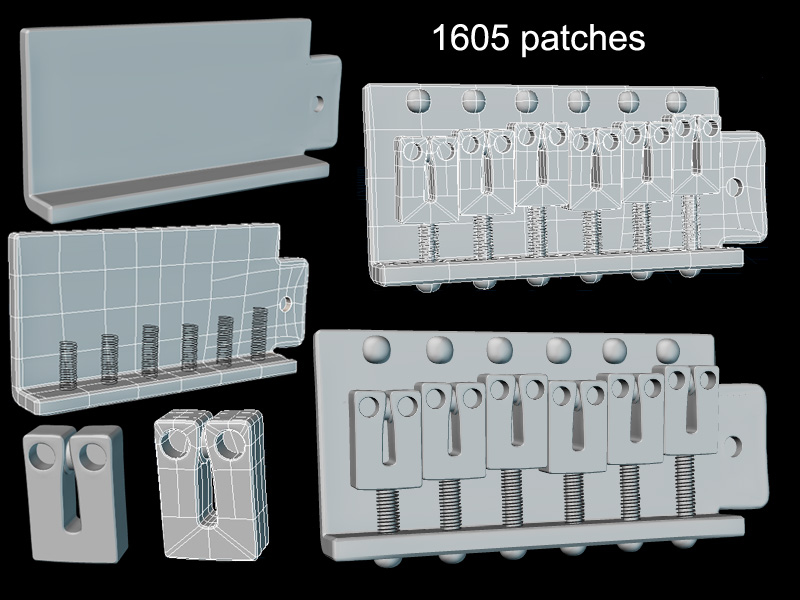
Ok, finished the bridge. I'm really enjoying this. The design is basically that of my own, except I modified it slightly for aesthetic reasons. No materials (other than on the springs) have been applied. Despite the already high patch count I'm starting to really wish I had the grooves in the screw heads. I may use a bump map is I find it works well. I haven't modeled the whammy bar yet, but the hole is there. I hope the pictures are pretty self explanatory, as a lot of the modeling process was similar to (although notably more complicated than) previous pieces, I will not go into extreme detail about the process. Pieces (I don't know their real names): Keys Pretty simple, I used a similar outline technique as before, making sure to bevel every surface. There are two holes that are in every model I have ever seen, although the reason is unkown to me. inside there are little concave wheels for the strings to roll on. Bridge This was a little bit complicated in its construction. I started out wit a pre-beveled, 4 point spline which I extruded all the way around the shape of bridge. Then I made an outline for a hole in which the whammy bar will go. I later filled it in. One difficulty was dealing w/ some peaked/smoothed issues. In some places I had to go with a peaked spline that's bias was tweaked on one side. This is a last case scenario for me, as tweaking biases for perfect bevels is not easy, and can get bad results. There is probably an easier way for all of this, but it worked. From the looks of it, other than possibly the body, this is the most complicated piece, modeling wise. I'm not sure what I'll model next, I may just knock off some of the easy stuff, like tone and volume adjusters, tuning keys, or the neck. Hope you've enjoyed this or learned something. Hopefully I'll get something else done either tonight or tomorrow. Cheers, Zack EDIT: The total number of patches for all the pieces I have modeled so far is 2071.

-
I sent it in to Support, but I went in and took the transparency and brightness keyframes out of the emitter, and just use the alpha channel of the hair image to control tranparency and that worked... Now I have another issue where I have this character riding in a car that has a reflective surface on the body. I crash every time I try to render to file. I can turn either the FuFu or the car inactive and either will render to file. but if both objects are active it crashes... I sent that project into support as well. hopefully my client will be understanding of why I can't finish his project... I stayed up till 4:00am trying everything I could think of.
-
You know what I am dieing to see? Some very subtle deformations of the paper poster. Whenever I do paper stuff like that I always put in enough splines so I can put in very slight surface changes. And also a slight bump map might be nice. It really adds to the realism. It just breaks up the "perfectness" of the image. I love where you are going with the lighting. Nice mood. Vernon Zehr
-
Windows versions can be found here: 2004 CDROM (Orangutan) dongle (HASP) Version Multi-User Dongle Version FTP area V11.0 Features V11.0 Online Technical Reference V11.0 requires dongles to be programmed for year 2004. If you receive a hasp or "No Authorization" error you will need to have your dongle upgraded for the 2004 subscription. Contact upgrades@hash.com for more info. Run the RUS Utility to get your HASP ID#. After receiving an update code from support@hash.com you can use this utility to flash the HASP. ----- Fixes since last version. Fixed setting action shortcut repeat to non integer values {Steven Potter} Fixed Sounds not starting a the begining of an action {Bob Freeman} Made hair density be in hairs per square cm. New values are larger than old values but the density remains the same. Fixed hair and with render as lines in same model {Bernd} Increasing the number of control points on hair after grooming correctly saves farther grooming. {Stephen Millingen} Hair with modified length at the guides automatically makes longer softer and shorter stiffer than default. Surface constraint now ignores hair systems. {Paul Forwood} Z-buffered hair no longer ignores cast shadow flag on Hair system. Cast shadow flag on Hair systems defaults to ON. Z-buffered hair viewed with strong perspective does not have small gaps between polygons. Final rendering of reflective hair works correctly, no more stray polygons. {John Keates} Rendering of hair with transparency does not get progressively slower. {John Henderson} Rigid body simulation does not crash after finishing. {Michael DeSantis} OrientLike constraint with enforcement Grooming guides stay positioned as groomed even if hair dynamics are ON.
-
Andrew, Nope, the whole eyeball, iris and all, rotate together. I've setup poses to expand and contract the iris/pupil. What "textured part" are you referring to? The only thing that's textured is the iris. --edit-- BTW, the eyeball is not built to normal human proportions. In humans, the iris/cornea takes up about 1/3 of the front surface... This one is more like 1/8th or so because of the look I wanted when re-building Clay.
-
I work for a hospital equipment planning company (for now) and am constantly looking at medical supplies. Most of the time they have a simliar layout. I'd like to see it rendered on a flat relfective surface without the background material, which may also lower your render time. You can apply the logo flat-on with photoshop. Maybe do a radiosity render with a high d.o.f. Good start none the less.
-
Ha! I can finally answer a question! It's because you're using Z-Buffered shadows. IIRC from another thread, Z-buffered shadows need to hit TWO surfaces before they cast a shadow; since in the real world, everything has thickness, this usually isn't a problem. However, it looks like your cape is only one surface, not two, hence... I found the appropriate link: http://www.hash.com/forums/index.php?showt...indpost&p=18572 Try using raytraced shadows and see if they work. I love the look of your characters. Fay (v2)'s face seems different than the first design, and I like the first version better. I think it's a question of eye proportion... but that's just my opinion.
-
I've been working on this metal flake material, in v8.5, in my spare time. I really wanted to capture the sparkling quality as the perspective changed. I rememberd a tuturial by Charles Babbage: "Diffraction Grating 101", where he used a multi-gradient tree for specular accents. I figured I could do the same thing for a whole material by adjusting the "edge surface" property, by rotating you see the same material slightly offset with some colors attributes switched, giving it a twinkling appearance. Still needs a little work. Metal Flake Test .MOV If someone would like to repost, please do so. (low, low bandwidth) And incase your wondering "Why did he need to use metal flake?" I've been working on my stick-puppet coverband, "The Rinds". This is going to be an ever changing project, always growing...Growing...GROWING!!!
-
Here's an update. I put cog/fan bones in his left shoulder and hip. All the cogs are driven by smartskins. So far, I like this way of rigging the joints; Between the bones and muscle motion there's a lot of control over the surface. Rhett
-
Hey all, it's me again. This time, the problem is the eyes. (Yay that he has eyes at all! Now then.) Many of you know about the rabbit model in the Hash CD library, the one with the unusual eyes. The eyes are spheres in the model window but transformed into oblong cartoony eyes in all the relationships. The clever modeler/rigger made the eyes such that the pupils adhere to the surface of this irregular eye and still move to track an eye target. My Robot The Finished Rabbit The Rabbit in the Model Window See what I mean? I want to get that effect with my robot's eyes. The right eye of my robot (his right, your left) is just something I made to fit the socket so I could sculpt the socket and deal with this problem later. Now is later, and I would like to know if anyone knows how this was done with the rabbit model, so's I could imitate. Thanks for looking. ** EDIT: Wait, why am I asking this... Noel already answered it for me. Duh. Forgive the stupid person. Thanks for looking anyway. I should have more of this guy posted once I finish his eyes and hands.
-
You have to remember that to have a good reflectivity to your reflective surface you have to have something to reflect. Otherwise it will only reflect the edges and the color of you modeling area. Do it in a chor with something in the background a good lighting you should have something.
-
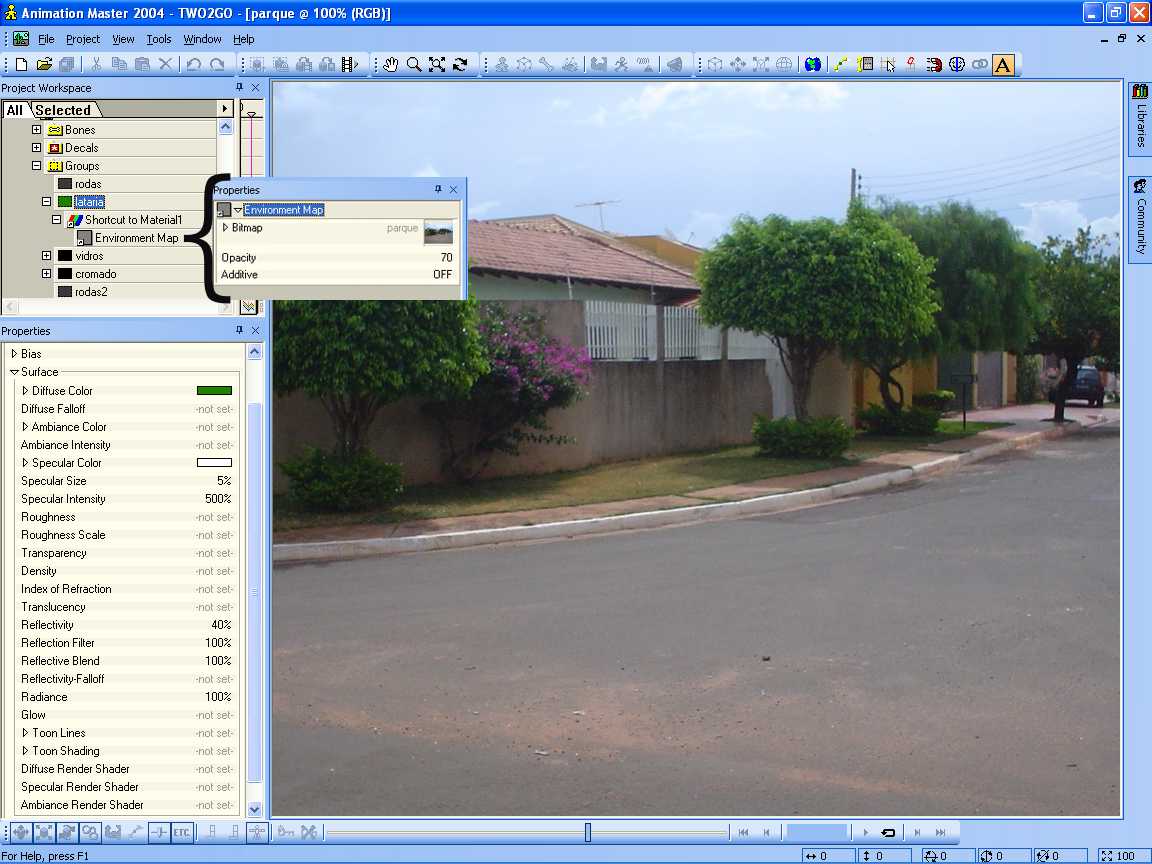
hi scrawntor : Thx ..... i used a very very very basic surface and 1 material ( enviroment map ). these news reflections options are great !!!!!!!!! THX HASH´s guys !!!!
-
Step 2: Test for Depth now invoke the TreeeZ plugin. we are doing this to find out how many levels your tree will have. depending on your target surface and on your locality curve the number of generated levels may vary greatly. the example tree had 8 levels (0=the topmost level, 7=the trunks base) note the number as and reload your saved project
-
another day, and again its 2:00 am and another premiere: target surfaces can now be animated! this example doesnt show it off too well, but it actually uses a rotating target surface to get the twisting of the tree.
-
You might try a modified version of the cartoon eye thing. Where you have a round eye with pupil that you want to track on the surface of the eye controlled by the rotation of a bone from the center of the eye. Then a parent bone to they eye and pupil bones is scaled more in the y axis. This makes the pupil track a non spherical eye. You may be able to treat your mouth like the pupil If my explanation isn't up to snuff, or you want me to hack together an example just yell.
-
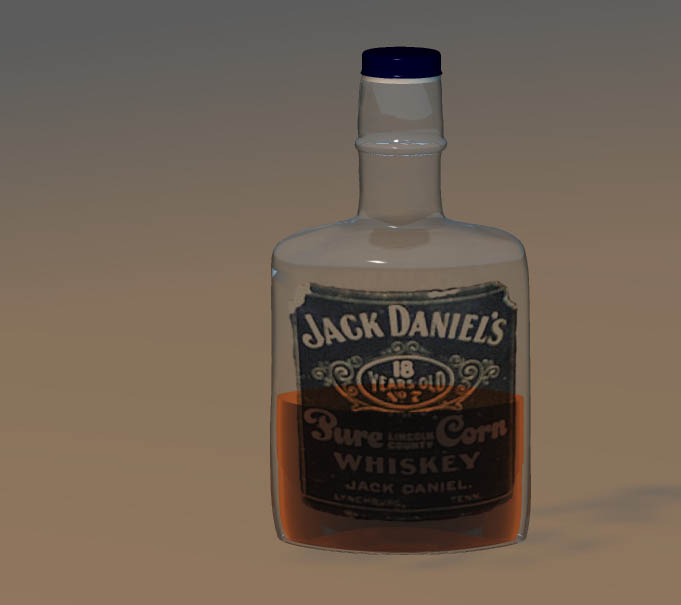
okay,after a couple days of in depth research into the subject of liquor Here's another render with the liquor material and label in place. I'm having a problem with the label. For some reason the white lettering is transparent. I apllied it to just the outer surface of the bottle, it's got an alpha channel out of ps.Anyone have any suggestions please
-
yes. but if you delete the old "base", the groups "level0" through "level20" will be empty. this means, that no new cps can be added by the plugin (this is being fixed in a:m - thanks dan!). so if you want the plugin to assign the cps to the levels (to be easily able to assign hair), you'll have to add cps of the base to each level you want filled. selecting one cp is sufficient (have a look at my example project to see how i did it .. difficult to explain (for me) but actually very simple ..) the model is actually created in the MODEL. the action is just used to get the curve controls (and soon the target surface animation). so you can just select your tree, copy it and insert it into a new model in your desired project. Aha! That's why I saw just the one CP light up when I clicked on the different levels in the PWS...makes sense now. Question: What happens if you add more or delete levels? Will the treeZ generate more or less branches (yes I know it does this based on target CP's, but what will happen otherwise)? And, thanks for the info on the model. Simple and should have thought of that, but being at my current day job (until we get the game studio off the ground) and using an old Dell drains any creativity from me...no matter how simple something is. Can't wait to get home and try this on my Mac!!
-
yes. but if you delete the old "base", the groups "level0" through "level20" will be empty. this means, that no new cps can be added by the plugin (this is being fixed in a:m - thanks dan!). so if you want the plugin to assign the cps to the levels (to be easily able to assign hair), you'll have to add cps of the base to each level you want filled. selecting one cp is sufficient (have a look at my example project to see how i did it .. difficult to explain (for me) but actually very simple ..) the model is actually created in the MODEL. the action is just used to get the curve controls (and soon the target surface animation). so you can just select your tree, copy it and insert it into a new model in your desired project.
-
Looks Great! I still detect a problem showing the lack of gravity. Google the web and find some Nasa footage. Once you see some of the astonauts "hopping" around, you may have a better feel for animating. But... Overall, I think it looks very good! I like the lighting and lunar surface! Keep up the good work! Its coming along very well!
-
...and well you should be proud! I like! My milk jugs don't have as deep a dent though... *(For Ken) Mine usually do have the dent though... There are probably several reasons for the dent. One guess would be to increase the surface area of the jug to keep the contents cool. My conspiratory mind first thought it might be to make it look like a bigger jug than the competition... but a gallon is a gallon...I guess. As Sigmund used to say, "Sometimes a milk jug is just a milk jug". Are you gonna decal it with a label?
-
Great tips Zach! Didn't know all those.... Q: If you make 2 separate groups with the one patch and set the surface properties of each group differently which group will take precedence? A: The group furthest down the hierarchy line in the PWS(Project Work Space) Also, the best way to make a clean patch is to draw a line and extrude it. Then you can shape it. Here's what support says when you only have 2 groups: "when you've only got two items, drag the one you want to re-order, directly on to the groups folder"