c-wheeler
-
Posts
855 -
Joined
-
Last visited
c-wheeler's Achievements
Prolific (6/10)
0
Reputation
-
It may be worth posting your system specs just to make sure its ok. But I'm fairly sure its a modeling thingy- you could consider posting the project so people can see- or at least some screen shots.
-
---encouregment mode---- As an instructor you will understand that the more you practice, the better you get and to try not to be discouraged if you cant do everything you want to straight away -it takes a lot of time and effort to be a virtuoso. I have been animating for some time and there are lots of things I still dont understand -I just know a bit more than when I started. ---end encouregment mode---- sky & ground The ground colour is just the default colouron the lights - try shortcut to rim/colour/change it. In the default mode in the choreography window the "sky"is just the background colour of the camera open the CHO window, go to cameras,background,click on the colour and change it.For further effects you could try importing a picture into am, then dropping it onto the cho as a layer. You can then manouver it around till it looksa right -experiment -use google heres one I found on layers http://www.mossor.org/Desktop/Tutorials/Layers/layers.html Lighting is a huge concept.The three lights in the cho system is,suprisingly, known as three point lighting- try googling....http://www.3drender.com/light/3point.html explains it well.Digital Lighting & Rendering By Jeremy Birn is one of my most thumbed books Cameras: Tutorials try googling cinematography tutorial Render to fle/format/quick time movie Chris
-
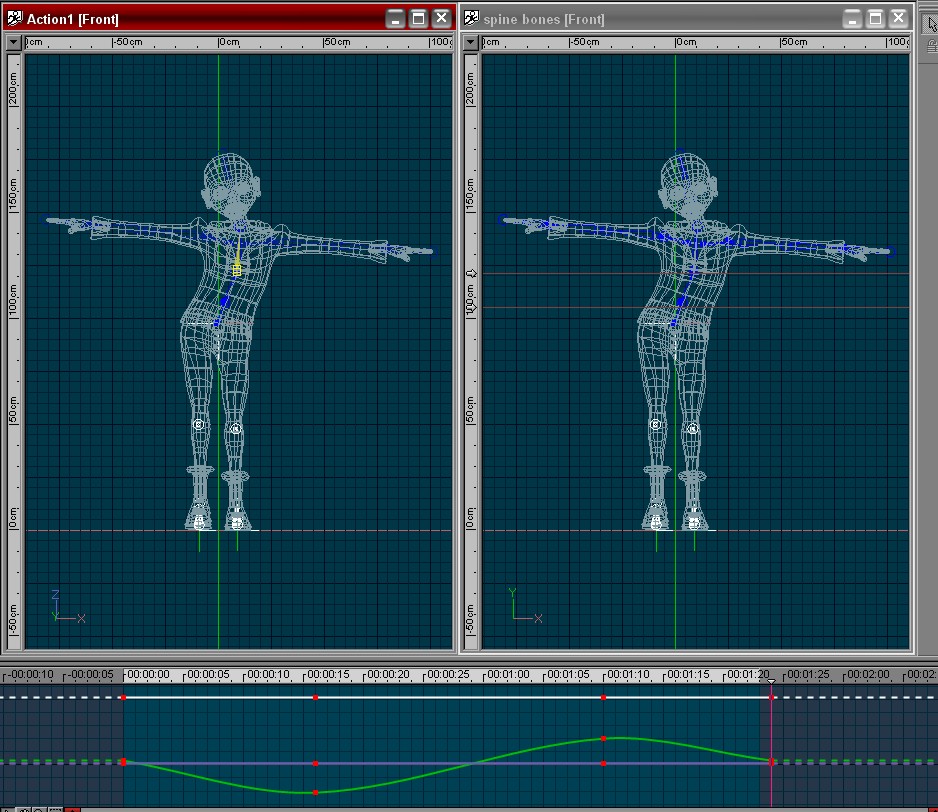
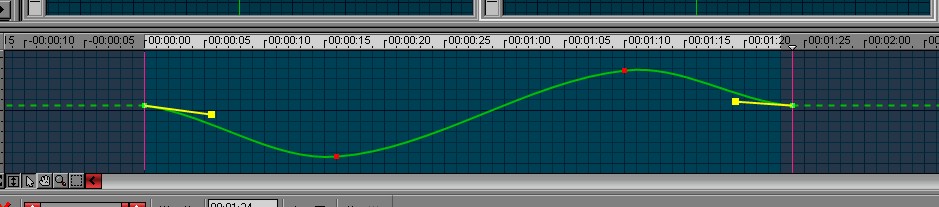
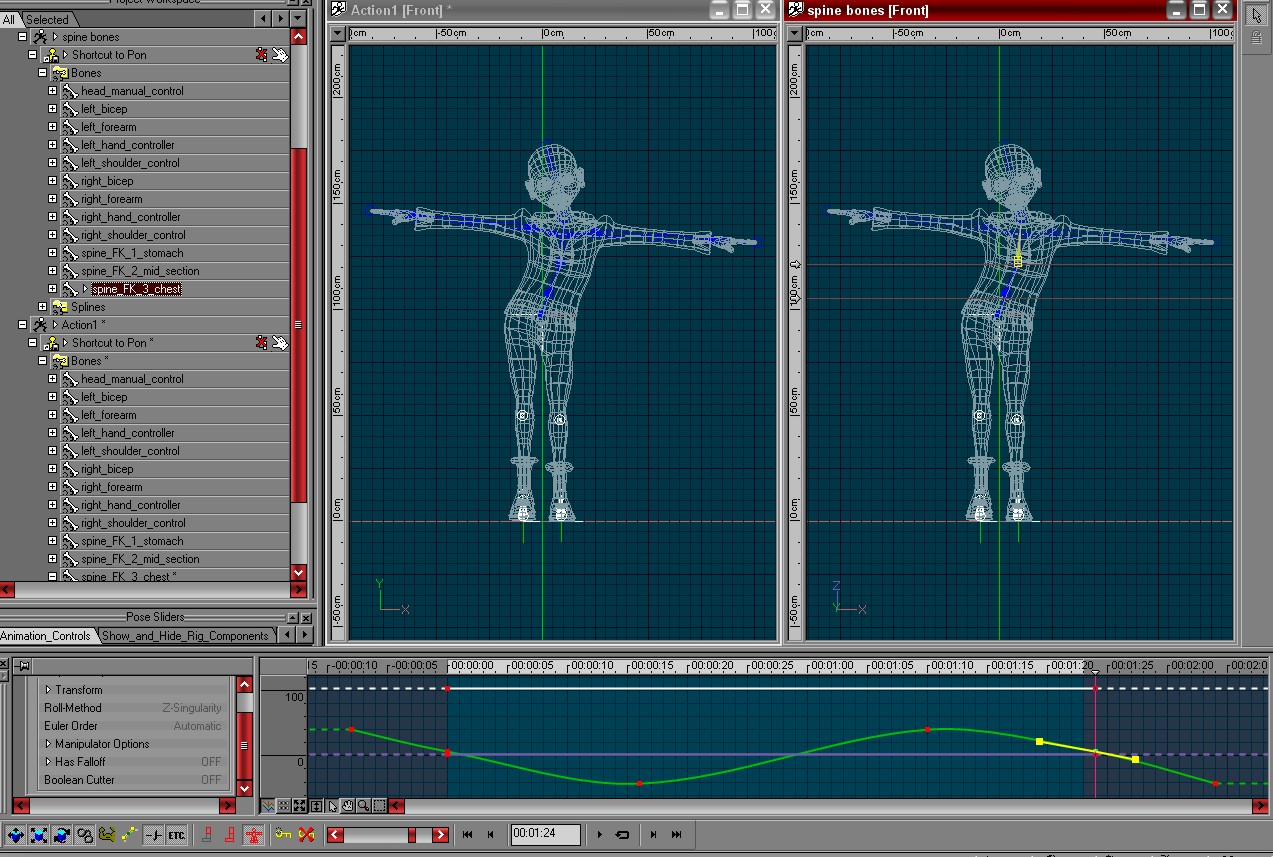
I read both answers to this question, and it took me ages to realize that they were both almost saying the same thing. I think,though, that the prize for the most succinct answer should go to Vern. But.... Sometimes you get a pop on an action cycle caused by differences in the entry/exit position on the motion channel drivers(time line graphs).If we look at one bone in an action cycle I can illustrate what I mean. In the first picture,Action 1 was made using copy/paste in the normal way.It lasts from 00:00 to 01:24, with 01:23 being the set range end. If you look at the entry and exit angles for the bias handles on the Y axis motion channel on first and last point in the time line graph on the second picture, you can see that the angle made does not match.In a cyclic action this can give an annoying blip at this point-specially if its something like the hands or feet in a walk cycle. The second action is almost identical, but without the blip.This was made by copying the first 16 frames to 01:24, and a sort of reverse process from frame 00:00 to -00:08. The motion graph now approaches the cp from both sides in the same way.If you just key the bones at their position on frame 00:01:23, deleting all the keys on frame 00:01:24, you still get the spline problem. Feel free to ignore this, its subtle,and comes under the heading of "Tweaking"

-
I prefer 3 as well. I am not a great fan of heavy black lines - but it depends on what everything else looks like Chris
-
Thanks for that,Caroline. I usually just click "show normals" then spend ages peering at the little yellow pointers trying to establish the direction on tiny curved patches. This way is much easier. Chris
-
Customer support can do amazing things - they have rescued model files for me in the past. Of course theres no garantee. but it might be worth a shot. There are a few add ons that back up am to a seperate drive or folder available. Prjsaver.exe saves numbered versions of a project to a seperate file, and saver.exe,although written for AM will save multiple versions of any file on windows. Chris
-
Why not make one -its fairly simple.ditto with the bed. Also requests for help are more likely to be granted with sweetness.Saying"whereisone" will not get me looking
-
Rusty has a great in-depth am/photoshop tutes on his website:- Facial skin mapping technique Chris
-
I had no idea you could do that. Thanks for the tip Chris
-
Perhaps posting a screenshot would help. Chris
-
You could try something like sounddogs, or there are lots of links Free sound effects another another one Just do a search Chris
-
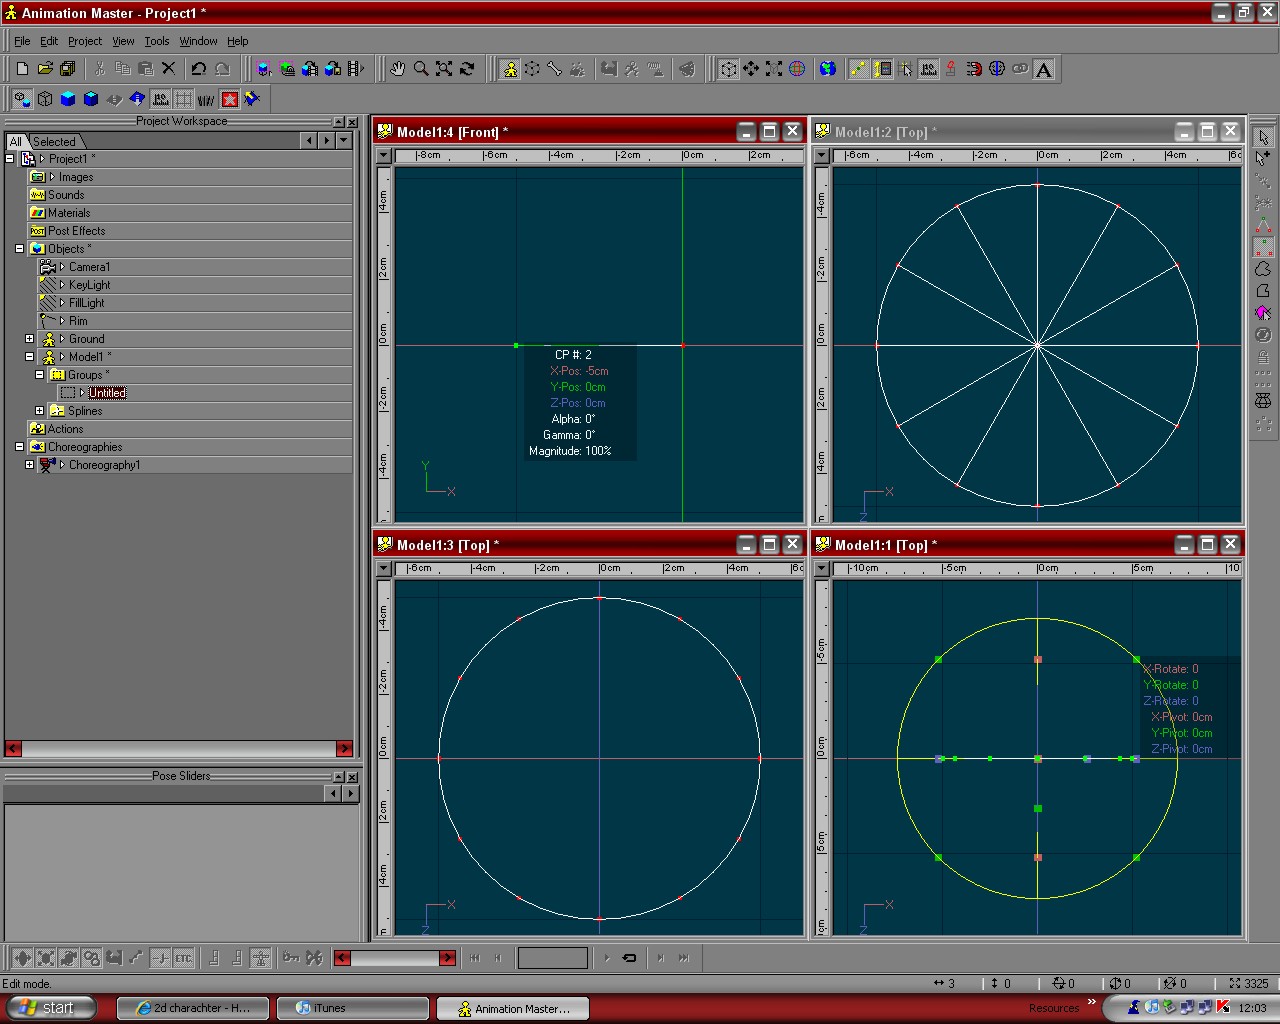
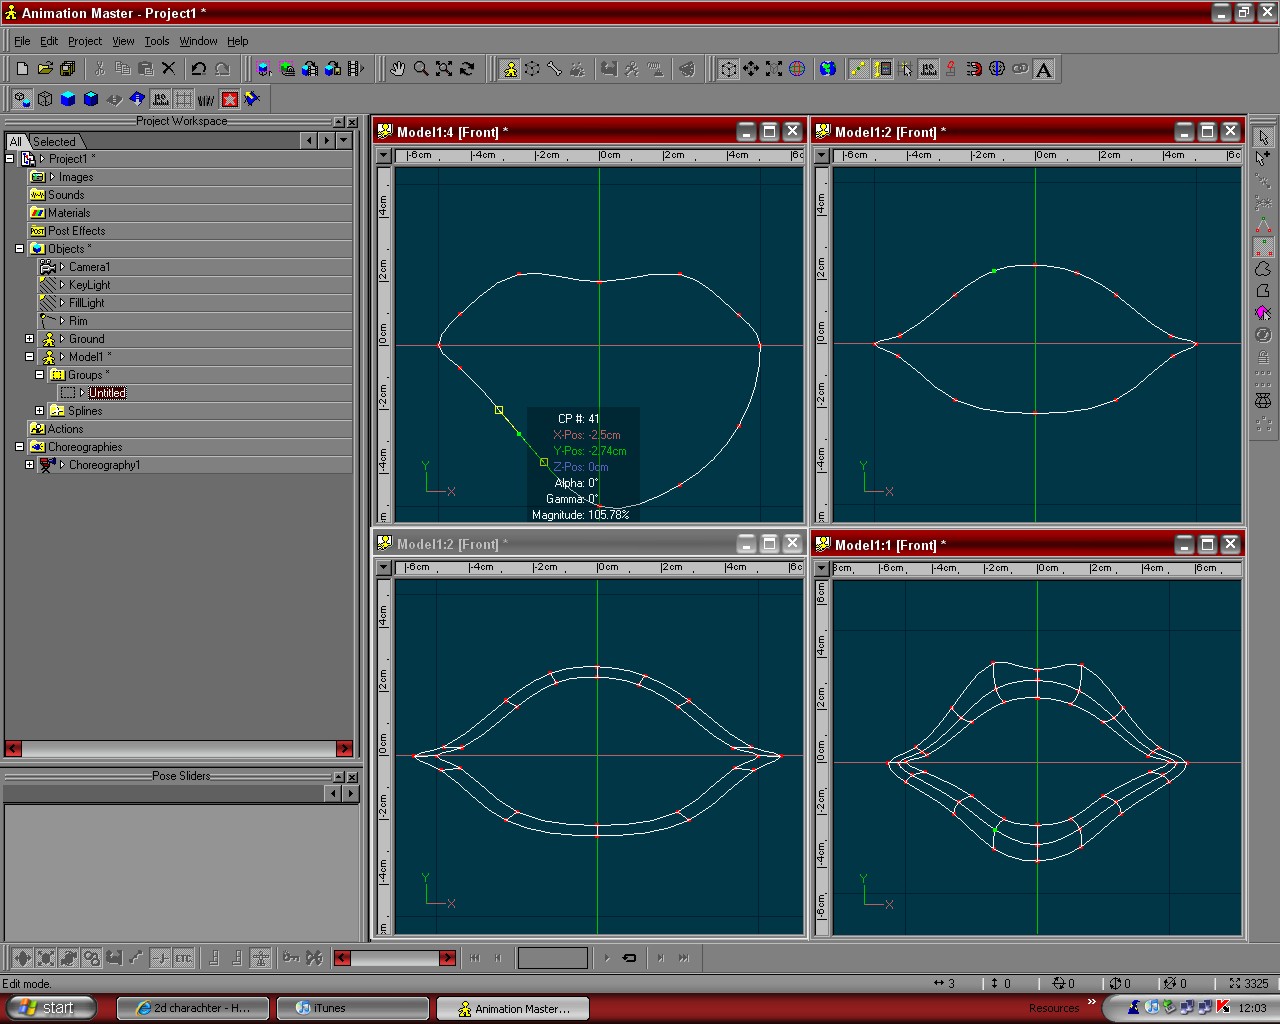
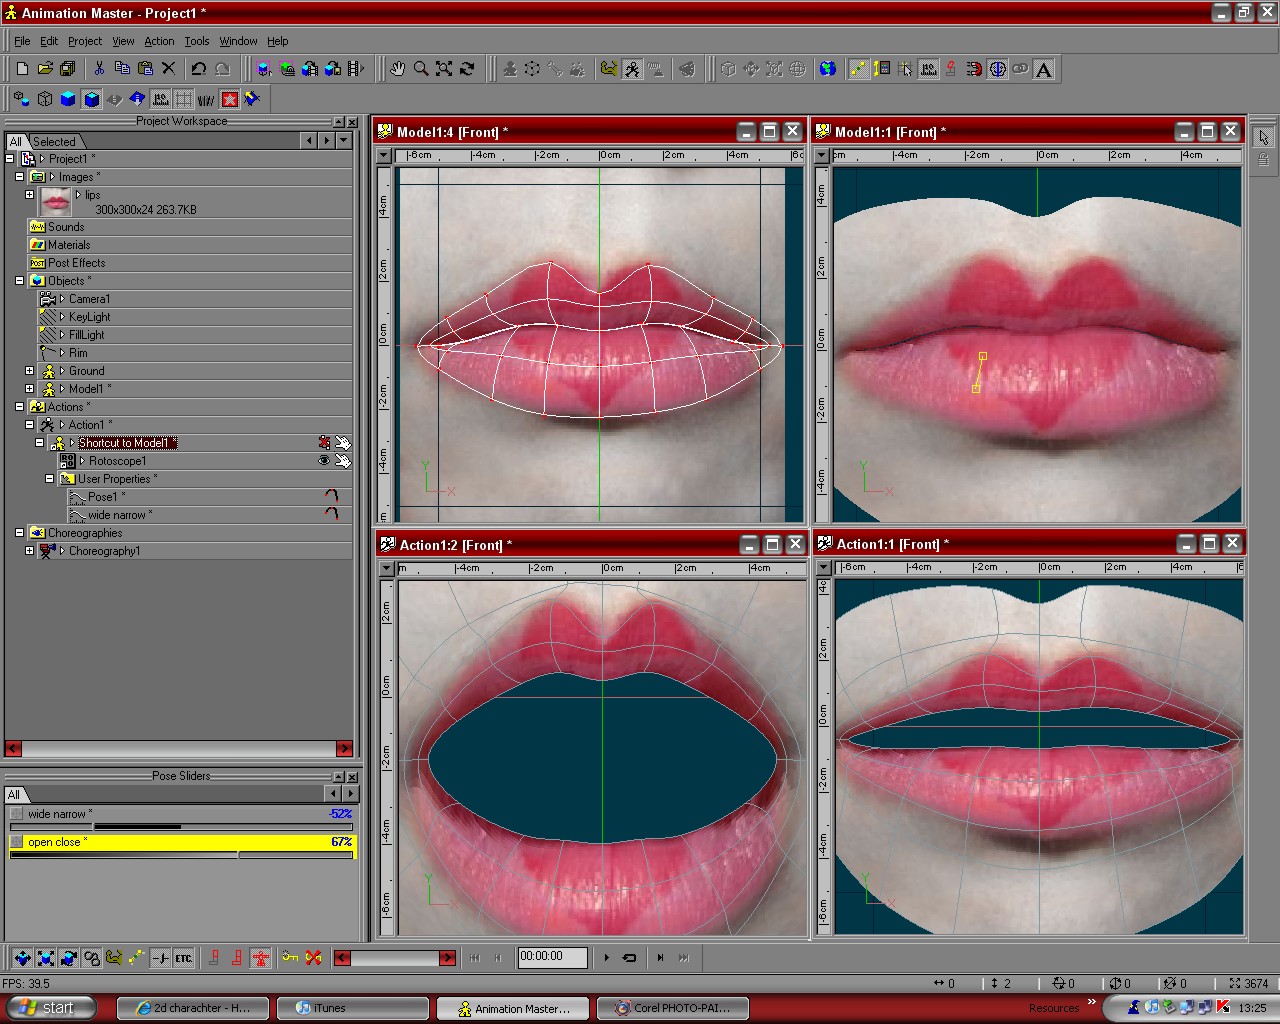
Heres my 2cs worth. I'me sure theres many ways of doing this, but here's one.Apologies if its too simplistic Step 1. View from above.Start with a 2 pt spline. Position 1 cp at x=0,y=0,z=0(Use "show manipulator properties" in the toolbar.Put the other about 5cm on the x axis. Step 2 Open tools/options/modeling. Set Lathe cross sections to 12. Lathe the spline Step 3 Delete the center Step 4 select the spline, press "r" for rotate, rotate 90 degrees in the x axis. Step 5 View from the front.Hit "mirror mode" and work on one side of the mouth.Constrain cps to "y" axis by pressing shortcut key "2"("1" is x, "3" is z) and push up or down cps to achieve a nice shape.If I wanted a 3d mouth I would also use "3" and view from the top. Step 7 Hit "mirror mode" again to turn it OFF.Select the spline and extrude. Hit lock, then select spline.In the PWS, select the untitled group in your model and scale in the x/y axis seperately using transform/scale.Hit "mirror mode" once again to turn it ON.Again push the cps to a nice shape. Step 8 I added two extra rows of splines in the top lip and 2 in the bottom.Select the top lip and make a group. Do the same for the bottom lip to help with poses later. Step 9 and 10 If you have a rotoscope, I would use it to help position the splines in their final "bored'" closed mouth position(Dont wait till now - use it before is better).Here I found one one the internet and used it as a lip decal as well. Step11 and 12 You can create poses now. I made one for open/close and wide/narrow as a quick test, but you can make any of the Preson Phenomes I've included the prooject file Chris lips.zip
-
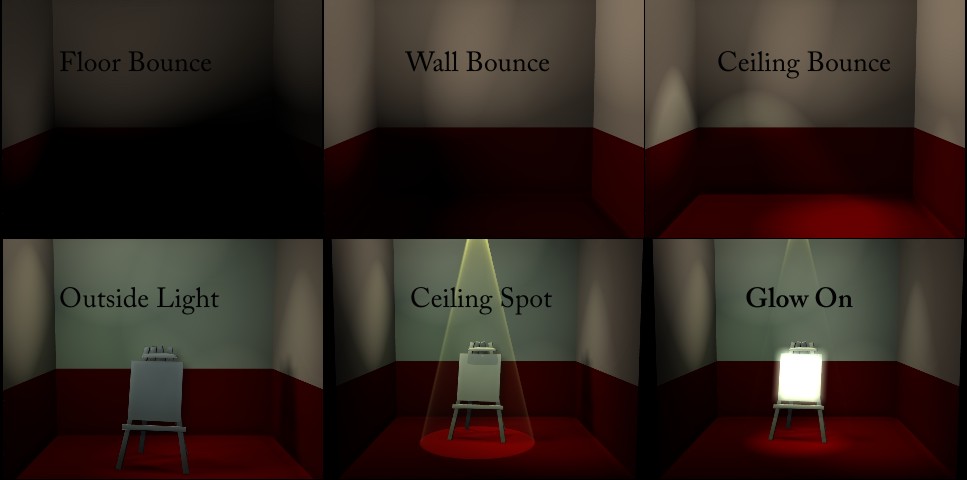
This is just my opinion,and only offered for adice, and as a base to work from, not a solution:- Eric2575 mentioned bounce lights, I would:- In Objects,make a new Klieg light, wide angle -about 120degrees,low intensity,say 30%, white colour with 50%fall off.Crank up the width softness to 95%.Turn z-buffered shadows to ON.Set map resolution to 1024x1024. Use this as the base reflective light. Add 2 of these to the cho, just above floor level,pointing at the ceiling. Ensure that the fall off reaches the ceiling.Then add one or two for left wall, and for the right wall. Make these very slightly red and turn cast shadows OFF. Add some for the ceiling, pointed at the floor. Make these the same colour as the ceiling, only much whiter, just a tint.Point these down. Unlike me, try not to get any hard light rings on the walls, floor or ceiling.Just play around till your happy. I aded one more of the bounce lights from the camera side. I tinted this one slightly blue, as if the light was coming in from the outside. A single spot from the ceiling with volumetrics ON. I set this to a Yellow colour(light temperature and all that) I set the glow ON for the canvas Render time was 14 secs
-
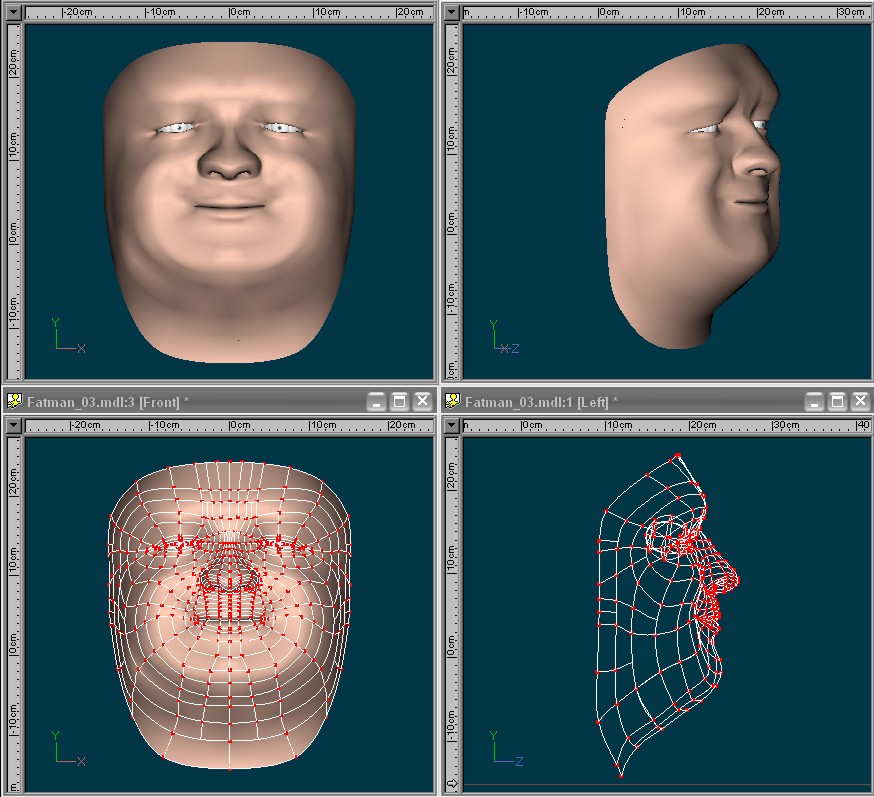
Both, thanks, I just want to know what people think about it. Do you mean the ones on the cheek?They are there to tie in the ears, which at time of posting, looked cr*ppy, so I left them(the ears) out. Do you think they will cause problems with posing? Chris
-
I started this model-no rotoscopes/drawings or pictures by demonstrating to a friend how to construct an eye, then it sort of got fleshed out when I had nothing better to do. Now I cant help but feel I got something a bit wrong, but I may be too involved in his face. He seems to resemble me a lot as well.