Tralfaz
-
Posts
899 -
Joined
-
Last visited
-
Days Won
1
Content Type
Profiles
Forums
Events
Everything posted by Tralfaz
-
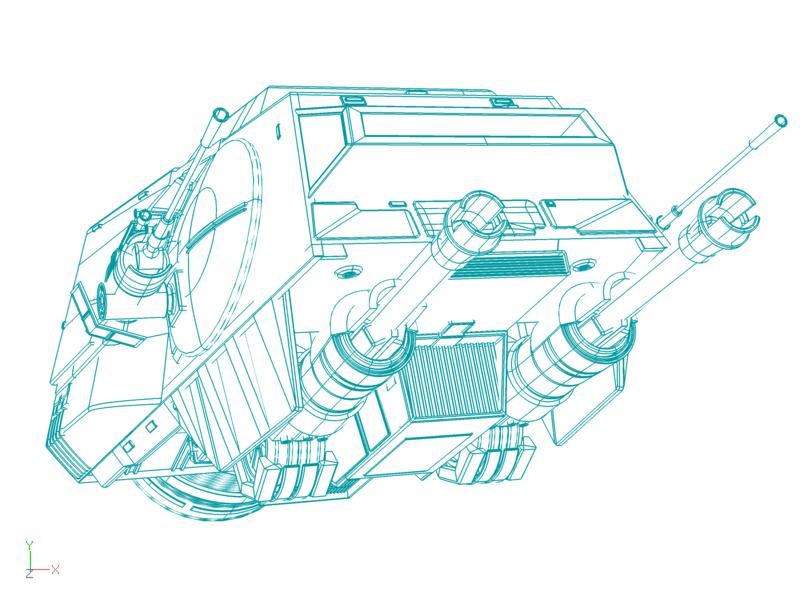
Hey CW, don't sell yourself short. Like anything, modelling takes practice. The more you model, the easier it will become and you will find little tricks and workflows to make things better. One thing that will really help in modelling will be good references (e.g. blueprints, photos, etc.). Largento has been posting some great comic book style tutorials that may help as well. Robcat's tips on your splines are very good indeed. One of the neat things about modelling, is that you don't have to model the item as one whole object. Looking at your wire frame, you might be able to model the body with fewer splines. You could then leave just a hole in the body where the cockpit will go and model a separate cockpit. This may help with some of the creasing. It would also make it easier to model just half of the body, for instance the left side, then copy, flip and attach it to give you the whole body. That way you really only have to worry about getting the splines perfect on one side instead of trying to make both sides match. When you get the hang of working with splines, they can be extremely powerful in modelling. Just takes practice. And it looks like you have got a really good start on working with them. Keep up the good work... Al
-
Gotta' agree with Vern on this one Mark. These tutorials are great and easy to understand. I've learned a couple of new things already from them. So, what's next? (waiting anxiously and trying to be patient) Al
-
Thank you Case and Ken. You are absolutely right about the positions of the legs Ken. The pose was more to test the limits of the rig I created for the AT-AT. Without giving away too much about the story for the AT-AT, I can tell you that the AT-AT has to be, how do I put it, flexible. Here is a quick animation testing the head and gun movements. The movements aren't very smooth, again, testing the limits of the rig. Oh yeah, the laser blasts were added through another software package. C&C always welcome... Al AT_AT_Test.mov
-
Excellent work Mark. Both styles look great! Really looking forward to seeing your characters animated. Al
-
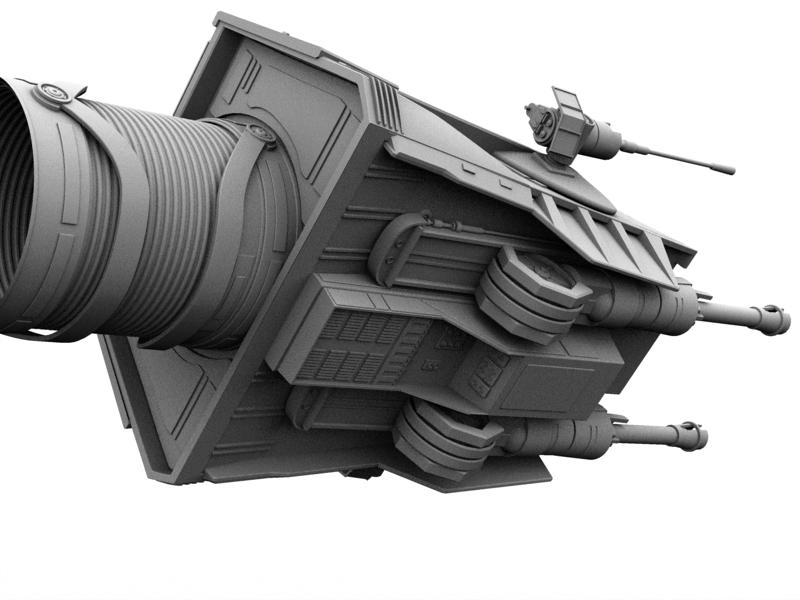
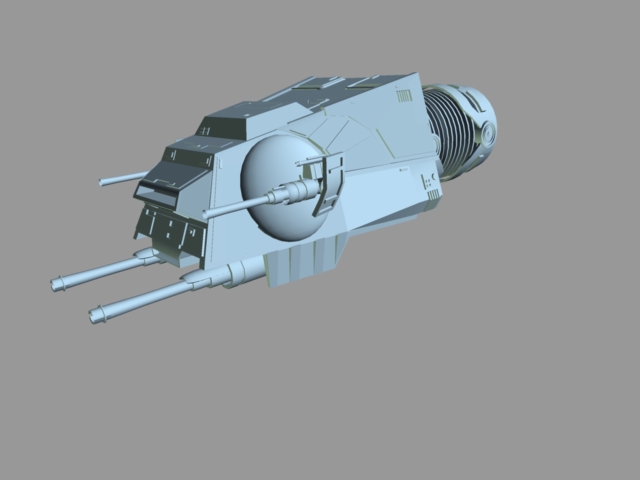
I really do feel honored to receive such comments and thank you all very much. I wouldn't call myself a master by any means, and do not consider myself in the same league as Stian and may others here. The AT-AT is really a lot of straight surfaces with bits of detail added to it. A lot of other parts on it are just lathed splines. Things just fell into place on this model, and as I mentioned before, this is my third attempt at modelling the darned thing! As for how long it has taken to model it, I have been working on this evenings and weekends for the past 3 weeks or so. I checked and my first post was on June 28. I will be texturing the model, something that I am going to have to learn to do in order to get the right look and feel to it. Update: I got the basic rigging done on the AT-AT. There are some other things that I need to rig in order to complete the film, but for now the legs (right down to the toes), neck, head and guns are all rigged. I am posting some pictures of the AT-AT in a pose. Later on (hopefully tonight), I will be posting a short animation showing the gun and head movements. C&C always welcome... Al

-
Thank you photoman. Everything on the AT-AT will be rigged to animate, so I've got all the bases covered when it comes time to do my fan film. Update: I thought I had all the modelling done, but after assembling all the different models into one whole model, I noticed a black area on the rear right side of the body. Will have to figure out what that is. It is not there in the body model, just appeared after assembling the whole thing. BTW, the total patch count is now just under 48,000! C&C always welcome. Al (no black mark on the separate body model) (black mark appears on body when assembled into the whole model)
-
No problem Mark. I am still in the very early planning stages, and haven't even started character development or modelling. All your hard work is definitely appreciated. Al
-
Thanks for doing this upgrade on the rig folks. I will definitely be using it for my characters in the little film I am starting. Al
-
Congrats on solving your Bender problem Andy! He is looking really great now! Look forward to seeing more of him... Al
-
Right now, I am assembling the parts in a chor. With the number of patches that I have, trying to model it as all one piece is just impracticle. Once all modelling is done (hopefully, sometime this week), then it will be assembled as a single model and rigged. Prior to rigging though, I will do the textures on model. Easier to work on smaller individual pieces than one large one. I am glad to have you confirm what I was planning on doing as far as a proxy model goes. Once I have the model completed and rigged, I was going to save it with different name (e.g. AT-AT Proxy.mdl) or something like that. Than, I was going to go to town and remove any patches that were not necessary so that I would end up with a very low patch model. Thanks everyone. Update: Finished modelling the underside of the AT-AT and the top of the rear section. Didn't put a whole lot of detail in the underside, as the drive motors and legs are going to be covering a lot of the bottom anyway. Took a lot of artistic license in the underside as well, although I made sure the grate area that Luke cuts through with his light sabre is there. Kind of off topic, but really funny. Did anyone see the Robot Chicken Star Wars special? There is a hilarious scene where Luke cuts through the grate, and tosses in his little explosive device. What he has cut into though is a washroom and there is a Storm Trooper sitting on the toilet reading a paper and this explosive device gets tossed in with him. Cracked me up. The whole special had me rolling on the floor. Anyway, I am really looking forward to modelling the rear of the AT-AT as there is all kinds of neat little details back there! C&C always welcome... Al
-
Great modelling Eric. Really captures the look and feel of the old ships. I can hear the tapping of the Captain's wooden leg as he walks the deck of his ship, looking down on all the scurvy dogs he calls his crew. On his should perches a parrot. But wait, this parrot isn't moving. He is... dead. No he isn't, he's pining. Beautiful plumage the Norwegian Blue! Oh, wait a minute, that is a different story... Al
-
The more that cgarlick posts, the more that I feel he is posting just to irritate the responsible and mature members of this forum. If he has a beef with Hash, then let him handle it there, and not in this forum. If he persists in bantering here, then I recommend that Hash delete this thread and terminate his user status. If this happened such a long time ago, why dredge it up here now. This is a great forum, and personally, I don't see any purpose in crap threads like this. Al
-
Before this digresses too far into the depths of name calling and bad feelings, it seems you have your opinion and no amount of persuading or comments from the folks here will change it. Your story seems to have a few inconsistencies in it, so I am not really too sure what to make of it. I have the A:M 2007 CD, and if something happened to it, I wouldn't expect Hash to replace it. If the disc was defective, than that would be another matter. If it was stolen, I would try to have the insurance company cover the cost. It was your responsibility when you took your CD to your workplace. As Hash doesn't even offer upgrades via CD anymore, the fact that they would give one to you for $150 is more than generous. If you do decide to go the web version route, make sure you understand what it is you are getting for $50 before you come back here complaining again. The web version is good for 1 year from the time you activate it. Once that year expires, you need to pay $50 for another year and so on. Also, the activation key you get for your web subscription will work only on that one PC. If for some reason your hard drive crashes, Hash will re-issue a different activation key. But keep in mind that you can have it installed only on one PC. As has already been mentioned, the latest version of A:M is rock solid. I started with version 12 and have noticed how much more stable version 14 is and version 15 is even better. No software is perfect and 100% bullet proof. I am a software developer by trade and have used a lot of software over the years, but A:M is the closest thing to it that I have used (except my own software of course ). If you do decide to upgrade, you will find the folks at this forum amongst the best there is. They are extremely helpful and some of the most talented people you will ever run into. Al
-
Since it was stolen at work along with company computer's, see if your company or their insurance company will cover the cost of the new CD. Al
-
Thanks all! I have downloaded over 50 different images of the AT-AT from the internet. Some of the photos are of the actual model, some are of licensed models built from the actual model. Others are from Jas Hodges excellent 3D model of the AT-AT. I am also using screen grabs from the movie and where I am not sure, then artistic license comes into play (so long as it fits in with the look and feel of the AT-AT). No, I do not have an AT-AT myself. The official path count is now... - Head - 11,539 - Neck - 1,630 - Body - 6,940 - Drive Motors - 2,252 - Leg - 4,482 ( x 4 = 17,768) For a grand total of ... 40,129 patches. I can easily see this model being between 50,000 and 55,000 patches when finished. Once this puppy is finished and rigged, I am going to definitely have to make a proxy model for doing the animating. To make the proxy, do I just copy the high res version of the model to a new model, then strip out the unnecessary patches? Update: Finished modelling the front part of the body and the top of the front and middle parts of the body. C&C always welcome... Al
-
Thanks Eric. I am going to be completely rigging the AT-AT and animating it in my fan film. I have had this idea for the fan film for quite a few years, but am only now being able to realize it. Al
-
Thanks Mark. I knew there had to be a way to align CPs, but didn't know how to do it. I was always manually trying to align the little suckers! Very time consuming and really monotanous. Al
-
Thanks Rodney. There have been a few good tutorials lately on the forums. I am thinking of starting a hard copy 'book' of them all so that I will always have them on hand. Update time: Started working on the body yesterday. Got the body side details all modelled. Still have to do the front, top, rear and bottom details. Oh yeah, also need to do the side drive shield on the body. The renders show close-ups of the body. I also made a chor where I was able to assemble the different parts of the AT-AT to get a feel for how it is going to all come together. C&C always welcome... Al
-
This is really a great entry Eric. The texturing is really well done. It is nice to see the wire frame as well to see where the model stops and the background starts. It blends together seamlessly. My son and I had stared at this image for quite a while trying to figure out what was the modelled and what wasn't. We both knew that Thom was a model, but couldn't figure out if the building was or not. What was throwing us for a loop (and this is the only thing that bothered me about this image), is that the direction of the shadow for Thom doesn't match the direction of the shadow for the building and sign. It is as if the light source for Thom is almost directly overhead where the light source for the bulding and sign is at more of an angle to the top right corner of the image. Other than that, it looks perfect. Again, great job and congrats on your win. It is well deserved. Any chance of doing a tutorial or showing some steps on how you textured the building? You talk about many layers on some of the surfaces. I would be really interested in seing how this was done. Al
-
I put together a small tutorial on how to do the blueprint style wireframes images. Here is the link: http://www.hash.com/forums/index.php?showtopic=32711 Hope it helps... Al
-
Wow, where to start. First, thanks to everyone for their kind words about what I am doing. Yes, when I post a WIP, I always add 'C&C always welcome' to my signature. I am not just looking for praise or pats on the back. I am genuinely interested in what people have to say amout what I am working on. Quite often I get so wrapped up in a project that I lose my objectivity and need those comments or critiques to help keep me going in the right direction. So long as the comments are constructive (whether good or bad), then it will always be accepted with a positive attitude. Everyone at this forum has always been helpful whenever I had a question, and I have learned so much from looking at other peoples works. I hope I can give something back to other members as well. Even at 52 years of age, I am still learning. And when it comes to creating a human character for this project, I am going to be looking for a lot of help! And then there is the animating part, and texturing, and lighting, and camera work. There is just sooo much to learn. I know now why movies have so many specialized people working on them... And now for an update: Finally finished the AT-AT head tonight. Corrected a few things that didn't look quite right. I am working on a laptop with a 15" screen where things look pretty good. Then, when I get into work and look at it on my dual 19" screens, I spot things that I hadn't seen on the laptop. BTW, the head now sits at 11,539 patches. And as requested, here are some wireframes. C&C always welcome... Al
-
Thanks Stian. I have always been awe of your models, and coming from you, this means an awlful lot to me.
-
Hi bighop, Your Bender is looking pretty good. Largento is correct in that the mouth shape itself doesn't move, so you could model it directly into the head using the suggestions already given. You may even be able to cut down the number of control points in your head as the splines and bias control points do a great job of obtaining the shape you need. Then in behind the mouth, model the upper and lower teeth separately so they can be opened and closed or animated as necessary. Keep up the great work. Really love this character and I am often caught quoting 'You can bit my shiny metal @$$!' around the house (in a joking manner of course). My wife would kill me if she thought I was serious!!! Al
-
Thanks everyone. Update: Mostly finished the big guns under the head. Few tweaks and adjustments left on them and then the side shields and a few more details. Hope to have the head finished in the next modelling session or two. C&C always welcome... Al
-
Thanks! So far, the head as is, is coming in at 4,613 patches. Just for interests sake, here is the very first head of the AT-AT created in another modelling program (polygon modelling). I am showing this image here because I thought it was really well done, but looking at it now, it is far from it. The next image is my second attempt at the AT-AT, but this time in A:M. I was still pretty new at modelling in A:M and looking back on it, it is not even close to being a good model. I can really see why I got the crit about 'Bevelling being your friend'. Having good references are essential to creating accurate models. Al First attempt at AT-AT Second attempt at AT-AT