Tralfaz
-
Posts
899 -
Joined
-
Last visited
-
Days Won
1
Content Type
Profiles
Forums
Events
Everything posted by Tralfaz
-
Hadn't thought of doing that, but maybe...... Update: Completed modelling the smaller guns on the side of the head. Did some larger renders of the head so far. C&C always welcome... Al

-
Thanks Eric. Yes, most everything is bevelled. When I did my first A:M AT-AT a while back, one of the crits on it was that "Bevelling is your friend". Wasn't until I got further along with my modelling that I realized how much bevelling an object can have an effect on how it looks. I am modelling everything as smaller models initially and then will assemble them later into a whole. Makes it a lot easier and faster for modelling this way. One other thing I have done is create a model called 'Greebles'. In it, I am creating basic shapes that can be re-used as needed. So, if I need a beveled square, I just copy and paste one from the Greebles into the model I am working on and then just size it as needed. I am also using displacement maps for most of the recessed panel lines. It would have been a nightmare to model those. And as Ken requested, here are some shaded wire frames. Al
-
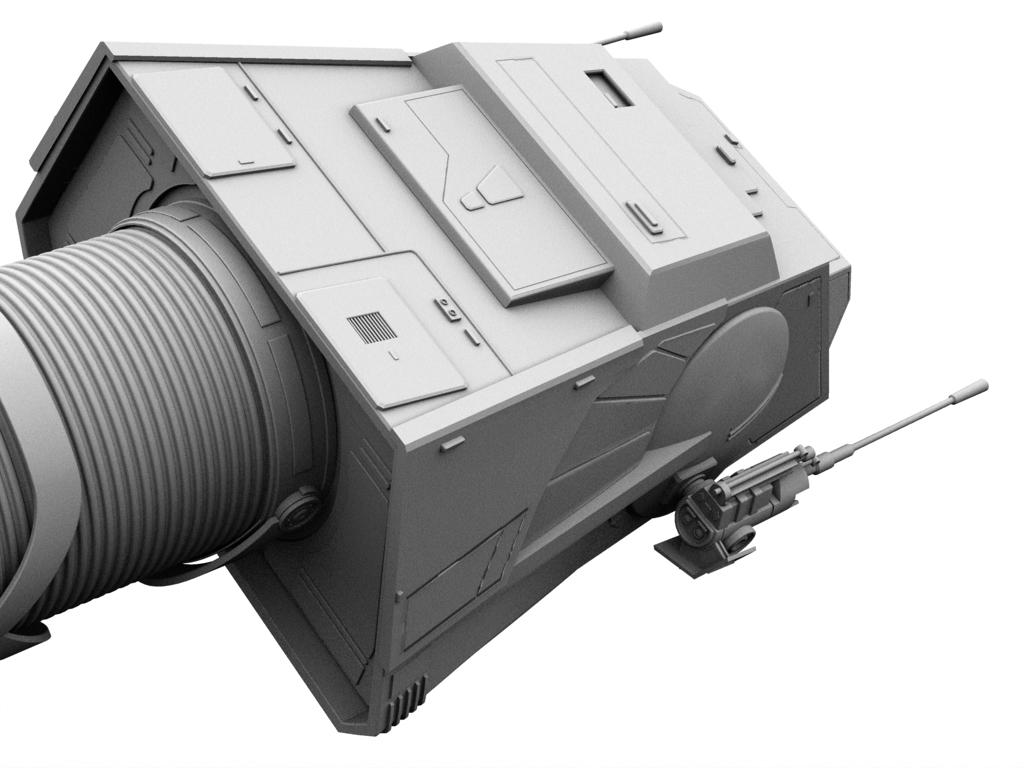
Another Update: Completed adding all the little bits of detail to the back, top and front of the head. Besides the side mounted guns, there are a few more bits of detail needed there as well as the entire bottom of the head and big guns. Eric, I am including a still from Episode 5 of Star Wars so you can see what the AT-AT looks like. C&C always welcome... Al
-
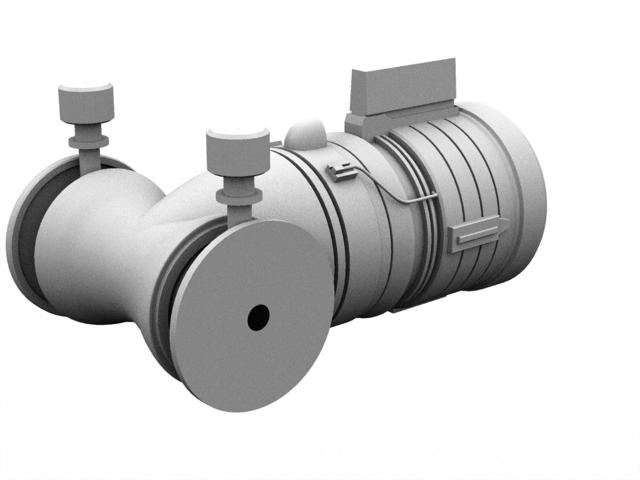
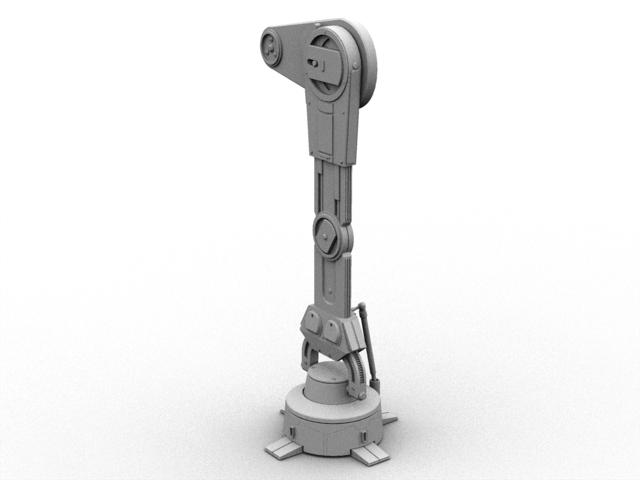
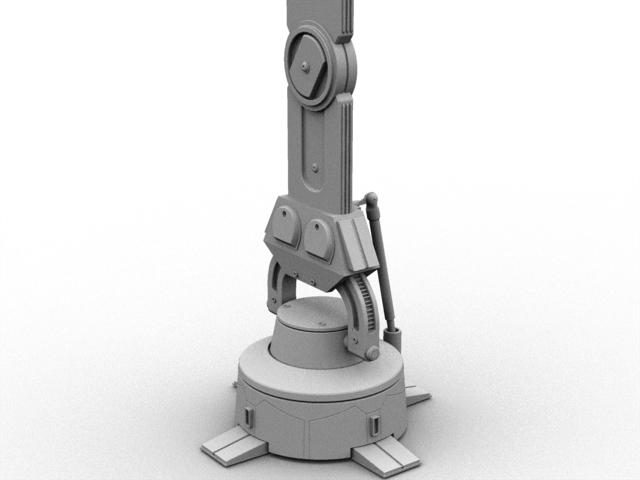
Thanks John. If this is the AMT/ERTL model of the AT-AT, then that means a lot. I had the Millenium Falcon, and AMT put a lot of detail in their Star Wars models. Thank you draagn. On the first page of this topic, I gave the instructions on how I was rendering the images and wire frames. Hmmm... good question. So far, there are: Head - 968 patches Neck - 1,630 patches Drive Motors - 2,253 patches One Leg - 4,482 patches For a grand total of 9,333 patches so far. The modelling is complete on the Leg, Drive Motors and Neck. Still have more to do on the Head, then the Body. Update: Completed modelling, what for me, I is the hardest part of the Head. So many weird angles and trying to keep everything smooth and wrinkle free... arghhhh!!! Anyway, the rest of the head will be pretty straight forward now. C&C always welcome... Al
-
Thanks Ken. I will see if I can put something together so you can see how the legs attach to the drive motors. The previous heads weren't very accurate and not done well at all. I am just better off starting from scratch. Actually, I am re-modelling everything on this model, not using anything from the previous ones. Sigh... I don't have much of a life... Actually, I am not all that patient of a person for most things. You should see me waiting to buy something at the store and I am stuck behind some bozo buying their lottery tickets! Or idiots who want to pay for stuff with all their lose change. But doing stuff like this or when I used to build plastic models, or when I am programming; I become totally absorbed in what I am doing and lose complete track of time. Tonight is a prime example. Here it almost midnight, another evening has slipped by and I should have been in bed a couple of hours ago. Anyway, here is an update: Started working on the neck and head. The neck is pretty much done and got started working on the head portion. C&C always welcome... Al
-
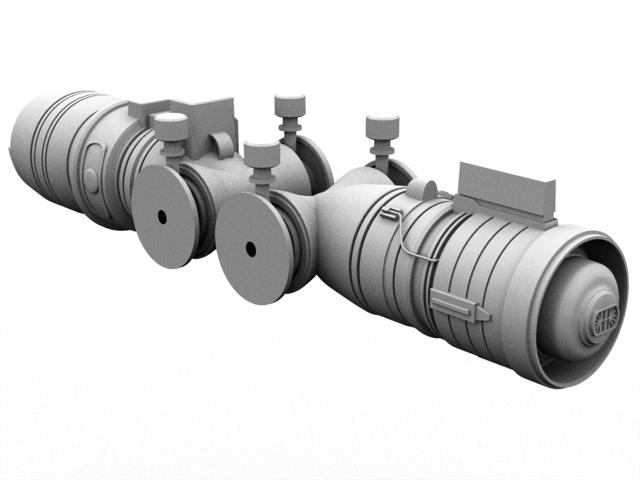
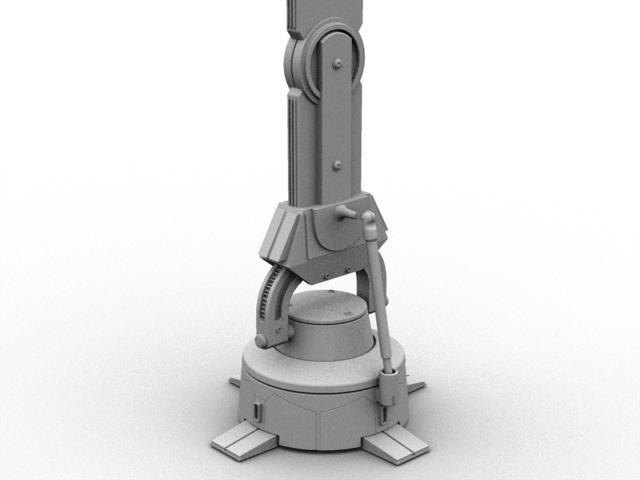
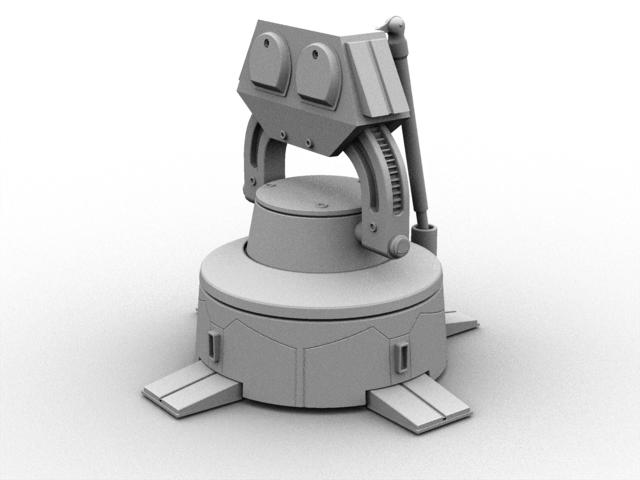
Update: The drive motors are done. Think I will move on to the head next (not really looking forward to this part). Out of the whole model, I think the head was the hardest for me to do, followed by the feet. C&C always welcome... Al
-
Gosh, you are making me blush Eric! Thank you very much. And more you shall have... Update: Finished the front motor drive section. This section drives the front two legs. Next will be the rear motor section. C&C always welcome... Al
-
Update: The completed leg. C&C always welcome... Al
-
I know what you mean. Soon he'll want to borrow the land speeder to go into Mos Eisley. And you know the trouble those young'ins can get into there! Right you are Wade about the wireframes. First, I am doing AO renders to get the really neat grey renders. To do an AO render is to: 1) In the Properties for the Chor, set Ambient Occlusion to "Global Color". 2) In the Camera properties, set the Background Color to White. 3) Turn off all lights. I believe the three lights in the default chor are Rim, Fill and Backlight. There are three of them anyway. 4) In the Render options, turn on Ambient Occlusion. 5) I also have Multipass set to 16 (4 x 4). I am not at my home computer right now, but I believe those are the steps necessary to do the neat grey renders. Than the only other thing that I do is change the render option from 'Final' to 'Shaded and Wireframe'. Presto, a blueprint kind of render. (You can do the 'Shaded and Wireframe' render without doing an AO render.) Hope to have another update later on tonight of the upper part of the leg. Al
-
Thanks Rodney. I wouldn't say I've 'mastered the modelling thang', because there is still so much to learn. I've just had a fair amount of practice lately working on the Gallardo and Rebel. There are some modeller's here that I would truly call masters and it is their work that inspires me to do better. Update: Finished the leg up to the knee. C&C always welcome... Al
-
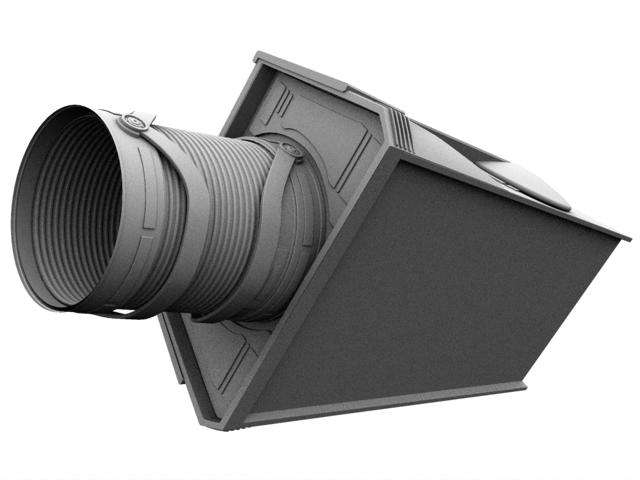
Thanks everyone! Update: Completed modelling the foot and ankle. The blueprints that I have are a good reference, but not all that accurate. I am using some screen grabs of the film to help make the model more accurate. Also found some photos of the film model on the web which is helping. Jas Hodge modelled an incredible AT-AT which is absolutely over the top in the amount of detail he added. I am using some of his photos as reference as well. I've always found modelling the feet and head to be the hardest parts of the AT-AT. Now that the foot is done, I am not looking forward to the head... C&C always welcome... Al
-
I modelled the AT-AT from Star Wars once before. Actually, I modelled it once in Anim8or, than once again in Animation:Master. There were a lot of flaws in those models. I've learned quite a bit about modelling since I originally created it (bevelling edges, minimal spline usage, etc.), so am attempting to do it once more. I want to have it as detailed as possible as I have a plan for it. I have had a plan for the AT-AT all the way back to when I modelled it in Anim8or. Anyway, here is the start of it. I am building it with animating it in mind. I am creating and naming groups for specific tasks as I go along so that it will make it easier when it comes time for rigging it. C&C always welcome... Al
-
Thanks for all the kind words everyone. You are right about it being a tough call. There were a lot of excellent models in this contest. As for the movie, my bad. Here is the correct one... Al Rebel250.mov
-
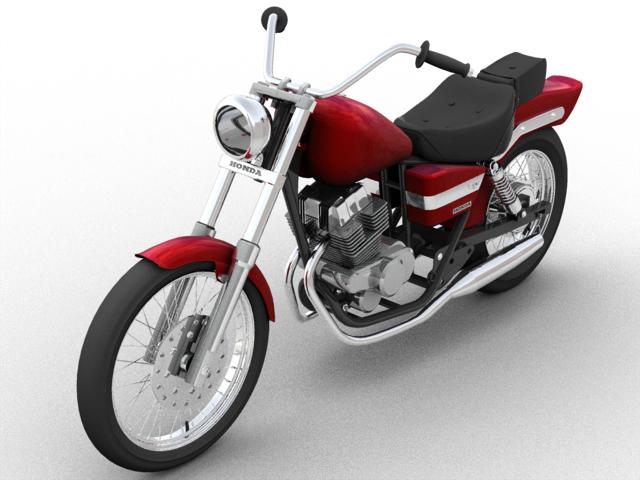
Here are some wireframes as well as an animated 360 movie of the bike. Al Posted the wrong movie here, look for the correct one further down... HondaRebel450_.mov
-

This was my entry for the May Mechanical contest
Tralfaz replied to Eric2575's topic in Work In Progress / Sweatbox
I... must... vote... for... Eric... I... must... vote... for... Eric... I... must... vote... for... Eric... I... must... vote... for... Eric... -
This was my entry for the May Mechanical contest
Tralfaz replied to Eric2575's topic in Work In Progress / Sweatbox
Yeah why is that? I'm sure it's the same image right? For some reason it looks better here than it did when I was voting... maybe it was my subconcious tricking me into thinking mine was better. This was a mechanical modelling contest and I feel the above images do more to show the quality and technical expertise of the model and modeller than the contest image did. The camera is showing a different angle of the tank in the above renders. In the contest image, the tank seemed to blend in with the background more and was kind of lost in the image. I guess this is what they are supposed to do in real life. For me, a mechanical modelling contest is just that. I look at the details and how well it appears to have been modelled. For me, textures, lighting, backgrounds, etc., are secondary in this type of contest. I am looking at the quality and execution of the model. When it comes to the Photoreal contest, my judging criteria will change. The model becomes secondary and things like textures, lighting and how well the model is integrated into it's environment become the primary consideration. When it comes to other contests, than everything plays an equal role, including things like does it tell a story, what type of emotion does it invoke in me, etc. I could be totally wrong on how to judge, but this is how I approach it. Just my opinion... Al -
As per Vern's request, this was one of the May Mechanical Contest entries. (I actually entered two, this Rebel and the Lamborghinni Gallardo). And as with Eric's entry, this is still a WIP. I had been doing a WIP thread on this already, showing the progress of the model. The Gallardo was the model I created mainly for this contest. Never even thought about entering the Rebel until someone in the WIP thread asked if I was going to enter it. I hastily tried to complete the model, but didn't succeed very well. There are a lot of things on the Rebel that I am not really happy with, and will be redoing them properly. Anyway, here are some larger, higher resolution images of the bike. Thanks to those (if anyone) who voted for my models. The models in this competition were really well done and I am always impressed with the quality and talent of the members of this forum. Al
-
This was my entry for the May Mechanical contest
Tralfaz replied to Eric2575's topic in Work In Progress / Sweatbox
Hi Eric: Your entry is phenomenal. As mentioned, the level of detail and textures are outstanding. The model is much more impressive in these renderings than it appeared in the entry photo. Congrats on a job well done. Al -
I downloaded the zip file and imported the .3ds model into Animation:Master. It really didn't import very well. Is there another format of Masterchief available? Something with quads instead of tri's would be better. If not, you would be better off to use the imported .3ds model as a reference and re-create him in A:M. The imported .3ds model won't animate very well without a lot (and I mean a lot) of work cleaning it up. Sorry if this isn't what you want to hear... Anyway, if you do want to proceed with the model, you should be able to use the Skin.jpg file. I would break up the Masterchief model into groups that would match the textures (e.g. chest plate, back plate, etc.). Then you would flatten the group and apply the texture as a decal to the group. You can search the forum for details on flattening and applying textures. Al
-
Yes, it is possible to add a decal with a transparent background. I did this for the Rebel logo I created for the side of the gas tank on the Honda Rebel motorcycle I am modelling. I created the logo in Photoshop with a transparent background and saved it as a .tga file. I then imported it into A:M and applied it as any normal decal. It took a while to get the background to actually save as transparent (not really familiar with Photoshop and transparent backgrounds), but once it saved properly, it worked like a charm. I believe Caroline did a little tutorial on creating images with transparent backgrounds so they can be used in A:M. Al
-
When using Front Projection (and I am not at home with A:M right now, so this is from memory), I believe you have to turn Flat Shading either On or Off for the object receiving the Front Projection. This will take care of the object being darker than the background. Hope this helps... Al
-
Shaggy Takes A Stroll In The Real World
Tralfaz replied to Tralfaz's topic in Work In Progress / Sweatbox
Try this link http://www.peerlessproductions.com/tuts/pages/Icarus.html There is both a Mac and Windows version as well as video tutorials in both Divx and QuickTime formats. Also has some video files like the building in the test I did earlier. And here is the link for the A:M plugin. http://www.kci-group.com/z/icarus.htm Hope this helps... Al -
Thanks Eric. I am modelling this mainly to try out different mods to the real bike. Not sure what type of scene would be suitable for a bike like this. I am open to suggestions... Thanks XTaz. Never even considered the mechanical contest for the bike. I don't think I would be able to get it finished in time. Still have so much to do, carbs, finish the brakes, shifter, tranny, chain drive, gas line, instrumentation, turn signals, finish the tires and more... Anyway, here is another update... C&C always welcome... Al
-
Another great start on a fine looking car Eric. Looking very smooth and great use of splines. Looking forward to seeing more... Al
-
Thanks everyone. Yes, the Rebel 250 is great on gas! Keep in mind these numbers are in Canadian gallons, which are a big bigger than U.S. gallons. In the city, I am getting 76 miles per gallon and on the highway I am getting 103 miles per gallon. It is a blast to ride as well! It will cruise along at 60 mph with no problems and have had it up to nearly 80 mph. Al