T-Dogg
-
Posts
344 -
Joined
-
Last visited
Content Type
Profiles
Forums
Events
Everything posted by T-Dogg
-
Here are some tutorial videos: TAoA:M videos Here are some videos made by A:M users: A:M Films Hope this is what you were looking for.
-
HOLY CRAP!!!! THAT IS UNBELIEVABLE!!!!!! CGTalk loves to showcase models like this... the kind with almost too much detail. I bet it would have floored them all to see that it was done in A:M. Heck, it floors me, and I use A:M!!! (Well, at least I try... when I see other people making stuff like this, I'm not sure I should even call myself a user any more.) Like everyone else said, I sure hope you get the time to come back and finish this great model. But even if you don't, just remember that the Venus de Milo was a masterpiece that didn't have any arms, and so is your Iron Man!
-
expressions can control lots of stuff
T-Dogg replied to johnl3d's topic in Work In Progress / Sweatbox
Fire phasers, Mr. Sulu!!! -
Now you've got it Charles!!! If memory serves me, in Physics class they taught us that Speed = Distance/Time. So to change the speed, you've gotta either change the distance or the time.
-
Thanks for answering my question Charles! I figured something had to be done to avoid having two identical keyframes in the walk cycle. I guess I was on the right track when I tried to answer your question earlier, since robcat pretty much says the same thing in his video... more time or bigger steps. Of course, he explains it a lot better than I did! The only other options I can think of are to scale Thom up or scale the path down. I tried using ease, but like you, I got pretty messed up results. I prefer to leave my stride length turned on for walk cycles anyway.
-
Charlie, I'm no expert, but I tried to repeat the project you described. I do have a few suggestions. First off, 3 seconds is an awfully short amount of time to walk around a figure 8. Watch Thom go around the path without adding the walk cycle and you'll see exactly how fast he needs to be moving to get from beginning to end in 3 seconds. Maybe my figure 8 was larger than yours, but there was just no way he could "amble" around it in 3 seconds. Secondly, the Resolute Walk seems to have a pretty short stride length for our favorite featureless yellow guy. If you study the action, you'll see that Thom never even fully extends his legs. I think you might need a different walk cycle with a greater stride length. That would let him go further with fewer steps. That's just my 2 cents... before taxes even. I don't mean to hijack your thread, Charles, but there is something that has always confused me about walk cycles, as well. I've read that the first and last keyframe should be identical. However, some animation lessons then go on to say that you should set a key at the next-to-last frame and then delete the last one. I don't think this was mentioned in TAoA:M though, so I was wondering if A:M handles things in some way that avoids having 2 identical keyframes in the walk cycle. From my own limited experience, it seems like when I animate a walk cycle and leave the first and last keyframe the same, that I do indeed get a very slight pause when the animation cycle repeats. I've been starting at 0 and ending at 24. Is it best to end at 25, but set a key at 24 and then delete the keyframe on 25? (I use frames elapsed instead of that SMPTE. It's easier for me to understand.)
-
It's pretty much the same as every other model I've seen you do... AMAZING!!! You are one seriously talented modeller, Stian.
-
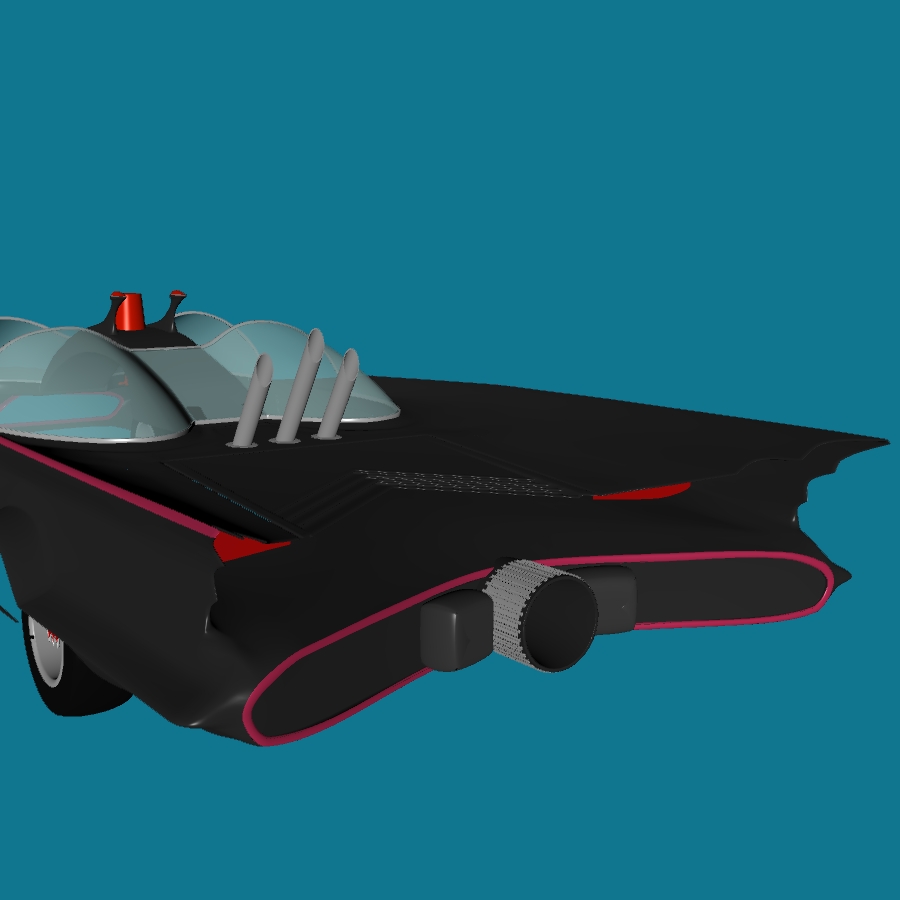
It's been nearly a month, but I finally have another update to show. This time around I've been working on the rear end. I added the rear grill. I am going to add a transparency map to as son as I get around to painting one. I filled in that area in the fins. I must have been looking at one of the later photos when I colored it red. I believe it was originally black. I also added the Jet Pipe and the parachutes. The poarachutes aren't very detailed, I know. The hardest part of all of this was creating the trim around the jet pipe. It wasn't hard to model. It just took me a while to figure out how to get the sweeper plugin to do what I wanted it to. I also did some tweaking of my grouping and surfacing. Instead of having the entire model with a black surface, I decided to go back to the default white color and then split the body into parts (body, doors, hood, trunk, etc.) and color each surface individually. If nothing else, it makes for easier selecting. This beast already has 5626 patches, and I've still got so much left to do! I still need to fix the front end, add wheel wells, and do the entire interior. Anywho, here's the pics. I hope y'all will like them.

-
I bought the yeti CD about a year ago, and mine was the same as yours. It actually comes with v12 on the CD, but you can download all the v13 updates from the hash website and they will work with your CD. The newest version, which is 14, will not. You can get version 13.0t HERE It should have come with the book The Art of Animation Master. I think you might be able to find a pdf version of it somewhere on these forums. Oh yeah, WELCOME TO THE FORUM!
-
David, you rock! Not just for making this thing, but also for always being so helpful.
-
OMG... an old black and white TV with rabbit ears??? HE REALLY IS IN HELL!
-
I have spent a lot of time on that site. Thanks, George. I am trying my best not to completely abandon it. I was a total newbie to spline modelling when I started this project. I've improved a lot since then, but I am still not very good. I still have trouble wrapping my head around the best way to run the splines. But as my skills have grown, so have my desires to do other projects. I wanted to model and rig my own characters (which I've done now). I wanted to learn to use cloth and hair better (which I've also done, but I am still learning). I wanted to animate (and I am working on a simple music video to teach myself). Modeling is the part of the whole movie-making process that I enjoy the least, so this project ended up on the back burner. I regularly read Terrence Walker's blog (as do some other people here), and one point he makes all the time is that you just need to finish your movie no matter what, and then you can move on to the next one. I am going to try to apply that same philosophy to my modelling as well and finish this project no matter what. I am not going to stop working on my other, more enjoyable, projects, but I am definitely going to set aside time to work on the Batmobile regularly at least a few minutes each day. Some progress is better than no progress, right? When Charles and I first started this project, there were times when I would get spurts of creativity and get a lot done. It would give me such a great feeling of accomplishment. It made up for all the times I got stuck and struggled. Hopefully I can rekindle some of that feeling and bring some fun back into my modeling.
-
Hey, I got it first! Thanks David! :-) I know dialup is pretty slow, but I recently lost my internet completely for a while and I would have killed just to have dialup. I was suffering from withdrawal!
-
largento, I always thought the wheels looked way too small, as well! I made my tires small because I they were completely round and I didn't want to distort them to match the rotoscope. I thought the tires just weren't drawn very well in the original sketch (because the rims are elliptical, too, and not just the rubber, which would be flattened at the bottom do to the weigth of the car), so I lined things up the best I could, and then I moved on. Now, after looking at that picture you posted, I noticed the wheels DO look round, and my model doesn't line up with the picture very well at all... at least not in the Y-axis. The only explanation I can think of is that maybe my rotoscope was squashed some back in the beginning stages to get the heights of the front, back, and side views to all be the same. The rotoscopes were set up to match the real-world measurements of the car, as well. I am pretty much commited to these rotoscopes at this point. The only thing I can think of to do now is to continue modelling as I have been and make any changes to the scale of the model after I am done.
-
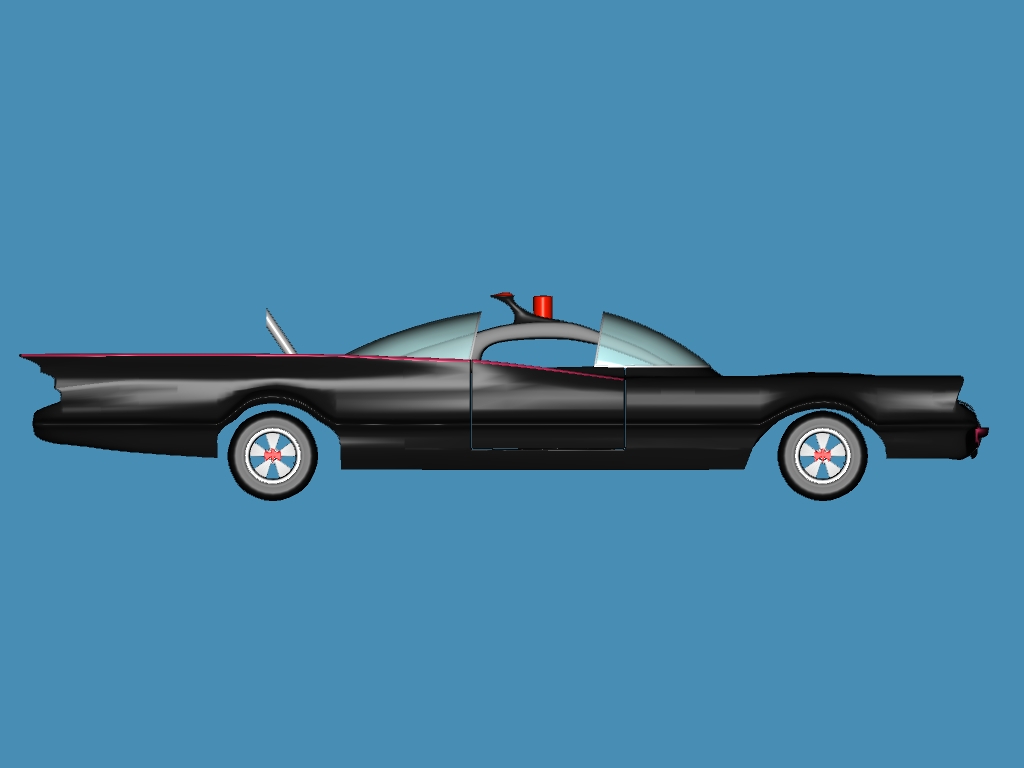
I've been really busy lately with other things, as well as other projects in A:M, and I've let the Batmobile Project fall by the wayside. I do pull it out and work on it from time to time when I'm frustrated with my other projects, so it hasn't been completely forgotten. I haven't really added anything new except for that emergency-whatever handle that hangs down in the middle. However, I have tweaked a lot of different areas of the mesh. When you compare my previous side view (top) to my current side view (bottom), you can see some of the changes. I raised the top of the front fender. I also lowered the area around the windshield. I think it looks much nicer now. The things you can't really see are all the minor adjustments to the glass and the console(?) in the middle. I made a lot of adjustments to the bias handles to prevent intersections of their surfaces. I also discovered a lot of normals that were pointing the wrong way and fixed those. I try to watch that as I am modelling, but apparently I need to do a much better job of it. I've started doing a little work on the interior, but I have nothing worth showing at this point. I know it isn't a lot to show for over 5 months since my last posted update. I just don't enjoy modelling nearly as much as I enjoy experimenting with the different features and dabbling in animation. I will try to persevere and eventually finish this thing, though. I must admit I do feel a little more inspired ever since I got this. Here are a couple more pics, since it's been so long since I posted any:
-
Dhar, It sounds like you might be clicking on custom groups for the cloth material itself. The custom groups for the cloth in MATERIALS is always empty. If you go to where your cloth is applied to your object, you should be able to click on custom groups and see a list of all the groups. Your attached group should be visible there. Hope this helps.
-
You're welcome! It's nice to finally be in a position where I can occasionally answer questions instead of always asking them. A lot of people on here have helped me, so I try to return the favor by helping others when I can.
-
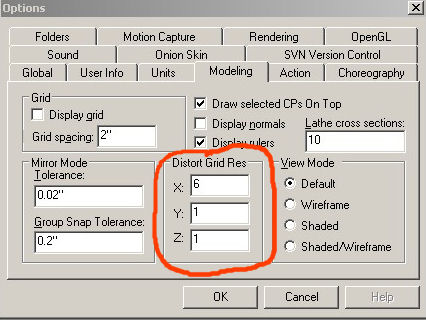
Click the Tools button and then click Options. Click the Modeling tab and you will find the place to change the Distortion Grid parameters.
-
That is really cool! Great job!
-
I've used that tutorial as well, but unfortunately the webpage has "expired on 02/08/2007 and is pending renewal or deletion." If you happen to own his book, Animation:Master A Complete Guide, the same leg setup is taught there. It is a really good starting point for setting up IK legs. Personally, I use his foot setup (with a few minor changes), but a completely different setup for the thigh and calf. As a side note, I recommend buying David's book to anyone who is trying to learn A:M. It touches on some things not covered in TAoA:M. EDIT - Looks like the web page is up and running again.
-
Yeah, I love PSP. It might not have all the bells and whistles that Photoshop has, but I really believe it can do everything I need. I paid around $50 for PSP X when it was marked down right before PSP XI came out. I'm just a hobbyist, so what it came down to for me is this: Does Photoshop really do enough to warrant me paying $600 more than I paid for PSP? In my case, the answer was a huge, resounding NO!!! By the way, I was at a local Best Buy store the other day and they had some copies of PSP X marked down to $9.99!!! I was kinda PO'ed. I don't have any updates to show this time around. I am really struggling of late. I've been trying to work in A:M at least an hour a day, but more often than not I find that I spend the hour working only to end up with results that I don't like. So I end up deleting it and having nothing to show for my time. It's frustrating. I remember hearing that every artist has to make a thousand bad drawings before he gets a good one. (I think it might have been Chuck Jones who said that.) Perhaps modelling is the same way. Maybe I have to struggle through 1000 bad hours to get to that one good one. Unfortunately, at an hour a day that adds up to almost 3 years!
-
Another update. I'll be working on the beacon now as time permits.
-
Thanks, Mike. I don't like the autobalancing stuff either. I think I will remove it as well and follow your simplified rig. One other thing: It puzzles me why someone would make such a complex rig and not even make it symmetrical. Maybe it doesn't really need to be, but I feel like my models are symmetrical, my bones should be as well. Maybe I am too nitpicky... especially for a newbie. What you're saying is that everytime you made a change you saved over the same file? Or hadn't even been saving at all? There's a lesson here Each of the asterisks above would definitely be a time to save a version of your model. model_001 model_002 model_003 Then, you'd be able to go back to the version just before the trouble started instead of having to go back to the very beginning. I'm guessing you altered the heirarchy of the bones accidentally. Or maybe have some CPs mis-assigned. But not knowing how you did it makes it tough to diagnose. Actually, my problem is the opposite of what you're implying. I actually saved too much! I pretty much did it exactly like you said, too. I named it model_v001, and so on. It works well if A:M crashes and I need to go back one version. Where it doesn't work well is trying to go back through all those different versions later and trying to figure out what was going on. For example, I can't recall what I was doing between versions 027 and 028 or whatever the numbers were. If there is any lesson to be learned here, it's that I need to make more descriptive save filenames!!! You were right on the money about heirarchy, though! I opened the 2001 rig into my project and started comparing it with my model's skeleton. It seems some of the fan bones I had added knocked the calf bones down in the heirarchy so "Attached to Parent" was no longer working.
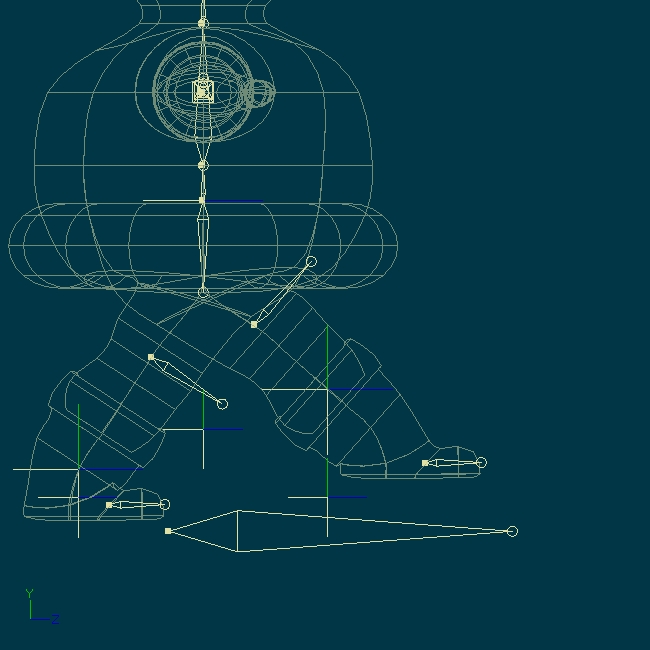
-
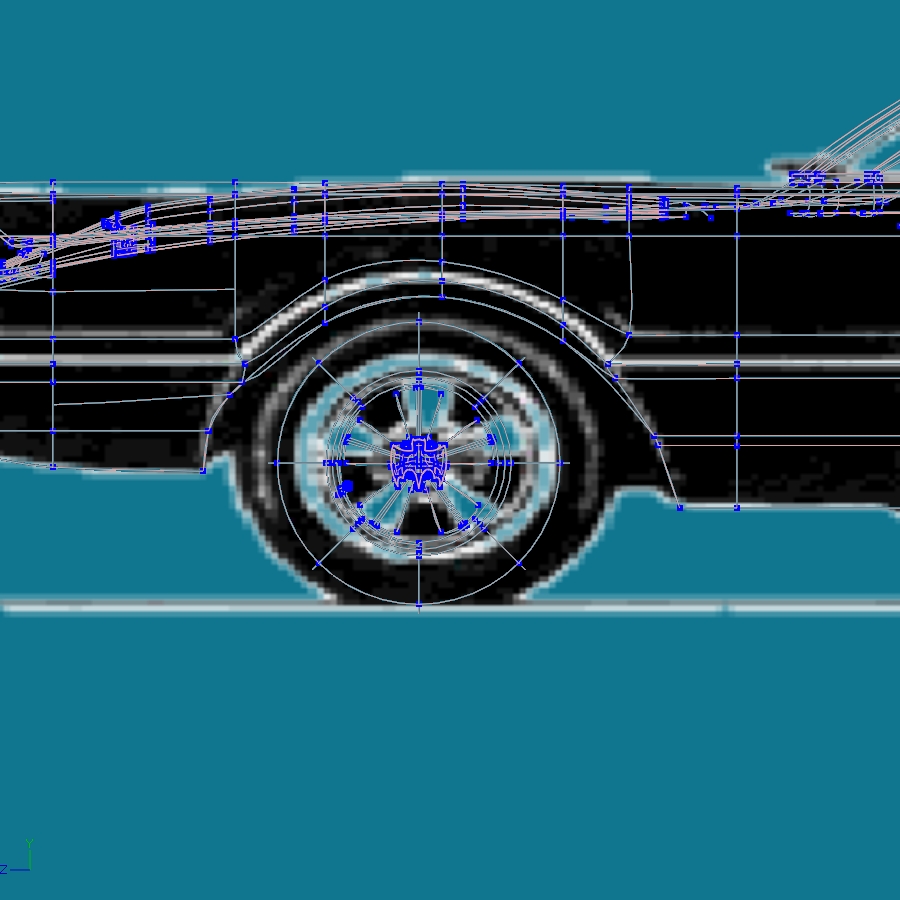
I was rigging one of my own characters using the 2001 rig. I was following in the manual about how to install it and everything seemed to be OK. I changed some of the bones' positions to make it more symmetrical. Then I added a bunch of fan bones to help with the joints. Somewhere during all of this, I must have messed things up because the rig does not behave at all like the characters that come on the CD. If I try to raise the foot off the ground, the foot target pulls away from the foot and the knee will not bend. [attachmentid=22567] Does anyone have any idea what might be causing this problem? I am hoping there is a simple fix for it because I really don't want to go back and start all over from scratch. I spent a lot of time on this already. Thanks for your help!