T-Dogg
-
Posts
344 -
Joined
-
Last visited
Content Type
Profiles
Forums
Events
Everything posted by T-Dogg
-
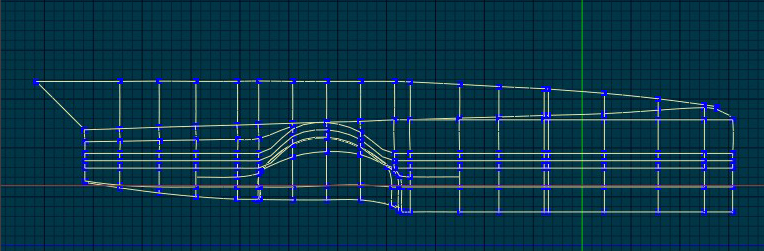
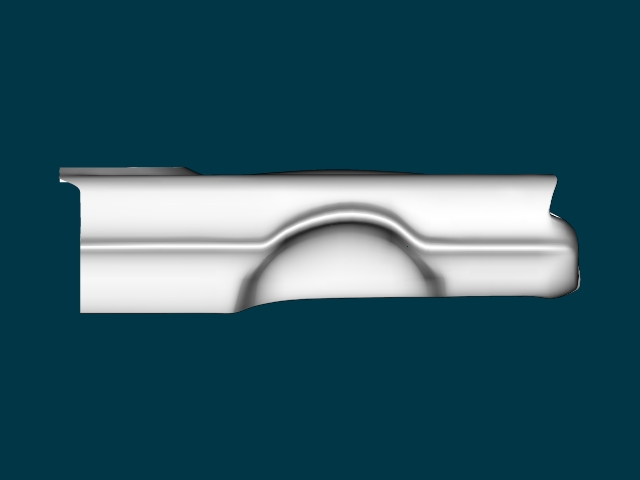
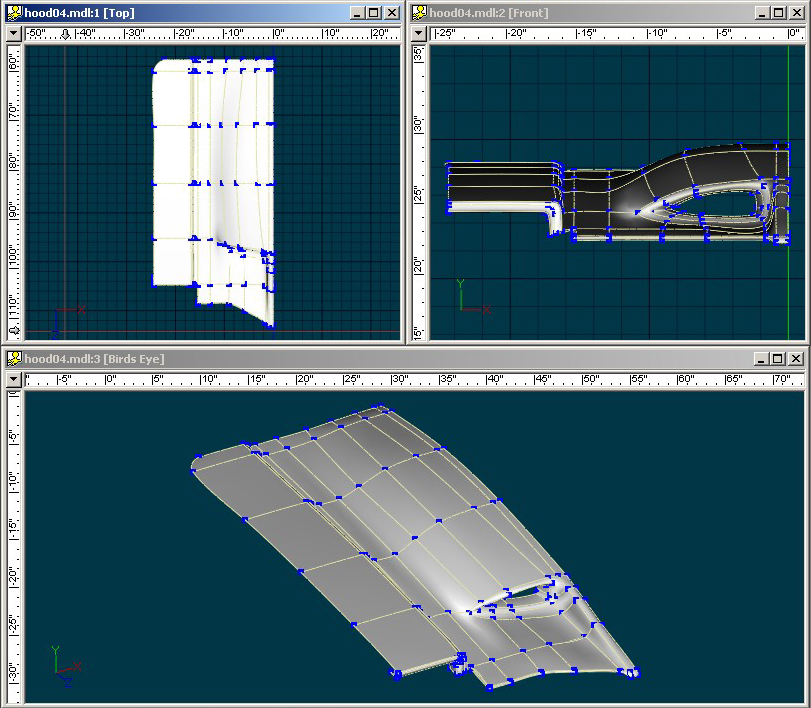
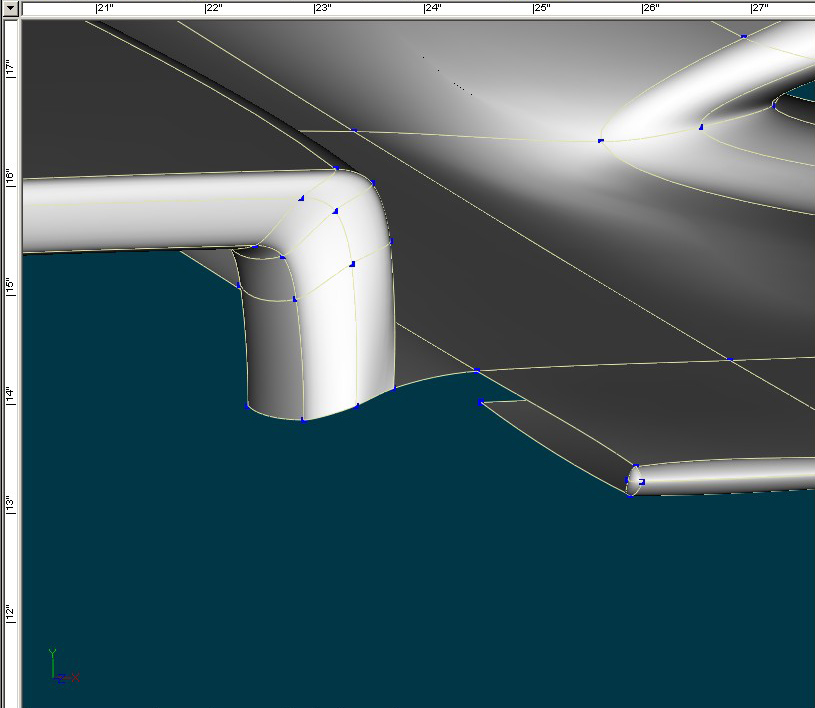
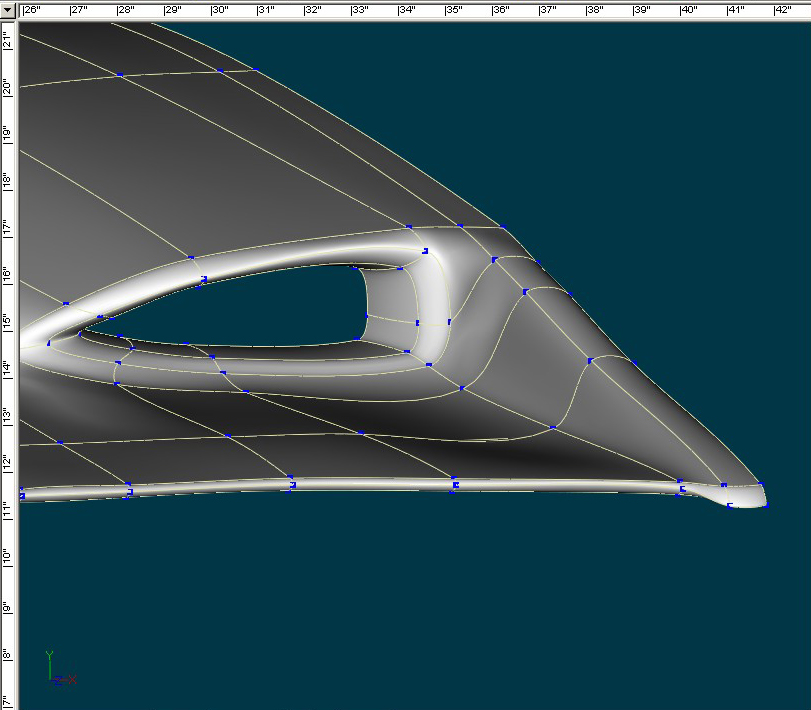
Charles, Here's the wires you asked for. [attachmentid=18496][attachmentid=18497] I know I need to round out the side a lot more. I think my biggest concern right now is figuring out the best way to do the area where the tailfin joins the main body. I have 2 splines that are extremely close together there. I think I will move one down and use that spline to round out the side. If I do that, I will be able to delete that spline I added into the back for that same purpose. What do you think?

-
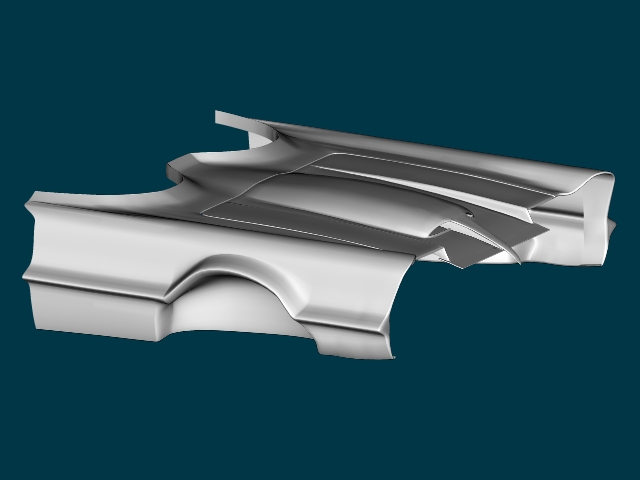
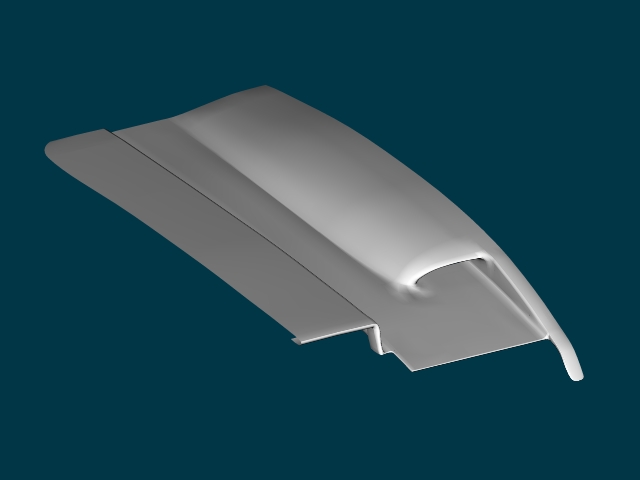
Charles, Ok, just a bit of quick, sloppy work, but at least it's some form of progress, right? Basically, all I did was take the spline at the edge of the front fender and extrude it back a bunch of times. Then I went back and shaped it as best I could to match the side rotoscope and added in the rear wheel well. I'm not sure what the best way is to do the tailfin. I'm having problems with the splines where the tailfin joins the body. As usual, I ask for your advice my sensei of splinage. What should I do? [attachmentid=18445][attachmentid=18446]
-
Charles, As a guy who works nights, let me tell you this: Sleep is definitely NOT overrated!!! At least I don't think it is.... from what little I can remember about sleep. I just checked out that saleen thread you mentioned. Kinda makes an unskilled modeller like me feel inadequate. But I ain't giving up just yet! For every new section I try to model, I run into about 847 new problems. By the time I learn how to fix all of those, I should be pretty darn good, right? I haven't got anything new to show right now. I still haven't fully recovered from the Puffy AmiYumi concert. Those gals rocked!!! Plus, I got their new CD at the show before it's official release.... so now I have someting new to listen to while I get back to modelling!!! Life is good.
-
I did a bit of tweaking and removed the porcelain. What do you think of it now? [attachmentid=18313][attachmentid=18314] [attachmentid=18315][attachmentid=18316]
-
Charles, You're right about the porcelin. I had added it earlier to check for flipped 5-point patches (of which I had several! ) and forgotten about it. Next time I'll post some renders without it. I'd also noticed the part between the grills was too flat, but I just hadn't got around to fixing it yet. I'll try to bring the ridge around the front more as well. I still need to add some thickness around several of the edges, too. Other than that, I've went back and removed several unnecessary splines and tried to open up some of the areas where I had splines too close together. There are several areas where I tried to peak my control points, but it seemed to create as many problems afor me as it solved. I've also tried to avoid messing with the bias handles as much as possible so far. I adjusted a few, but then as I made changes to the mesh, having those handles adjusted caused me problems. I ended up re-zeroing them. I think it will be best for me to just leave the bias handles alone until all the splines are in place. By adding in some extra splines and control points, I'm trying my best to just avoid messing with the bias altogether. My biggest reason for adjusting bias handles will probably be to smooth out the humps caused by sharp curves in the splines. I've learned a lot so far, but it seems like I am still doing a lot of things wrong. I think by the end of this project I should be a pretty decent modeller, though.
-
BTW, are you using the latest D. Rogers book? If so, what do you think of Capt. Splines & Polygozmo? I've nearly completed them. Yes, I am using the latest version of David's book. I haven't started Capt. Splines yet, but I hope to do so soon. It looks like a lot of fun and a great learning exercise. Thanks for the info, Chris. I'll look into it. I was going to try to save as a .mov file but for some reason I just saved as a series of images instead. Then I just took the images and made the animated GIF that I posted. I thought doing it that way would meake it easier to post here, but in the future I'll reconsider .mov format.
-
While I was having problems getting back into the modelling groove for my Batmobile project, I decided to take a little break and work through some of the tutorials in Animation Master: A Complete Guide by David Rogers. I modelled the flour sack and attempted to animate a walk (hop?) cycle. [attachmentid=18185] What do you Animation Masters think? Any pointers would be greatly appreciated.
-
Sorry I haven't posted anything in a while. After recovering from being sick, I kind of lost my modelling groove. This morning I sat down and tried again while I listened to a CD of Puffy AmiYumi. (Who, incidentally, I am going to go see in concert in Cincinnati this Friday night! ) [attachmentid=18184] I think I finally made some progress! I have been struggling a great deal with getting the front to look right. I initially tried to take my fender and kind of sweep the edge around to make the front. I don't know if I am explaining it right. Anyway, it doesn't matter, because it didn't work. Today I tried a new approach. I drew the trim around the grill firs and extruded it out and back. Then I tweaked it and attached it to my fender, adding splines as necessary. It isn't completely finished yet, but here is what I wound up with: [attachmentid=18179][attachmentid=18180] [attachmentid=18181][attachmentid=18182] As always, let me know what you think and give me some pointers on how I can make it better. EDIT: I just did a check of how it looks all put together so far, and I thought I'd share the pictures: [attachmentid=18192][attachmentid=18193][attachmentid=18194]
-
Charles, Sorry I haven't posted anything here in a while. I have been too busy with this math equation: (Heat + Humidity) x Sinus Infection = Pure Misery The anitbiotics are finally starting to kick in, so I am feeling somewhat better. Hopefully I'll make some progress on it this week. The front is proving to be a tricky thing to model. I've been reading some of David Rogers' new A:M book, and hopefully I can put the things I've learned to good use.
-
I finally got my copy yesterday! I've just started reading it, but I've already learned a couple of new hotkeys. They may have been documented in other places, but I never noticed them until I got this book, so it's already been helpful to me. I'm sure the more advanced chapters will help me even more. Thanks David Rogers for writing this.
-
I would certainly like to make them. Perhaps by the time I finish their car I will have become a good enough spline modeller to be able to do it. I definitely want to learn character modelling and rigging in A:M, so the Dynamic Duo might be a great place to start. Thank you! It has definitely been fun and challenging, and also sometimes frustrating! I have learned a lot so far though, and we are not even halfway finished. It was really great for Chas to take me under his wing like this and help a new guy out. I can't stress enough how great the community here at Hash.com has been.
-
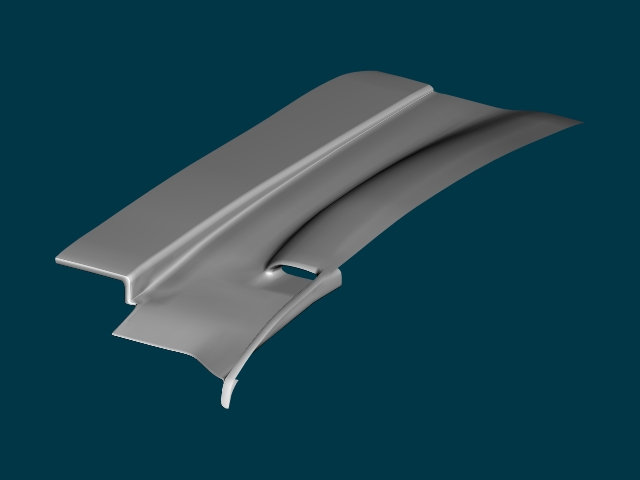
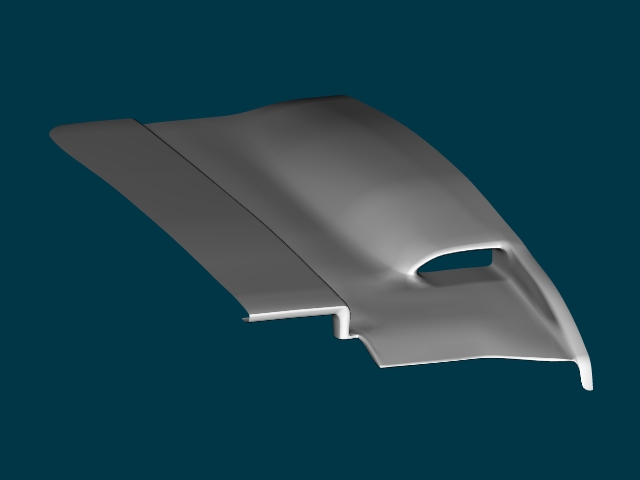
That picture gave me a very good reference. Thank you. I did a lot more modelling on the fender. It looks much better now. What do you think? [attachmentid=17629][attachmentid=17630] Here it is combined with the hood. I think it's looking pretty good so far. [attachmentid=17631][attachmentid=17632] [attachmentid=17633][attachmentid=17634] Any comments would be appreciated. Thanks!
-
I started the fender... but just like when I started the hood, I don't think it looks right. It's really hard for me to figure these parts out. [attachmentid=17584]
-
Changed it back to closed. For some reason, it took me a lot longer to figure out how to close it back up than it did to open it in the first place. I don't know what else to do with the hood now, so I am going to start working on the fender. Let me know what else you think should be done to the hood. Here is what it looks like now: [attachmentid=17557][attachmentid=17558]
-
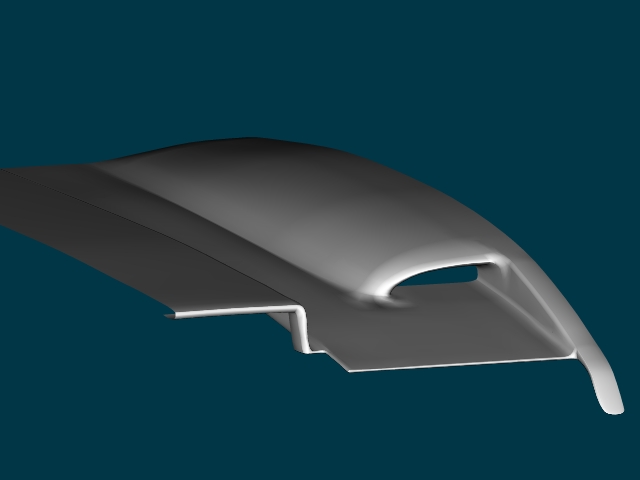
I raised that part in front of the scoop like you pointed out. I also narrowed the "beak" like you had mentioned. Upon closer inspection of that picture you posted, I got the feeling that the area between the hood and the beak might actually be empty. If you look closely you can see there are reflections on the hood directly under the beak piece. So I changed it yet again, and this is what I came up with: [attachmentid=17466][attachmentid=17467] I think I might need to go back and widen the beak some where it joins the scoop. Also, I noticed after attaching the other half, that I might have to go in and raise the CPs along the centerline to round things back out. Adding the other side seems like it might have flattened things out a little. What do you think?
-
I tried to do the changes you mentioned. I even did a copy/flip/attach just to see what it looked like as a complete hood. See if this is more to your liking. [attachmentid=17446]
-
Actually, Charles, I spotted a major flaw. Here's the wrong mesh: [attachmentid=17439] And here it is corrected: [attachmentid=17440] This was a clear case of looking at something and still not seeing it... or not seeing the forest for the trees, as the saying goes. I noticed in the pictures that bottom of the hood extended past the bend that goes over the signal light, and I even fixed that part just recently, as you can see in that top picture. For some reason it didn't register to me that the extended part in question came down all the way to the front of the hood! It's embarrassing to think about how much time I wasted fixing that little inside corner... and the whole time I didn't even need it!!! Also, you asked for wires, so here they are. [attachmentid=17442] I don't think it's perfect, but I am pretty happy with it now.
-
I did a bit more tweaking. I'm not sure what else needs to be done to it other than creating an edge along the left side and back. Any more suggestions? [attachmentid=17434] I nearly forgot to mention that I also fixed another problem I was having. [attachmentid=17436]
-
OK, I did the fixes you mentioned, Charles. Here's what it looks like now: [attachmentid=17409][attachmentid=17410][attachmentid=17411]
-
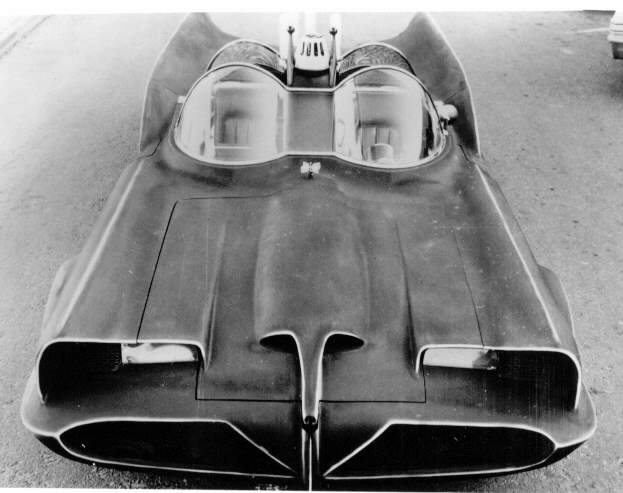
I see what you mean about the hood needing to be cut straight. For some reason, it didn't look clear in my rotoscope, and I guess I got confused. But when I looked at the picture by itself, you can definitely see the hood stays straight. That will be an easy enough thing to fix. I'll give the piece that goes over the turn signals a better angle too. I was using this picture as a reference, [attachmentid=17405] and it looked straight to me. I guess it is due to the camera angle. Should be another easy fix though. As for the hood scoop... or whatever it's called... being too wide, I am not so sure about that one. I basically traced a spline right along the line in the rotoscope. Also, as you can see it is pretty wide in the picture I previously posted. I can make it narrower if you want, though. I'll do the fixes and post another picture as soon as I can. I am trying, y'all.....
-
I tried to implement Rodger's suggestions, and I also ended up adding a few more splines here and there to try to give it a better shape. Here's what I've ended up with thus far: [attachmentid=17365][attachmentid=17366] I can't believe it's taken me so long to model just the hood. I worry about how long it will take once we get into the more detailed areas. I seriously need to improve my modelling skills. Seems like when I fix one thing, I mess something else up. I'll keep trying, though.
-
Rodger, I tried your approach. It made sense to me because when I do a head, I try to do the hard parts first. So I started over on my hood. First I made the air intake. Then I made the part that goes over the turn signal and extruded it out towards the center of the hood. Then I just played connect-the-dots to make a grid like Charles had originally drawn. This is what I have so far: [attachmentid=17313] I have a couple of major problem areas. Frist off, I am not sure what how to connect this corner: [attachmentid=17314] And secondly, I don't think this part is right: [attachmentid=17315] Any help would be appreciated.
-
I'm glad some of you guys have gotten the book already. As for myself, I have had no luck. I went to both Barnes & Noble and Borders. In both places I was told the same thing... not only did they not have it in stock, but they were unable to order it! This was after I read about you guys ordering it and after B&N.com had changed it from pre-order status to new. I will check again when I get paid, and if they don't have it by then, I am ordering it online.
-
I've been attempting to model the hood as well, but I haven't gotten very far. this is what I have so far:[attachmentid=17277] It's not very impressive I admit. I have always had problems with using rotoscopes. I try to line things up in the front and side views, but somehow I can never make the complete transition into a good 3D model. I've tried looking at photos to see how it is supposed to really look, but still I can't get it to look quite right. I had the same problems with my head model.
-
I found a fixed knight model, but not keekat.