T-Dogg
-
Posts
344 -
Joined
-
Last visited
Content Type
Profiles
Forums
Events
Everything posted by T-Dogg
-
That's a good question! I know he was working a lot of long hours at his job. I hope he's OK and will be back here soon! I will probably just give it a glossy black finish. I think that will look pretty cool.
-
Sorry it's been so long since I added anything. Life has a way of pulling me away from this project (and I also got distracted trying to make a render for the latest image contest). I havent really made any progress at all. I was attempting to model the windshield, but I ran into a problem. It seems that my rotoscopes don't match up properly. [attachmentid=20169][attachmentid=20170] I'm sure this is something that happens to modellers all the time, especially when working from drawings. Since I'm still a newbie modeller, I thought I'd aske for advice from you pros. What is the common practice for modelling in this situation? Does the modeller take artistic license and just do what feels right? Thanks again for your time!

-
Burning out has definitely been a problem, Eric, but not the burnout you're thinking of. The room my PC is in isn't air-conditioned!!! Before I bought A:M I had been trying to learn a different piece of software by staying after hours at my old job, and I ended up with a ton of unfinished models. However, I couldn't afford to buy that software to use at home. When I bought A:M, I tried to find a plugin or something that would let me bring my old models into A:M. Oakchas explained that I'd be better off to just forget the poly stuff and work on my spline modelling. He agreed to work with me on a project to help me learn. Thus, the batmobile project was born! With all the encouragement I have gotten from Oakchas and all the great folks on the forum, there is no way I am gonna let this project end up in my graveyard of unfinished models! That folder is full enough already!
-
Since I've gone a week without posting any progress, I figured I'd go ahead and show what little (and I mean very little) progress I've made. Pretty much all I've done is remove some of the "puffiness" in this area that was really annoying me. (Perhaps that's a bit ironic, since I have been listening to "Puffy" AmiYumi as I've modeled.) Now it looks nice and flat. [attachmentid=19548] Now onward to bigger and better things! Perhaps the windshield....
-
Sorry, Jeetman! I definitely did not mean to ignore you. One thing me and Chas agreed on at the beginning of this project was that the model would be freely given to the community when we finished it. I didn't want to share it before that, though. I didn't want everyone to see my screw-ups. I was hoping there wouldn't be as many by the time the model is finished. I keep learning new things as I go along, so hopefully this will be the case. I've seen several superhero threads on this forum, so I really hope people will download this car after we finish it and post some nice renders.
-
I looked it up in David Rogers' book! Hey.... look y'all... it's my 100th post!!!!!!!! Edit - Cool! I have just become a Master! If only I had the skills to back that up!
-
Wow! I am really loving what you've done with this model. Maybe when you're done, you can do some renders with him alongside his Jim Talbot conterpart... something along the lines of Infinite Crisis. That would look sweet!
-
Thanks Eric! I didn't have that particular toolbar visible. Upon further inspection, I see now that the perspective option is also available from the right-click window and has the hotkey of "\". I guess I had seen it in the right-click menu before but hadn't really paid any attention to it. Thanks for pointing it out to me! I've had this program for around 5 months now, and sometimes I still feel like I don't know anything about it.
-
Holy Crap! That is one serious bit of modelling!!!!!!!!! Very impressive!
-
I thought using button 7 was a perspective view. How do I change it?
-
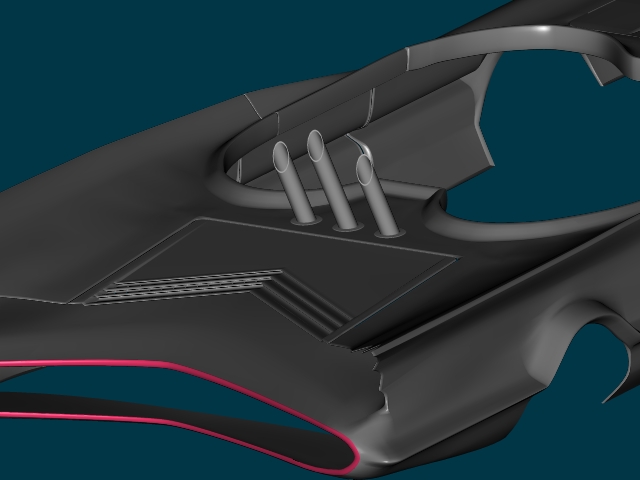
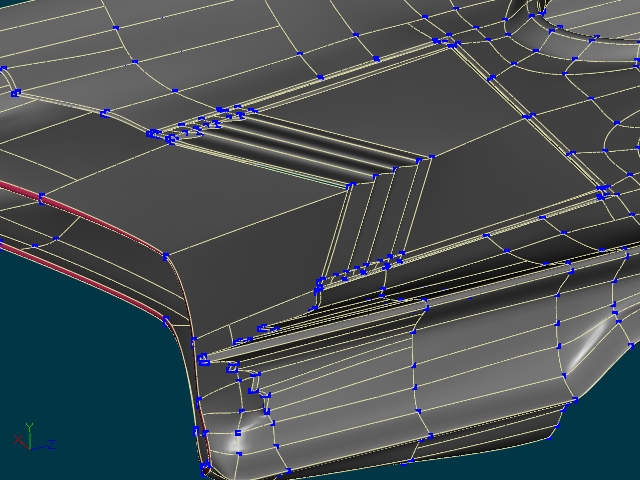
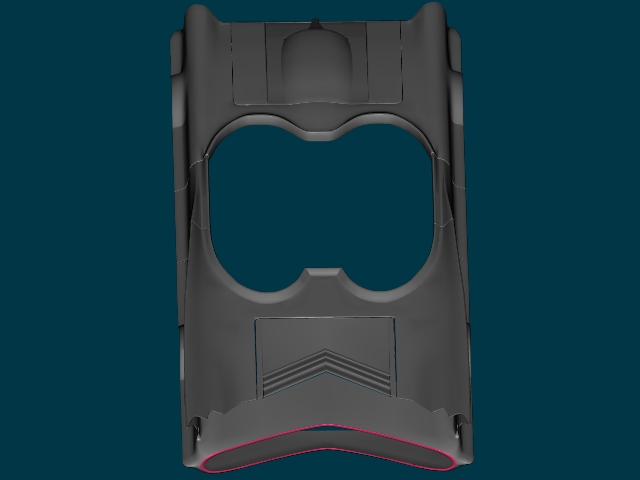
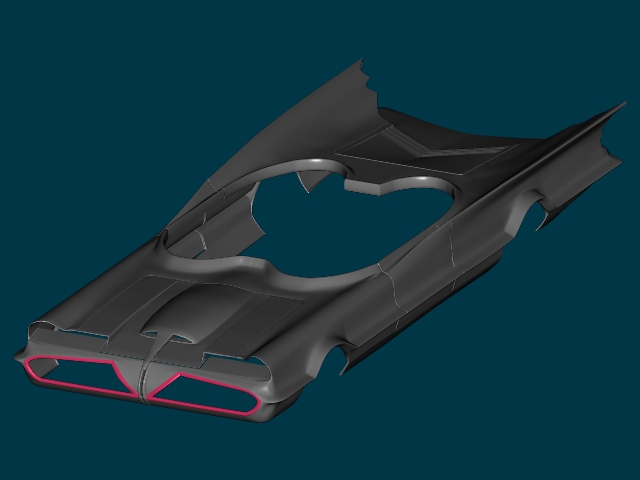
Just to feel like I was making some progress and not just constantly reworking the same parts, I added the exhaust pipes. Sure it was simple lathing with a bit of rotation and scaling on one end, but it sure felt good to see them on the body. I didn't cut holes in the body for them. I just stuck them through the body mesh and put those rings around them to make it look good. What do you think? [attachmentid=19128][attachmentid=19129]
-
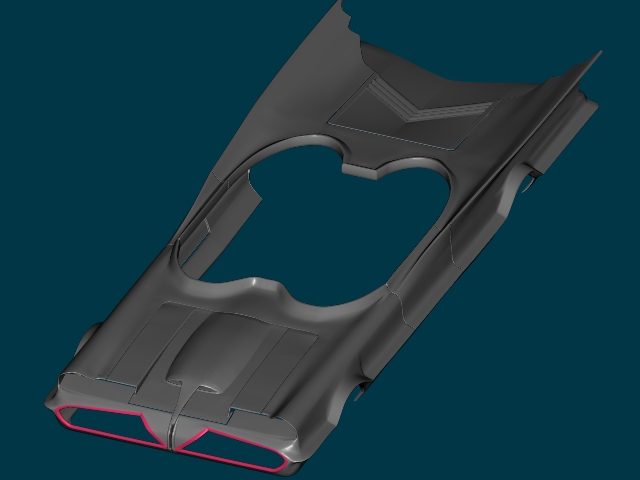
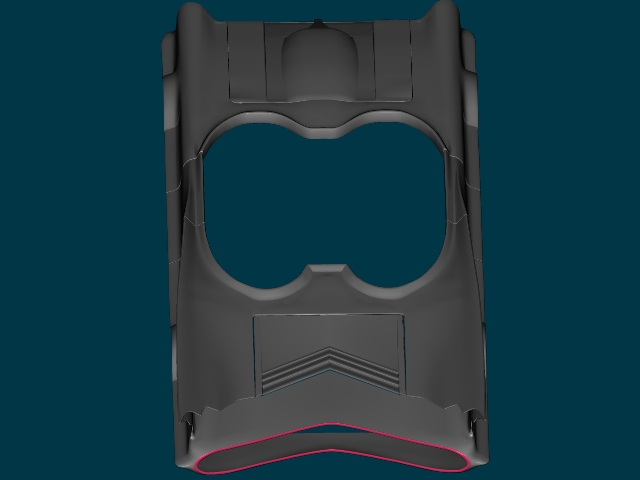
Ok, I think I got it fixed. The mistake was that I wrongfully modeled the louvres [?] on the trunk parallel in order to keep them all even. This is how it looked from the back view: [attachmentid=19043] In reality, since the middle of the trunk is pulled back at an angle and the entire trunk is sloping downward, the middle section should actually be higher than the sides in the back view, like so: [attachmentid=19044] Having raised that up, I then had to raise the area around that part of the trunk as well. I also detached a hook on both sides of the centerline and made a complete spline that connected in the middle. In the pictures below, this is the spline that is seen between the cerise trim and the trunk. I also did even more tweaking of bias handles around the trunk and the hood to get rid of some more of those bumps. This is what I finally ended up with: [attachmentid=19045][attachmentid=19046] [attachmentid=19047][attachmentid=19048] Does anyone see any other mistakes? If not, I am going to move on to a different area.
-
Rodger, That's exactly what happened!!! There I was happily modelling away... Well, maybe not so happily, but I was fighting off the frustration and modelling anyway... when alluva sudden the topic of patch count comes up. So I, being overzealous (or maybe just looking for something else to do during a period where I was stuck), dive into my model and start deleting patches and using hooks on everything in site. I thought it still looked as good as before. It was when I noticed that flattened area around the back of the passenger cutout that I began to see the error of my ways.... A small voice in my head began to get loder and louder saying "You must find a happy medium!" Unfortunately, John Edward was nowhere to be seen... Suddenly a louder, somewhat gravelly voice shouted out "No Dummy! We're talking about a balance between patch count and a good-looking model! I'll give you five of these across your lip if you don't fix that model before it starts looking as bad as Esther!" Then the voice muttered something about the big one and disappeared. And that, my fellow Hash addicts, is why I turn to you guys for advice! [OK, I admit it. I wrote all of this because I have no real progress to show right now. But I'm not giving up. Although for many things having a deep crease in the rear end is perfectly natural, the batmobile is not one of them! This will be fixed!]
-
Sure thing, Eric! Is this better? [attachmentid=19004] I still think it has something to do with peaking those control points. Maybe I should try to smooth them again and mess around more with the settings. I'm really at a loss here, so any advice you can give me will help a lot. Thank you!
-
I did some more tweaking to try to fix the areas Rodger mentioned... as well as some others such as rounding the nose a bit more. Here are the pictures: [attachmentid=18912][attachmentid=18913][attachmentid=18914] I thought it was looking pretty good, until I noticed this problem in the render. [attachmentid=18915] I went back and tried to fix it. I thought it was caused by my peaking the control points in that area to get the sharp corners I wanted, but when I smoothed the points, the creases didn't go away. Any help would be greatly appreciated.
-
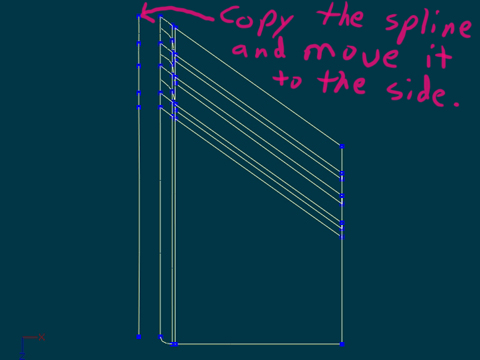
Rodger, I had started reworking this area already because I noticed that somewhere along the way I had lost the proper shape of the passenger cutouts. There was a large straight area when it should have been curved. Probably something I screwed up when I was trying to lower my spline count. Thanks for pointing out those other areas, as well. That area of the hood edge you mentioned does look particularly nasty. I hadn't noticed it before. I have spent so much time trying to keep splines even. Sometimes it's easy enough to just go into the properties and set the scale percent to 0 for 1 or 2 of the axes, but other times I have to go into the manipulator window and manually adjust values. I also go into the manipulator window a lot and calculate the distance between 2 points when I am trying to keep splines an equal distance apart along their lengths. I have learned one good trick about moving groups of points. If I know where at least one point in a group is supposed to go, I can select the group of points... deselect the point I know by clicking it while holding the control key... then re-select it while holding the shift key. Then I can enter the values I want for that particular point and the rest of the group will move with it accordingly. I used this technique to properly place the 2nd door after I had copied and flipped it. I also developed another technique to help me keep angled surfaces smoother. Instead of trying to just explain it with words, I made some pictures to try to illustrate it more clearly. [attachmentid=18892][attachmentid=18893][attachmentid=18894][attachmentid=18895] Of course, I could always just draw a 2-point spline and line up the end points, but I find this technique is usually quicker than typing in the values to exactly align the endpoints. You experienced modellers already know these things, I'm sure. I just thought I would post them here in case they might help some other newbie modellers such as myself. The funny (or sad) thing is... no matter how precise I try to be as I am modelling, I always find things wrong when I go back and check later. I have a nasty habit of fixing one thing just to screw something else up. Hopefully, it's a habit I can break!
-
Well, I added the thickness around the edges that I had been meaning to do. I also fixed the doors. I had originally modelled the doors as going the entire height of the body, which of course was incorrect. Then I spent a whole lot of time tweaking control points in a desperate attempt to keep things smooth and keep splines rinning the way I wanted them to. After all that, I took the pieces and did some copying, flipping, and attaching again. Then I slapped a little bit more of that cerise paint on the rear trim for effect. What I came up with was this: [attachmentid=18835][attachmentid=18836] [attachmentid=18837][attachmentid=18838] I had a lot of stability issues with A:M this time around, which was unusual for me. Luckily, I save often, so while it was frustrating to have to redo things... at least I didn't have to redo very much each time. I finally broke down and did a reinstall of version 12w (which took all of 30 seconds... so why did I put it off for so long???) and it seems to have settled things down again. Hopefully the problem has been solved. Any comments or advice would help a lot. Thanks!
-
Far be it from me to argue with a superior modeller like Rodger... especially when the mistake he pointed out is as simple to fix as hitting the K key a few times! The wheel wells are now fixed. I think I have pretty much got the main body of back end done now, other than adding some thickness to the trunk and fenders. Now comes all the extras, like the rocket engine and the parachutes and whatnot. Here are some more recent pictures: [attachmentid=18768][attachmentid=18769][attachmentid=18770]
-
I did a little more work on the rear end. I'm still not 100% sure how to tie it all together yet, but I've got some good ideas. At least I made a little progress. As always, any advice is greatly appreciated. [attachmentid=18695][attachmentid=18696]
-
Thanks for the tips, Eic and Rodger! I haven't made any further progress on my model, but I did go back and do some tweaking. I cut my patch count from 2147 down to 1787 with no noticeable change in quality. It did require tweaking some bias handles in a few spots to keep things smooth, but I think it turned out pretty well. I'm done tweaking for now. I want to go ahead and try to finish the back. Then I'll have the main body completed. There's still so much to be done after that, though. *sigh*
-
Thanks Eric!!!! Thus far, the complete model after putting both sides together is 2147 patches. Is that too much at this stage? I know there is still a ton of stuff that needs to be added.
-
Where does it show the patch count? I have looked everywhere.
-
Doh!!! How could I have missed that??? For some reason I kept looking in the toon render settings... I dunno why. Anyway, thanks so much for helping me out, Neu_Type! And since I know how to do it now, here are some pictures of my latest progress with the wireframes showing. [attachmentid=18537][attachmentid=18538] [attachmentid=18539][attachmentid=18540] As always, any comments are welcome.
-
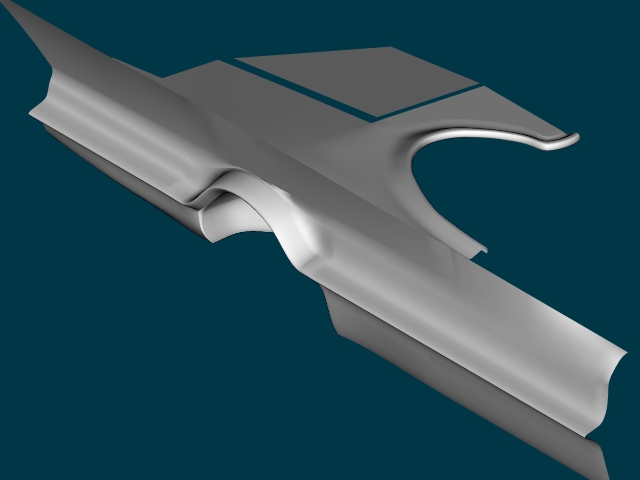
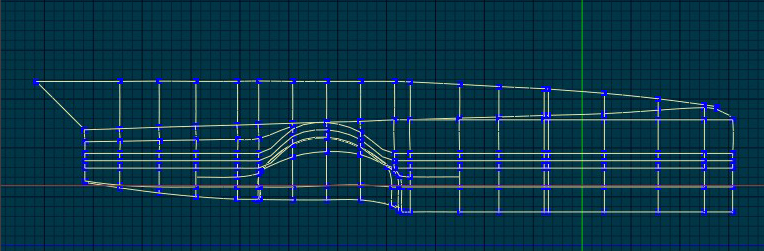
Here are some new pictures after a bit of adjusting. It's hard to tell much from them. Basically I have just started roughing in the trunk area. I still need to finish the tailfin and smooth things out. Then I can start trying to join it all together somehow. Thanks for the advice, Eric. I did delete a few of the vertical splines. Is there a way to actually render wireframes in A:M? I have been taking screenshots to show mine, but that results in a much smaller picture. [attachmentid=18519][attachmentid=18520] [attachmentid=18521][attachmentid=18522]
-
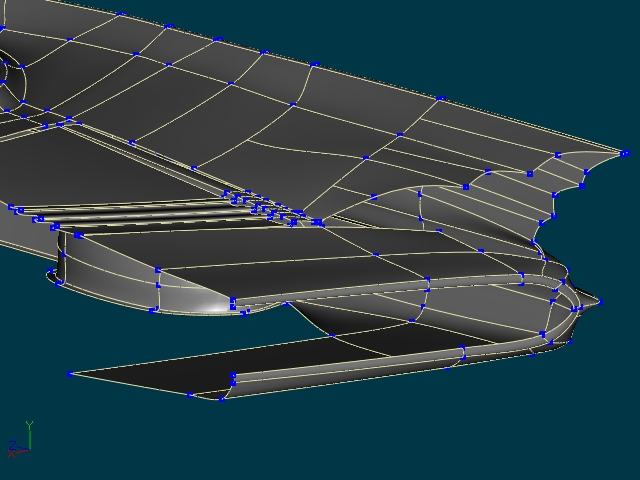
Charles, Here's the wires you asked for. [attachmentid=18496][attachmentid=18497] I know I need to round out the side a lot more. I think my biggest concern right now is figuring out the best way to do the area where the tailfin joins the main body. I have 2 splines that are extremely close together there. I think I will move one down and use that spline to round out the side. If I do that, I will be able to delete that spline I added into the back for that same purpose. What do you think?