arkaos
-
Posts
358 -
Joined
-
Last visited
Content Type
Profiles
Forums
Events
Everything posted by arkaos
-
Dang, that's pretty bad-*ss! Absolutely love it!
-
Blobbies, unfortunately, are slower than molasses...pun intended. I would LOVE to use blobbies in my animations if I didn't have to wait until my software was 10 revisions out-of-date before they finished rendering.
-
I rather like the cartoony look and the big nose. Cartoony looks alway lend themselves to be more believable and entertaining in an outrageous-off-the-wall type of slapstick animations. Great job, largento .
-
Hello All! Attached is a quick animation test I did this morning. In this scene, my character is undergoing an emotional crisis which triggers an unexpected phenomenon (not shown wait for the final). I just wanted some feedback on the primary motion and timing of this shot. Note: secondary animation not keyframed, yet (fingers, facial expressions, etc.) Enjoy Action02_test.mov
-
Since you are making a 'generic' man, maybe flatten out this hands to give them a 'mittens' look. Set up a basic hand rig so his 'mittens' can fold around objects. That way he can interact with objects better. And also they'd match the look and feel of his feet.
-
Make sure that the start of your simulation, if the walk action makes the leg stick through the dress at the starting frame, then you need to adjust the dress to fit the 1st frame of your walk cycle/cloth sim. I'm not sure, but I think you can correct the dress in muscle mode at first frame and it might(?) work.
-
I like the face modeling. Kind of a classic 50's alien and Chinese mix. Looks like a little guy with BIG attitude.
-
It sounds like the 'Alpha' is turned on in the 'buffers' section. That renders only the objects in the scene and all backgrounds are rendered looking black, but will save as the alpha transparency if the format supports it.
-
I really don't get what that alien is supposed to be doing. Looks like he is trying to bowl while highly intoxicated. Is it just random movement to test the rig? Pretty crazy, man!
-
It's too bad you have to abandon the project due to scheduling constraints. I, for one, do NOT believe you lack the skill to complete this project, however. The work you've done so far is really good and I'm kinda sad to see you not complete it. Good luck and keep smiling
-
3 outdoor gaming object character made for kids
arkaos replied to ruscular's topic in Work In Progress / Sweatbox
That was pretty cool. The only thing that sticks out is there is way too much body motion during the lip sync. Almost made her seem to be vibrating when she talks. Tone that down a little, cuz "Man, the was annoying", lol. Sorry dude, couldn't resist. -
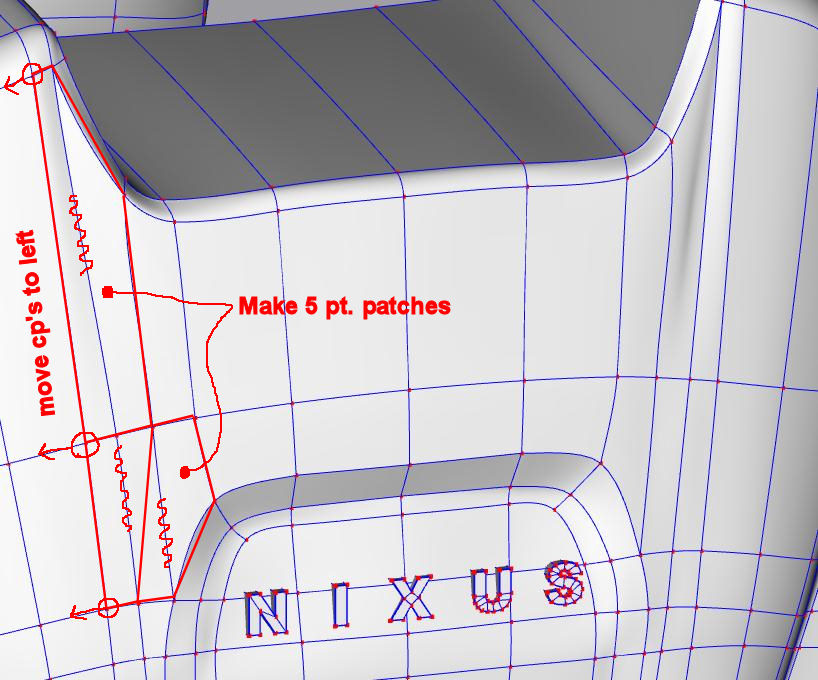
Here are a couple of more suggestions. Create 5 point patches as shown and remove the spline sections I have marked with a squiggly. Move circled cps over to create a more even distrubution of splines. Remember, the longer and skinnier you make a patch, the harder it will be to create a smooth surface. Sometimes is takes a lot of patience and perseverance when modeling. When you get the mesh as smooth as humanly possible, add a 'Porcelain' material to force the mesh into a higher degree of smoothness. Great looking model so far. I can't wait until you finish. Are you planning on using it in an animation?

-
Once again, at those locations with creases, you have 2 splines merging into one. That's always a crease-maker. Change it so those splines do not merge, and you'll be set. You might want to examine the model closely for other areas you may have merged splines and fix.
-
Always worked for MY creature modelling needs.
-
Moving bones in [Skeletal] Choreography...
arkaos replied to Kelley's topic in Work In Progress / Sweatbox
Thanks! It's a question that comes up fairly often, i should probably do a better one that isn't specifically tied to "The door is stuck". Anyway, I think it is helpful for any animation task. Seeing that the newbies who are doing "The Door is Stuck" often run into that problem and are really confused by it, I think it is a good one to post, anyway. I know I had the same problem while doing that excersise and it was really difficult to get an answer to "What was I doing wrong?" that made sense to a beginner. Your tut makes sense . Thank you on behalf of all aspiring animators. -
Great work. I like your spline flow. You just need to make the front panels around the wheel more circular. It looks like the spline go from cp to cp with only a little curvature in between. So, are you guys willing to share your models when you are done? I think it would go GREAT in my current personal project. Keep up the great work, guys.
-
Hey there, thanx for the comment Here is a pic with the keylight set back to normal and without the volumetric effect on the rim. As I said, I haven't textured the clothing and armor at all, just slapped on some surface attributes. The basic coloring scheme I think I will use, though. Since I got the new A:M Paint this spring, I think I will use that to get the texturing done. I DO have a copy of ZBrush 3 I've been using for my lightwave models, but I'm kinda limited for time (working 70 hr + weeks at my day job) so I think I will just stick with A:M Paint for now. Some quick test stuff I've done using it really impressed me (and was easy and fast). Hopefully I can get a final textured model sometime soon. Since my work schedule has been so busy, I've just been creating short re-usable actions and other short snippets of my animation instead of texturing. Spin.mov
-
Moving bones in [Skeletal] Choreography...
arkaos replied to Kelley's topic in Work In Progress / Sweatbox
Wow. That is the single best tut on the subject I've seen yet. I had to learn that the hard way....by animating--bashing head on wall--animating--slinging keyboard across room--and animating. Do you have the link for that posted in the newbies section. I'm sure that would be VERY beneficial to the new crowd. -
Well, after a brief vacation from A:M I decided to at least give this guy something to wear. Here is a test render I did last Sat. night. I havent really gotten all the texturing done, but in this shot it doesn't really matter.
-
Awesome
-
Moving bones in [Skeletal] Choreography...
arkaos replied to Kelley's topic in Work In Progress / Sweatbox
*Edit* What he said ^^^^ -
SimCloth V14 working quite well!!!
arkaos replied to John Bigboote's topic in Work In Progress / Sweatbox
WOOOO HOOOO YEAH! Killer representation, John! Way to GO. A:M does it AGAIN! -
when attaching one spline to another between the other's cp's, right clicking on an empty area of the spline you are connecting to will create a hook.
-
I want to see either the race car or the peugot. I can't wait 'til you get the tutorial done. I've always wanted to do a (good) car model.
-
Well, the first thing I notice viewing the wireframe is you have way too many splines on the side areas of the ship. You can get much better smoothness using fewer splines and taking advantage of bias handles. I also see that you use patches on the engines to provide a surface for the red markings. Lose those, decrease the spline count running along the length of the engines and use your bias handles. The coloring can be texture mapped and will render faster if you map them. Remember, it only takes 4 cp's in a ring to make a circle using bias handles. I suggest you examine each cross section along the ship and try to replicate the shape you want using as few cp's as possible and using the bias handles in a temporary spline ring off to the side. That will give you a better feel of how many longitudinal splines you will need to get the basic shape of the ship. Once you got a good, smooth basic model in the shape you want, THEN start adding detail only where you need it, once again using as few cp's needed to get the job done. One other thing to consider. If you want cutouts (holes) in the model, it may be better to use boolean cutters, depending on the complexity of the hole shape. Complex holes will be difficult to spline in and makes it harder to keep the areas around the hole smooth due to increased spline count. Of course, there are advantages and disadvantages to either splining in holes or using boolean cutters, so really, whichever method you choose is completely up to you. You have a really good basic design of the ship. With time and effort, you will end up with a fabulous model. Good luck and don't get discouraged.