-
Posts
28,400 -
Joined
-
Last visited
-
Days Won
425
Content Type
Profiles
Forums
Events
Everything posted by robcat2075
-
The wider you make that Kleig light the farther you are stretching the bitmap that is drawing the shadow. Very wide angle Kleigs cast shadows in directions that don't look like the infinitely far away sun light. The array of Kleig lights is promising. If you do a shadows only render of Kleig lights the image will include the dark shadow cast by an object but NOT the darkness outside the cone of the light. So if you had a narrow, distant Kleig on every model, rendered shadows and composited that with a non-shadowed Sun light render you might get something like a shadow-mapped Sun light. Probably not worth the trouble for one frame but for many animation frames it might pay off.
-
That's a great result. Of course your 8 seconds would be like 20 on mine. My main beef with kleig lights is it's hard to do daytime outdoor scenes with them. Another software has z-buffered Sun lights. I have no idea how that can work. How do you map the shadows from a light that is infinitely wide? But it would be handy. I wish we could bake lighting onto objects, that would be really handy.
-
great looking character designs, even the pyramid!
-
True... but consider that the original wasn't a look that I was trying to get, I just threw threw the models and lights on the stage and pretty much accepted whatever I got since I was interested in render time rather than appearance. That first result isn't necessarily the ideal. It's completely unlike many lighting situations that you might need in a movie. If we were lighting a nightclub, the shadow mapped Kleig lights might be the best solution and not just the cheapest.
-

Testing with November 11 second club entry
robcat2075 replied to NancyGormezano's topic in Work In Progress / Sweatbox
Hey, you made it into the top half! Onward and upward! -
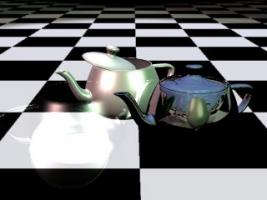
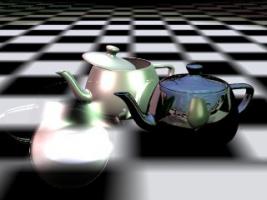
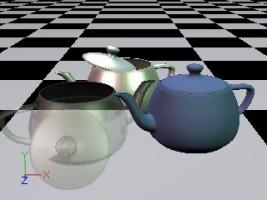
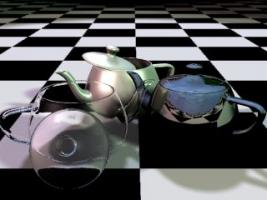
Whittling away further... If I turn off even the quick Z-buffered shadows I get 14 seconds The black checkerboard floor helps hide the lack of shadows. If I set the refraction on the glass teapot to 1.0 we get down to 10 seconds Of course that diminishes the glass effect which depended on the bending of the light rays to show the form of the glass. But for infinitely thin transparent surfaces like soap bubbles it might be just fine. More? Baking textures has great potential, but not for this scene. The only combiner textures in this scene are the sky dome and ground. The sky dome was already eliminated when I created an environment map to simulate reflection. The default Ground object doesn't bake well because it is just one huge single patch; if I had subdivided it in to more patches the baked texture woudl be clearer. But here is the Grand Prize Shortest Final Rendering Time winner... at 6 seconds... Anything left? Shaded render is just fine for most animation preview purposes. I handed in a lot of AnimationMentor assignments in just Shaded mode and no one ever complained. 0.25 seconds!
-
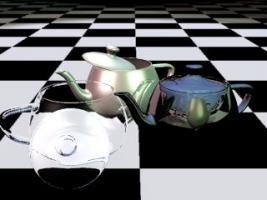
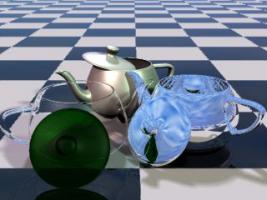
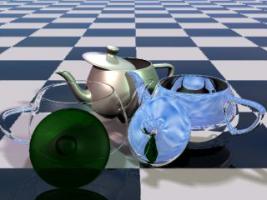
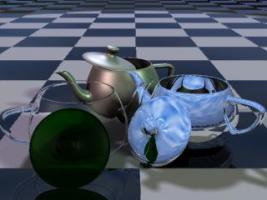
My Benchmark scene was intentionally contrived to take a long time to render with many parameters set unnecessarily high to make extra work for the CPU. It's easier to discern differences in rendering time if the time is on the scale of minutes rather than seconds. The original scene takes 17:10 on my Athlon 3200 XP: That version had reflections set to 8 possible levels. If I cut that to 2 we get a time of 15:31... That's only a slight improvement because it only speeds up pixels that would have shown a reflection of more than 2 bounces. Notice the difference in the interior of the right teapot. Those two previous scenes had three "Sun" lights using 25 rays apiece to cast their shadows. If I cut that to 5 rays I get a render time of 3:55... It's hard to see in this small image size but the shadows are visibly grainier. But obviously the lighting was the major slow down in the first two scenes, rather than reflections or the refraction of the clear teapot. The biggest surprise is that anti-aliasing is also much briefer. I would have thought edges were edges but apparently lighting makes a difference. If I was OK with razor sharp shadows I could cut the rays to 1 and get a time of 1:09... If I change the lights from Sun to Klieg lights with Z-buffered shadows (not raytraced) the time goes down to 41 seconds If I replace the mirrored Teapot with an environment mapped Teapot and turn off reflections I get 29 seconds... That's a crude reflection map, a better one could be made with more time and for an animation of many frames it might be a benefit. But that is about the same lighting resources that Pixar has used for most of its movies. According to Pixar no ray traced shadowing, reflection or refraction was used prior to Cars. All the reflections you saw in Buzz Lightyear's visor were "fake" environment mapped reflections. Carefully done by fine lighting artists, of course. So with A:M you have in your hand as good or better rendering capabilities than in the movies you have seen and loved, and if you use them wisely you can get economical results for your movie and not spend 17 hours per frame as Pixar did for Cars.
-
A slight diversion: snap_H264.mov
-
Smaller is better in that universe.
-
One likely reason a later version of the render wouldn't be as fast is that it has to accommodate rendering features that have been added since the earlier version. It has more things to test for and handle properly and has to do it on every pixel. There are switches in the renderer you can set to tell it to not bother with certain time-consuming stuff. For example you can disable Shadows or Hair or AO. You can avoid refraction calculations by only setting IOR to 1. But you couldn't have a switch for every possible rendering element. There are already more render parameters than some users can manage. It's also possible that the earlier version failed to properly handle some combination of existing features (some shadows and semi transparency rings a bell here) that were technically legal but so rare that it wasn't noticed by most users or perhaps not rare but noticed only by a few discerning users. So the earlier version may have finished its work faster but not always correctly. Once the problem is noticed the code needs to be expanded to always test for that particular situation and that adds to the render time. My test case PRJ probably doesn't invoke any of those problem situations since everbody's renders all look identical. But there's no way for A:M to know those situations aren't there and that it didn't need to test for them until it's finished the last pixel. And since this is animation, that situation that wasn't in the last frame might be in the next frame. Back to square one on testing.
-
It may be faster , but the problem is we only have two results by users that also gave results for v15. One g and one h. Paul's was 24% faster but Nancy's was only 14% faster. However, Paul's h was faster than his g but my g was faster than my h. Explain that. It's possible that different versions do differently on different CPUs. It's possible 14 might not do any better on some and it looks like most people have moved to 15 for the features and stability. (the fastest render of all was Serg with 15h, but he didn't do a run on 14 for comparison.) But I want to come up with a benchmark that takes less time to run so more people will be likely to contribute data. My goal is to compare CPUs. BTW, to qualify as "screamer" for me it has to go > 50% faster.
-
Rodney, you are RIGHT! I closed all A:M windows except the render window and my time improved from 19:21 to 17:10, an improvement of 12%! Curiously, minimizing A:M during the render only dropped the time to 17:46 Setting priority to High dropped the time just a little bit to 16:56 Closing the other windows is easy enough to do and will probably eliminates some Graphics card overhead. SO, anyone reading this... I'm going to CLOSE this thread and come up with a new, shorter, more consistent CPU test in another thread. Be on the lookout for it. Thanks to everyone who participated so far! Edit: Temporarily reopened to catch straggler's posts.
-
-This may be the difference between "use settings from this dialog/ the camera" in options. -is windows auto adding a .avi extension after you type in your filename.?
-
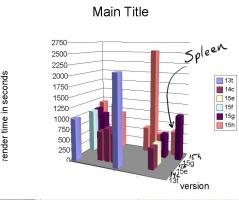
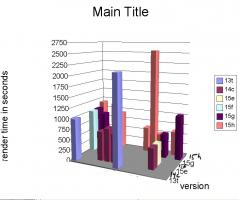
Here's a first attempt at a chart with the raw data, I need to find something better to visualize this. Note the lack of labels. if you go from front to back you have the same CPU running different versions of A:M. Relatively small differences If you go from left to right you have different (unidentified!) CPUs running the same version of A:M. Fairly large variations. I'll try to find a chartmaker that handles this better.
-
I recall Steffen is using some different libraries since v15f to enable some new features so that might be part of it.
-
I'm sure those are elements; the CPU has to talk to the RAM just to run the program at all, but to try to minimize that bottleneck this test uses no bitmap textures and renders to a small image. But I suspect CPU power is the #1 factor in how fast A:M renders.
-
It occurs to me that since the render time variation between different versions of A:M appears consistent among the various CPUs that have reported results for more than one version, I can make a multiplier that factors that out and leave us with something approaching a CPU comparison only for example if Nancy's 15e rendertime is 9 and 15g is 10 and my 15g is 17 and my 15h is 19 I can estimate what 15e would do on my CPU (15.3) and predict that 15h woudl do about 11.2 on Nancy's. By this, I could include results from someone who only tests with 15e on their CPU With what I have now i can convert times from 13t 14c 15e,f,g,h This conversion will be more reliable with the PC data since we have more of that so far But keep posting your results if have time. Thanks!
-
i got 16:44 in v13t vs. 19:59 in v15h That's comparable to your difference between v14 and v15 So 15 does seem slower.
-
That mac time is better than before Intel macs came along and better than intel times were some years ago. And this is a scene designed to take absurdly long to render on any machine. Compare this to the 11Second club entry I just did. That took 2 seconds per frame to render in "Final". So Mac would take 4 seconds per frame.
-
Take the PRJ and show us. People would say that but they never posted actual comparisons. Realistic production demands are whatever someone puts in their production. There is not single test for that As I said at the top, this is a test designed to focus on the CPUs processing power for A:M. While everything uses the CPU Particles introduce introduce other significant variables like RAM access speed and total available RAM. Those are not the variables I'm trying to look at IN THIS TEST. I want to examine as few variables at a time as possible. I just want to examine the relative processing power of CPUs. Those will be informative whether you use hair or fog or whatever in your particular production. Nowhere am I claiming that three teapots is a typical scene. It does however invoke a set of loads that are mostly CPU intensive and much less of all other resources. That makes it a fair test OF THE CPU. For the moment, I just want to examine the relative processing power of CPUs. And if I haven't mentioned it up to this point, for the moment, I just want to examine the relative processing power of CPUs.
-
Congrats! You got some inches there!
-
It would be useful to find out how various CPUs do with A:M, for those who are considering new machines. This PRJ is designed to test the major render time hits like reflection, refraction, multiple ray-traced lights, shadows, anti-aliasing and combiner materials without touching on disk and RAM hogs like bitmaps or hair. Please download this PRJ ThreeTeapotsBenchmarkv005.prj select the camera view in the chor. If you are testing v16 or later, load this render preset when you render to file. benchmark.pre If you are testing v13-15 set your Options>Render Settings to "use settings from Camera" before you render to file. The PRJ has every possible render parameter set in the chor camera. In either case you will need to set a file path. Then hit render and wait. You should get a small jpg (320x240) exactly like this in your "My Documents" folder (Mac Users may have to select a new location): Report your: version of A:M (see Help>About A:M) render time min:sec CPU Brand and model Actual CPU speed in GHz how many cores A:M is using RAM OS mine was: 15h 19:59 AMD Athlon XP 3200 1.921 GHz 1 core 2 GB RAM Windows 2000 Thank you!
-
there really needs to be a horsey head on that flotation device. Have you written this commercial yet? If it's short I might be able to animate it for you.
-
That's a big chunk! I could see most of that! On many of the POV shots it was hard for me be sure who's POV it was. Your animation is getting better. Have you ever watched my vid on Keyframing options? I think you could get more consistent results if you were using the timeline effectively.


